Stable Diffusion General Guide
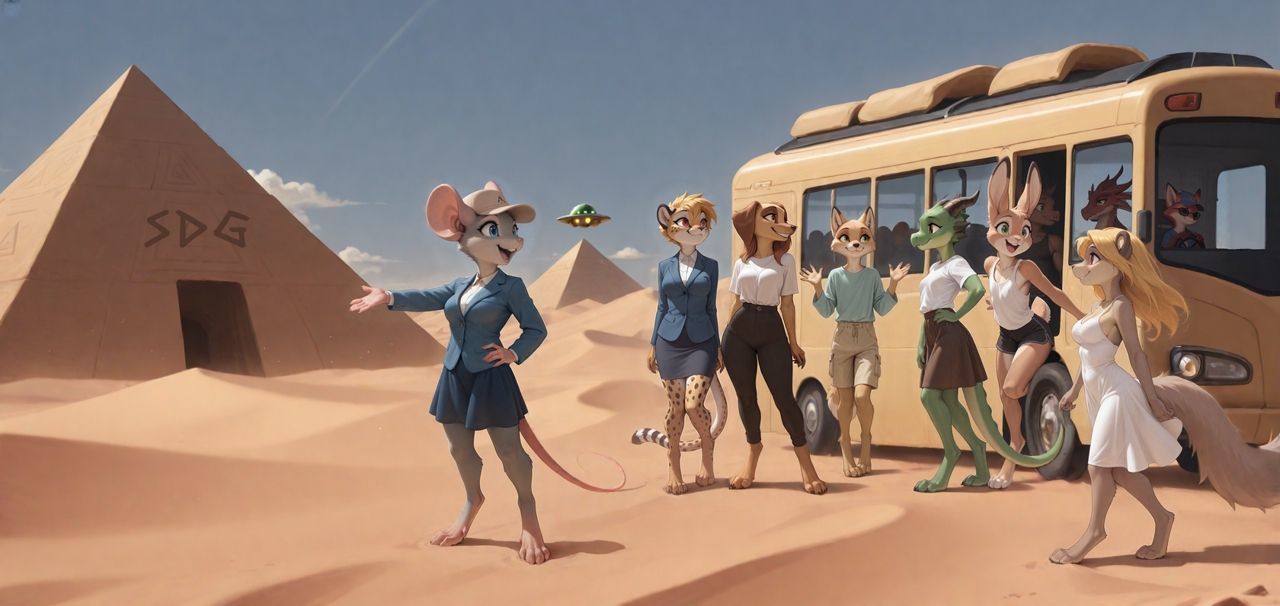

Welcome
This guide will collect guides, tips and useful links to get beginners started on their Stable Diffusion journey.
As it contains a lot of information its recommended to start with the basic setup first, gather some experience with it, and then come back to read more about the advanced topics bit by bit. Especially for newcomers it will be very difficult to comprehend everything in this guide all at once.
Most information in this guide applies to noobAI-XL based models and reForge/Forge.
There is a shorter FAQ style collection over here: https://rentry.org/sdgfaq

- Introduction
- QUICKSTART
- Fundamentals
- Advanced Tools
- FAQ
- Resources
- Useful links


Introduction
Welcome
This rentry is the successor to the hard work anon put into the previous trashfaq, trashcollects and trashcollects_loras rentrys after they announced they currently don't have the time to maintain them. The original rentrys are linked here. Many thanks and godspeed, anon.
I want to thank all the helpful anons of sdg and the cool people of FD for all their tips, ongoing help and patience with me learning all this stuff. Without those giants I would likely still be slopping along on civitai, having no clue what I was doing. Special thanks to Fluffscaler for his guides.
As usual this guide is eternally WIP. If you have tips, corrections or suggestions you can ping me on Discord.
While today there are other base architectures too (Flux, Auraflow, Qwen), the StabilityAI SDXL v1.0 still is the base for the majority of models used nowadays to create anime and furry images with generative AI. It allows people like me who are totally incapable of doing it in the traditional way to put their ideas and fantasies into cute images, and as such we should remember to be grateful to the people who brought us this awesome technology as well as the countless artists whose original art has been (often involuntarily) used to train these models. Some mutual respect goes a long way to let everyone have fun with this awesome technology.
This guide will cover topics related to using a local installation on your computer to generate images. There are online generation services for those that are currently unable to use a local installation, they are covered in their own section and some of the general prompt related tips apply to them as well.

QUICKSTART
This section is for those who want to start as soon as possible and features detailed step-by-step instructions without in-depth explanations. The next section explains the various Stable Diffusion related options in more detail. This section assumes you have a current NVidia GPU with at least 8GB VRAM, a current CPU and at least 16GB of system RAM.

Step 1: Install reForge
If you already have installed reForge or Forge skip this step
You can download a portable version of reForge that is updated to the current version and works with up to NVidia 5000 (Blackwell) series here:
Mega mirror, but check Huggingface first for most current version!
If you want to install it the classic way or use a different UI, there are detailed install guides here:

Step 2: Download a model
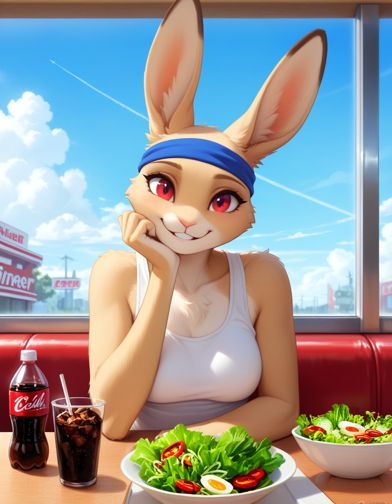
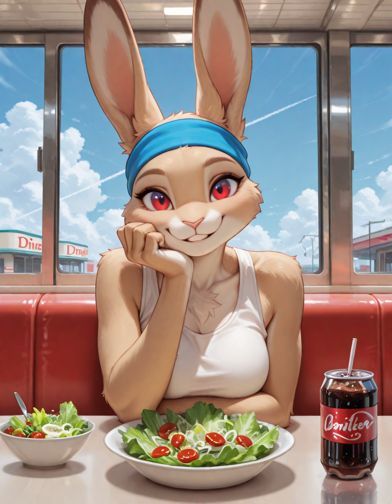
There are a ton of models available, often with marginal differences, and new ones appear every week. Here is a quick selection of three sdg favorites with metadata, but also check this page for more suggestions.
| StableMondAI-SDG | Nova Furry XL | Manticore |
|---|---|---|
 |
 |
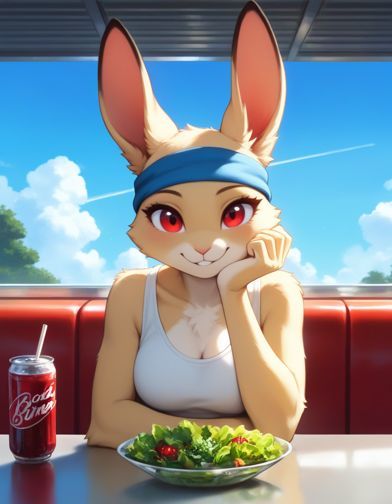 |
| https://civitai.com/models/1280186 | https://civitai.com/models/503815 | https://civitai.com/models/1208658 |

Browse to the civitai page and click the "Download" button on the top right of the page.


Put the downloaded .safetensors file into <your webUI base dir>\models\stable-diffusion and click the refresh button besides the "Stable Diffusion checkpoint" selection (if your UI is still open).


Step 3: Basic options
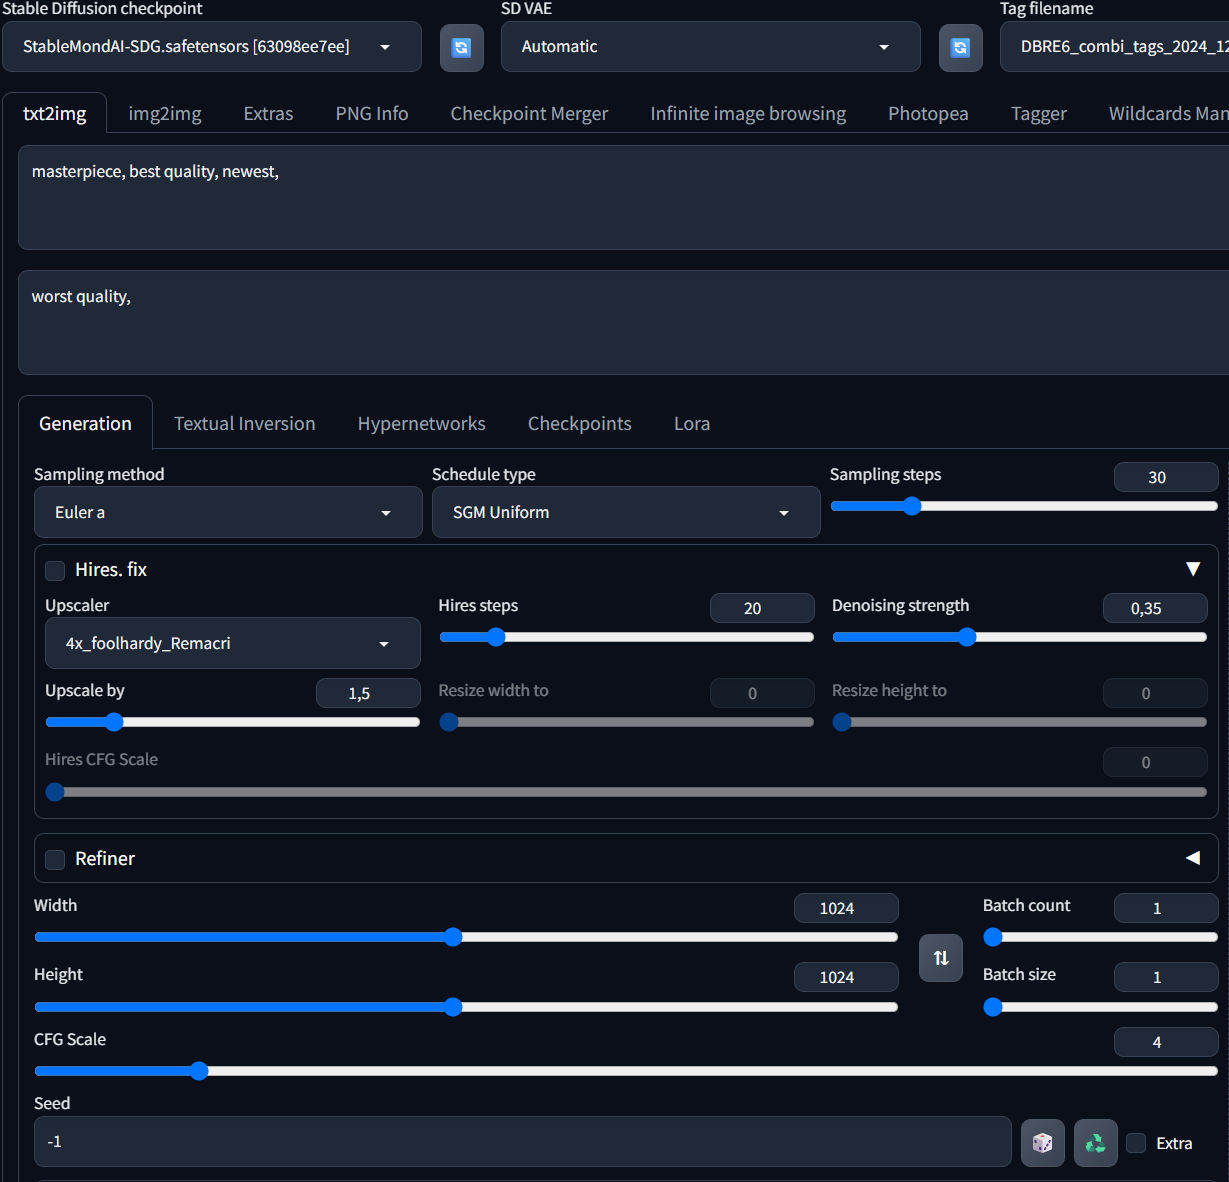
If you are using the portable reForge from huggingface these values will already be set
After a fresh clone from the github the default options of reForge/Forge are not suitable for current IllustriousXL/noobaiXL based models. Change your settings to the following new defaults as a starting point. These are not the end-all only settings that will work but a proven baseline which work with nearly all noobAI-XL based models from which you can experiment. Expand the "Hires. fix" to see the corresponding settings
| Setting | Value |
|---|---|
| SD VAE | Automatic |
| Prompt | masterpiece, best quality, newest, |
| Negative prompt | worst quality, |
| Sampling Method | Euler a |
| Schedule Type | SGM Uniform |
| Sampling Steps | 30 |
| Width | 1024 |
| Height | 1024 |
| CFG Scale | 4 |
| Hires.fix Upscaler | 4x_foolhardy_Remacri |
| Hires.fix Hires steps | 20 |
| Hires.fix Denoising strenght | 0.35 |
| Hires.fix Upscale by | 1.5 |
Your UI should now look like this:

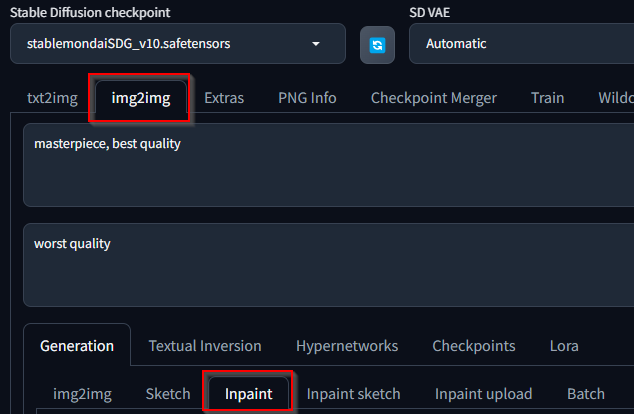
Switch from the "txt2img" to the "img2img" tab, then open the "Inpaint" subtab
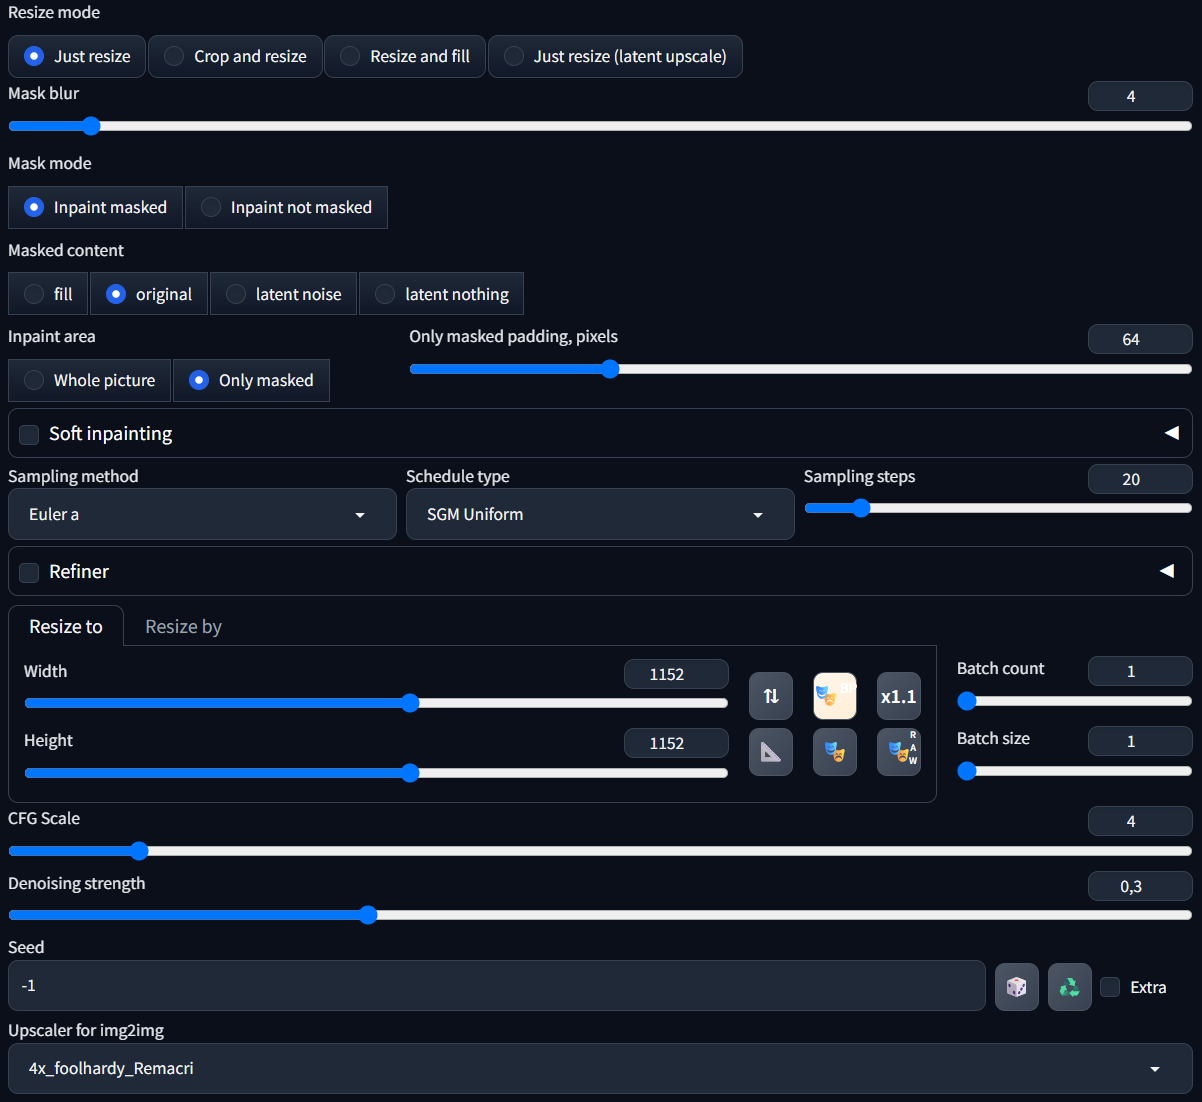
Change the following settings
| Setting | Value |
|---|---|
| Sampling Method | Euler a |
| Schedule Type | SGM Uniform |
| Sampling Steps | 20 |
| Inpaint Area | Only masked |
| Only masked padding | 64 |
| Width | 1152 |
| Height | 1152 |
| CFG Scale | 4 |
| Denoising strength | 0.3 |
Your UI should now look like this:

Go to the "Settings" tab, scroll down until you reach the "Other" section on the left menu bar. Click on "Defaults", then scroll up again until you see the "View changes" and "Apply" button. Click "View changes" to review your settings, then click "Apply" to save them as defaults.


Step 4: Basic prompt
With this basic setup you can write a prompt and start generating. Try the following example:
Positive prompt:
masterpiece, best quality, newest, furry, anthro, solo, fox, female, standing, crop top, miniskirt, legs apart, hand on own hip, happy, smile, facing viewer, red eyes, thumbs up,
Negative prompt:
worst quality,
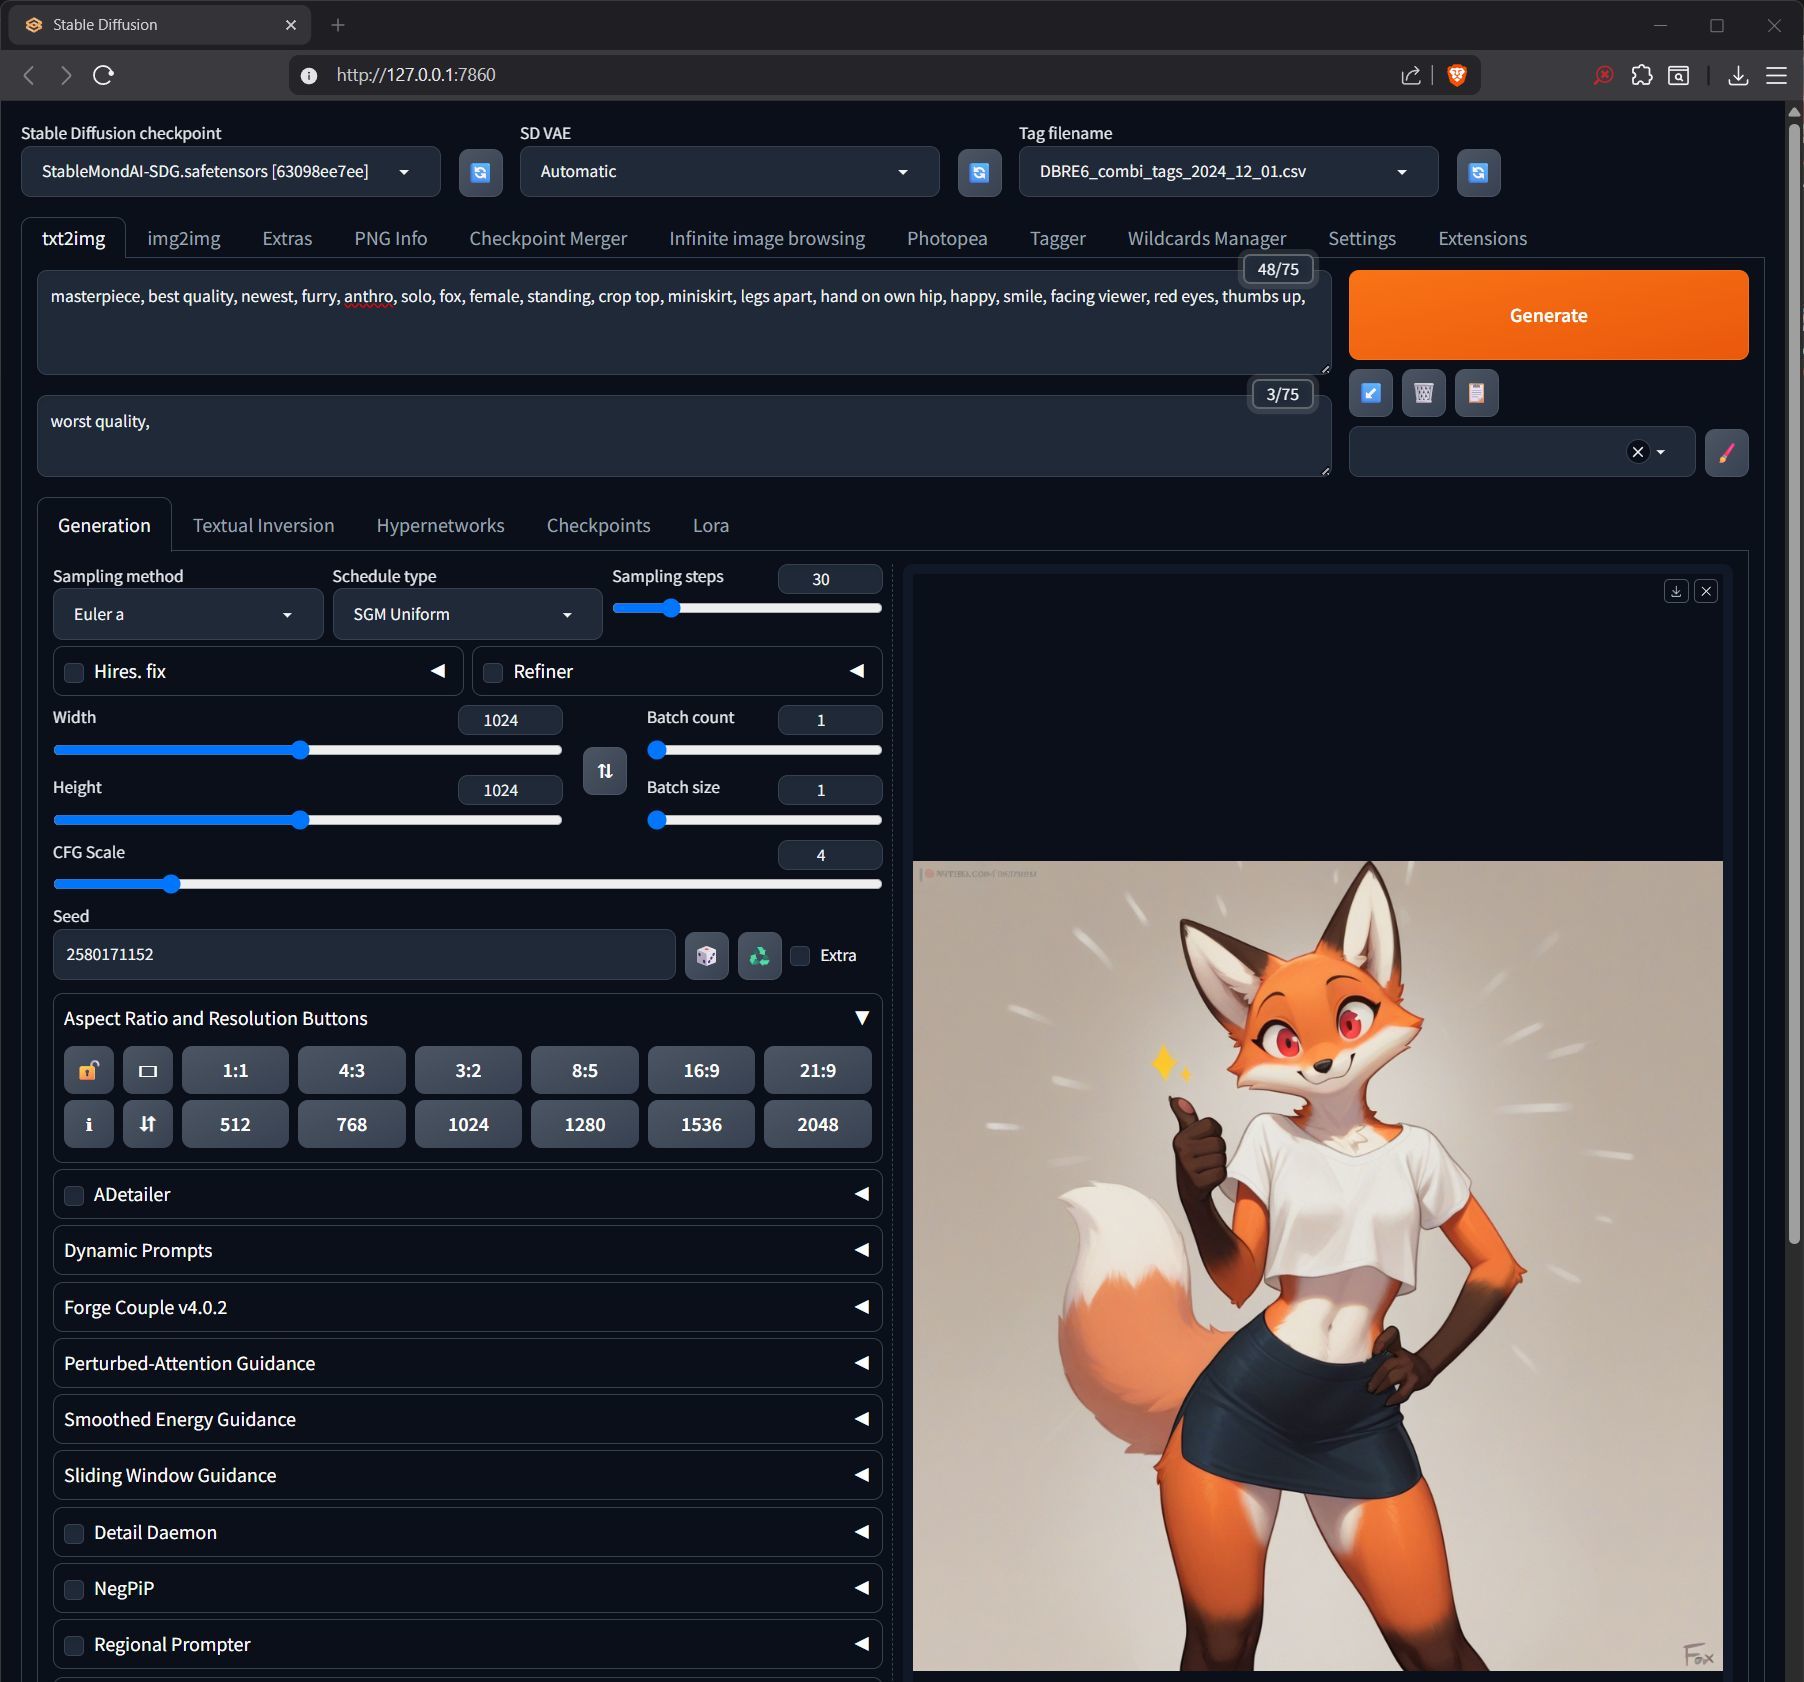
This guide contains a lot of additional information you should take a look at when you have familiarized yourself with the UI a bit.
- How to write good prompts
prompting tips - I want larger resolution!
hires.fix - Why are my eyes/faces all kinda janky?
ADetailer - Help! Something is wrong with my images!
https://rentry.org/sdgfaq#my-gens-are-fried-help - I mastered text2image but it seems limited, what are the next steps?
https://rentry.org/sdgguide#img2img-inpainting


⬆️⬆️⬆️To the top⬆️⬆️⬆️

Fundamentals
This section describes the base components that are currently relevant to get started in more detail. As the software landscape is always changing it may not cover any cutting edge developments but will be maintained to keep a good general overview.
Hardware requirements
Most generative AI technologies are heavily optimized for NVidia CUDA compatible graphics cards (GPUs). It is possible to utilize AMD or Intel ARC based graphic cards, but there are some things to consider and set up.
If you are on a budget you can try to find a RTX 3060 12GB card, but it is recommended to get a RTX 5060 Ti 16GB which supports newer technologies. Be careful as there are also 8GB versions of both cards!
While by far the most important hardware part is your GPU, your system should have at least a 10th generation Intel quad core (eight cores recommended) or comparable AMD CPU, and 32GB system RAM is highly recommended.
SDXL based models can -with restrictions- work even on old 4GB VRAM GPUs, but you will have very slow generation speeds and may not be able to use all of the features available. Nowadays it is recommended to have at least 12GB VRAM, as that will give you some buffer for advanced topics/tools like training loras. While you can use an old HDD drive to save your gens and for backup, the drive that your Stable Diffusion install and data resides on should be a fast SSD drive.
Software requirements
These guides will cover installing and using the tools required on a Microsoft Windows operating system, but most sections apply to Linux systems as well.
Some of the components used are no longer supported on Windows 7, so it's recommended to use at least Windows 10 (LTSC) or Windows 11.

User Interface (UI)
TLDR
Want a stable, standardized user interface that comes with a lot of built-in tools and lot of support? => reForge
Want to build your own UI and have access to a nearly unlimited amount of custom stuff and not afraid of complexity? => ComfyUI
There are quite a few different programs available for offline image generation that each have their own strength and weaknesses, some concerned about being very stable, some at the experimental cutting edge, part provide a standardized user interface, others give you maximum customizability.
This list covers some of the most popular ones
Automatic1111 / Forge / reForge (WebUI forks)
Automatic1111 was one of the first popular UIs but today development has largely halted and it is not recommended anymore. A fork called "Forge" was created that kept the same look and feel and compatibility to A1111 plugins, but for a while development on Forge halted as well, leading to another fork called "reForge", also keeping the same look and feel and compatibility. In the meantime, development on Forge has resumed.
So which one should you use? It is a matter of personal preference, and which developer is currently more active. For the sake of this guide we will use reForge, but almost all settings are the same on Forge. Currently both UIs are considered stable in their production release for everyday use. reForge does come with a few useful plugins built-in that would need to be added to Forge manually. Both UIs have nearly the same look and feel and the same baseline features.
ComfyUI
ComfyUI is an entirely different beast. It boasts a very high customizability, an extensive library of custom extensions, very good performance and a stable experience. All of this comes at the price of having a non-standardized and depending on use case very complex user interface that at first glance makes tasks that are simple button clicks in the WebUIs a daunting challenge.
If you want to customize your UI to your own preference in the most detailed way, there is nothing else like comfyUI.
A comprehensive install guide is over here: https://rentry.org/sdginstall
Repository of official workflow examples: https://github.com/comfyanonymous/ComfyUI_examples
Another anon has collected tips and workflows here: https://rentry.org/comfyui4a1111
InvokeAI
Targeting traditional artists, InvokeUI is very easy to setup and maintain, and provides a paid version with support besides the free full-featured community edition. Boasting a native UI instead of a web interface, it handles very smoothly.
Its look and feel and workflow is very different to WebUI and comfyUI, and I have little personal experience with it.
SD.next is another WebUI fork that changed the look and feel a bit. It is listed here as it provides (native?) support for AMD and Intel hardware via special libraries. No practical experience yet, hopefully more to come.
Stability Matrix
A package manager for other UIs, also has its own UI
https://lykos.ai/
Krita plugin
https://github.com/Acly/krita-ai-diffusion
Photoshop plugin
https://github.com/AbdullahAlfaraj/Auto-Photoshop-StableDiffusion-Plugin

Model types
TLDR
For a selection of popular models with sampler/scheduler/cfg comparisons:
https://rentry.org/truegrid-models
While Stable Diffusion provides the math and the User Interface is what you use to control it, a model contains all the information that is required to actually turn your prompt into an image. It is a large file that is the "memory" of all information that was fed into it during its training. As such, each model can have vastly different capabilities, knowledge and style, e.g. there might be models that concentrate on creating highly (photo)realistic images, others may be specialized in creating cartoons or highly stylized abstract art. Some models may not work well on their own (see loras) while others may be not very flexible in the output they can produce.
In general there are three important type of models
Base Models (SDXL1.0, SD1.5, Flux)
These models were trained with immense effort in datacenters by large corporations on millions of images. They form the base of basically any model available today for private users and offline generation. Creating such a base model is not feasibly for anyone.
Finetunes (PonyDiffusionXL, Illustrious XL, NoobAI-XL)
A finetune takes a base model and trains/adds a lot of additional information to it. As the data added is a much smaller amount than a base model but still much larger than a merge model, it is still unfeasible for a single person/small group to create, but well funded teams are capable of doing so.
PonyDiffusionXL and IllustriousXL are two popular examples of finetunes of the SDXL base model, adding respectively furry and anime training data to the SDXL model.
A finetune usually has the implication that while new information is added to an existing model, the result will likely lose some of the original models capabilities as well, as the overall "capacity" is limited.
The currently popular noobAI-XL is special case as it is not a finetune of a base model but a finetune of the Illustrious-XL, which is a finetune itself. High-level, it added the furry training data to Illustrious.
Merge models
Merge models (sometimes called style merges) are models that are not created by adding more original training data directly, but by merging two or more pre-existing models, or by merging an existing model and an existing Lora into a new model. This method, as it does not require any training, requires little resources and can be done by everyone. This process, while technically simple, is very complex to understand and fine-tune.
These models are usually created to enforce a specific output style or to add a specific knowledge to an existing model. A popular example are the novaFurry XL models which provide a strong built-in art style but don't add any other knowledge.

Prompts

The prompt (sometimes called positive prompt) and the negative prompt is human-readable text that is provided by the user to steer the image creation. Without any prompt (called unconditional generation), the model will create a random image from its knowledge. The process to generate an image from prompts alone is called "text2image".

General prompting tips
- SDXL models have (nearly) no tag context. There is no way to group your tags or enforce that certain tags belong to other tags or vice versa. The model will take a look at all your tags and during the diffusion process apply them to whatever part of the image that it wants to.
- Do not over-prompt! The webUIs show you a token counter on the top right of the prompt and negative prompt box. Try to stay below 150 or even better below 75 overall tokens on the prompt and use the negative prompt as little as possible. Do not copy crazy long prompts from old metadata or civitai!

Testing shows that if you go over 225 tokens the models will start to ignore some of them, and over 300 will usually "overload" it so that your generations will deteriorate in prompt adherence and quality. - The model will try to fit everything you tag into the image. Don't prompt for
pink pawpadsif you don't want to see some twisted feet. Don't prompt forcleavageif you want to have your character shownfrom behind, don't prompt an eye color if you character is supposed to wear black sunglasses. If you want to have your char sitting at a desk partially obscured, don't prompt for body parts or clothing that should be obscured. - noobAI-XL models tend to not "fill" backgrounds like Pony based ones used to do. E.g. if you prompt just
forestorstreetfor your background, or if your indoor room has windows, you will often see that these are just filled bright white. Carefully prompt for things you want to appear instead, like e.g.blue sky, clouds,. This often applies to things like furniture as well, if you don't want to have sparse rooms prompt for some furniture. - Some tags imply other tags. If you prompt for
hair bun,the model will very likely generate a character with hair, etc. - If a tag contains parentheses (), then you must escape them with backslash \ in your prompt, otherwise they will get interpreted as weighting instructions, e.g.
watercolor (style)must be tagged aswatercolor \(style\). - use tag weighting sparingly. The more tags you apply weight to, the less effect you will see. Try to use it on two to three tokens max. Don't go over 1.5 weight on any tag.
- Don't use BREAK with current models.
- Don't overuse the negative prompt! It's much better to guide the generation process with the positive prompt than trying to fill the negative prompt to the limit. Use it only for small things that consistently appear, like
neck tuftorcanine nose. On some models it might be useful to addhumanto the neg prompt to lessen the anime influence. - The order of the tags does not matter enough to care about it. While technically the earlier tags in the prompt should receive more attention, it is more important to not overload your prompt to give the models the chance to pay attention to all of them at all.
- Current best practice is to consider the comma that separates tags to be a part of the previous tag, and as such include them in weighting parentheses and close the last tag with a comma too. While the effect is not extensively studied, it seems to work well. Attach the comma directly without whitespace to the tag, e.g.
(athletic,:1.2)In this example don't add another comma after the closing parenthesis! - Use whitespace to separate words in multi-word tags (
hands on own hips,), don't use underscores (hands_on_own_hips,
Check the Advanced Prompt Syntax section too to learn about using weighting and prompt scheduling.

Prompt style (tags vs nlp)
There are two common approaches for prompting, tag based and Natural Language Prompting (NLP). Which one can be used depends on the model. As a general guideline the majority of models based on SDXL are trained for tag-based prompts, while Flux is trained for NLP. SDXL models may understand some very basic NLP, but usually they still just filter the tags from it.
Tag based prompt example:
outside, day, sun,
calico cat, sitting, stone wall, looking at viewer,
Natural language prompt example:
A calico cat sitting on a stone wall outside on a bright summer day looking at the viewer.
Current noobAI-XL based models understand both danbooru and e621 tags. Some Danbooru tags may come with a certain anime influence and may try to steer towards that style. If possible, prefer to use e621 tags instead.

Quality Tags
TLDR
Quality tags are commonly understood by and used with IllustriousXL/noobAI-X models and many high quality gens are made with them but there are also examples that not using them at all is desirable too. Start with the minimal tags shown below but experiment with each model how it reacts to them and other tags you are using.
score_9, score_8_up what are these?
These are the quality tags for PonyDiffusionXL based models. If you import metadata which contains these but want to regen on noobAI-XL, remove these and replace with the tags from this section.
IllustriousXL and noobAI-XL based models support/require a variety of quality tags which were used during training to sort images into certain quality categories. As such these supposedly help to steer the overall quality of the generated images towards better quality as well.
They have been the subject of constant experimentation and discussion as it is never 100% clear how much and what kind of influence these quality tags have. Sometimes using them can overwrite other (artist) styles, sometimes they can restrict the models flexibility, but overall they seem to indeed help increase the quality (if not necessarily the coherence) of the generated images. One common issue is that these quality tags are trained on a lot of anime data from danbooru, so their usage in general can steer the look in that direction. If you are using a specialized style merge model this effect is usually reduced as the model style again overwrites the base style influence at least partially.
the noobAI-XL creators have a high level overview of the tags they used documented here: https://huggingface.co/Laxhar/noobai-XL-Vpred-0.5?not-for-all-audiences=true#quality-tags
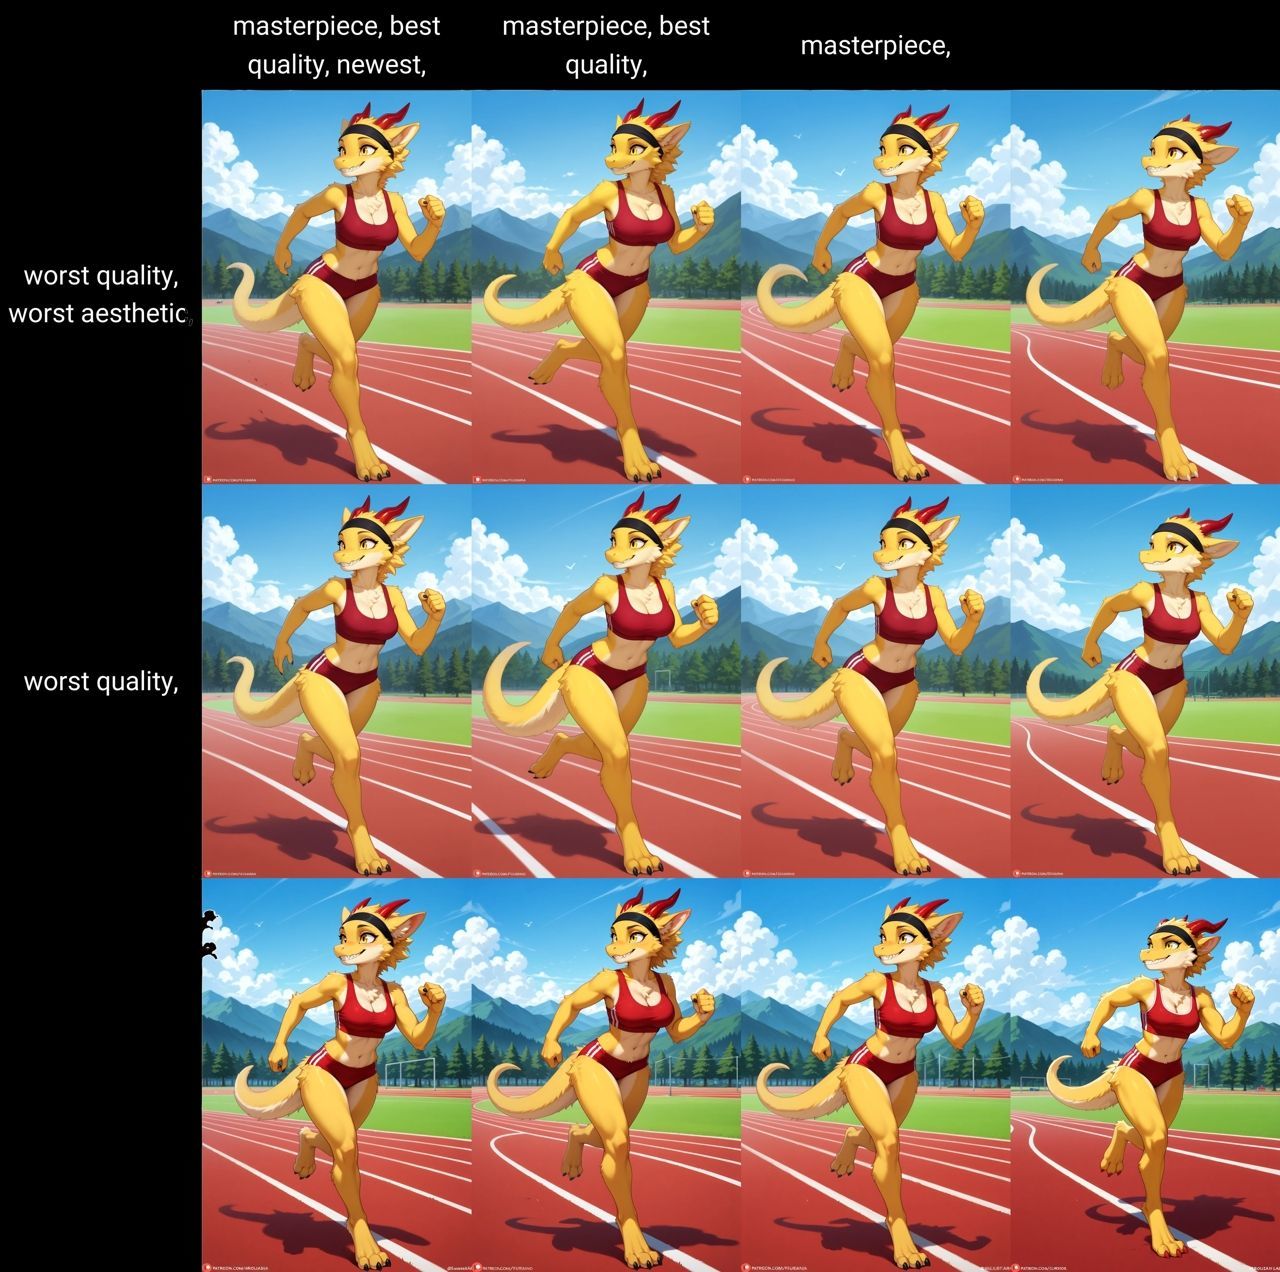
As a commonly accepted baseline you can start your prompt with
masterpiece, best quality, newest,
and this negative prompt
worst quality, worst aesthetic,
Testing showed that it does not have a reliable effect at which place in the prompt the quality tags are placed.
An example grid of these tags, though changing anything on the prompt will always trigger a bit of randomness so to be really sure a larger amount of test cases need to be made.

Artist Tags
All IllustriousXL based models know the artist tags of danbooru and all noobAI-XL based models additionally know the artist tags of e621. There have been conflicting reports on how exactly to use the artist tags, but after a long time it seems that just using the artist name/tag itself without any additional keywords seems to work just fine.
Artist style tags should be used like any other tag in the prompt
iamtheartisttag,
"by artist" does usually work too but the "by" is just ignored as it is not trained in noobAI-XL so it is recommended to not use it to save on tokens.
by iamtheartisttag,
It seems that noobAI-XL EPS v1.1 and noobAI-XL VPred v1.0 also are trained on using the "artist:" prefix. There have been reports that for some artist tags that often experience tag bleed using this prefix can help, but no reliable data is available to confirm if this really makes a difference or is even understood properly by the model.
Some artist tags contain additional word(s) in parentheses, make sure to escape them properly or they will not be recognized well!
iamtheartisttag \(artist\),
Additionally some artist tags contain words that are tags themselves, e.g. the big hamster may introduce tag bleed on the words big and hamster. Check here on some tips how to prevent that.
See here for some choice artist tag galleries:
https://rentry.org/stablemondai-doomp
https://rentry.org/jinkies-doomp

Style Tags
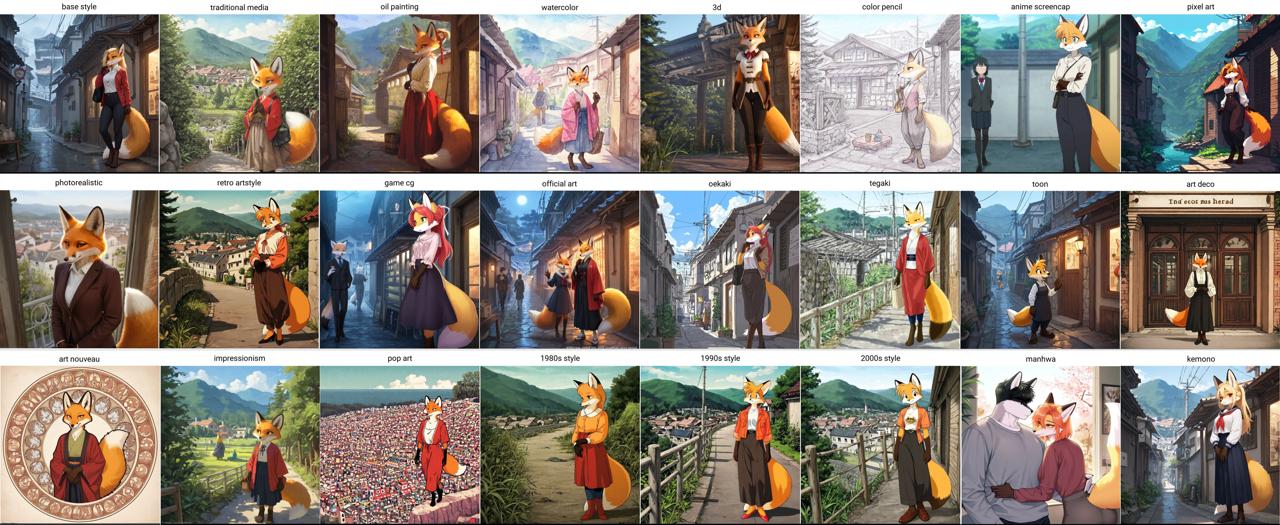
Besides the general quality tags and the styles that come via artist tags there are also some general style tags that can greatly influence the visual style of the image. How well these work depends on the model used, some of them e.g. can produce better realistic images cause they have been specifically trained to do so, while others may be better at toon style. Experiment or look at demo generations on e.g. civitai.
Some example style tags
1980s \(style\), 1990s \(style\), 2000s \(style\), 3D, anime screencap, art deco, color pencil, game cg, impressionism, kemono, manhwa, minimalism, oil painting, oekaki, official art, photorealistic, pixel art, pop art, realism, retro artstyle, sketch, tegaki, toon, traditional media, watercolor
Here is an example style grid using the StableMondAI-SDG model:

Sampler/Scheduler/Steps

TLDR
noobAI-XL based models all seem to work well with Euler A / SGM Uniform at around 30 steps, so this is a good starting point. DPM SDE samplers usually are more finicky. The Karras scheduler often produces a lot of artifacts, so avoid it.
This topic is ... pretty complicated and there are a lot of different opinions. There is no easy answer what sampler, scheduler and number of steps one should use in any given circumstance as it's dependent on different factors and personal preference. Usually a model comes with a recommendation on what combination to use, and that is always a good starting point to experiment.
On a high level, the sampler and scheduler control how much noise is removed in a specific way from the image during each of the steps. As such, the combination of these options must fit together, as some samplers need a higher or lower amount of steps than others, some samplers work well only with specific schedulers, and then again specific models (e.g. lightning) need a specific amount of steps to generate good images.
If there is no information available from the model creator, you can use the x/y/z plot scripts to easily test multiple combinations. For some of the currently popular models these grids are available here:
https://rentry.org/truegrid-models

Resolution (width, height)

While the UIs will allow you to choose any arbitrary resolution for your images not all of them work well. The models are trained on training data in specific resolutions, or rather megapixels, and if your rawgen resolution differs too much from that it will result in lower quality or incoherent images.
SDXL is trained on images of about 1 megapixel resolution, so using one of the following settings is recommended:
| Resolution | Ratio |
|---|---|
| 640 x 1536 | 5:12 |
| 768 x 1344 | 4:7 |
| 832 x 1216 | 13:19 |
| 896 x 1152 | 7:9 |
| 1024 x 1024 | 1:1 |
| 1152 x 896 | 9:7 |
| 1216 x 832 | 19:13 |
| 1344 x 768 | 7:4 |
| 1536 x 640 | 12:5 |
How much can you vary from these? It is not recommended to generate at a lower resolution as quality will quickly deteriorate if you do so. Testing shows that most noobAI-XL based models can generate at slightly higher than 1 megpixel without loosing coherence, some can even generate in 1536x1536. Check the models description for any recommendation, but if you encounter too much issues revert to lower resolutions close to 1 megpixel. The final resolution of your image should be achieved via Hires.fix/i2i upscale anyway and not on the basegen.
You can enter any odd number manually into the width and height fields but the UI will generate an image in the dimensions that are rounded down to the closest values that can be divided by 8. But SDXL based models usually scale only properly on sizes that can be divided by 64 instead, so if you choose a resolution that does not you will notice a greyish "fade-out" border that fills the difference in pixels. There is a way to make the webUI sliders change the values by 64 instead of 8 but it involves changing a lot of rows in the "ui-config.json" file, so try to stick to values that can be divided by 64.
The models increased resolution tolerance is very helpful for inpainting though, as you can use a resolution like "1280x1280" which allows you to give the inpaint step more context without loosing details on your masked area [more info to follow].
If you are using (re)Forge, there is an extension which can set these values automatically for you: https://github.com/altoiddealer/--sd-webui-ar-plusplus

Seed
The seed is used to create the random noise from which the scheduler and sampler create the final image during the generation process. The seed is a random positive number, and by default a new one is used for each new generation process. This is indicated by a "-1" in the seed field:
Random seed:

Sometimes it might be appropriate to reuse the last seed for the next generation process, or to reproduce an earlier image. You can click the green "Recycle" button next to the seed field or enter it manually:
Fixed seed:

To discard the fixed seed and use a random one for the next generation, click the dice button or write "-1" into the field.
Notes:
- Using a fixed seed can be useful to "prompt tweak" if you want to make limited changes to your generation by changing some tags. But be aware that sometimes changing a single tag will lead to a very different generation. Use it to try to make small changes only.
- The value if the seed is just one parameter that influences the generation process, changing the prompt, CFG, sampler or even just the resolution might have a large impact on the final image even if the seed is unchanged.
- Sending an image from the PNG Info tab will also fix the seed to the one from its metadata.
- You can use variation seed to induce a second randomization factor into the generation which can sometimes fix slight issues.
- There are no golden seeds. The seed is just one of many parameters during the generation, so its impossible to know which seed will "work best" for what you are trying to achieve.

CFG

The CFG scale (classifier-free guidance scale) is another mystery topic. While the high-level description is "The Classifier-Free Guidance (CFG) scale controls how closely a prompt should be followed", you would think to crank it up all the way to eleven, because of course you want your prompt to be followed? Wrong.
Usually, again, the model will come with a recommended CFG range to use, and while there are always edge cases for exceeding these recommendations, it is usually best to follow them. Some samplers (e.g. the CFG++) samplers have specific requirements for the CFG scale setting as well.
So what value should you use? CFG 4.0 is a good starting value for most noobAI-XL based models. Some of the more realism-based models have shown to prefer a slightly higher CFG value of 5.0-6.0.
CFG/RescaleCFG comparison grids for some of the currently popular models are available here:
https://rentry.org/truegrid-models

RescaleCFG
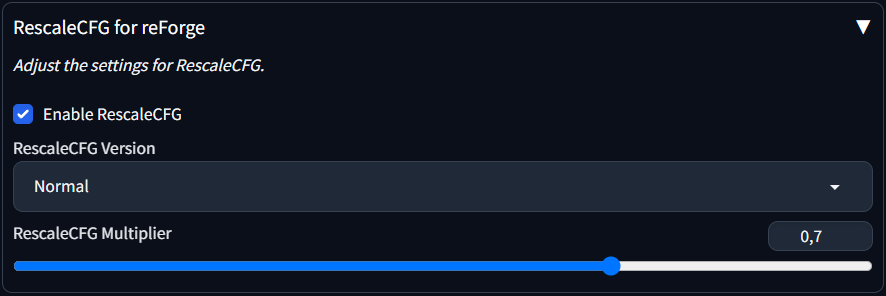
Rescale CFG is designed to adjust the conditioning and unconditioning scales of a model's output based on a specified multiplier, aiming to achieve a more balanced and controlled generation process.
All clear? Me neither. RescaleCFG is an important option if you are using a model that is using V-Prediction (vpred) mode instead of EPS-Prediction. Check the models description page for this as in (re)Forge there is no easy way to see the mode, while ComfyUI will show you the mode while loading the model. If you are not using RescaleCFG on vpred models you may encounter oversaturated or washed out colors, as well as a slightly worse prompt adherence.
So what value should you use? It depends on the model, but usually a value of 0.5-0.7 with a base CFG of 4.0-5.0 is a good starting point.
reForge comes with a built-in extension that lets you set the RescaleCFG value very easily, if you are using Forge this plugin is not available, check here on how to configure RescaleCFG properly.

⬆️⬆️⬆️To the top⬆️⬆️⬆️

Advanced Tools
Hiresfix
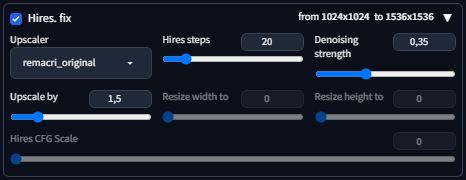
Hires.fix is an useful built-in extension that increases the resolution of your image while also (trying to) add in more details on this higher resolution. While you can also just upscale the resolution in e.g. an image editor, hires.fix will use the upscaled image and run it through an automatic img2img generation process, which will re-add details that the pure upscale usually looses. While over time you will want to do upscaling manually in the img2img tab to have more control, it is still an useful tool for beginners or quick gens that don't need any additional editing.
The default settings after a fresh install are not very modern so here are some recommendations:
- Upscaler: Use one of those listed below in the next subchapter
- Upscale by: Choose something around 1.5 for starters
- Hires steps: It is recommended to use fewer steps than for your basegen about 2/3 is a good starting point
- Denoising strenght: This depends on your sampler but around 0.35 is a good starting point
- Hires CFG Scale: This should be set to 0 which takes the same CFG scale as your basegen. Importing metadata can change this setting so verify from time to time!
If you select the checkbox all your basegens are automatically upscaled. This is not sensible as it more than doubles your generation time and you usually want to only upscale "good" basegens. The better way is to use the sparkle button that is below the preview area:

Upscaler
The default upscale method used by hires.fix is "Latent", which is ... special. There is a variety of other upscaler models available that are easier to handle. But why use an Upscaler model at all? In most circumstances you can just use "None" and the result will be fine too. "None" just resizes the image like you would do in an image editor, while using an Upscaler model is trained specifically for increasing resolution while trying to keep details. How well the Upscaler can do this depends on what is is trained on and what your images look like. Most Upscalers are trained on realistic images, some are trained on anime while some are also trying to be general purpose. So there is some trial and error involved to find the best approach for you.
In general the choice of upscaler does not seem to matter much for Hires.fix or i2i upscale as you will denoise the image after the upscale, so any differences are usually within the usual randomness.
If you try to upscale by a very large factor (>1.75) or use the "Extras" tab to do pure upscaling without denoising the image then the choice of upscaler may become more relevant to fight hallucinations. See here for more information.
Recommendation: Either start with "None" or Remacri as these options inject the least changes to your basegen during the upscale.
Here are some popular Upscaler models:
- Remacri
https://civitai.com/models/147759/remacri - NMKD Siax CX 200k
https://civitai.com/models/147641/nmkd-siax-cx - Nickelback 70000G
https://openmodeldb.info/models/4x-Nickelback - Nomos8k SC
https://openmodeldb.info/models/4x-Nomos8kSC - R-ESRGAN 4x+ Anime6B
included with base (re)Forge installation
Download these .pt or .pth files and put them in <your webUI base path>\models\ESRGAN. If this folder does not exist on your setup just create it.

Here is a comparison grid of the upscalers listed above, click for large:


ADetailer
ADetailer is an extension that must be installed separately, see here: https://rentry.org/sdginstall#add-useful-extensions
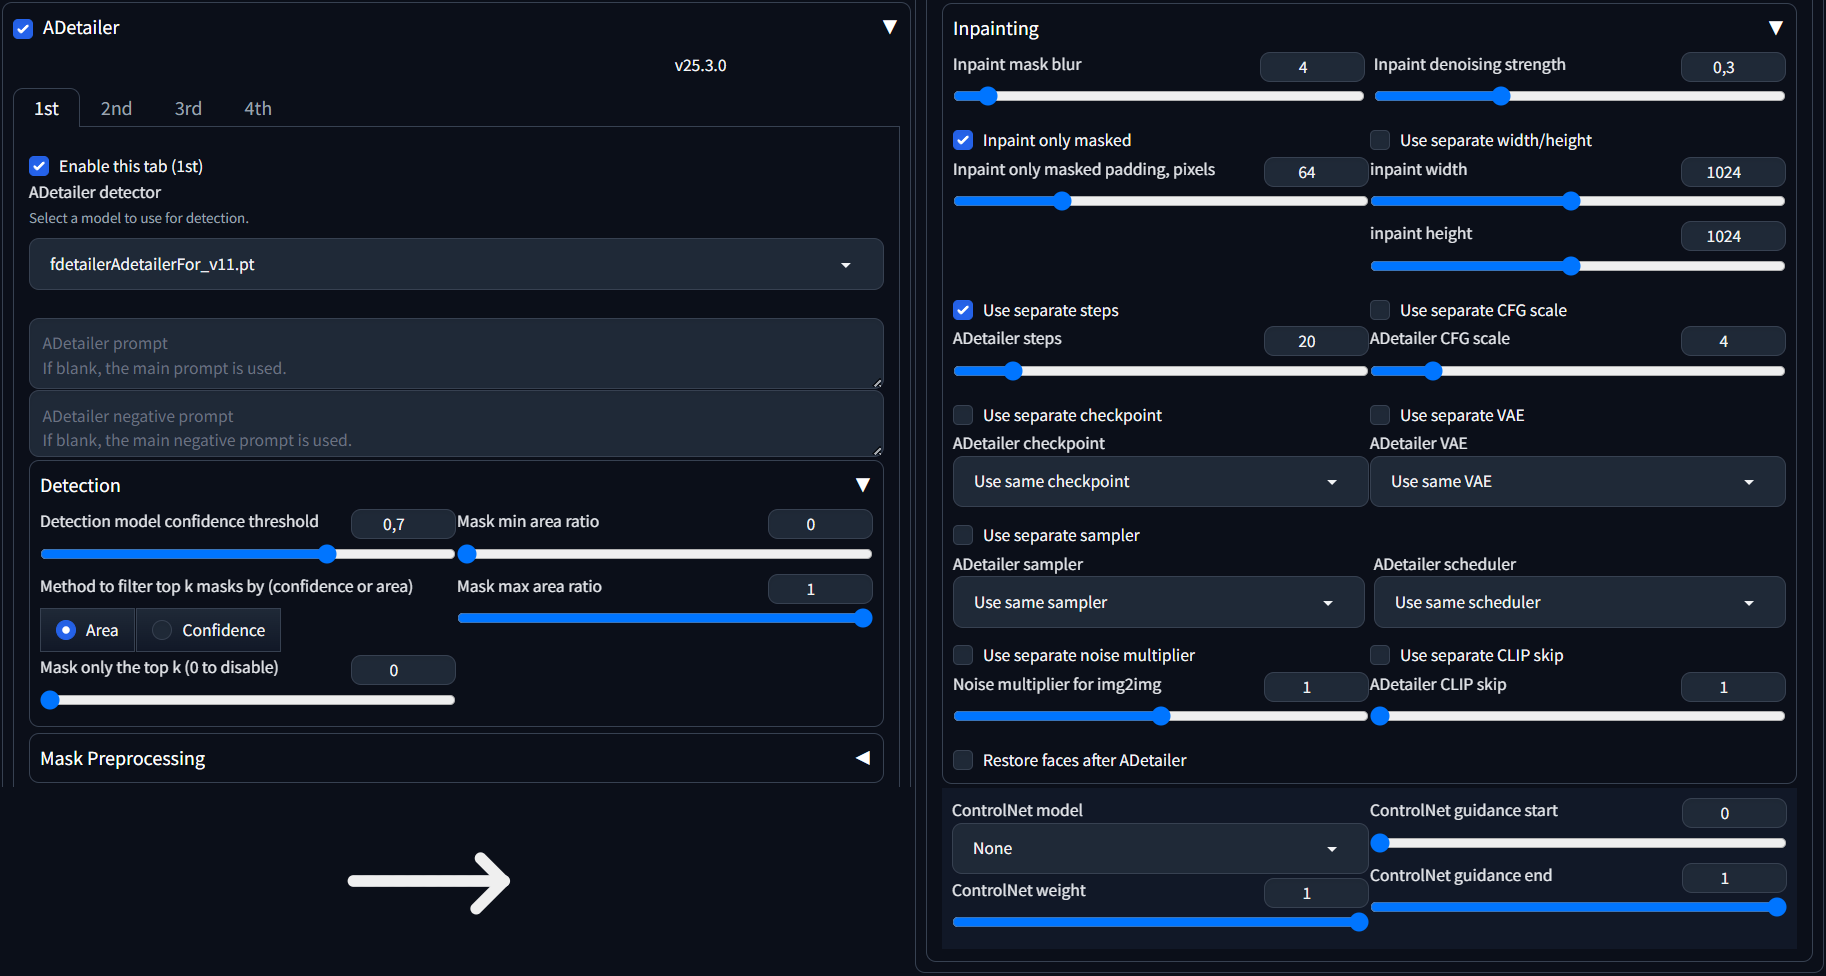 ADetailer is an useful extension to add details to your images automatically. It does this by using a detection model to analyse your basegen, automatically create masks on certain anatomical features and inpaint them. While over time you will want to do inpainting manually, it is still an useful tool for beginners or quick gens that don't need any additional editing.
While it does come with some detection models preinstalled, there are better ones available.
- https://huggingface.co/astrii/fdetailer/tree/main
A few single-class models.
Using individual ones allows for fine-grained settings for each of them. - https://civitai.com/models/1228695/fdetailer-adetailer-for-furries
A multi-class detection world model. Currently these are not fully supported on (re)Forge so while they will detect everything correctly you cannot set specific settings for each detection class.
Download the .pt files you want and put them in the "<your webUI base path>\models\adetailer" folder. If your UI is still open you need to restart it.

To use ADetailer you need to enable the extension and at least one tab before you start to generate/upscale. If it is enabled and you also enable hires.fix it will be executed after the hiresfix. If you do a basegen and then manual hiresfix, it will run two times, but that usually doesn't matter. If you choose to use a multi-class model you just need to enable the first tab and select it from the dropdown list. If you want to use different single-class models for more control, enable as many tabs as you need and select the corresponding model in each of them, they will be applied one after the other. Each pass will process all instances it has detected, e.g. if there are three faces on your image one pass of the face model will (hopefully) detect all three and inpaint them. You do not need to use the same detection model in multiple tabs.
While the default settings work well, depending on your sampler and model it may be advisable to adapt them a bit.
- Detection mode confidence threshold: The "sensitivity" of the detection model. Higher values means it will only activate if it is a sure hit, lower values may lead to superfluous detections and garbled images
Recommended starting value: 0.6-0.7 - Inpaint denoising strenght: Recommended to use about the same value as you would use for hires.fix
Recommended starting value: 0.3 - Inpaint only masked: If you see that the inpainted areas are not fitting their surroundings, increase this value
Recommended starting value: 64 - Use separate steps: Depending on sampler, set to about the same value as your hires.fix steps
Recommended starting value: 20
Be aware that by default the prompt and negative prompt you used to generate the image will be applied to all adetailer passes as well. If the denoise is too high or the context (masked area) is too small it will easily regenerate a lot of unwanted details in those regions. If you are using the single-class models you can try and supply an individual reduced prompt for each of them, but this will require a bit of fine tuning.

LoRa (& LyCoris & LoHa & LoCon)
(While there are technical differences between them, for the sake of this guide we will call them all LoRa)
If the model is the encyclopaedia of all the knowledge you can leverage, a LoRa is a small addendum that adds a specific part to the whole. This can be used to add information about a character, a concept or an overall style to the existing model at runtime (during the generation process) without the need to modify the model itself. As such, the use of LoRas is highly flexible, and you can even combine multiple of them.
But.
There is an immense amount of LoRas out there, and as such there are also a lot that are not of a very good quality. Adding mediocre LoRas to your prompt may lead to all kinds of deteriorating effects, like changing the overall style, heavily restricting the models flexibility, introducing artifacts or incompatibility with other LoRas. Additionally there are lot of LoRas of questionable use, like many of the "detailer" or "slider" LoRas, which often work only under very specific circumstances, if at all.
Because of this it is highly recommended to use as few LoRas as possible, if at all necessary. If you encounter any issues with prompt adherence or image quality, first remove all LoRas and verify if the issue persists while using just the base model!
A LoRa must fit the model you are using. LoRas created for SD1.5 do not work at all on SDXL based models, and SDXL LoRas will not work with Flux, etc. PDXL, IllustriousXL, noobAI-XL are all based on SDXL1.0, so LoRas trained on a different chain are technically compatible, but if e.g. a Pony LoRa will work with a noobAI-XL based model has to be tested on a case-by-case basis.
All current LoRas should come as a .safetensor file at usually between 50mb and 500mb size. Put them in this folder <your webUI base path>\models\Lora. After that you can load them by clicking on them in the "Lora" tab. Clicking on it again will remove it from the prompt, which you can also achieve by just deleting the string added.
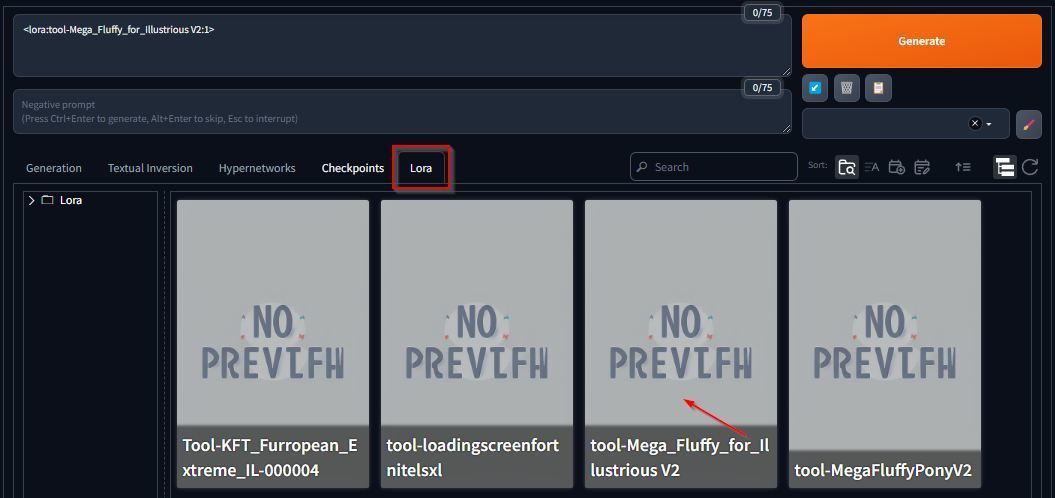
By default the LoRa is loaded with a weight of "1". Usually the creator of the LoRa gives a recommendation on how much weight to use, it can be beneficial to reduce LoRa weight to decrease the influence it applies during the generation process. Also read the section on LoraCTL for advanced control over how the LoRa is applied.

Variation Seed

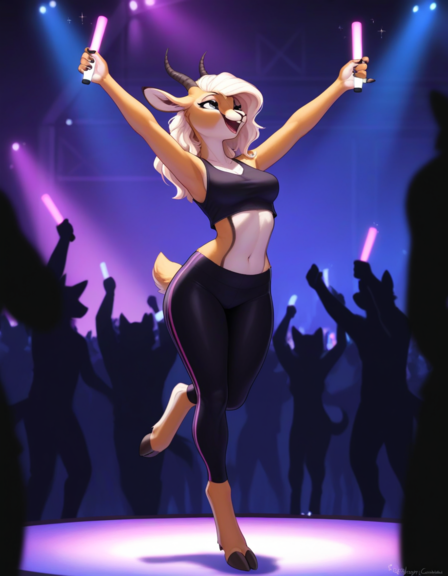
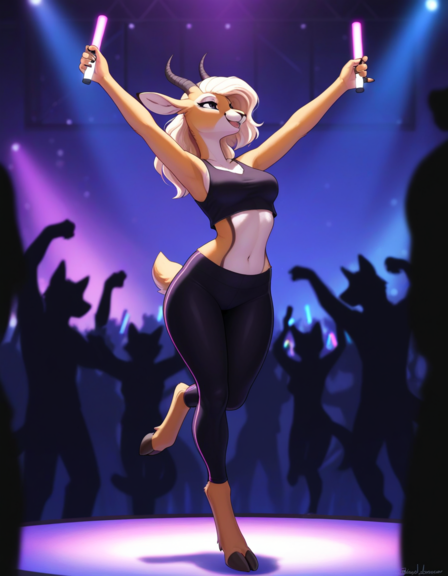
Variation seed is a little known option that hides behind the "Extra" checkbox next to your base seed field. Enable it to show the options. Variation seed is very useful when seed hunting as it gives you little variations that are much less different than a new base seed. To use it you must fix your base seed in place, select "-1" as variation seed and choose a "Variation strength" that determines how much influence the variation seed will have on your resulting image. How much do you need, you ask? It is highly dependent on model, sampler and your general prompt setup, some react pretty strongly to variation seeds below 0,2 while others need a much higher strength to divert from the original base image.
Here are some examples on a setup which requires quite a lot of strength to have major changes:
| Strength 0,2 | Strength 0,4 | Strength 0,6 |
|---|---|---|
 |
 |
 |

Advanced Prompt syntax
The webUI forks (A1111,Forge,reForge) support advanced prompt syntax which is described here. ComfyUI and InvokeAI support other/different syntax, separate guides or links will follow.
Weighting (Attention/emphasis)
https://github.com/AUTOMATIC1111/stable-diffusion-webui/wiki/Features#attentionemphasis
Using () in the prompt increases the model's attention to enclosed words, and [] decreases it. You can combine multiple modifiers:
(word) - increase attention to word by a factor of 1.1
((word)) - increase attention to word by a factor of 1.21 (= 1.1 * 1.1)
[word] - decrease attention to word by a factor of 1.1
(word:1.5) - increase attention to word by a factor of 1.5
(word:0.25) - decrease attention to word by a factor of 4 (= 1 / 0.25)
Do not use too much weight or your gens will be fried. Usually a value below 2.0 is more than sufficient, you should stay in the 1.1 - 1.5 range (ComfyUI is more sensitive than the webUIs). Do not mix multiple parentheses and numbered weighting.
The weight algorithm is also affected by the "Emphasis mode" setting, you should set this to "No Norm".
If you want to use parentheses in your prompt, e.g. if they belong to a tag, you must escape them with \(word\). This is relevant if the tag itself contains them, e.g. for artist tags or character tags.
loona (helluva boss),- this can be interpreted as having a tag "loona" and a tag "helluva boss" with putting weight on the helluva bossloona \(helluva boss\),- this will be interpreted as the tag "loona (helluva boss),"
Note that both may work depending on how the specific tag was trained, how much training data went into the model with or without the words in parentheses etc. It is recommended to use the tags as they appear on danbooru/e621, so if the tag contains parentheses over there you need to take care to escape them in your prompt properly.
Editing / Scheduling
https://github.com/AUTOMATIC1111/stable-diffusion-webui/wiki/Features#prompt-editing
Prompt Editing allows you to change parts of your prompt during the generation.
[TAG1:TAG2:when] - replaces TAG1 with TAG2 at number of steps (when)
[TAG:when] - adds TAG to the prompt after a number of steps (when)
[TAG::when] - removes TAG from from the prompt after a number of steps (when)
The exact time (step) when the change occurs (when) can either be set either as
- positive integer - make the change at exactly this step (regardless of total number of steps). If there are less steps overall it will not trigger
- decimal number - make the change at the percentage of steps, 0.3 for example after 30%
Examples:
[horse,:pig,:0.5]- replaces the tag "horse" with the tag "pig" after 50% of generation steps are done[black background,:detailed background,:15]- replaces the tag "black background" with the tag "detailed background" after exactly 15 steps[fluffy,:0.7]- adds the tag "fluffy" to the prompt after 70% of generation steps are done[realism,::0.35]- removes the tag "realism" after 35% of generation steps are done
Alternating tags
https://github.com/AUTOMATIC1111/stable-diffusion-webui/wiki/Features#alternating-words
[cow|horse|pig|cat]
Using this syntax the tag is swapped every step to the next one separated by |, meaning on step 1 the prompt will contain "cow", on the second step "horse", etc. The fifth step will then revert to "cow".
A common use case for this feature is to create hybrid characters.

Dynamic Prompts (Wildcards)
The Dynamic Prompts extension must be installed before use, see here: https://rentry.org/sdginstall#add-useful-extensions
https://github.com/adieyal/sd-dynamic-prompts
Dynamic Prompts is an extension that allows for many ways of varying and randomizing prompts. It has far too much to cover here, so check out the link above if you want to know more about its myriad options, here we will cover only how to utilize wildcard prompts.
Wildcards are simple text files that contain one or more tags per line. If the wildcard is called in the prompt field it will be replaced with a random line from its corresponding file on each generation. Wildcard files need to be placed in <your webUI base path>\extensions\sd-dynamic-prompts\wildcards. Installing Dynamic Prompts adds a Wildcards Manager tab to the WebUI from which you can view, search and edit these files.
As an example, if you create a text file in this folder called backgrounds.txt and fill it with the following lines
You can now add __backgrounds__ to your prompt to get a random background from this list on each generation.

Regional Prompting
Forge Couple
The Forge Couple extension must be installed before first use, see here: https://rentry.org/sdginstall#add-useful-extensions
https://rentry.org/sdgregionalprompting

Regional Prompter
The Regional Prompter extension must be installed before first use, see here: https://rentry.org/sdginstall#add-useful-extensions
https://rentry.org/sdgregionalprompting

LoRa Scheduling (LoraCTL)
The LoraCTL extension must be installed before first use, see here: https://rentry.org/sdginstall#add-useful-extensions

This extension allows to schedule the application and strength of a lora during the generation process. A common use case is to apply a style lora only after a certain percentage of the steps are done to ensure the flexibility of the base model is not constrained during the critical first steps.
When you enable this extension, you can still use the normal LoRa weighting which will load it from step 1 with a static weight, or the advanced syntax which gives you fine grained control. To achieve that, you replace the static weight with a comma separated list of "(weight)@(step),(weight)@(step),(weight)@(step),....".
The weight is the same weighting you normally use, while step can be defined as
- positive integer - make the change at exactly this step (regardless of total number of steps)
- decimal number - make the change at the percentage of steps, 0.3 for example after 30%
<lora:tool-noob-Mega_Fluffy_for_Illustrious V2:0@0,0.8@0.3,1@0.9>
In this example the LoRa is not loaded at the start of the generation process (weight 0 @ step 0), instead it is loaded at 30% of the generation steps and applied with 0.8 weight (0.8 @ 0.3) and then the weight is increased to 1 at 90% of the steps (1 @ 0.9)

img2img & inpainting
https://rentry.org/fluffscaler-inpaint

Controlnet
https://rentry.org/IcyIbis-Quick-ControlNet-Guide
IPAdapter
https://civitai.com/models/1233692/style-ipadapter-for-noobai-xl
https://civitai.com/models/1000401/noob-ipa-mark1

Extras tab upscaling
You can use the Extras tab for various thing (tbc) but a common use is to use an advanced HAT model upscaler to increase images in size without an additional denoise set. Upscalers also try to keep details intact while just increasing size in an image editor will not. This can be useful to increase low res source images to SDXL compatible resolutions for img2img or try to upscale your generated image even further than the models can cope with (e.g. 4k resolution). Be aware that these upscalers are not perfect and depending on your specific image, style and content it may work well or not.
There are a lot of different HAT style upscalers available on openddb, one that is often recommended is the L(arge) version of Nomos8k:
https://openmodeldb.info/models/4x-Nomos8kSCHAT-L
Download the .pt or .pth files and put it in "<your webUI base path>\models\HAT". If this folder does not exist on your setup just create it.

rembg (Remove Background)
The rembg extension must be installed before first use, see here: https://rentry.org/sdginstall#add-useful-extensions

With this extension you can (try to) cleanly remove the background behind your characters replacing it with a transparent alpha channel. After the extension is installed you will find a new option on the "Extras" tab called "Remove background". You can send or load an image into the source panel, activate the extension (make sure that "Upscale" is not activated at the same time!) and choose a model. You will see that depending on your input image some models will work better and some will remove too much/not enough, and sometimes it may not work well at all.
Try the "isnet-general-use" or the "isnet-anime" models. Additional models can be downloaded from the official github. Put these .onnx files into <your webUI base path>\models\u2net.
For ComfyUI the recommended tool is the ComfyUI-Inspyrenet-Rembg node.

Other extensions
Just a collection of notes I have gathered on less commonly used extensions.
| Name | Description |
|---|---|
| HyperTile | Upscales the image in tiles instead of as a whole. Speed increase with minimal quality loss, but seems its only really useful if you have very low end hardware/very little VRAM. To use it, enable it together with hires.fix or on the img2img tab. Tile size should be model training data size. |
| Kohya HRFix | Alternative to hiresfix upscaling. You set your desired final size directly for your base gen and this will modify the latent to be (by default) half the set size for the first steps of the generation process and then increase it. This allows you to gen images in larger-than-model-training size in one step while keeping them coherent. |
| SelfAttentionGuidance | SAG does try to influence the generation process to focus on some (mostly background) details at each step, hopefully guiding the model to generate them "better". There are mixed reports if this even works on non-realistic models. |
| FreeU | Another extension that influences the generation process. Seems to increase coherence on models that have an issue with that but can blur out details and oversaturate. |

⬆️⬆️⬆️To the top⬆️⬆️⬆️

FAQ

Resources
Various resources, tools and links
Catbox
Catbox is a free image and file sharing service
URL: https://catbox.moe/
Uploading images to 4chan, imgbox or Discord deletes the generation metadata from the image. Uploading it to catbox allows sharing this information with other people. File size limit is 200mb, if you have a larger file to share you can use https://litterbox.catbox.moe/ to upload a file up to 2gb in size which is stored for up to three days (you MUST set the expiration limit BEFORE starting the upload).
Catboxanon maintains a 4chanX extension script that allows to directly upload images to catbox and 4chan simultaneously, as well as viewing metadata of these catboxed images in the browser
https://gist.github.com/catboxanon/ca46eb79ce55e3216aecab49d5c7a3fb
Follow the instructions in the GitHub to install it.
As catbox is pretty unreliable recently you can also use https://pomf.lain.la/ for the same purpose, but there is no similar script available.
Online generation services
Civitai.com
- Largest repository of models, lora and other resources
- Online generation of t2i, i2i, t2v and i2v with models that are otherwise only available via (paid) API access (e.g. Flux Ultra)
- Freemium model with (confusing) dual premium currency buzz. Can collect free daily buzz for generation services
https://www.civitai.com
Tensor.art
- Lots of models and loras, but can be set to exclusive mode by uploader so only available for onsite generation
- Online generation of t2i and i2i with advanced editing capabilities (inpaint)
- Freemium model with onsite currency, free amounts for (daily) activities
https://tensor.art
Perchance.org
- Free, but very limited
https://perchance.org/ai-furry-generator
frosting.ai
- Free generation only possible with old (SD1.5?) based models in low quality
- Subscription service for newer SDXL based models
- New experimental video generation service
https://frosting.ai
Seaart.ai
- Freemium service with some free generations
- Image and Video generation
- seems similar to Civitai from the features
https://www.seaart.ai/
NovelAI
- Subscription only (?) with free monthly premium currency
- Provides own models which are supposed to be pretty good
https://novelai.net/
LoRa collects
Some civitai links (tbc)
https://civitai.com/user/cloud9999
https://civitai.com/user/homer_26 alternate: https://mega.nz/folder/lnZkTKQQ#gLPWq0TQ6-yyMjzSexa7BQ
https://civitai.com/user/KumquatMcGee
https://civitai.com/user/gokro_biggo
https://civitai.com/user/Boxtel
https://civitai.com/user/lordmordrek663
https://civitai.com/user/lugianon_sdg
https://civitai.com/user/X70NDA
Professor Harkness
https://www.mediafire.com/folder/30caesntlcq6u/LoRA's#myfiles
A collection of LoRas that were only shared via Catbox links
https://huggingface.co/datasets/Xeno443/sdg_Lora_Collect/tree/main
Original trashcollects_lora, no longer maintained, mostly PDXL
https://rentry.org/trashcollects_loras
Another collection by anon
https://rentry.org/obscurecharacterslora

⬆️⬆️⬆️To the top⬆️⬆️⬆️

Useful links
Original trashfaq:
https://rentry.org/trashfaq
https://rentry.org/trashcollects
https://rentry.org/trashcollects_loras
Comparison grids:
https://rentry.org/truegrid
Automatic1111 feature list (still relevant for Forge/reForge)
https://github.com/AUTOMATIC1111/stable-diffusion-webui/wiki/Features
RedRocket Joint Tagger Project (autotagger):
https://huggingface.co/RedRocket
https://rentry.org/basic-autotagger-guide
Awesome ComfyUI Custom Nodes Megalist:
https://github.com/ComfyUI-Workflow/awesome-comfyui?tab=readme-ov-file#new-workflows
Lama-Cleaner:
https://huggingface.co/spaces/Sanster/Lama-Cleaner-lama
https://github.com/light-and-ray/sd-webui-lama-cleaner-masked-content
Prompt Squirrel:
https://huggingface.co/spaces/FoodDesert/Prompt_Squirrel
Style Squirrel:
https://huggingface.co/spaces/FoodDesert/StyleSquirrel
Lora Metadata Viewer:
https://xypher7.github.io/lora-metadata-viewer/
AI Image Metadata Editor
https://xypher7.github.io/ai-image-metadata-editor/
Standalone SD Prompt Reader:
https://github.com/receyuki/stable-diffusion-prompt-reader
Backup of thread OP:
https://rentry.org/sdg-op
NAI dynamic prompts wildcard lists:
https://rentry.org/NAIwildcards
/g/ /sdg/ large link collection:
https://rentry.org/sdg-link
PonyXL info rentry:
https://rentry.org/ponyxl_loras_n_stuff
SeaArt model artist list:
https://rentry.org/sdg-seaart-artists/
Nomos8kSCHAT-L:
https://openmodeldb.info/models/4x-Nomos8kSCHAT-L
For later:
https://civitai.com/models/1003088/mega-scaly-for-illustrious-xl
https://civitai.com/models/890007/mega-fluffy-for-illustrious-xl
https://civitai.com/models/1073409/mega-feathery-for-illustrious-xl
A quick visual guide to what's actually happening when you generate an image with Stable Diffusion:
https://www.reddit.com/r/StableDiffusion/comments/13belgg/a_quick_visual_guide_to_whats_actually_happening/
Steve Mould randomly explains the inner workings of Stable Diffusion
https://www.youtube.com/watch?v=FMRi6pNAoag
Wildcard lists:
Species https://files.catbox.moe/06i981.txt
Outfits https://files.catbox.moe/97y4r8.txt
Art Styles https://files.catbox.moe/k9l1c6.txt, https://files.catbox.moe/zr30th.txt
Anime Chars https://files.catbox.moe/2kcyyc.txt
Animal Crossing Chars https://files.catbox.moe/tcswhx.txt
Pokemons (?) https://files.catbox.moe/dma3tl.txt
Assorted danbooru artists https://files.catbox.moe/tfm6gg.txt https://files.catbox.moe/obkgpr.txt
Waifu Generator (Wildcards) https://civitai.com/models/147399/waifu-generator-wildcards
e621 above 50 posts https://files.catbox.moe/y352dr.txt
e621 50-500 posts https://files.catbox.moe/p64u2f.txt
Danbooru above 50 posts https://files.catbox.moe/t4s0za.txt
Danbooru 50-500 posts https://files.catbox.moe/4m5c3p.txt
Illustrious XL v0.1 Visual Dictionary
https://rentry.org/w4dzqdri
Master Corneo's Danbooru Tagging Visualization for PonyXL/AutismMix
https://rentry.org/corneo_visual_dictionary
Using Blender to create consistent backgrounds:
https://blog.io7m.com/2024/01/07/consistent-environments-stable-diffusion.xhtml
List of colors
https://en.wikipedia.org/wiki/List_of_colors_(alphabetical)
BIGUS'S GUIDE ON HOW TO TRAIN LORAS
https://files.catbox.moe/0euyoe.txt

⬆️⬆️⬆️To the top⬆️⬆️⬆️

Xeno443