Img2Img & Inpainting
General Info:
Unless otherwise denoted, all generations use Vanilla PonyXL, DPM++ 2M Karras, and 30 steps. All gens are done on a 3060 12GB Vram with 32GB of Ram. If something varied in the prompt data it wasn't very vital for tutorial purposes.
ANIME TITTIES:
YES you can use this guide for generating Anime. In fact, a lot of the furry focused models/loras are quite adept at generating anime style images, and vice versa.
SLOW LOADING:
Images load slowly since I'm too lazy to convert them to jpgs. Let the rentry load. If you don't see any images at all, check if catbox.moe is down. Catbox also blocks some countries, so you may need to get creative with a VPN or something.
Introduction
1.5?XL?:
This tutorial works for both SD1.5 as well as SDXL. General concepts might help ComfyUI users with the basics, but will not show you workflows. Not my expertise.
Previews:
I find enabling more frequent previews helpful when testing or understanding these things.
Settings > User Interface > Live Preview > Live preview display period [2-3].
These have a negligible performance impact for me.
So you want to become an effortgenner huh? Let's look at some basics again to understand what we are actually doing here.
A diffusion model is trained by adding noise to an image, then to reverse that process. Once a model lands in the grubby hands of a prompter, the model essentially generates a cloud of noise, then attempts to recreate an amalgam image, according to whatever said proompter has put into their textbox. We are essentially working with an incredibly convoluted de-noising algorithm.
But here comes the issue, one that over the course of generations has had a couple of solutions: How can we steer the model further. Obviously different checkpoints and loras exist, essentially focus-trained data to make the AI solve the cloud of noise into a pair of nice fat tits, and not whatever Stability Ai considers attractive.
Now what if we didn't start from random noise? This is fundamentally what of Img2Img/Inpainting is.
A diffusion model works in "Steps". You probably at least partially know what these are. Samplers are designed to "solve" images in a discrete number of steps, for example EulerA is designed to solve in roughly 30 steps, going higher is of no benefit to the image. Often these steps are also not linear, the biggest changes tend to happen during the early steps.
Img2img and inpainting designate a denoise value, this value determines how many steps the underlying image you are working on occupies. For example a denoise of 0.7 would mean that 30% of the steps, in this case the first 9 steps, are your original image, and then the model comes in. This is why gen times are proportionally faster during img2img/inpainting, a denoise of 0.5 would mean the image generates in half the time, because the AI only has to do 15 steps.
Controlnets:
Controlnets are another attempt at making generations more predictable. I personally don't use them much, I find them a little boring to use.
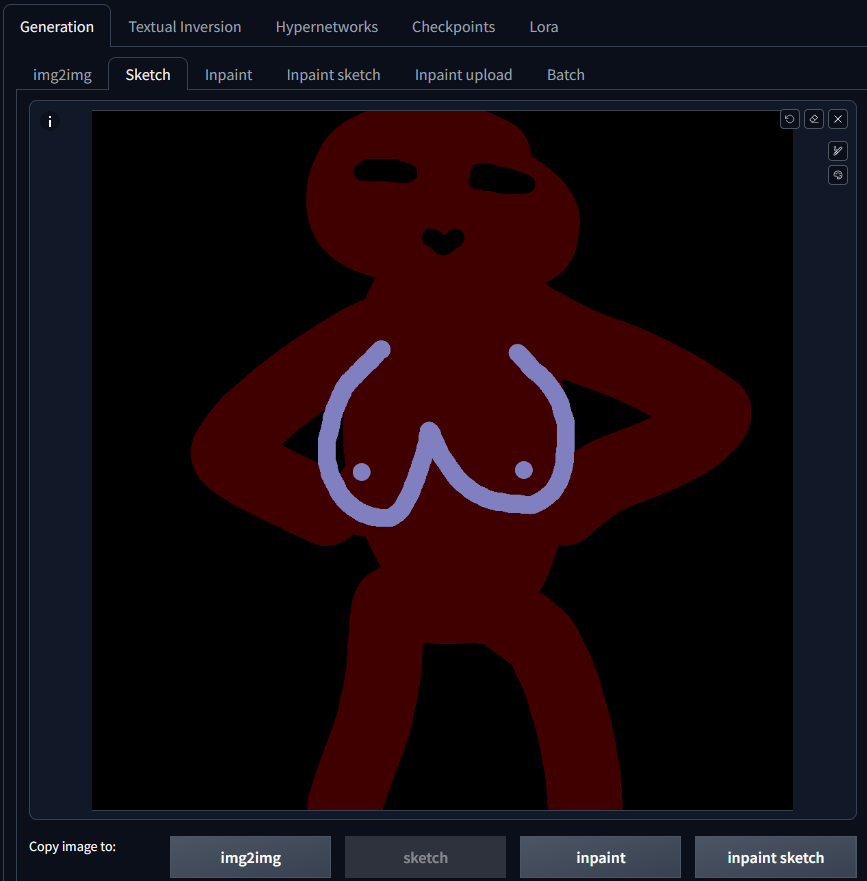
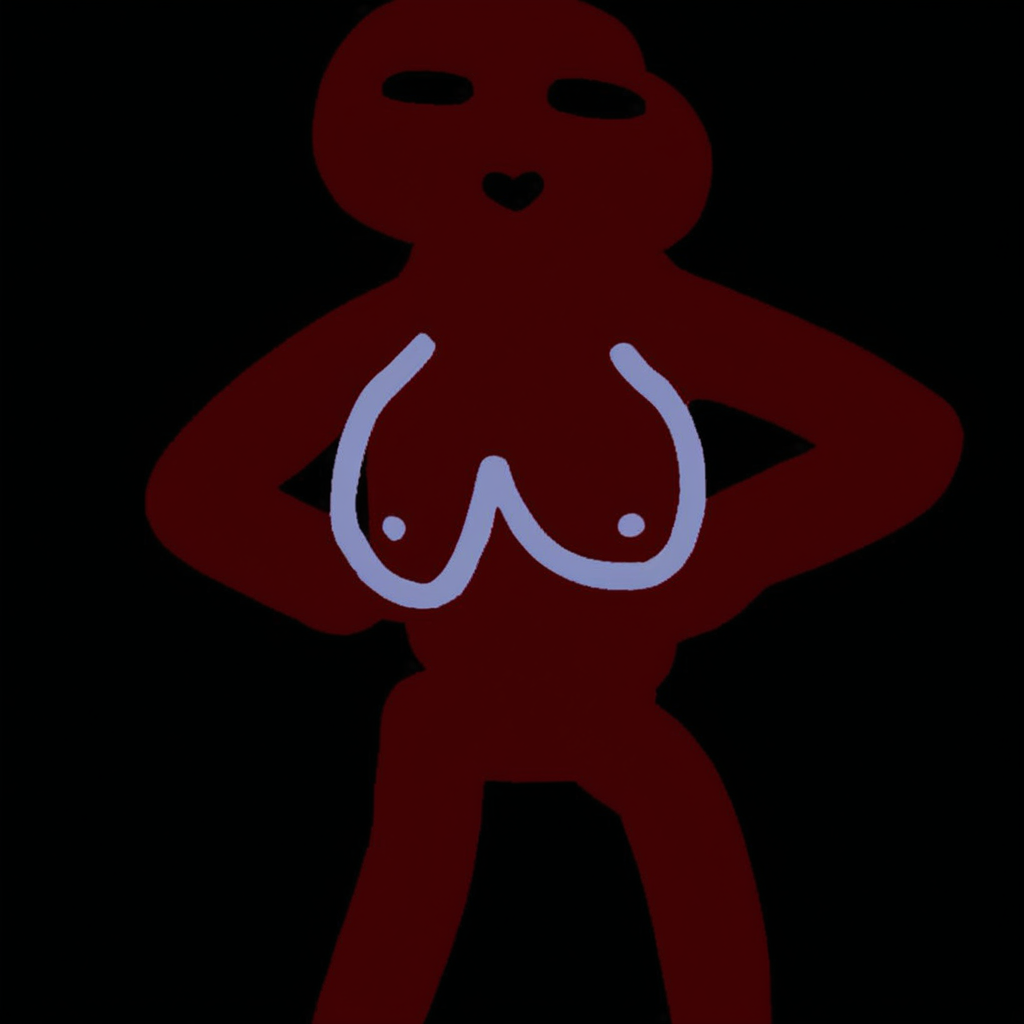
Img2Img to steer a pose.
Meet Sexwolf, my new OC:
Prompt:
Model: PonyXL
score_9, score_8_up, score_7_up, score_6_up, source_furry, realistic,
detailed background,
bar, sitting, bar stool, looking at viewer,
female, anthro, wolf, (young:0.6), red body, detailed fur, sweaty, clothes, looking at viewer, black clothes, happy, blue eyes, drunk, cleavage, virgin killer sweater, bedroom eyes,
Negative:
blurry, low res, text, source_pony,
| Sketch | 0.3 |
|---|---|
 |
 |
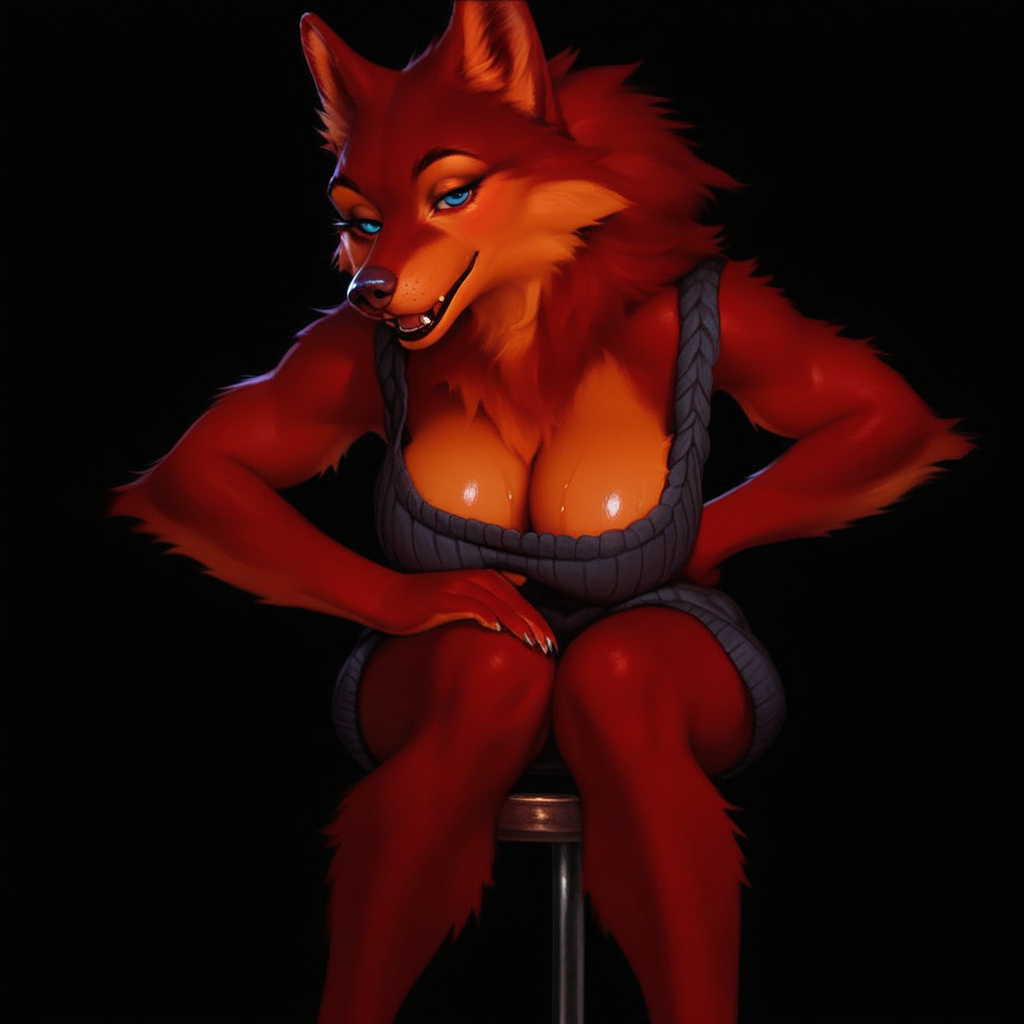
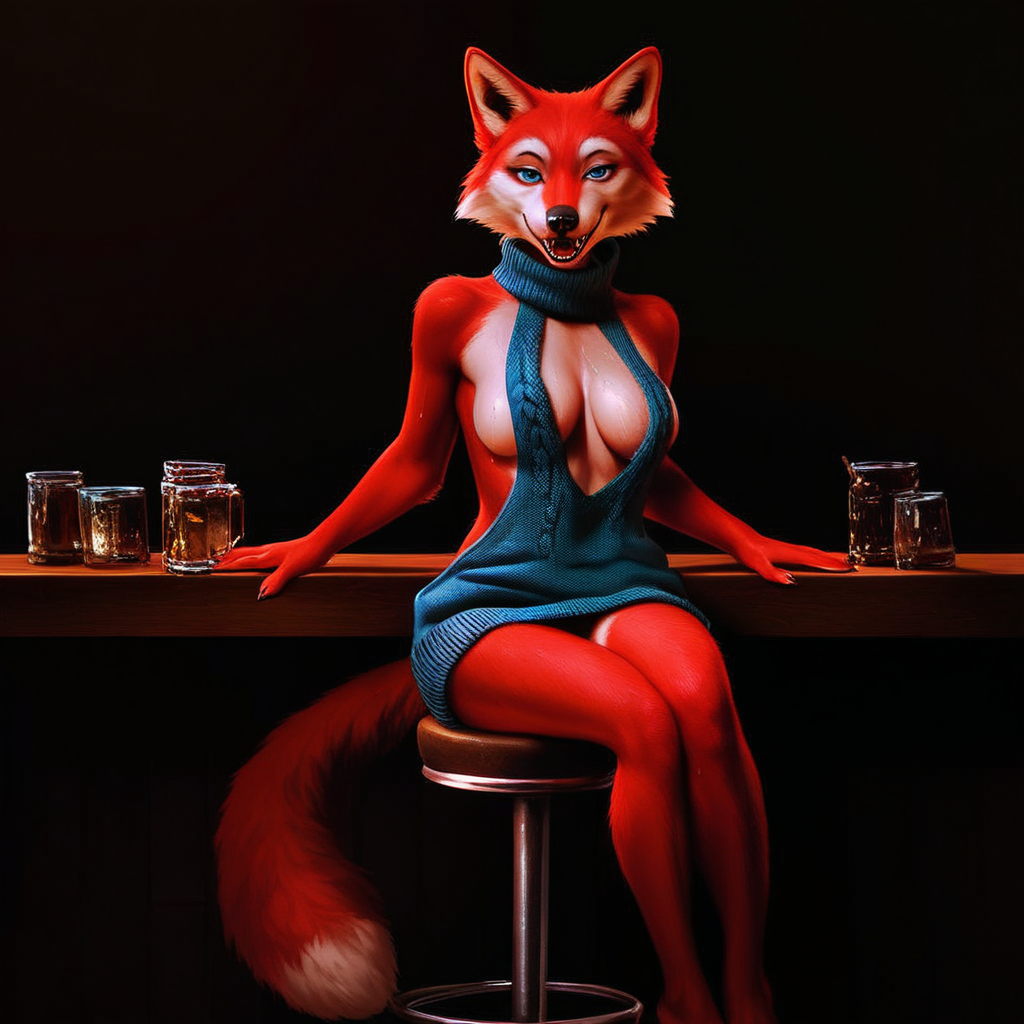
| 0.8 | 1.0 |
 |
 |
I recommend using an image editor like GIMP (free) for this and NOT the inpaint sketch tab, since its broken and outdated.
As you can see, img2img can be used to steer a pose, the higher the denoise the more it deviates from the sketch, eventually it essentially ignores it. Important to note, is that anything present will get reinforced. Since the background is pitch black, the AI catches on and assumes that's what the image should be. If you want a more detailed background, make sure to plant some trees, these can be just as rough, a few table legs, some shapes, etc.
Another important factor is actually properly 'solving' the image. Lower denoise values would mean, that the AI does not get enough steps to properly 'mold' the image. Remember, samplers are designed to finish in a specific amount of steps.
To properly shade/structure, you may need to iterate on the same image, so your first pass might be 0.55 denoise, send it back in, do 0.4 after, and so on. This can also vary on samplers a lot, so experiment with your denoises a little.
Summary:
- Use high denoise to sufficiently cook your image.
- Consider doing multiple passes, for example a first pass at 0.6 denoise, hitting "Send to Img2Img" and then running another 0.6 denoise, maybe even multiple variants, then picking the nicest candidate. This way you can incrementally get to the pose you want.
- The more colors you add the better. If your sketch includes a solid black background, then it's very likely it will stay that way, since it's such a large continuous space. Consider adding very basic background objects and construct rooms or environments and whatever, even if just in solid colors. For example a beach scene needs very little beyond some blue water and sky, and then some yellow sand.
Example, Img2Img to swap a species.
Meet Dork Cat, she will be Dork Wolf soon:
Prompt:
Model: PonyXL
score_9, score_8_up, score_7_up, score_6_up, source_furry, realistic,
detailed background, atmospheric lighting,
medieval, fantasy, tower, forest, city, standing, raised arms, upper body, celebration,
female, anthro, kemono, [siamese], round glasses, librarian, summer, skirt, love, blush, cleavage cutout, bob cut, white hair, medium breasts, happy, smiling, 4 toes, eyes closed, <3, open mouth, fangs, tail, clothes, [white|green] clothing,
<lora:syurof:0.9> <lora:Waspsalad_Style_PonyXL:0.5> <lora:rance_pony_v1-0:0.5> <lora:p:0.3>
Negative:
blurry, low res, text,
multi anus,
score_3,score_2,score_1,
I will exchange the [siamese] for [wolf]:

Pretty straight forward results. The higher the denoise, the wolfier she gets, as the AI has more power to deviate from the given image, but that power makes it steer from the given pose more and more. Inpainting might be more suited to something like this, but it's very fun to play around with on occasion. You can adjust your prompt according to what changes you want to see.
We can somewhat relate this to the previous example as well. Technically speaking there is no fundamental difference between providing an already "solved" image or providing a cloud of noise, or a bunch of blobs. You want big changes? You give the AI more steps to work with, which means a higher denoise.
Summary:
- Use the same prompt as the base image, changing only what you need to.
Upscaling.
One fundamental problem with Stable Diffusion, is that it's trained on a distinct base resolution. Anything above or below that resolution tends to get garbled. This most commonly manifests in extra limbs or quadruple navels If you generate at higher resolution than the model is designed for.
The AI tries to fill that space with partial copies of your image.
Think about it like trying to fill a bottle of water. SDXL works on 1megapixel (1024x1024), a bottle can can contain 1L. Trying to generate at 1024x1536 would mean trying to fill it with 1.25L of water. That spillage is extra limbs. To circumvent this problem, we have a few tricks.
First we need to differentiate two different kinds of upscaling.
Note, both of these are technically 'AI upscaling', but for simplicities sake, I term them as follows:
Simple Upscalers
This includes Extras Tab Upscalers and Hires.Fix Upscaling Models (these are the same thing). These do NOT use your actual Stable Diffusion AI model, they algorithms that are meant to stretch images in an intelligent manner. These do not create new details, their primary concern is preserving details on a larger image. Some of these have a few other use cases, such as sharpening or removing jpg artifacts.
These do not use a prompt, and toasters can run them. HAT, GAN, ESRGAN, are all terms related to these.
AI Upscaling/Img2img Upscaling
AI upscaling using your Stable Diffusion model. This is what's far more appealing for details and quality images. AI upscaling methods all work similar, your image gets cut up into chunks, solved separately by the model, then stitched back together. We usually call this "img2img upscaling".
Terminology
I cannot stress enough how these two methods are fundamentally different in quality and execution, yet are used interchangeably in conversations online. I've seen enough "Dude, I just upscaled to 4K with this one weird trick, why do you make it out to be so hard!!" and then they just chucked the image into waifu2x or some shit. Always look twice what "upscaling" means in a conversation. This gets even muddier with hiresfix because it does both.
Img2Img upscaling
Generate your image. At a normal standardized resolution, in my case it is a 1152x896 SDXL PonyXL image. Below your generated image, click the 🖼 icon, which will send it to img2img.
Change sampler, scheduler and steps to what you used in your base image.
Now, above the resolution sliders you will find a tab simply named 'resize by', go to that and choose a reasonable resolution scale for now (like 1.5x). The important variable now is the denoising value. 1.75x scale and 0.3 is a very safe choice. The higher your scale, the lower your denoise will have to be to compensate.
Make sure your prompt is the same as your base image, hit generate, wait for it to finish. You should have a bigger image, with hopefully higher detailing and no fucky limbs. If limbs come out fucky, try a lower denoise or smaller scale. Some fuckiness is hard to avoid, even at safe denoise levels and often needs to be inpainted away after, an example would be the common 'double navel' issue.
There is a definitive point of diminishing returns, where your scaling makes no sense anymore, as you have to compensate with tiny denoise values. Going above 2x scale is largely pointless imo. This primarily has to do with hitting the limits of what SDXL can accomplish.
Hires.Fix
Chances are you have already used Img2Img to upscale:
Hires.Fix is a series of tasks, that get chained into one function for convenience. The order of operation is as follows:
Basegen - Simple Upscaler - Img2Img upscaling
Generally speaking, you would not want to have Hirex.fix enabled all the time. This is something you can enable on a good image candidate to generate a higher resolution version of it, similar to the img2img upscaling method above, just with a little more convenience. The big difference is that it also chains in a simple upscaler automatically. The upscaling model I recommend for general purpose stuff is 4x_NMKD-Siax_200k (Installed in the models -> ESRGAN folder, if the folder does not exist, create it).
Here's the kicker, the specific simple upscaler matters surprisingly little, if you are doing AI upscaling after. All those fine details get mushed anyway. Does it hurt to do a simple upscaler instead of just letting img2img stretch it? Not really. It does add some non significant generation times on top however.
Tip: Hit the✨ below the finished base image and it will do hires.fix with your current settings, skipping the first step where it would generate your image. I believe this button is Forge/reForge exclusive. Make sure to set your settings before you hit the button! You don't have to actually tick Hires.fix, just fill in the values.
Default upscaler
In the webUI you can choose a default simple upscaling model to use for img2img and inpainting. This is in the options somewhere if you type "upscaler" in the searchbar. I only recommend this on fast GPUs.
Examples and workflow
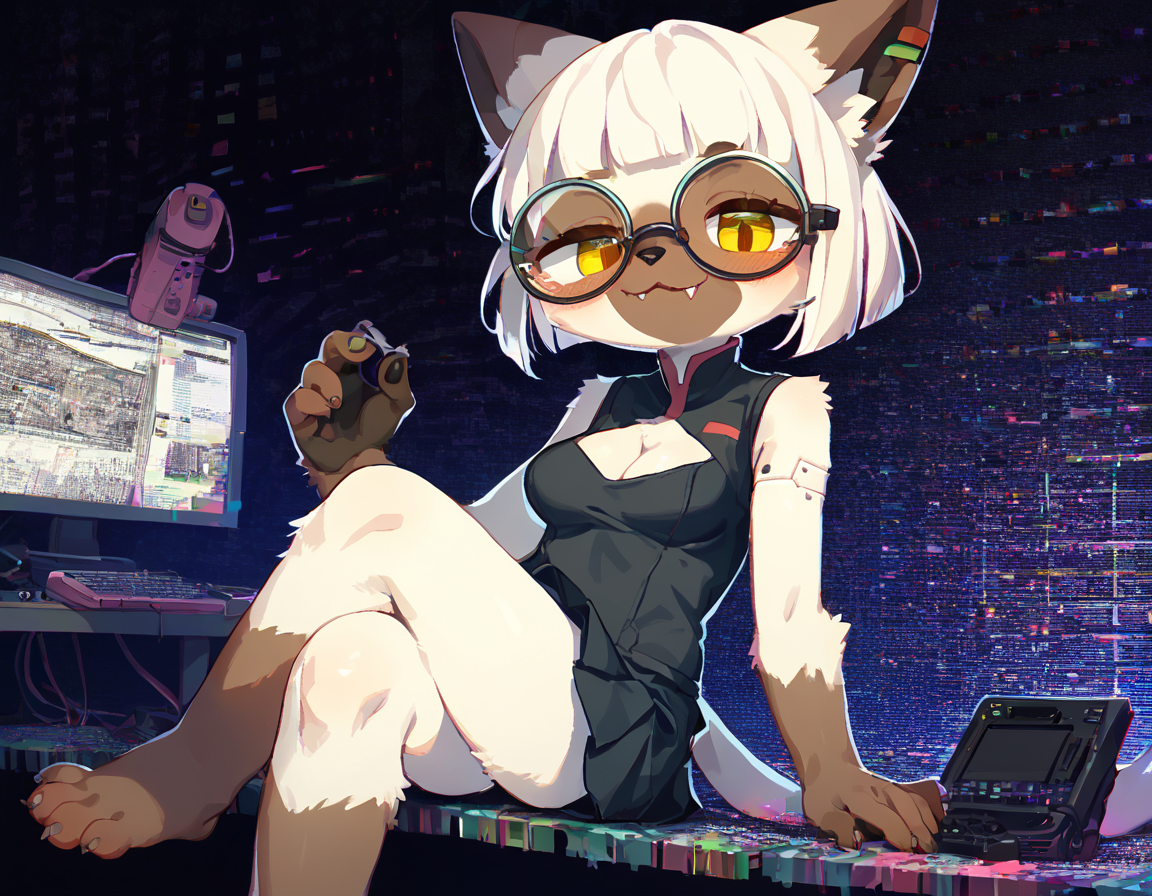
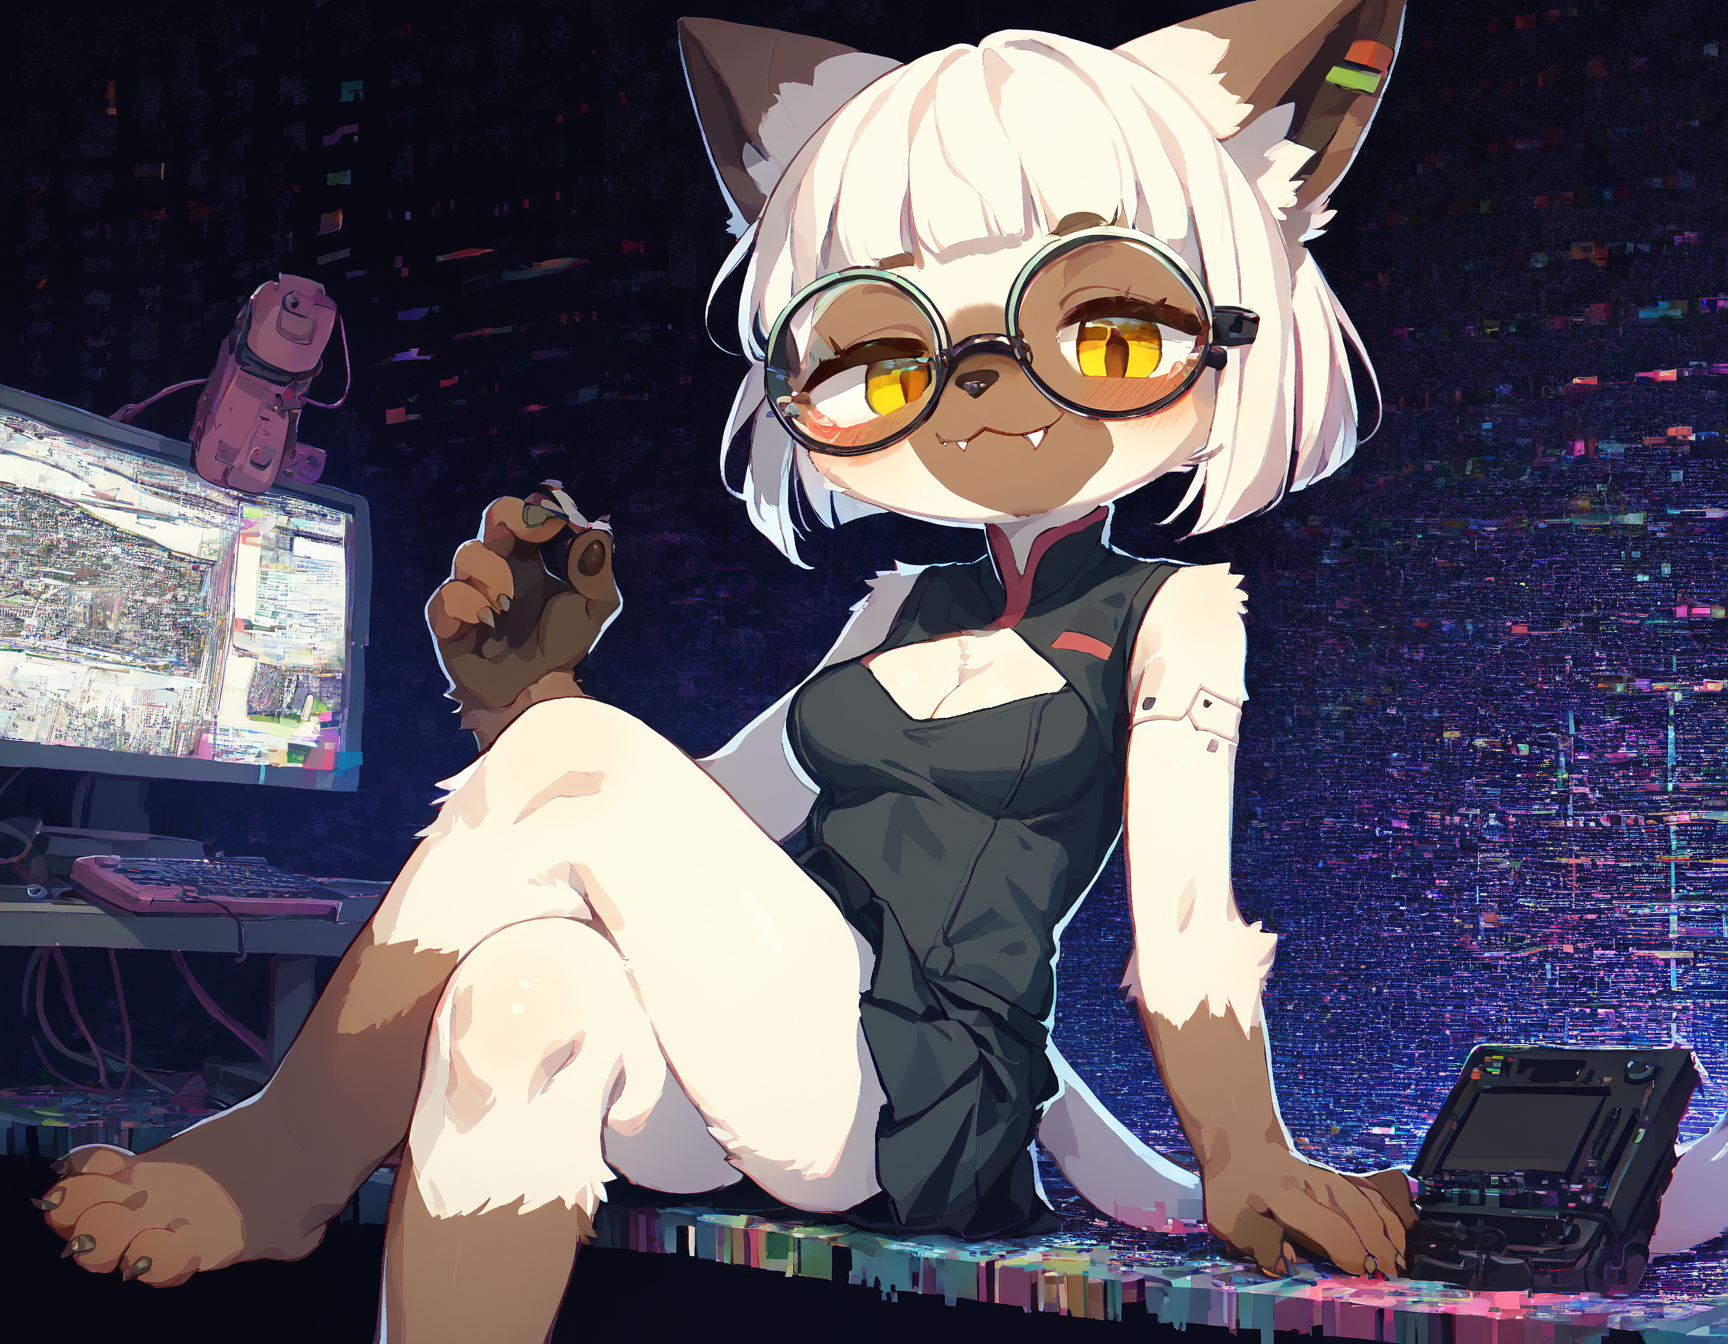
Using 0.3 Denoise and for Hires.fix the 4x_NMKD-Siax_200k upscaler.
| Initial | Img2Img | Hires.Fix |
|---|---|---|
 |
 |
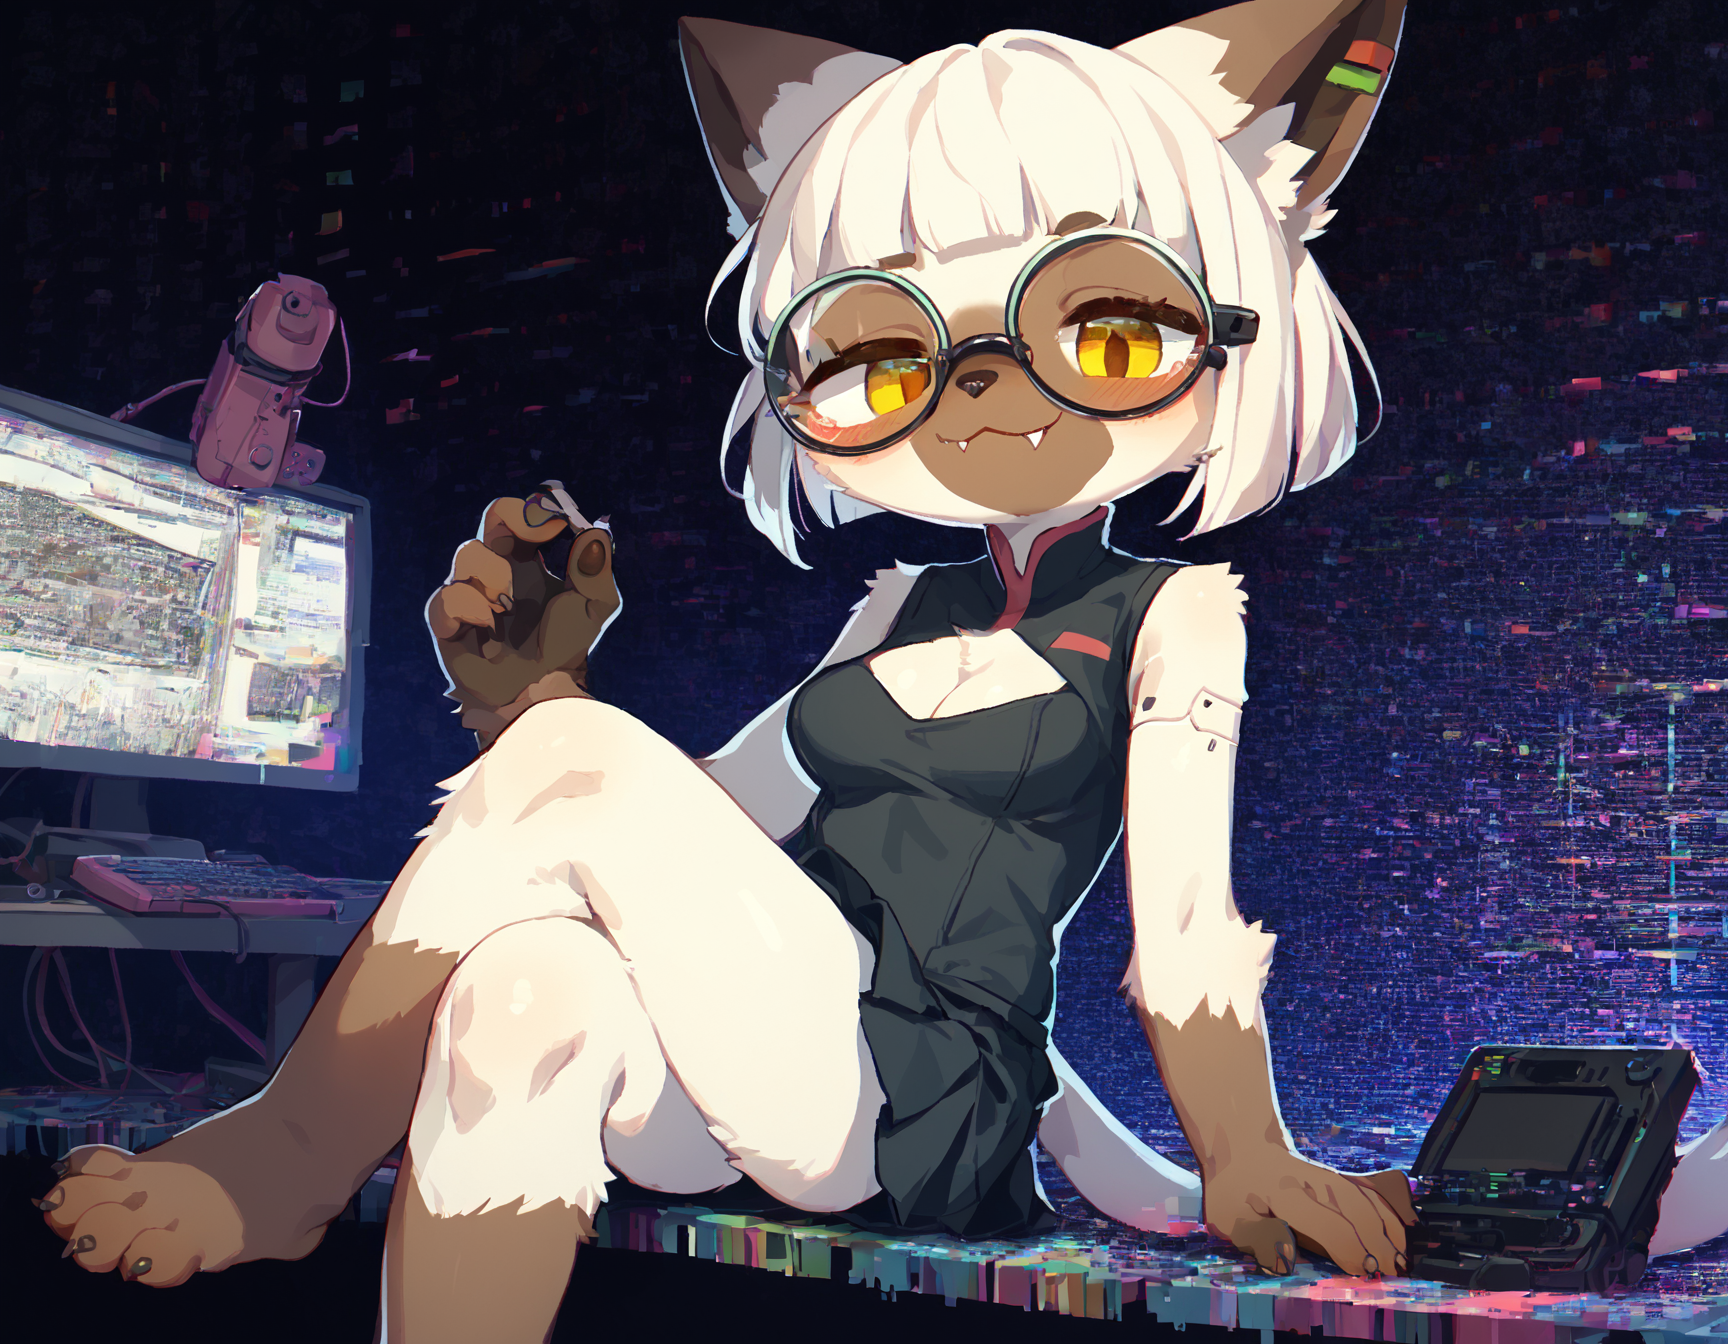 |
I specifically chose an image that's a bit noisy and shows off some practical detailing differences. The fingernails are good examples, upscaling did improve those quite significantly. 0.3 Denoise is also a fairly safe value, higher values would add better and more intricate detailing but run the risk of extra limbs and that sorta stuff. I rarely go beyond 0.4 ever, mostly since I still inpaint for detailing. I also want to point out that there's not a huge difference between the img2img and hires.fix versions, and they are mostly differing through simple seed differences and by chance.
The general workflow for upscaling goes something like this:
Generate candidates - When you find one you tap the ✨to hires.fix - You now have a larger pic that you can jack off to or inpaint or whatever
Summary:
- Start with low resolution multipliers and low denoising. The higher the resolution scale or the denoise the higher the risk is for extra limbs, for the same reasons that you wouldn't do your basegen res at much higher resolutions. You can go fairly high, 2x 0.3 denoise still works for plenty of pics. Experiment.
- Don't upscale every single image. Unless you are running a fat ass GPU farm you are wasting your time. Generate candidates and then upscale individual pieces you like.
- If fucky limbs annoy you, you will eventually need to learn how to inpaint to fix stuff. Inpainting is extremely powerful, if hard to get into and a bit tedious (hence why this guide has a fuckhuge inpainting section, how convenient!)
- Upscale resolution is one of the primary VRAM bottlenecks for AI image generation. If you go too high and hit your VRAM cap it will drastically slow down. Try to find your sweetspot, for me on Forge on a 3060 12GB Vram card a 2X upscale takes like 2.30minutes.
- Not all images need a fancy AI upscale, legit an extras tab simple upscale is often enough to make an image presentable, especially if it's a smoother simpler style.
Appendum
Latent Upscaling
Using Latent as your upscaling model works slightly different. Here you need significantly higher denoise values, around the 0.7 mark. I don't recommend using this. Cumbersome to work with, prone to changing your image.
UltimateSDUpscale
An extension that lets you overcome VRAM bottlenecks by chunking parts of the image, and then automatically upscale those and piece them back together. There used to be a LARGE section on this in this guide, I removed it because it is very difficult to get consistent results from it. It's slow, it's clunky. Technically it can create very large very detailed images, but in 99% of cases it needs manual cleanup through inpainting and image editing, so for the sake of this guide I removed it for now.
Inpainting V2
Summary
Inpainting is perhaps the most powerful tool in a genners arsenal. Not only can you fix mistakes, you can also direct entire portions of an image to be different, and it will blend regions seamlessly. If done properly, it can also enhance details quite drastically.
There's many ways to inpaint. There's a Krita plugin that merges inpaint functionality into the popular Image editor/drawing software directly
I will focus on my way, which is to just use the reForge WebUI inpainting. It's not the prettiest, sometimes it's a bit jank, but it does the job well, measured in real time and convenience.
All concepts will still apply if you use Forge and Comfy, though your UI may look slightly different.
On different models
PonyXL and NoobAI based models are pretty smart, so they are also context aware during inpainting (this means they are good!).
Lightning models like ChromaXL, SeaArtXL or Zoinks are specifically bad for inpainting, switch to a regular 30 step model.
SD1.5 model mileage varies, I don't have much experience.
The old inpaint guide can be found here InpaintV1
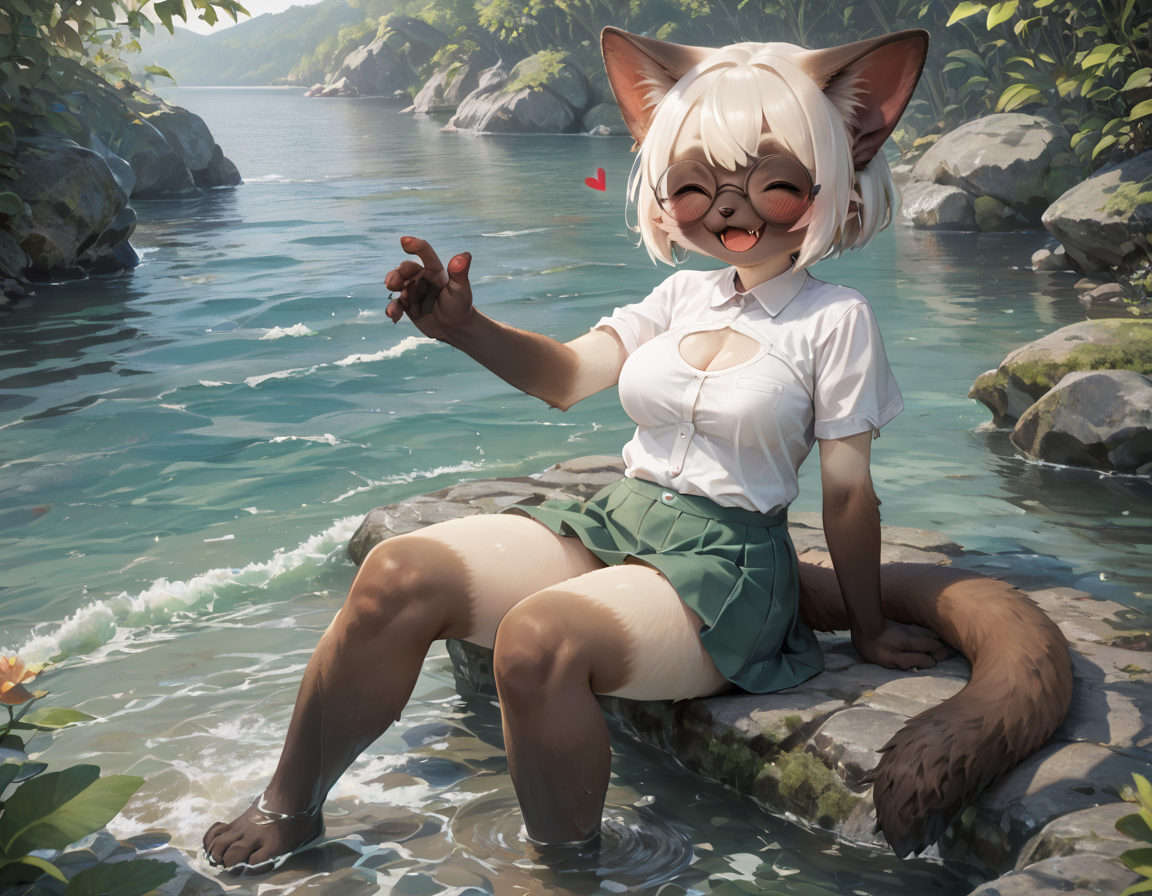
Dorkcat V2
Prompt:
score_9, score_8_up, score_7_up, score_6_up, source_furry, depth of field,
detailed background, atmospheric lighting,
from above, sitting, wave, forest, lake, submerged legs, wave,
female, anthro, (siamese), (young, kemono:0.8), round glasses, librarian, summer, skirt, love, blush, cleavage cutout, bob cut, white hair, medium breasts, happy, smiling, 4 toes, eyes closed, <3, open mouth, fangs, tail, clothes, [white|green] clothing,
<lora:syurof:0.9> <lora:Realistic000003_1_2.5DAnime_0.05_Merge1:0.5> <lora:tianliang_duohe_fangdongye_last_e40_n40:0.3> <lora:p:0.3>
Negative:
blurry, low res, text, source_pony,
score_5, score_4,
For this version of the guide I used loras in the basegen. These are not required, I merely wanted higher quality examples.
Fundamental Terms
Context&Padding
The first thing to understand about inpainting is "Context".
Practically speaking, Inpainting and Img2img
In Img2Img the entire image becomes the "Context", in masked inpainting you specify an area to be re-generated by drawing a mask, then an area around it will additionally be presented to the AI depending on the "Padding" value. This is very important, as the AI needs to know what it's looking at, since it only gets presented with a partial version of the full image.
Let me illustrate:
In this example I want to change her hand to have 5 fingers instead of the mangled 4 she has. You can observe the total context area in the generation preview once you start generating.
Here's the generation at 0 "masked padding".
To the AI, it just saw a brown vaguely hand shaped object. Now it has a prompt that talks about a siamese dorky librarian cat, and what do we get? A malignant furby growing out of her arm. The reason for this is the AI tries to 'solve' the image like it would any other.
So why don't we just reduce the prompt to just talk about (hand, 5 fingers)? Well, similar problems persist. The AI lacks context even here. Which way is the hand facing? Is that even an arm? What tends to happen is you may end up with the hand you asked for, but it doesn't go nearly the right way, or look feline like we wanted.
If you see the term Pseudolimb used, this is what is meant. I prefer the term over hallucination because it has a more specific meaning. Whenever the AI does not understand what it's looking at and instead tries to place "copies" of the main gen in there, that's a Pseudolimb.
Here's what happens if we put the "masked padding" value to the maximum of 256.
As you can see in the preview, the AI can see part of her face, which is usually a very strong reference point for the AI to know what's going on. The more context is given the more confident the AI is in piecing things together, correctly angling the hand.
Looking much better already! It even placed a little heart awwww (this is because of the <3 prompt, definitely something that should get dropped from the prompt).
So why don't we just keep the padding maxed like this, always. Well,
Brain Resolution
For lack of a better term there is something I call 'Brain Resolution'. AI models are trained on specific resolutions. SD1.5 models around the 512-768 range, and SDXL model like PonyXL here on 1024. When we do masked inpainting we already saw how only a fraction of the total image gets presented to the AI, it then focuses all that brainpower on that section, and tries to solve it.
The reason why "AI is bad at hands" is partially related to this. Fine details that require a ton of 'brainpower' like correctly doing hands, (after all, this is a classic problem even for real artists) tend to not get enough love. When we now focus on only the hand (and the padded area around it) the AI can really 'concentrate' on doing things correctly... and detailed.
The reason we might not want to crank our padding up very high is because, if the AI hyperfocuses on an area, it also tends to enhance details. In the case of the hand, there might be a sweetspot padding value where the AI 'understands' what it's supposed to regenerate, making a better hand at high detail.
Depending on the actual image resolution you are working with this tends to also manifest in different padding values, and wildly different levels of detail.
Denoise
Denoise determines how many steps the original image occupies when doing your inpaint. At 0.5 denoise and 30 steps the generation treats the original masked region as the first 15 steps, then does it's own thing for the last 15. This has several implications. On dpm++2m karras, images do not get solved/converge in a linear manner. This means that the difference between say, 0.3 and 0.35 denoise, is far far smaller than the effect between 0.7 and 0.75.
Generally speaking the denoise works in tandem with padding, this means that if you were to choose a lower denoise, you also often require less padding.
What value of denoise you choose is primarily dependant on what your change is. Want to blend in an area? 0.3. Want to enhance details? 0.45. Want to generate something new? 0.75. These values are some I use as baselines, as always you will have to go up and down depending on what you are working on.
Vibes:
A lot of the values I explicitly name are from experience and vibes based. These are values I tend to use at my Hires resolutions at around 2000x1600. For this tutorial all examples are at a more basic 1152x896 for convenience sake (and for page loading times).
Settings
Important Settings
Start by changing all the settings as per the image. If something is not mentioned either leave it as is or use common sense. Most of the options have hover tooltips.
Mask Blur: You can keep this at 4. Its like feathering in an image editor, it blends the masked area smoothly with the surroundings. Too little and you get strong seams, too much and it gets very blurry.
Masked Content: "Fill" will fill the masked area with a solid color, like using a paintbucket tool in an image editor. Don't actually use this. Use an image editor like photoshop/gimp instead to nudge the model for rougher edits.
"Original" takes your current image, use this 99% of the time. You can ignore the other 2 options.
Inpaint Area: IMPORTANT!!! ALWAYS ON ONLY MASKED; I REPEAT; ALWAYS ONLY MASKED. This is the entire reason we are here. If you were to do 'whole picture', you would ignore the masked padding value and send the entire image as context. This is a common mistake. If you were to have an upscaled image that's 2000x2000 you would use your 1024x1024 brain resolution on the whole canvas, blurring the shit out of it.
Sampler: Short answer, use the same sampler you generated your image with. Long answer? Some samplers are good to start your image with, but not to refine an already existing one. An example are ancestral samplers like EulerA, which on very low denoises may run into issues for inpainting/img2img specifically. Some samplers like DPM++ SDE may also enhance details, but that depends a lot on the model you are using. DDIM was a sampler that was touted as "specifically good for inpainting" for a long time, but it's kinda stinky imo. Scheduler choice somewhat matters, I have noticed some like AYS GITS not working terribly well. When in doubt choose simple or beta.
Soft Inpainting: Normally the masked area is a 1bit hard mask. Either it's masked or it's not. Soft inpainting gives the mask more nuance, being stronger in the center and softer on the edges. The overhead on this is about ~2seconds. I recommend toggling this and just leaving the default values.
Resolution: IMPORTANT!!! Use the models base resolution. On SDXL that is 1024x1024.
Note: NoobAI based models can generate at higher res, therefore you can experiment with a higher resolution for inpainting as well. I personally use 1344x1344 currently. You get some noticeable detail improvements.
If you are on SD1.5 then check your models base res, most good models work at 768x768.
Stable Diffusion models are trained on a specific resolution. We are using the base resolution, because inpainting, practically speaking, just generates a new image and uses your old image as part of the steps. We don't go higher or lower for the same reason as we wouldn't with text2image.
Useful Extra Settings:
You will send your generated inpainted image back into inpainting a lot. Normally this resets the resolution, and you have to manually change it each time.
Settings > User Interface > Send size when sending prompt or image to another interface [Off] fixes this issue, keeping the res consistent and only needing to be changed once on your initial inpaint. VERY useful.
Preparing your prompt
At this point I want to give a few hints and tips as to how you want to structure your prompts during inpainting. As you might already know, the hard cap for Stable Diffusion is actually 75 tokens. You can view how many tokens are you are already using in the WebUI in the top right of the prompt window. Back in the day, anything above 75 would just be ignored, however as things developed, the 'hack' is to instead separate tokens into blocks, this happens automatically. For example, once you breach 76 tokens you will see it switches to 76/150, which means 2 blocks. The BREAK keyword forces the current block to end prematurely. This is also why you see more drastic changes after breaching a threshold. A lot of the finickiness of working around the blocks is done by just ordering and formatting your base prompt properly. Important tags go first.
Here's what you should do once you send your image to inpainting:
Prompting:
- Attempt to keep the total token number under 150. The more token blocks, the harder it is to steer inpainting.
- Take your entire prompt at first, then remove ALL tokens that are not applicable to your image. If you genned (blue eyes) but they turned red? Either switch it to (red eyes) or drop it. In most cases I advise to drop them. There are also some tokens that are likely not critical anymore, such as certain background or lighting tags.
- Add tokens that are relevant to the area you are inpainting at the very top, on PonyXL this would be above the score tags even.
- Contrary to what you might think, you should NOT remove ALL tokens that aren't specifically related to the area you are inpainting. In many cases tags have bleedover and you would end up with mismatches. Only a few models respond better to hyperfocused prompts.
- A further advanced tip is in the 'Tricks' section.
Examples
Detailing Parts: A better Adetailer
Adetailer is simply a facial recognition algorithm that runs at the end of your generation, then it draws a mask around the face, then goes over it at a low denoise. If you think "Damn, that sounds just like inpainting" then yes, that's all it is. Ditching Adetailer to instead manually touch up your faces is not only faster but it also gives you much more control about the quality of the end product.
We can use high-ish denoise coupled with low-ish padding on the face, because it's an area packed with 'information'. The AI has an easy time recognizing it even with a smaller amount of context.
| Initial | Mask | Final |
|---|---|---|
A good indicator of quality here are the teeth. What makes this more convenient over Adetailer too is that you can just gen again if you don't like the result. Especially at higher denoises when you want to change more than just add detailing, you can roll the gacha.
As always you can adjust your prompt to reflect changes here. Want her eyes to be open? Swap (eyes closed), with (green eyes, looking at viewer). For changes like that you are looking at the 0.55-0.65 denoise range at least.
To reiterate; To get the best most fine detail you want as little padding as possible, and high denoise up to a certain point. If something breaks, increase padding or lower denoise.
Changing Parts: A better controlnet
Changing major parts requires a bit of practice, but isn't actually too hard.
First of all you, need at least around ~0.7 denoise for major regions to start changing. For major regions I also recommend starting at the maximum padding.
Importantly, you want to mask generously. In this example I want to make her spread her legs (😳) and show her panties (😳) because currently her foot is vanishing into the void. This means I not only need to mask where her leg currently is, but also where I want her leg to end up.
| Mask | Final |
|---|---|
Using high denoise values tends to result in seams. You can kinda see a seam between the leg and tail, where the Ai "ran out of space".
I personally like to just go over on the result again, on a lower padding and denoise.
| Mask | Final |
|---|---|
You can even use the mask you used prior for this, and extend it out a bit over the seams. In this example I just drew a new one over the leg.
Tricks
Use image editors
Using a regular image editor like Gimp or Krita helps A TON.
Lets say I suddenly wanted a horsecock in my scene. I would simple draw a fat black bar somewhere, append (horsecock), to my prompt, and mask over it at 0.7 denoise and maximum padding. Think about guiding the AI as if it was an auto-complete for images. By giving it a rough shape, you are basically forcing it to turn that shape into something and since there is no horsecock yet, it will very likely turn into one.
Image editors also help immensely because you can cut->move bodyparts easily, then blend them over with a 0.3 denoise mask. It's INCREDIBLY convenient.
Most of the complex pieces and comics you see done with AI are made with this sort of workflow.
Direct context drawing: Fixing a hand far away from the main body
A very simple trick actually, but one that's incredibly useful. When setting the masked padding value the masked area's context expands around it in all 4 directions, yet some areas are more useful to include.
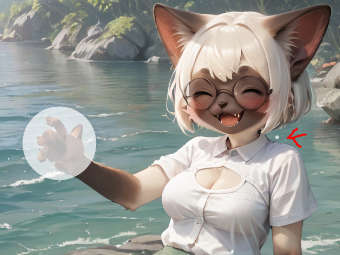
In this example I drew the same mask over the hand, but with a low padding, then draw a tiny area mask under her ear. That dot can be smaller too if you wish, I recommend placing it in an area with a flat color. This will draw the context to be from your main mask, to the other region you specified. This makes it very easy to draw direct context areas around the key areas you actually need, ensuring you use JUST enough padding.
As you can see unlike our prior example we avoid all the water areas to the left which are irrelevant for the hand to 'know' where it has to go. You could technically do most of your context areas this way, these days I find myself doing it more and more because it significantly reduces the need to eyeball padding values. Other frontends also let you draw context boxes more directly. It's one area where the WebUI is unfortunately a bit jank.
This technique is especially useful for bodyparts that are far away from the main body
Prompt adjustment for the lazy
A trick I sometimes use to adjust my prompt, is to wrap the main body in a (:0.9) bracket, and then put whatever I'm working with at the top. That way the rest is still there for the AI to adjust towards, but it focuses directly on what I'm working on. Remember, a lot of tags have bleedover. For example, if you were to prompt (kimono), you are more likely to end up with Japanese backgrounds. Removing parts of your prompt that aren't "relevant" to your current mask isn't actually what you want to do in 99% of cases.
Prompt:
(5 fingers:1.1),
score_9, score_8_up, score_7_up, score_6_up, source_furry, depth of field,
detailed background, atmospheric lighting,
(from above, sitting, wave, forest, lake, submerged legs, wave,
female, anthro, (siamese), (young, kemono:0.8), round glasses, librarian, summer, skirt, love, blush, cleavage cutout, bob cut, white hair, medium breasts, happy, smiling, 4 toes, eyes closed, <3, open mouth, fangs, tail, clothes, [white|green] clothing:0.9),
<lora:syurof:0.9> <lora:Realistic000003_1_2.5DAnime_0.05_Merge1:0.5> <lora:tianliang_duohe_fangdongye_last_e40_n40:0.3> <lora:p:0.3>
Plan ahead in your basegen
There are some prompts that create problems for inpainting down the line. (musk, steam) for some sniffclouds might look decent in your basegen, however they blend terribly during inpainting as they are essentially just noise. If you plan to inpaint anyway, consider dropping those prompts from your rawgen, then add them back in when you for example detail inpaint the crotch area.
You can also just leave certain specific detailing for later. (camel toe) could be added later during inpainting, unclogging your base prompt a little.
Lama inpainting: Easily remove watermarks and objects
Lama Inpainting adds an additional option to the (fill) and (original) content selection. You can read the documentation, in short it's a controlnet that is specialized in removing content. It works very very well, not just for removing watermarks, but also for redundant objects.
You use it the exact same as you would regular masked inpainting.
FAQ
What's a "Pseudolimb" or "Hallucination"? / "I am getting random limbs everywhere!"
- Pseudolimbs is what I call extra limbs, faces, or entire characters inside of an image. This can occur when A: You are generating an image at a much higher resolution than the model is trained for, or B: When you regenerate parts of the image at high denoising strengths (Inpainting/UltimateSDUpscale). Always make sure to match your models resolution during masked inpainting. Pseudolimbs are a side effect of your prompting and reducing the generation area. If the AI reads "Draw me a dorky cat" and gets a small quadrant to work with, it's gonna try to place one in there. The reason we don't just use blank prompts is that it still carries a lot of implicit data. If I fix a hand and remove everything but the prompts directly related to the cat and her hands, then it might forget other things. Could be gloves, it could also just imagine a different fur color. Plus it's also simply a convenience thing. Your mileage may vary. I mostly use the trick in "Prompt adjustment for the lazy" currently.
What about Kohya HRfix?
- I played with it a bunch, it tends to create artifacts, but of a different sort than the other alternatives. This is a good option if you are really strained for VRam, or your card gens super slowly. Try to just use the default values, occasionally you have to crank the block number to 4 if the image starts becoming noisy. I found that 1380x1280 or so was very safe for PDXL.
Does sampler choice matter?
- For SDXL I primarily use DPM++ 2M Karras these days. DDIM is a sampler that's specifically suited for inpainting, as it's more sensitive to the surrounding area. It's very good, and only rarely will run into issues. Say a black furred cat touches a white furred cat, if the context isn't sufficient it might take the black cats fur color and try to match your masked area over the white one. However it can usually be wrangled quite nicely if you do things correctly already.
My inpainted area looks stylistically different from the rest!
- Often a prompt issue. A lot of prompts carry more information than one might think. Dork cat wears round glasses in a medieval fantasy world. If I remove the glasses she is less likely to generate in cities that look like universities. If I attempt to refine a background bush and remove all of the character prompting then the AI might get lost. This is why I rarely actually adjust the prompt during Inpainting unless I have to, often opting to just give it a lower weight. If you are worried about seams, try another large mask and run 0.3 denoise over it.
My generated thing is cut off!
- Masked inpainting only lets the AI work in the given area. It will take the surrounding area into account, but it may not generate outside of it. This means that for example, if you try to correct a leg, the leg might cut off at the end when it reaches the mask edge. This can commonly happen with more aggressive inpaint settings such as high denoise or using "fill". You can usually fix this with a second inpaint pass, over the seam area, with large padding and low denoise.
My inpainted area has smudgy edges or doesn't blend in properly!
- Consider doing another pass, send it back to inpaint and mask generously around it and re-gen at 0.3 denoise. This is useful in general to smooth out edges. Preventing this is not easy, it's somewhat inevitable the higher you go on the denoise.
What about the "Refiner" option in the webUI?
- The refiner is literally just an Img2Img swap after a specific step. What makes it convenient is it loads models into your ram at the same time, so swapping and doing it's refining pass is fast and automatic. Unfortunately the vram/ram requirements to have 2 models loaded are too significant for most mortal men, so I never used it. But just running an Img2Img pass on a second model does give similar results.
Adetailer
- Adetailer is a facial recognition Algorithm that will do an inpaint pass at the end of your base generation. Inpainting manually will do the same and often better. Unless you need the process automated for peak sloppa throughput, you should be inpainting.
Some common mistakes.
- Forgetting to swap the resolution during masked inpainting back to the models default. Hitting "Send to Inpainting" below the preview also sets it to the image res, which is often higher. Consider setting "Send size when sending prompt or image to another interface [Off]" in the settings.
- Not using a proper prompt during Img2Img or Inpainting, or not using a prompt at all. I see the latter one a lot.
- Not being on the correct settings. Most commonly the masked area toggle.