Stable Diffusion General Install Guide


Welcome
This guide will lead you through the steps to do a basic installation of some of the currently popular UIs for local generation. It is very illustrated to cover every step of the installation process, especially for reForge. Take your time!
While this guide only covers basic installation steps, lots of additional information can be found in the sdgguide.
As usual this guide is eternally WIP.


Introduction
AMD AMD AMD
This guide assumes you have a CUDA compatible NVidia GPU. Sadly I have no personal experience with current AMD GPUs but I got a recommendation for these guides to set up the various UIs for them:
https://github.com/CS1o/Stable-Diffusion-Info/wiki/Webui-Installation-Guides#amd-install-guides
Setting up an UI for image generation is luckily pretty easy nowadays.
- reForge
is a popular choice but has the most "complex" setup as you have to install two prerequisites manually. This guide will show you every step that needs to be done in detail
has a few QoL extensions built-in
is very stable - Forge
has a portable version that you can just extract into any folder and are ready to go.
currently stable too, often implements experimental features which might make it more unstable for a while - ComfyUI
has a portable version too, but you will want to have one specific addon, and that needs you to install Git, so its the middle ground.
is the most customizable UI with a lot of cutting edge extensions, but has a steep learning curve
Another option is using Stability Matrix, kind of an installation and package manager for various UIs which hides the technical stuff from you. You can use it to install any of the UIs (and more), but it comes with overhead that you might not need and modifies the installed UIs a bit so that not everything you will see in guides and tutorials around the web might work as it does on a native UI install.
As Forge and reForge are both webUI forks and work very similiar, some sections apply to both of them equally. Those sections will be located in the reForge chapter.
This guide was written using a brand new Windows 11 Version 24H2 64-bit install. It focuses mostly on the parts required by the UIs.
It assumes that you have installed the latest updates, all drivers for your hardware including current NVidia drivers. Everything will be installed in a folder "C:\SD", but of course you can use any folder or any other drive.
Warning
Do not use a folder/path that contains empty spaces as this might lead to issues!
Do not use a deeply nested folder as the UI installs create a lot of subdirectories and you might run into "path too long" issues!
Example folder used in this guide
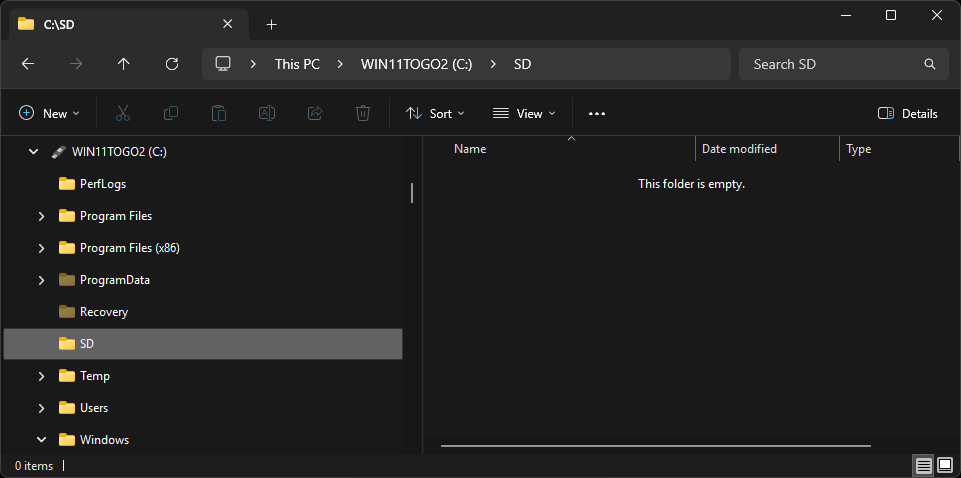
Branches / Channels (used interchangeably)
Most of the UIs are available in different "channels", called like main, stable, dev or similiar. These are used to test new features but only enable them for people who explicitly want to beta-test them. The main/stable channel of any UI is the one that has undergone this testing and has been choosen for general use. Sometimes it can happen that a feature you want to use is only available on a dev or test channel version. In this case you would use the checkout command to change to this channel, e.g. "git checkout dev". Be aware that this will change your current installation, if you want to test some features independently you will need to set up a second UI installation. You can change back to main anytime by the same process though.
Multiple installations in parallel
If you plan to install multiple UIs manually, check the SDG FAQ on a tip how to use the same directory to store your models etc. to save disk space

Prerequisites/Recommendations
Here are some general prerequisites/recommendations to install before setting up any of the UIs.
- 7-Zip
https://7-zip.org/
Powerful freeware tool to handle most types of archives and more - Microsoft Visual C++ 2015 Redistributable
https://www.microsoft.com/en-us/download/details.aspx?id=48145
This is required for various modules and may already be installed on your system from other software setups - Microsoft Visual C++ 2015-2022 Redistributable
https://learn.microsoft.com/en-us/cpp/windows/latest-supported-vc-redist?view=msvc-170#visual-studio-2015-2017-2019-and-2022
This is required for various modules and may already be installed on your system from other software setups - Ifranview
https://www.irfanview.com/64bit.htm
Sophisticated freeware image viewer with (bulk) conversion features - Krita
https://krita.org/en/download/
Powerful freeware Photoshop-style image editor. Complex, but can do everything. - Paint.NET
https://www.getpaint.net/download.html#download
Alternative to Krita, freeware, less features but still sufficient for most SD related image editing tasks - Notepad++
https://notepad-plus-plus.org/downloads/
Powerful freeware textfile editor with lots of useful plugins


Reforge
A portable version of reForge can be downloaded here: https://huggingface.co/datasets/Xeno443/reForge-portable
If you want to install reForge the "classic" way, continue with the following steps.
Install Git
This guide assumes that you need Git only to install reForge. If you already have Git installed or have different requirements, you probably know enough about it to skip this section
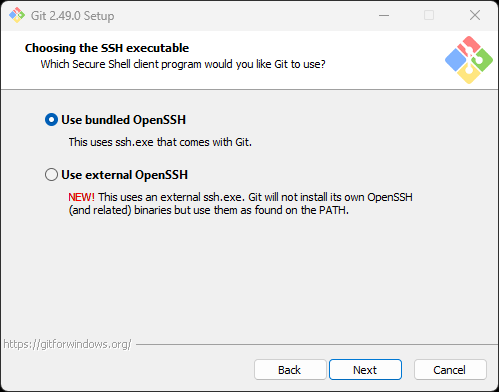
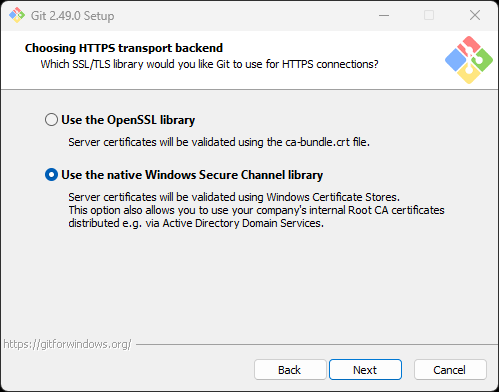
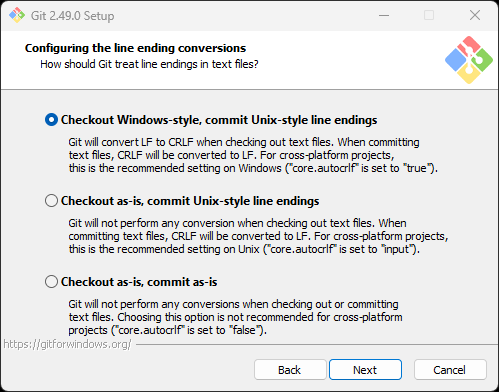
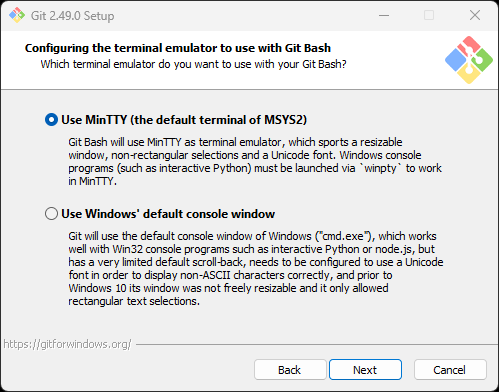
Browse to https://git-scm.com/downloads/win and download the latest 64bit standalone installer for Git and run it as administrator
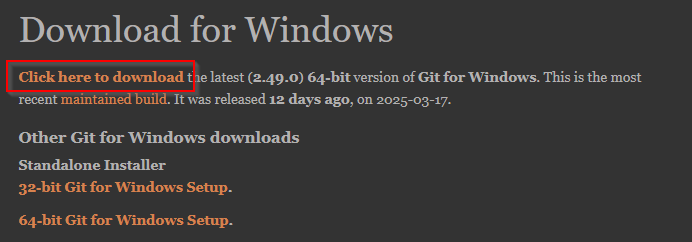

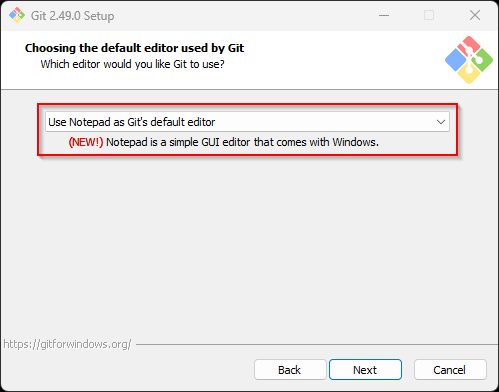
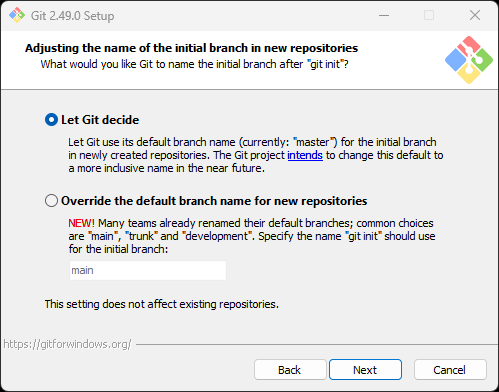
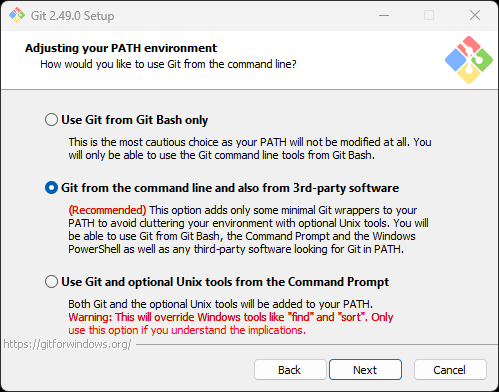
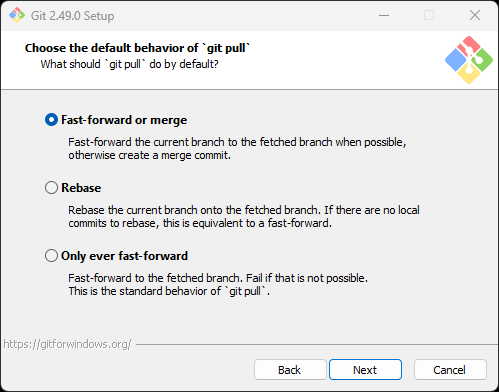
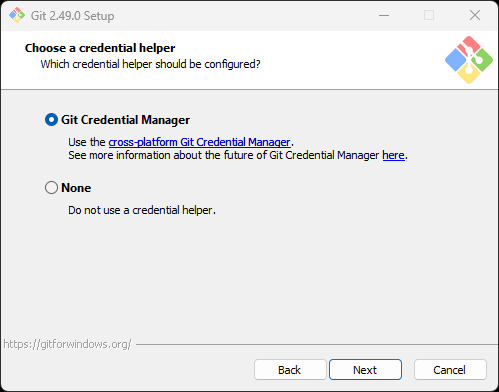
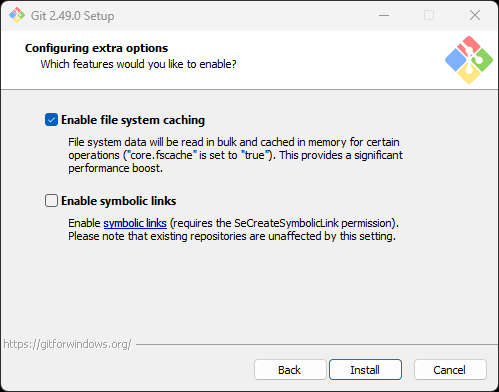
It will ask you a lot of stuff that you can just leave on default with one exception:
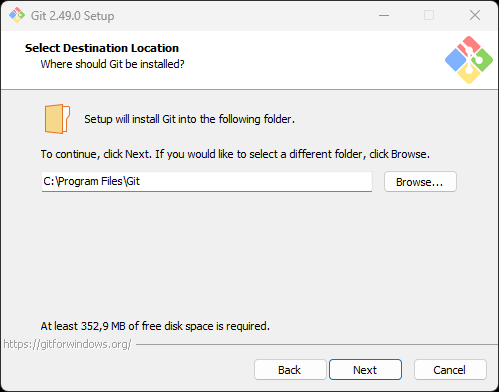
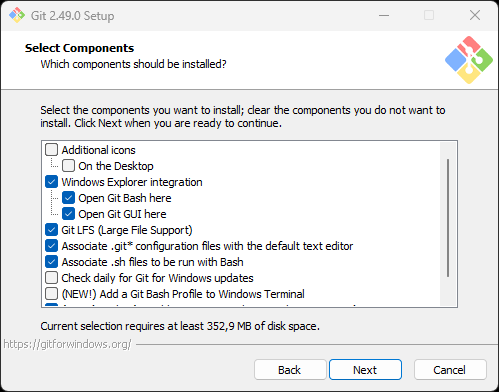
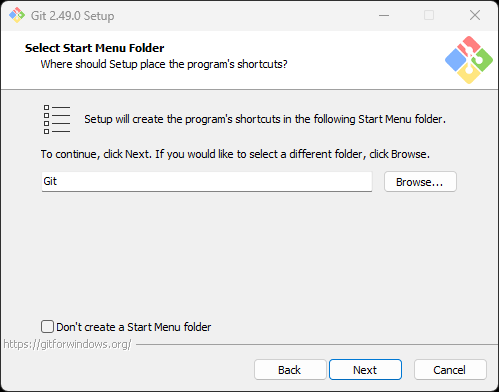
I would recommend to change the editor from "vim" to "notepad" in step 4


Install Python
In earlier versions reForge only worked with Python version 3.10.6. In recent updates the compatibility was improved though there are reports that using the latest versions still causes issues/crashes. This guide assumes that you need to install Python solely for reForge, so we will use version 3.10.11 which was the latest one based on 3.10 that comes with a full installer.
Browse to https://www.python.org/downloads/release/python-31011/ and download the Windows installer (64 bit) and run it as administrator


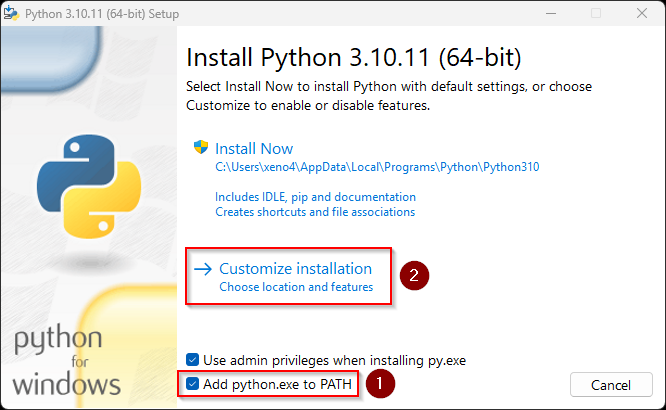
Step 1
Enable the checkbox "Add python.exe to PATH", then click on "Customize Installation"

Step 2
Leave all "Optional Features" as is
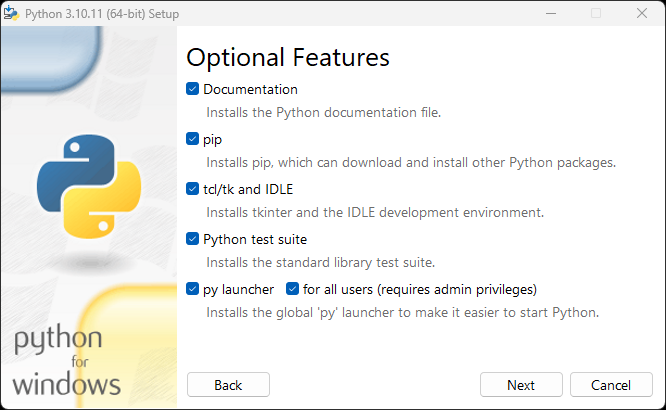

Step 3
Enable the checkbox "Install Python 3.10 for all users". This will also change the installation location
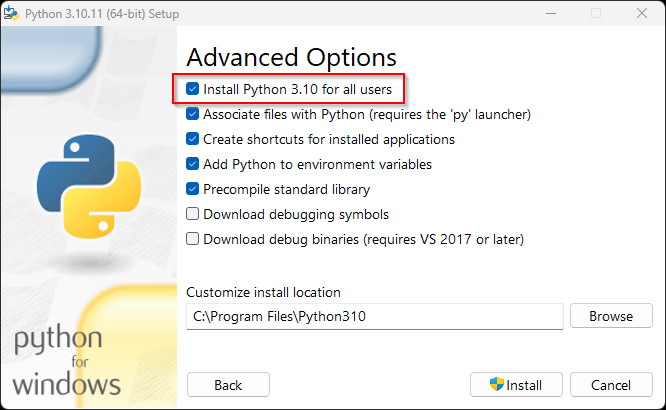

Step 4
After the setup completed successfully, click the "Disable path length limit", then click on "Close" to finish
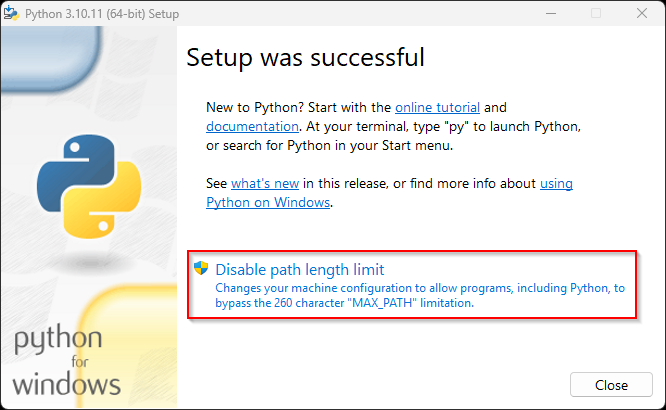


Install (clone) reForge via Git
Now that the prerequisites are fulfilled we can clone the reForge Git repository into our folder. Right-click the "C:\SD" folder in Windows Explorer. If you are using Windows 11, you will need to select "Show more options" (or shift+right click) to open the classic context menu which contains the full list. Select "Open Git Bash here" from that list.
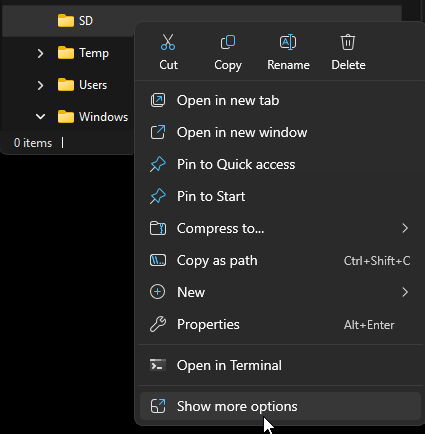
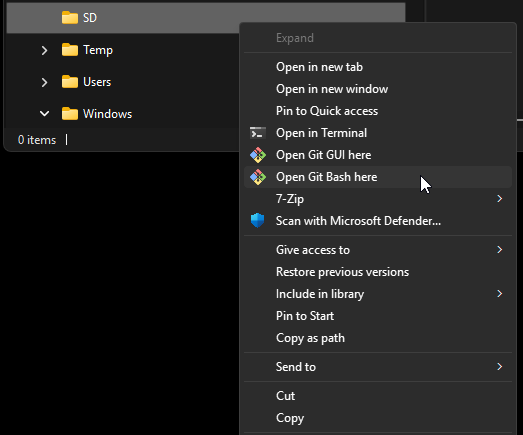

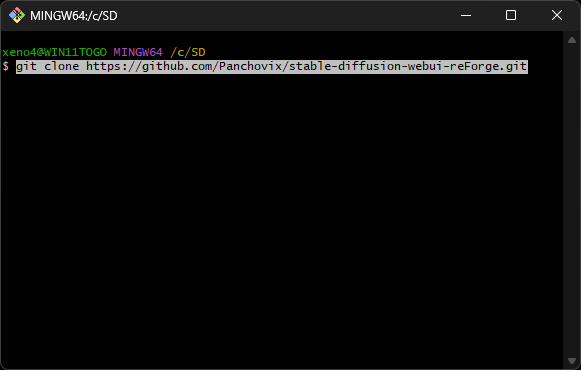
After a while a command prompt style bash window will appear and it should be located in "C:\SD". Copy the following command into that window and execute it. It will start to download the base files from the official reForge Github:
git clone https://github.com/Panchovix/stable-diffusion-webui-reForge.git

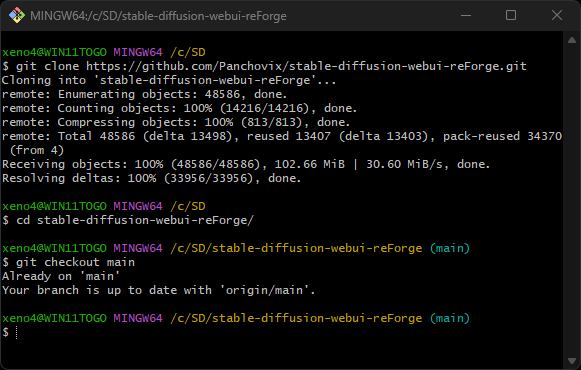
Once it has completed successfully, change into the newly created folder ("cd stable-diffusion-webui-reForge") and type the following command
git checkout main
This should confirm that you are on the main channel and no further updates are currently available.


Start reForge (first-run)
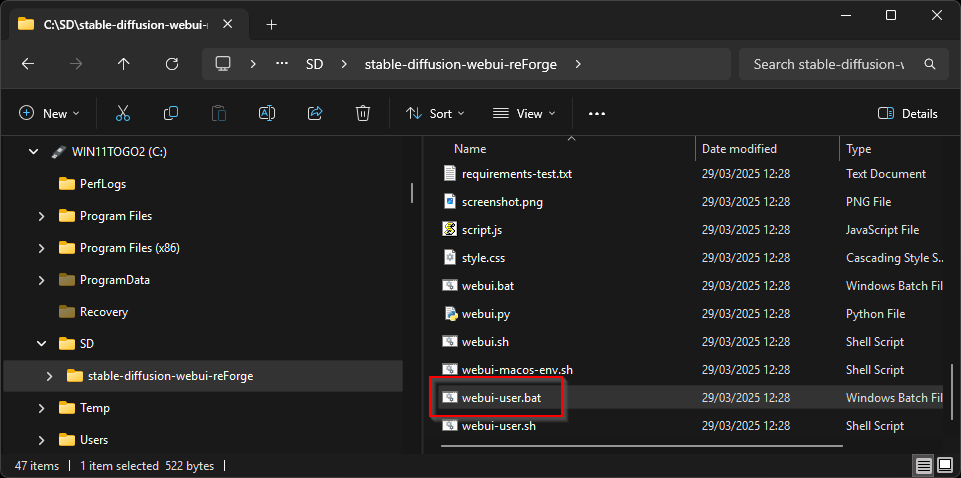
After the Git repository has been successfully downloaded, browse to the newly created reForge folder in "C:\SD" and launch the webui-user.bat

On the first run, it will start to download and install a lot of additional base components required. This can take a few minutes in which the console window intermittently will not update with any new output. Check with task manager, but just give it time to complete everything.
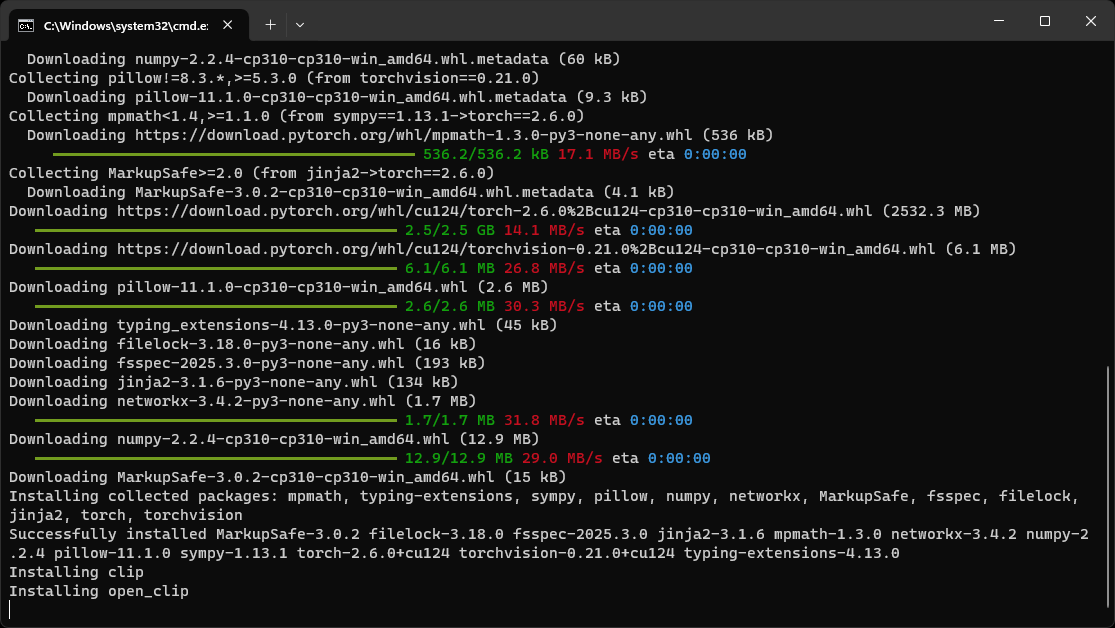
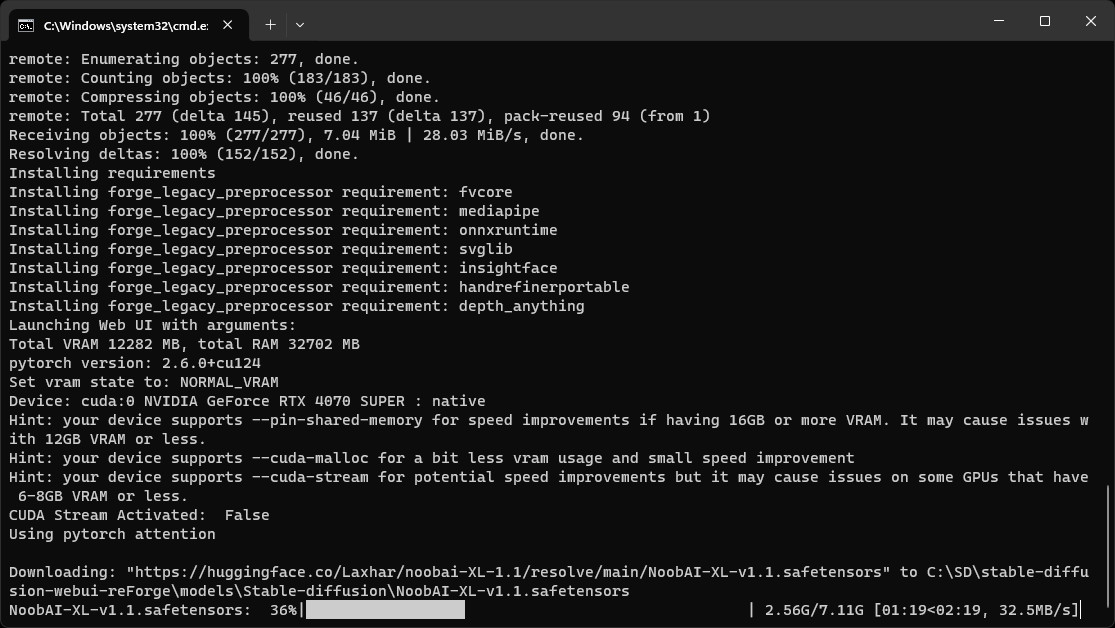

Once all the components have installed successfully a new browser window/tab will open and show you the default reForge GUI
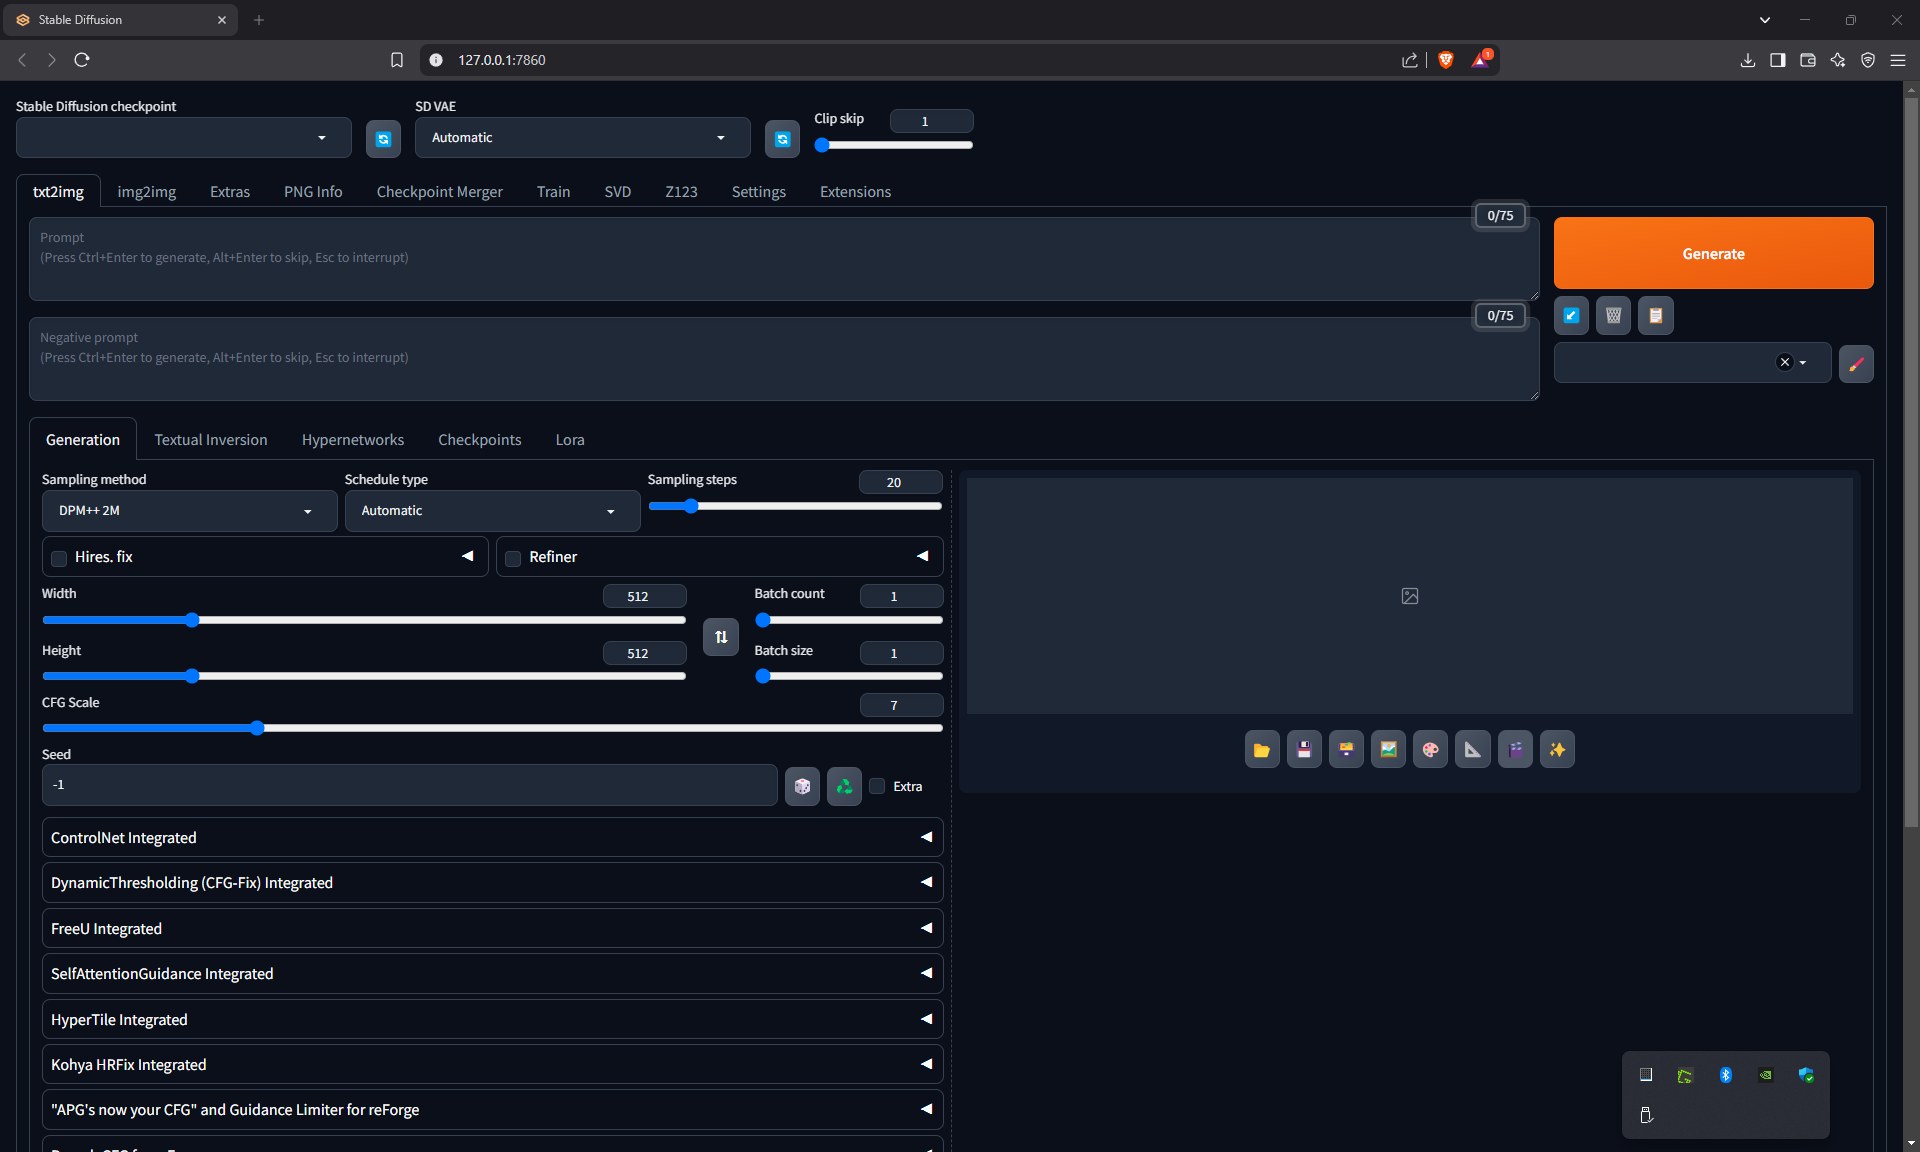


Extensions
reForge already comes with a lot of extensions by default. You can access the list of installed extensions to add and remove some via the "Extensions" tab in the UI.
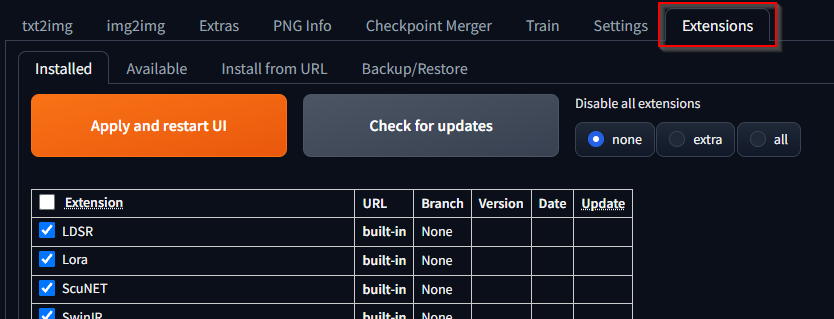
Disable rarely used extensions
A lot of them are only useful for (very) specific use cases so if you are just starting out on your journey you can disable these to have a leaner UI. This does not uninstall any of them and you can reenable them anytime! Clear the checkbox in front of these and "Apply and restart UI":
mahiro_reforge
reForge-APGIsYourCFG
sd_forge_dynamic_thresholding
sd_forge_freeu
sd_forge_hypertile
sd_forge_kohya_hrfix
sd_forge_multidiffusion
sd_forge_sag
sd_forge_svd
sd_forge_z123
Add useful extensions
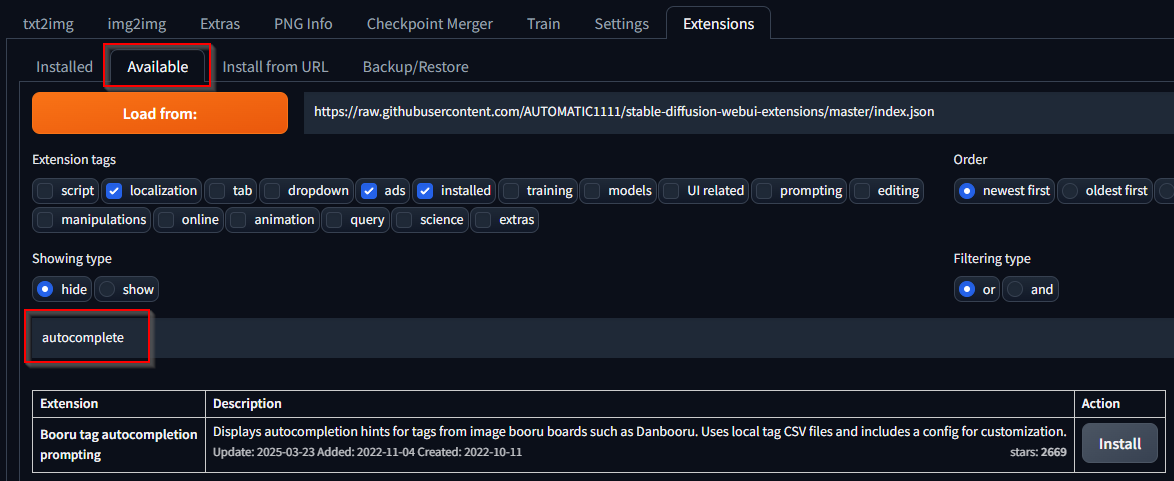
Most extensions can be easily installed from the default A1111 repository which is preconfigured in reForge. To search for a specific extension, open the "Available" tab inside the "Extensions" tab and click on the orange "Load from:" button to populate the list. Type into the unnamed text field to filter

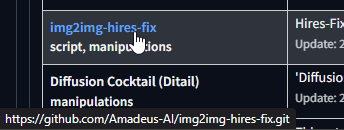
Sadly you cannot search for the Github repository names, and the extension display name is often quite different to how the Git repository is named. If you hover over the name in the Extension column you will see the Github URL and you can click on it to confirm if it is the one you are looking for

Install these extensions from the list:
- Search for "autocompletion" to find the "Booru tag autocompletion" extension
This enables tag autocomplete in the prompt text fields.
(see here tbc)
https://github.com/DominikDoom/a1111-sd-webui-tagcomplete - Search "regional prompter" to find the "Regional Prompter" extension
(Forge Couple is the native regional prompting extension for (re)Forge, but you may want to import images with metadata that were created with this extension so it's good to have it installed anyway). See https://rentry.org/sdgguide#regional-prompter
https://github.com/hako-mikan/sd-webui-regional-prompter - Search "dynamic prompts" to find the "Dynamic Prompts" extension
See https://rentry.org/sdgguide#dynamic-prompts or the Github page on how to use it.
https://github.com/adieyal/sd-dynamic-prompts - Search "adetailer" to find the "ADetailer" extension
See https://rentry.org/sdgguide#adetailer on how to use it.
https://github.com/Bing-su/adetailer
Some extensions are not part of the A1111 repository and must be installed via the "Install from URL" tab instead. Just paste the URL of the Github repository that contains the extension into the first text field and click "Install".
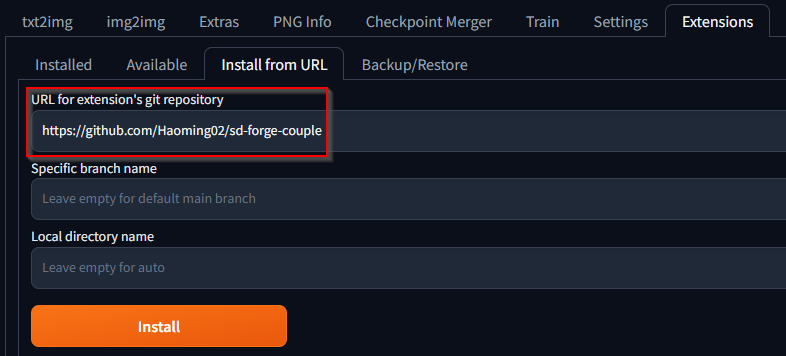

Add the following extensions from URL
- Forge Couple - (reForge and Forge)
Regional Prompting extension native to (re)Forge
https://rentry.org/sdgguide#forge-couple
https://github.com/Haoming02/sd-forge-couple - Lora CTL - (reForge only!)
Allows the scheduling of Loras. Advanced topic but pretty useful for handling bad Loras.
https://github.com/Panchovix/sd_webui_loractl_reforge_y
After you have installed all desired extensions, click on "Apply and restart UI". During the next launch additional requirements may be downloaded/installed automatically


Additional steps
Download upscaler
The default upscaler (see sdguide for more information about what this is) in reForge is latent which is not very good. For the purpose of this guide we will add the remacri upscaler.
Go to your reForge installation directory and into the "models" subdirectory. Create the folders "ERSGAN" and "HAT" if they don't already exist.
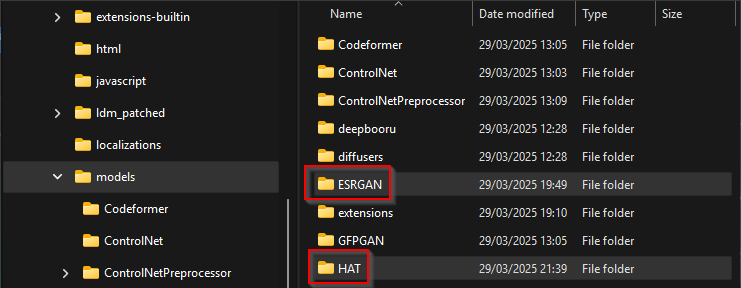

Browse to https://civitai.com/models/147759?modelVersionId=164821 and save the "remacri_original.pt" file into the ESRGAN directory but change the file extension to .pth!


Installation complete
This concludes the basic setup of reForge. To continue go to the section in the sdgguide

⬆️⬆️⬆️To the top⬆️⬆️⬆️

Forge
While you can install Forge via Git in the same way as reForge (just with a different Github URL), the much easier and recommended way is to use the "portable" One-Click package.
Install Forge portable
Browse to https://github.com/lllyasviel/stable-diffusion-webui-forge?tab=readme-ov-file#installing-forge and click on the link to download the latest package in 7z format


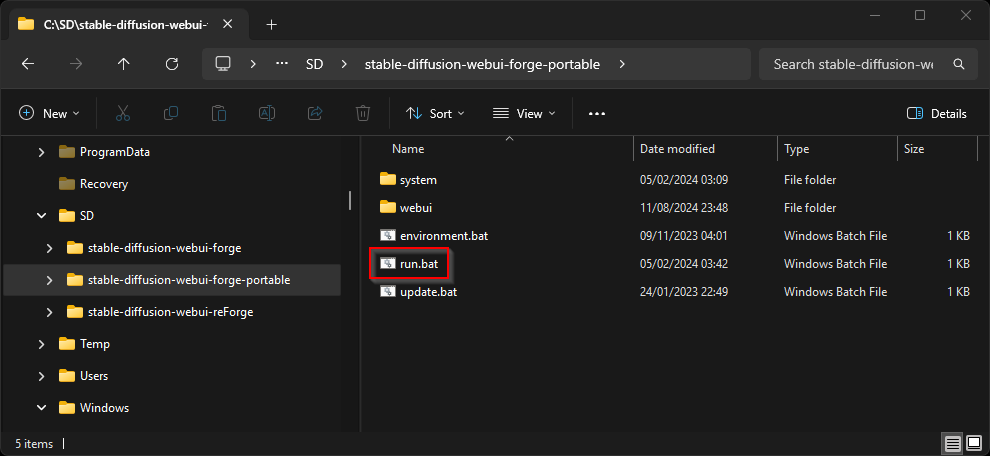
Create folder "C:\SD\stable-diffusion-webui-forge-portable" (or any other name you like) and extract all files from the zip into it.
Start Forge portable (first-run)
Start the "run.bat". On the first run it will take a while to download and install additional components
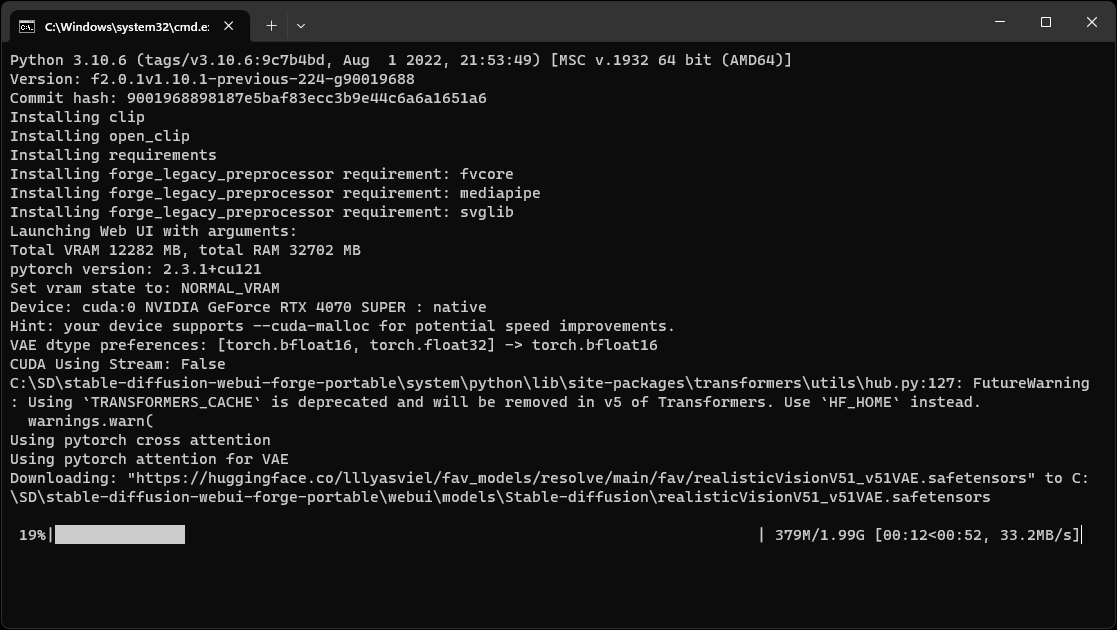

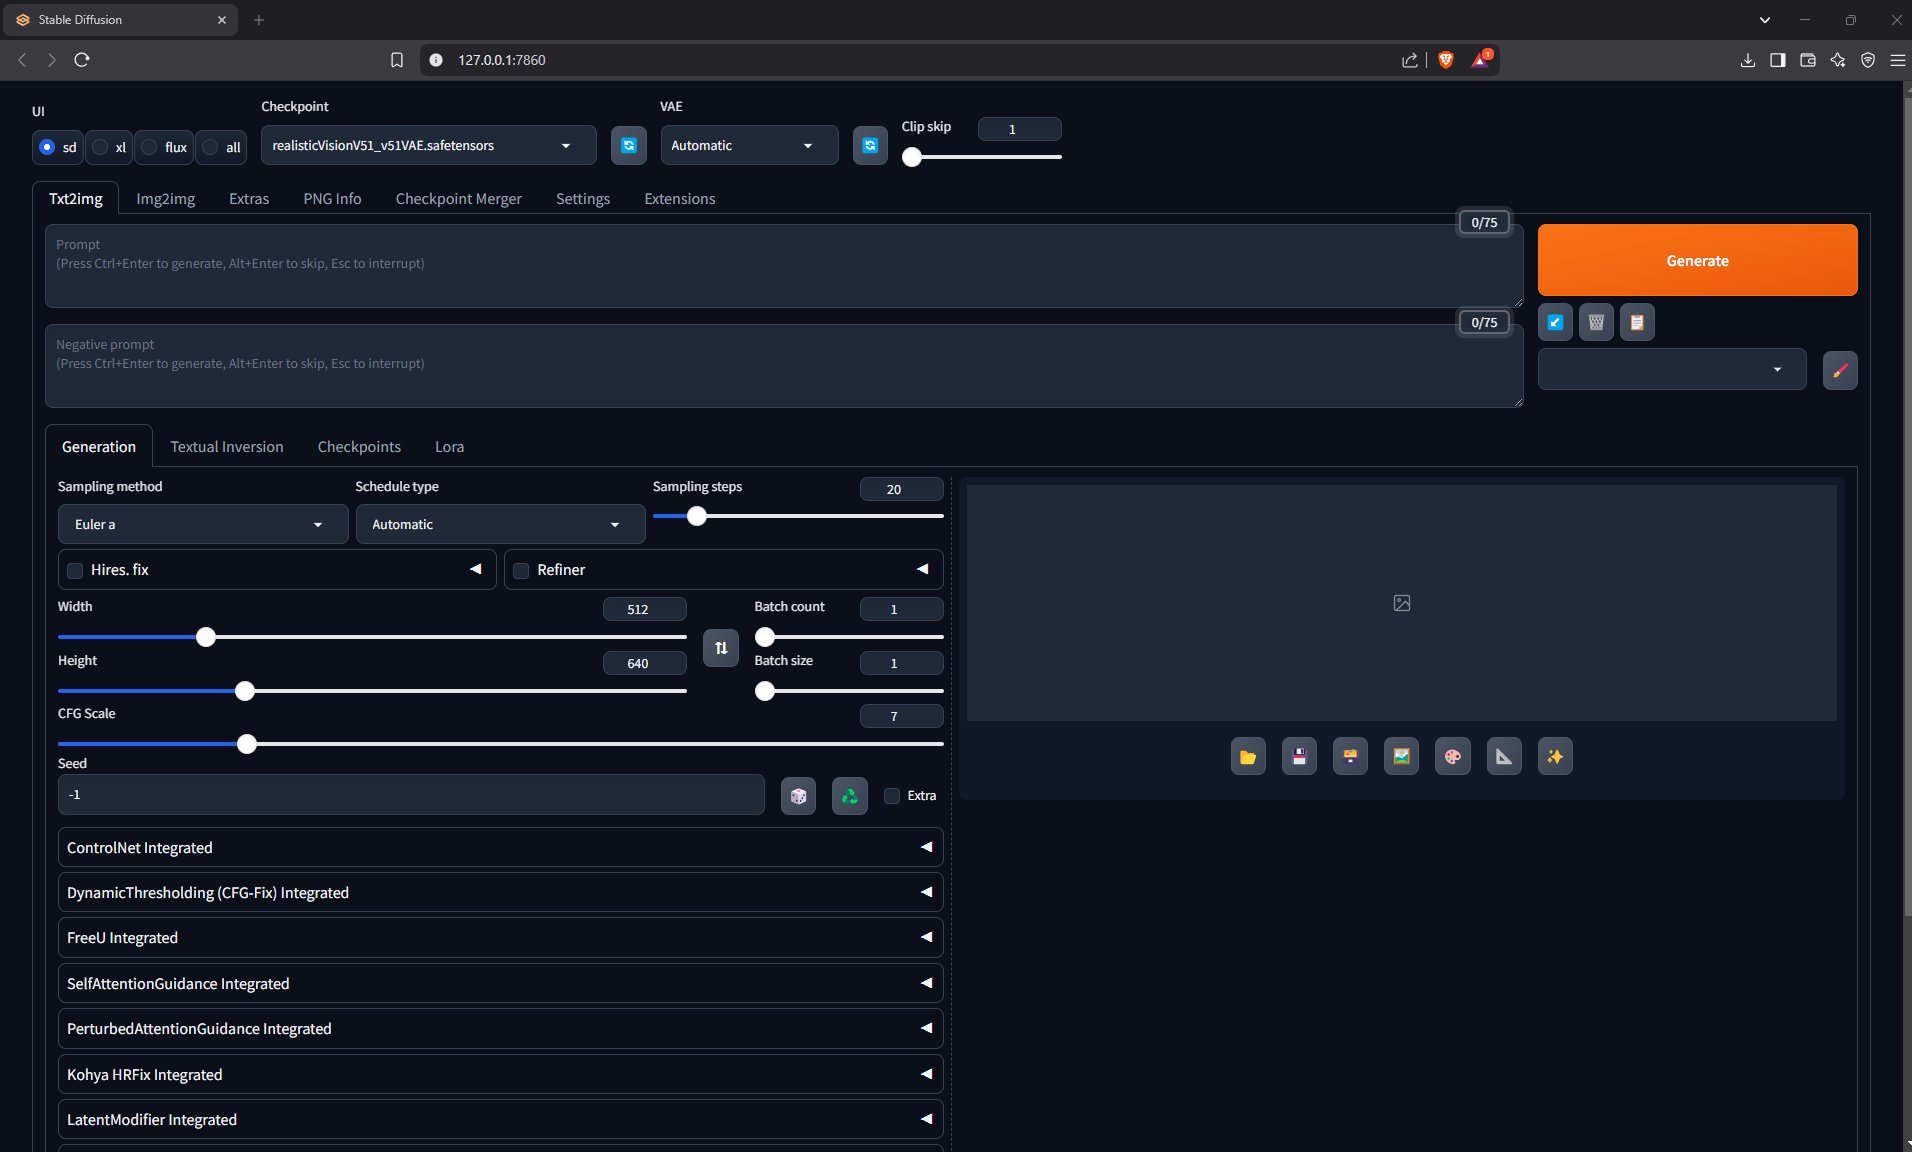
Once all the components have installed successfully a new browser window/tab will open and show you the default Forge GUI
Extensions and additional steps
Follow the steps in the two reForge sections.
Installation complete
This concludes the basic set up of Forge. To continue go to the section in the sdgguide

⬆️⬆️⬆️To the top⬆️⬆️⬆️

ComfyUI
ComfyUI has three different installation options: via Git, a standalone portable zip and an installer. The Git version can be installed as described in the reForge section but using the ComfyUI Github URL (https://github.com/comfyanonymous/ComfyUI). I have not tested this version.
The recommended approach is to use the portable ZIP based install. The installer version has the advantage that the ComfyUI manager plugin is already included, but it does install very differently than the portable versions into different places on your hard drive that you cannot change.
Install Git
While the ComfyUI portable does not need Git to be installed it is required to install certain extensions (most importantly the ComfyUI Manager). Follow the reForge section to set up Git, then continue here.
Install ComfyUI portable
Browse to https://github.com/comfyanonymous/ComfyUI?tab=readme-ov-file#installing and click on the link to download the latest package in 7z format.


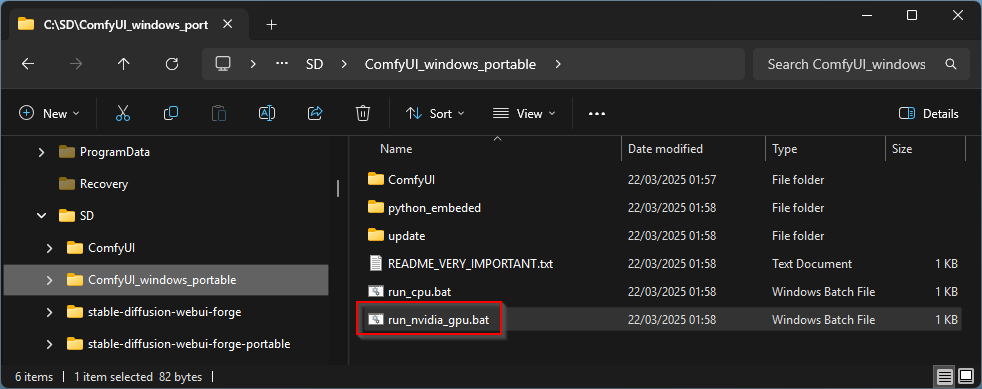
Unzip the 7z into "C:\SD" which will create the subfolder "ComfyUI_windows_portable" by default.
Start ComfyUI (first-run) - portable version
Start the "run_nvidia_gpu.bat". ComfyUI portable already comes with most components needed.
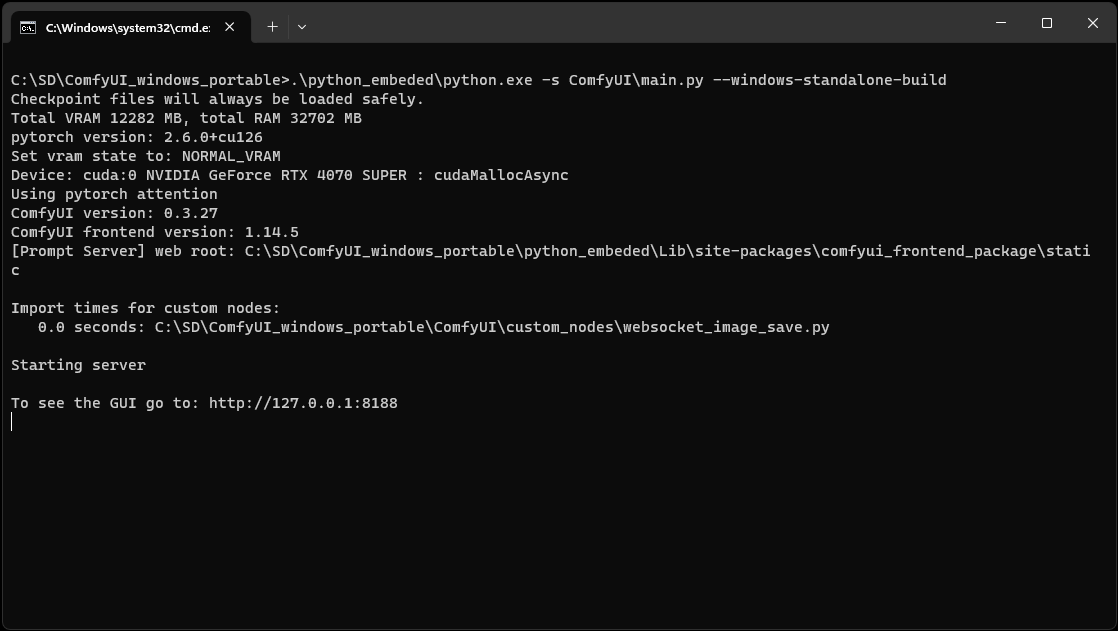

After a while a new browser window/tab will open to show you either a simple default workflow or the template wizard.
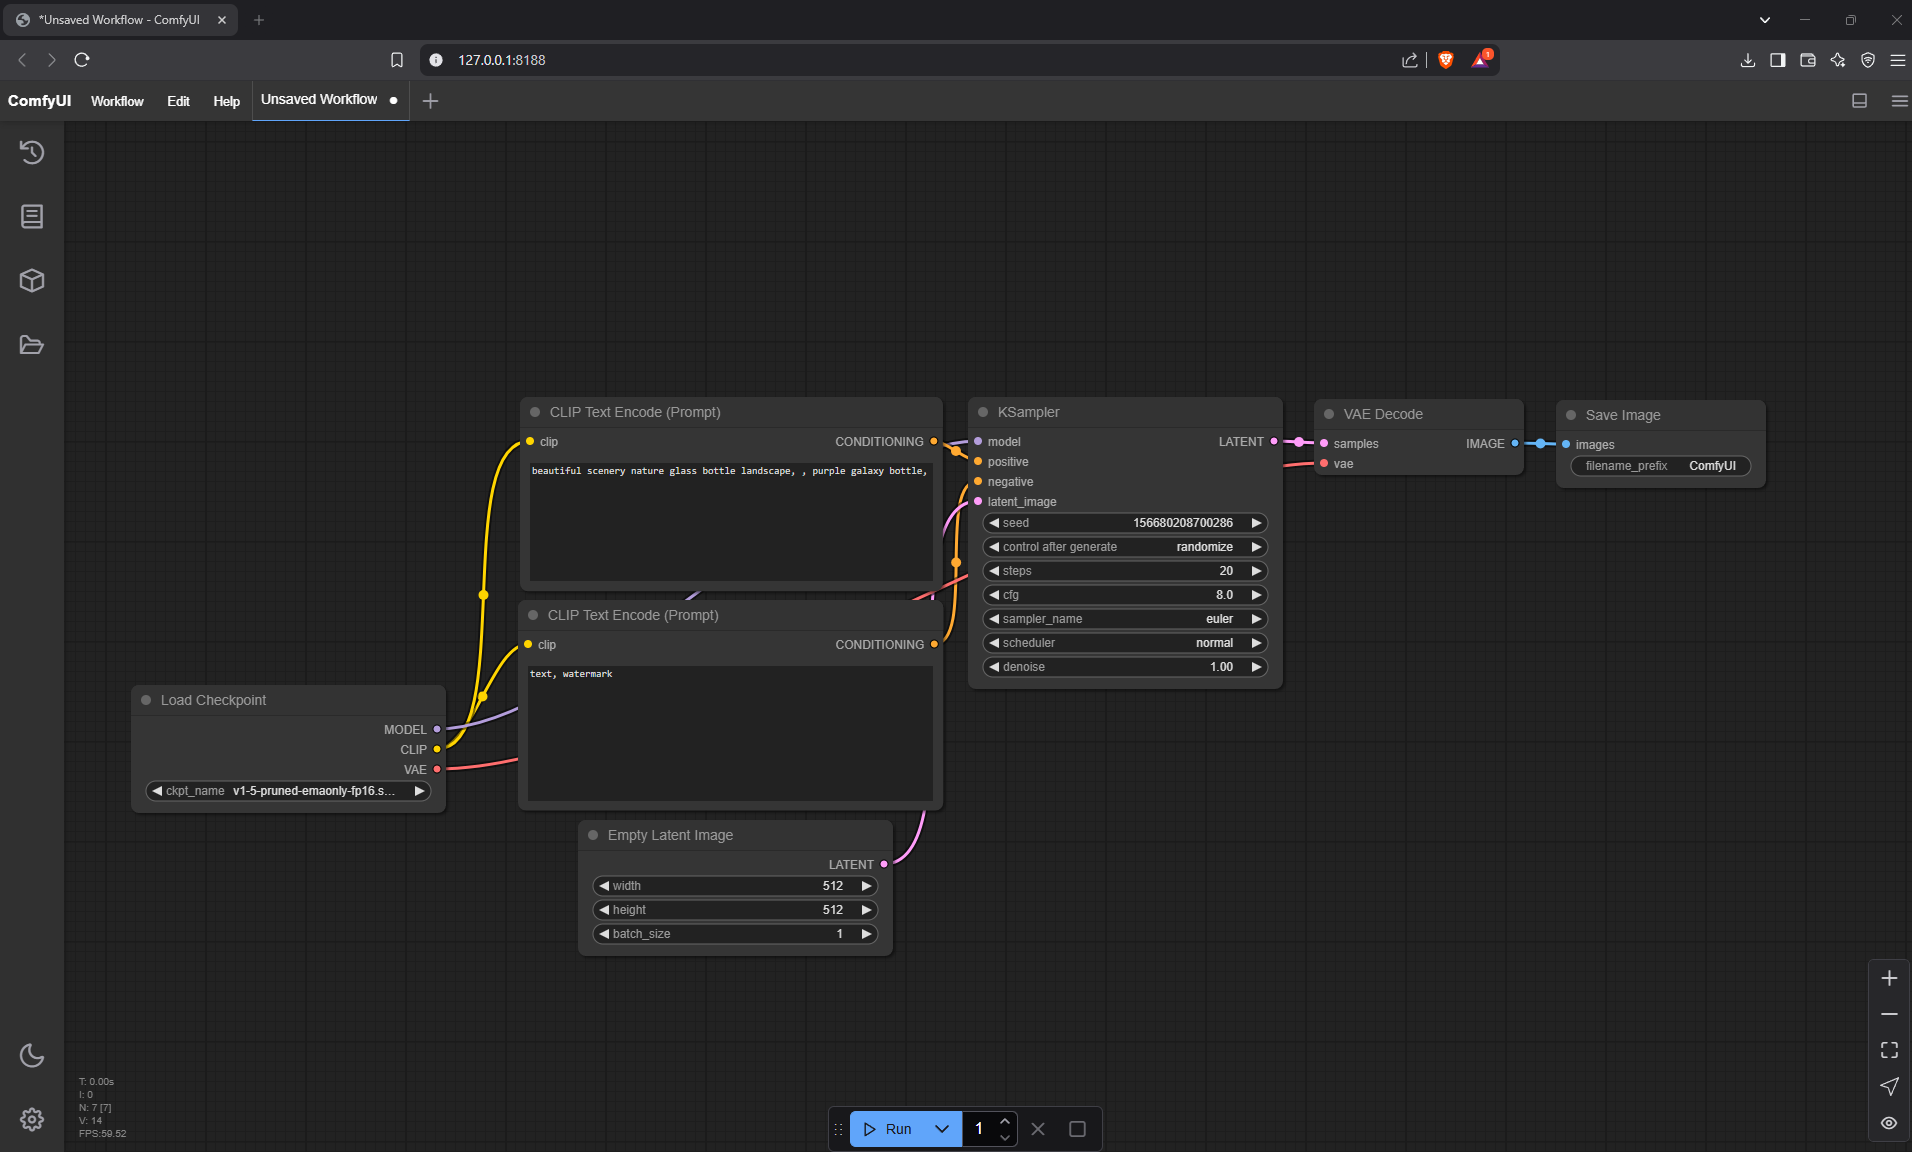
Extensions
The one and most important extension you should install before doing anything else is the ComfyUI Manager. Installing it requires Git.
Browse to the folder "C:\SD\ComfyUI_windows_portable\ComfyUI\custom_nodes" in Windows Explorer and right-click on in. In Windows 11 you first have to choose "Show more options" (or shift+right click) to see the "Open Git bash here" entry.
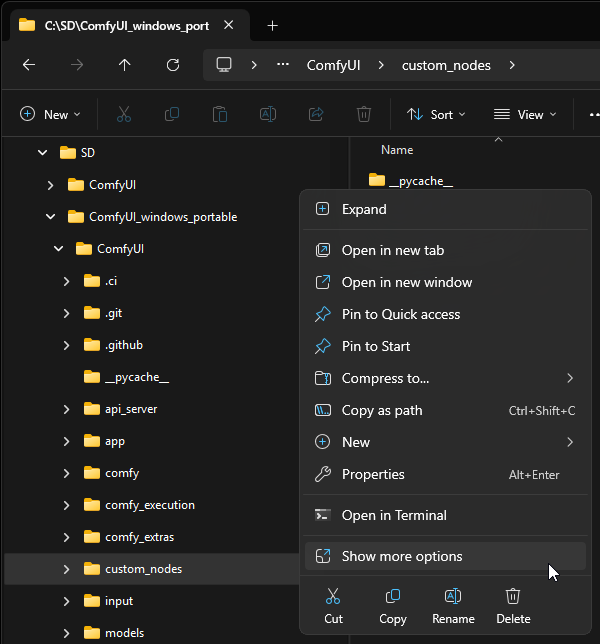
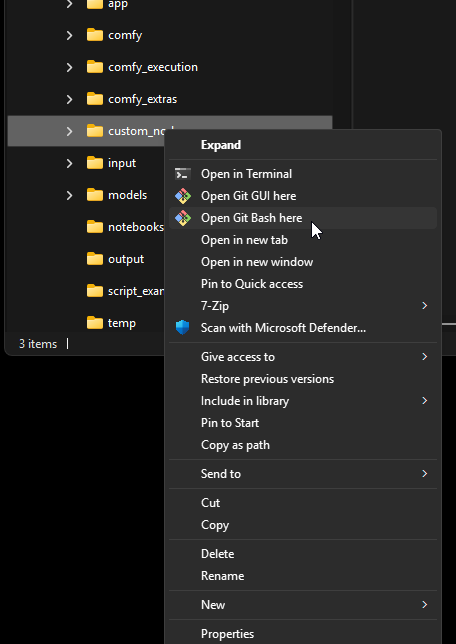

After a while a command prompt style bash window will appear and it should be located in "C:\SD\ComfyUI_windows_portable\ComfyUI\custom_nodes". Copy the following command into that window and execute it. It will start to download the base files from the official Github repository
git clone https://github.com/ltdrdata/ComfyUI-Manager comfyui-manager
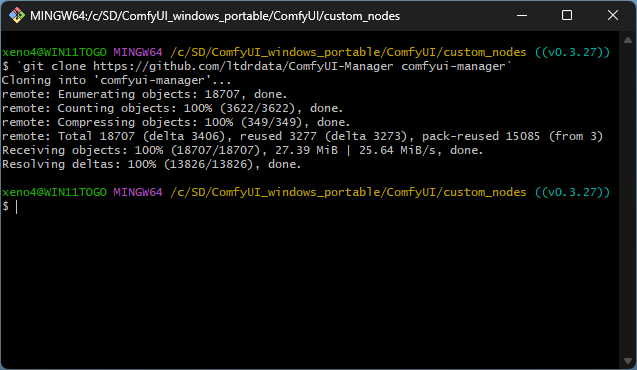

Restart your ComfyUI if it was still open. On the next run, you will see the blue "Manager" button on the top right of the UI. See the Github manual on how to use it.
Installation complete
This concludes the installation of comfyUI. To learn more about recommended settings go to the sdgguide

⬆️⬆️⬆️To the top⬆️⬆️⬆️

InvokeAI
forthcoming

⬆️⬆️⬆️To the top⬆️⬆️⬆️

Stability Matrix
StabilityMatrix by LykosAI is a UI frontend ("Inference") and package manager for other UIs all-in-one. It features simple installation of other UIs, civitai integration and manages model files across them all.
It all sounds very promising, I just have no personal experience with it so it's included here as a basic setup to get reForge running.
Installing UIs via Stability Matrix makes some changes to their configurations so some things you may read in guides or tutorials on the web may not work the same way as they do on standalone installs. See the last entry in this chapter for more information.
Install Stability Matrix
Browse to https://lykos.ai/downloads and download the latest stable version as a zip file.
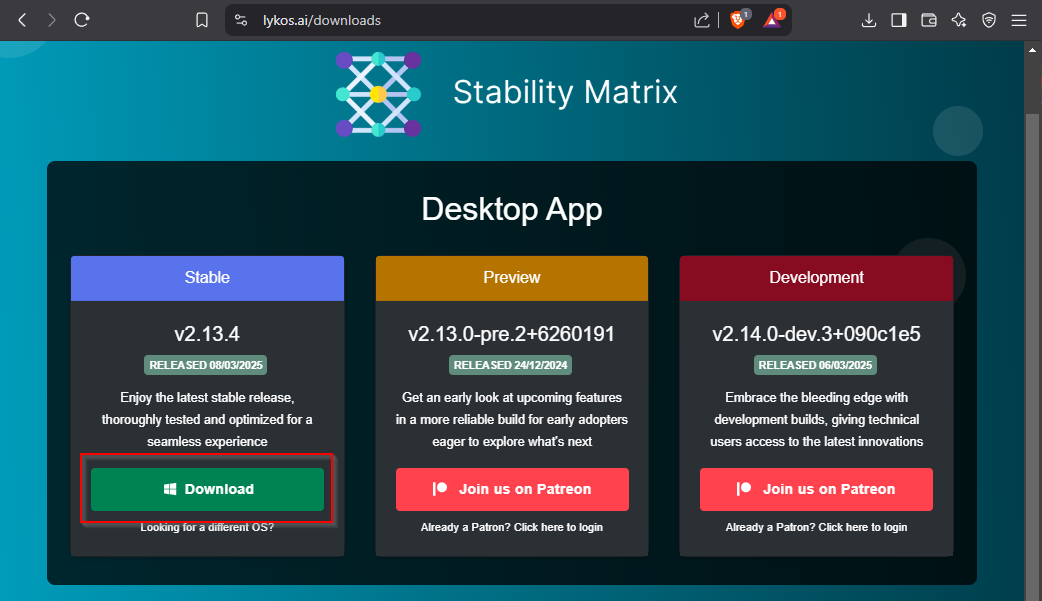

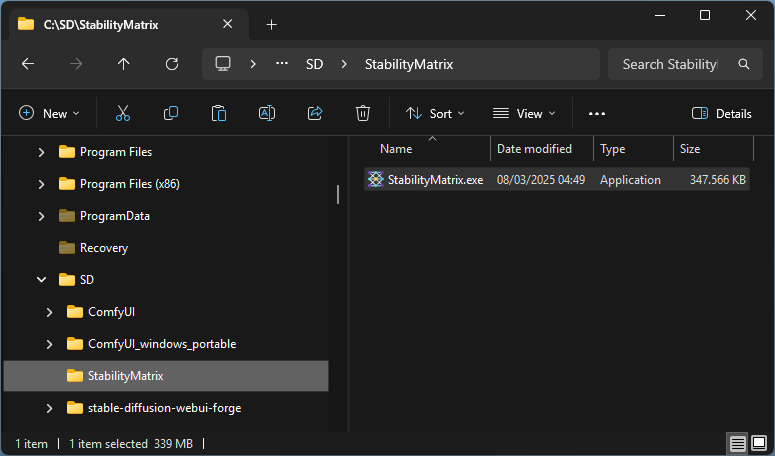
Create a folder "StabilityMatrix" in "C:\SD" and extract the single executable file from the zip into this folder.
Start StabilityMatrix (first-run)
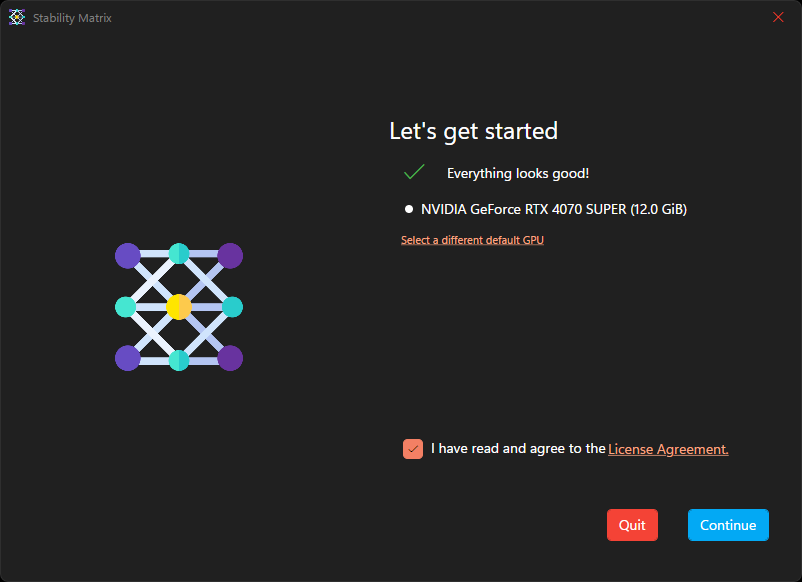
Run the "stabilitymatrix.exe" executable. On the first run it will check your system for compatibility. Accept the license agreement and continue.

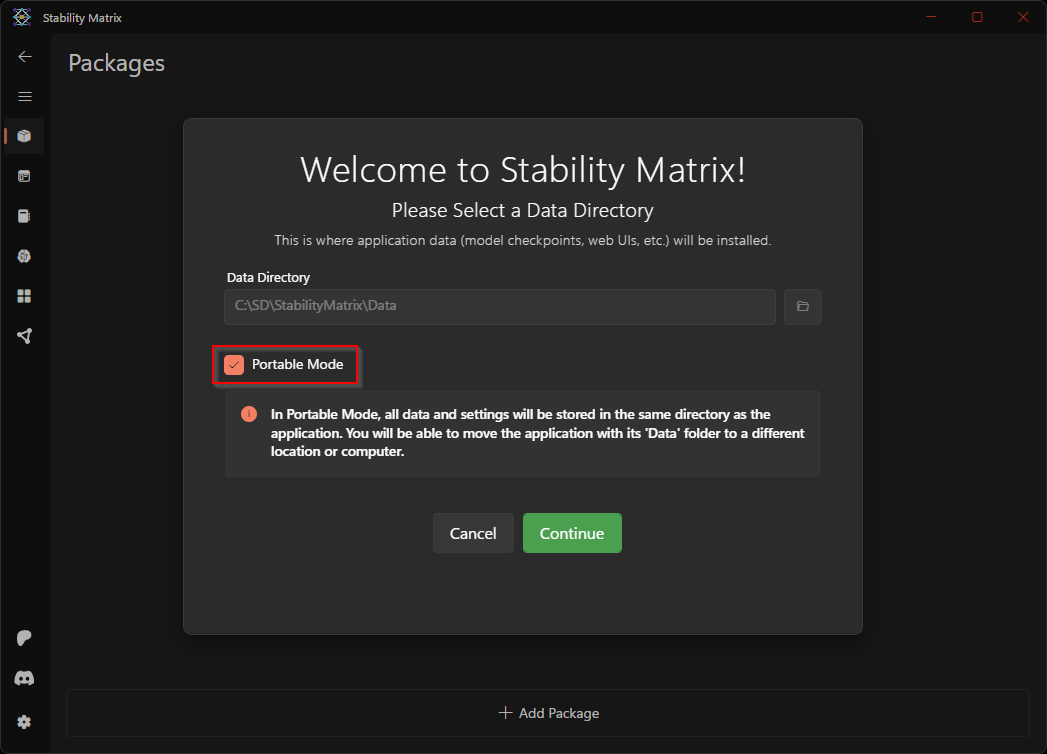
On the welcome wizard enable "Portable mode" to have all data saved in the folder you created instead of your user profile.

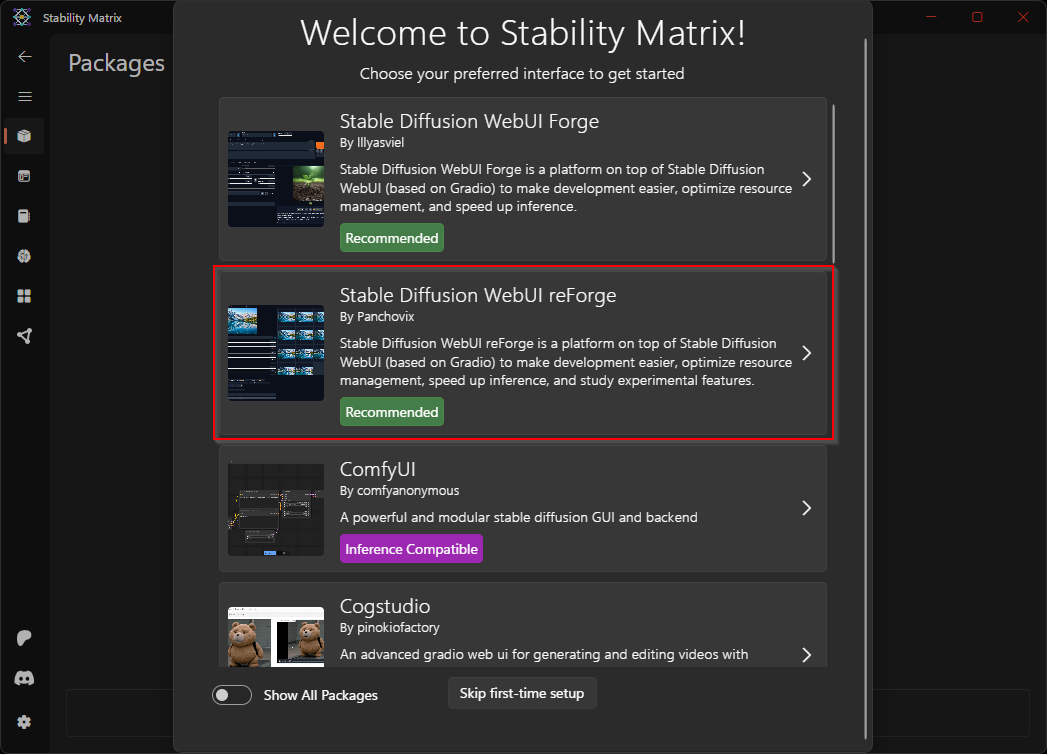
After choosing whatever you like on the Analytics question you will be presented with a list of UIs to install. Select "Stable Diffusion WebUI reForge".

You can then either choose to download a model from the examples provided or skip and download it later.


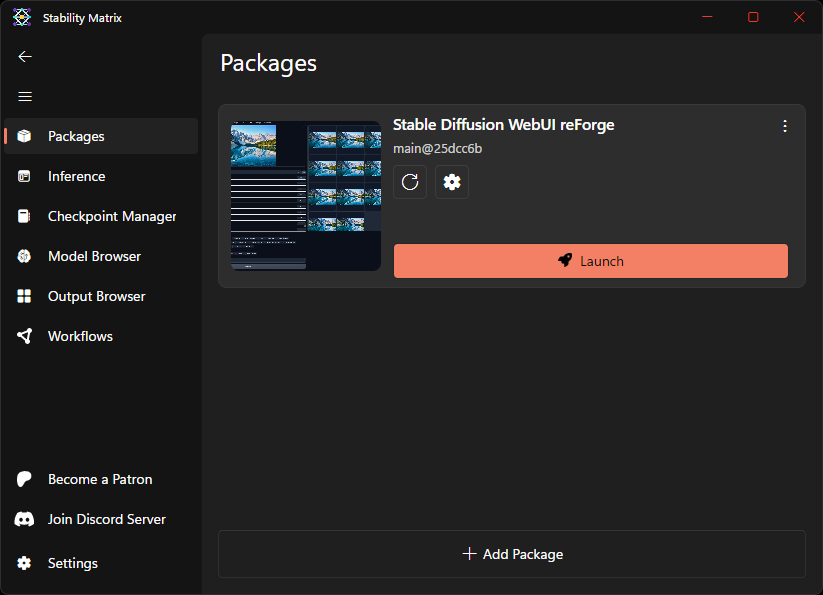
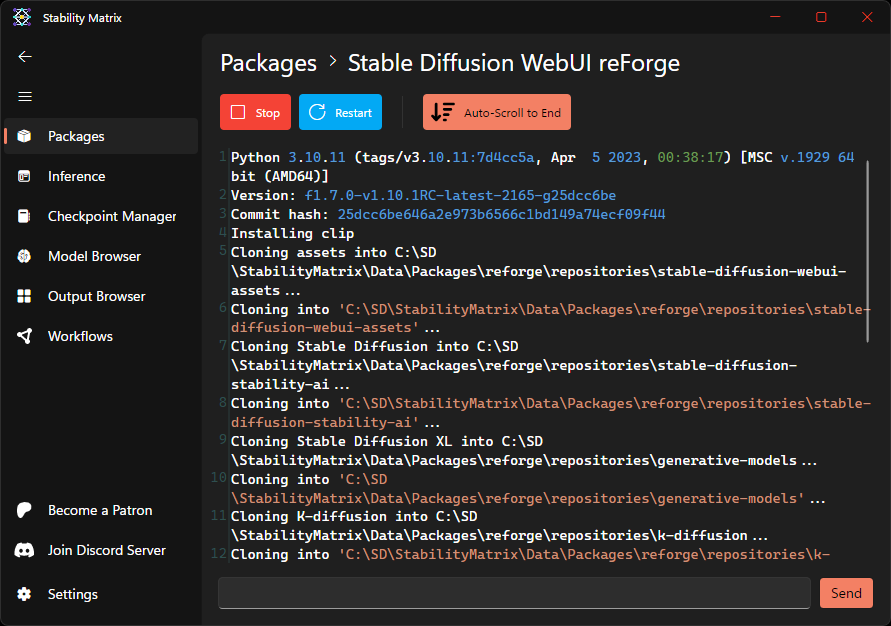
After the base installation is complete, you will be presented with a overview of UIs installed, in this case you should see only reForge. Click on "Launch" on the reForge tile. This will download any additional components required by reForge and after that is complete launch a new browser window/tab with the reForge UI.

Continue in the reForge section.
Installation complete
This concludes the installation of reForge via StabilityMatrix. To learn more about recommended settings go to the sdgguide
Stability Matrix considerations
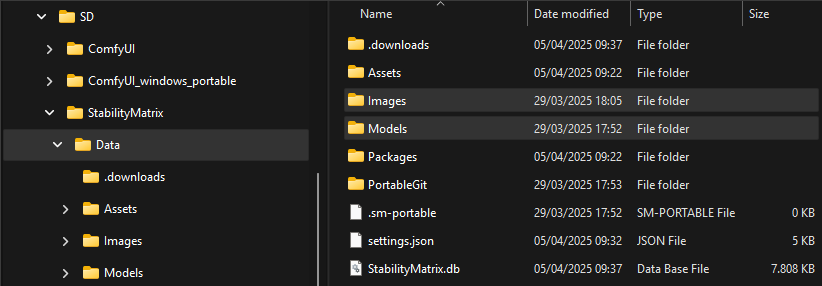
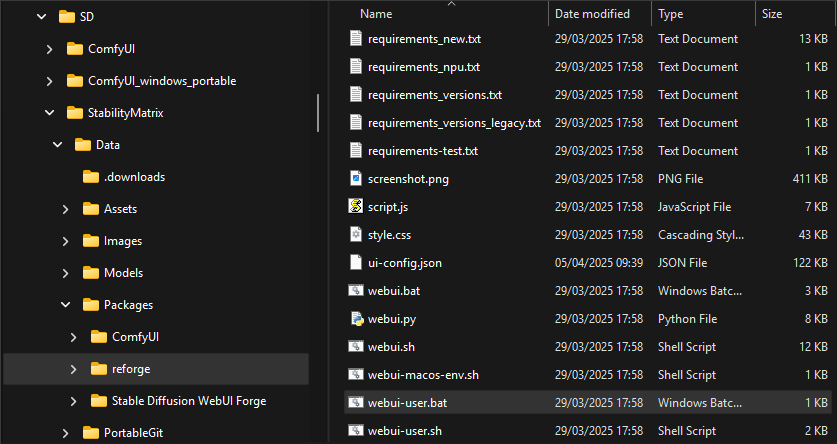
When you install any UI via Stability Matrix it modifies the model and output directories by default, meaning if you add models directly (without going through the Stability Matrix UI) you must put them in a different directory, and your generated images will be in a different location as well.
| Location of models and images | Location of installed UIs |
|---|---|
 |
 |
If you want to install models via the built-in civitai browser, you should enable nswf content, otherwise a lot of models will be hidden.

Should you receive an error message that you need to be logged in to download something from civitai, you must create an account on the civitai.com website and follow this guide to retrieve the key.


⬆️⬆️⬆️To the top⬆️⬆️⬆️

Xeno443