LoRA guide
by anons last update: 02.02.2023 UTC+3 Русская версия
Consider joining the discussions on GitHub if you have something useful to add.
WebUI native support
22.01.2023 AUTOMATIC1111 added native support for LoRA networks to the WebUI.
But kohya-ss (the author of the script used in the guide) says that networks trained with the script version 0.4.0, as well as those trained based on SD 2.x checkpoints do not work in WebUI yet, and advises to train on the script version 0.3.2, or use his extension sd-additional-networks.
upd. 0.4.0 networks are working now (but not SD 2.x networks)
Critical bug in kohya-ss/sd-scripts
21.01.2023 a topic was raised about the bug causing underflow of layer weights during training (weights values close to zero were rounded to zero).
At the time of guide update the bug was fixed: a new argument --network_alpha was added to prevent this behavior. The new variable most likely needs a different learning_rate (the author of the script as a temporary solution offers a value of 1e-3 for network_dim = 128; network_alpha = 1).
Script was updated.
If you don't have trained LoRA network working (gives NaN error or no change in image) – update to sd-scripts version 0.4.0 or higher and retrain.
You can also check your old nets: there is check_lora_weights.py script in sd-scripts\networks\ directory. Example usage:
.\venv\Scripts\activate
python .\networks\check_lora_weights.py "X:\LoRA\LoRA_network.safetensors"
Warning! If you used Clip Skip = 2 during training, the values of lora_te_text_model_encoder_layers_11_* will be 0.0, this is normal. These layers are not trained at this value of Clip Skip.
You might want to check other guides by anons:
https://rentry.org/lora_train
https://rentry.org/beginners-lora-training-params
https://rentry.org/lora-tag-faq
https://rentry.org/lora-training-science
https://rentry.org/LazyTrainingGuide
What is LoRA?
LoRA (Low-rank Adaptation for Fast Text-to-Image Diffusion Fine-tuning), according to the official repository, is the Stable Diffusion checkpoint fine-tuning method, which has the following features:
- twice as fast as the DreamBooth method;
- small output file size;
- results are sometimes better than traditional fine-tuning.
Requirements for training: NVidia video card, more than 6GB of VRAM.
Usage
There are currently two ways to use the LoRA network:
- WebUI's prompt
- Using sd-webui-additional-networks extension by kohya-ss
- Merge with SD checkpoint
Method 1 – using in WebUI's prompt
Warning!
As of 02.02.2023 UTC+3 SD 2.x networks won't work this way.
Use method 2 instead.
| 1. Click Show extra networks and open Lora tab, choose network | 2. LoRA will show up in prompt (edit the value : to change weight) |
|---|---|
 |
 |
Method 2 – using sd-webui-additional-networks extension
Install extension by kohya-ss for A1111-webui.
By default, network files are stored in the stable-diffusion-webui\models\lora\ directory.
It's easy to use:
| 1. Open a new panel | 2. Turn on, select model, adjust weights to taste |
|---|---|
 |
 |
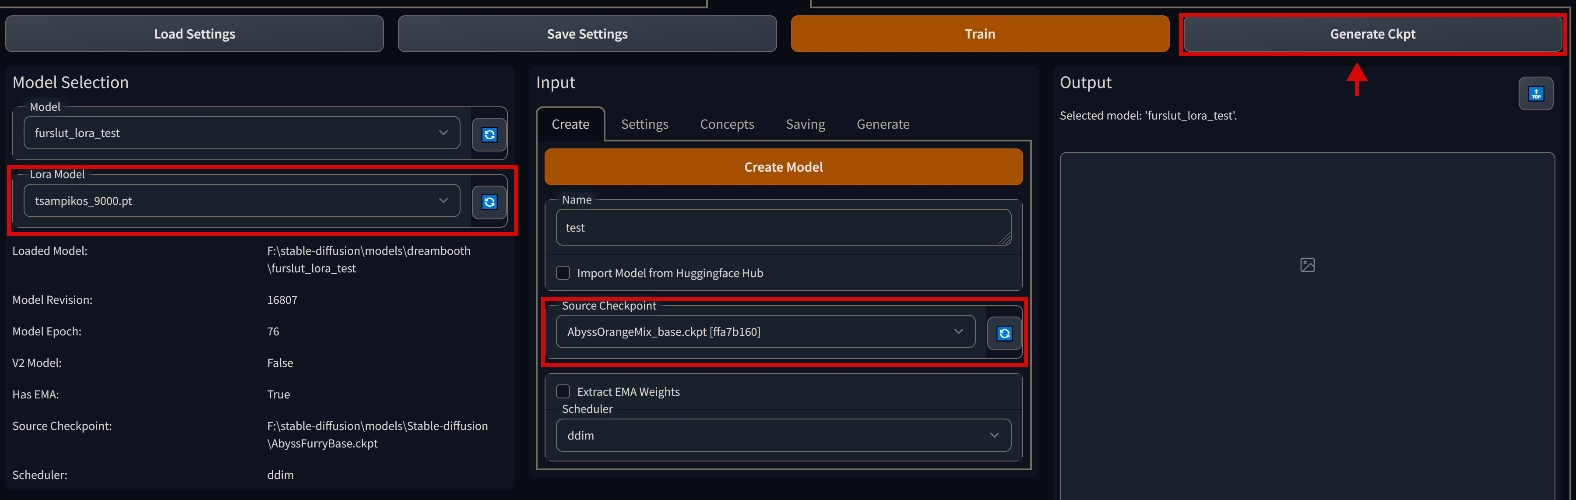
Method 3 – merge with checkpoint
Install extension by d8ahazard for A1111-webui.
CKPT vs SAFETENSORS
The safetensors files are not (yet) supported! Good news: ckpt can usually be downloaded from the same place where safetensors was downloaded.
First, make sure that the checkpoint file <model_name>.ckpt is in the stable-diffusion-webui\models\Stable-diffusion\, and the LoRA file <lora_name>.pt in stable-diffusion-webui\models\lora\, then:
| 1. Open a new tab | 2. Open the "Settings tab", click the "Use LORA checkbox" |
|---|---|
 |
 |
| 3. Go to the Create tab, select the source model "Source Checkpoint", select "Lora Model" on the left, and click "Generate Ckpt" at the top |
|---|
 |
Preparing a dataset
General advice
Advice #1 – difference between models
If you train for anime model (NAI, AnythingV3), make the description strictly in the style of Danbooru/Gelbooru tags. For example, 1girl, short hair, green eyes, black hair, school uniform....
If you are using SD 1.x/2.x, in the captions write what you see in the image. For example, if the image is a picture of a bearded fisherman at work, write pencil art of a man fishing, beard; if it is a picture of your smiling friend wearing glasses, red shirt, sunset in the background, write photo of friend_name, smiling, wearing glasses, red shirt, sunset in the background)
Advice #2 – concept word
If you are training a character/person, it is desirable that the dataset consist only of the images where he is present. And all captions should have a keyword describing this character/person. For example, 1.txt: photo of JohnFriend, jacket, jeans; 2.txt: photo of JohnFriend, shorts, t-shirt. You will use the tag JohnFriend to call this person in the prompt. The same works for anime models - in this case it will be the name of the character. For example, 1girl, shiina mayuri, short hair, green eyes, etc. Call out with shiina mayuri, respectively.
If you are training an author's style, as in the previous paragraph, it is advisable that the dataset consist only of images drawn by this author. Example of caption file: ArtistName, mountains, night, moon, snowy peaks, stars, etc. Calling the artist's style via ArtistName.
Advice #3 – clean images (preferably)
All the bits of other people's limbs, strange objects in the picture, artists' signatures, links – anything you don't want to see in the generation is better trimmed or masked in image editor.
Advice #4 – speeding up the workflow
Make the machines do the hard work.
To speed up manual tagging you can use sd-tagging-helper and BooruDatasetTagManager.
There are also extensions (1, 2, 3) for A1111-webui.
You can use Grabber with these settings (copy and paste: %all:unsafe,separator=^,^ %) to download images from various booru boards along with tags.
For kohya's script
Dataset needs a certain folder structure:
 Example folder structure
Where n – number of repeats of the given concept; conceptA, conceptB – concept names. The concept name can be anything, it is not used anywhere (except in a special case, see Important notes), it is rather a note for you what is in this folder. There must be an underscore between the number of repetitions and the concept name. Inside each concept folder there must be images along with *.txt description files, their names must match. Inside the text files must be the actual description. There can be as many concept folders as you like, but at least one must be present. Cropping images is not necessary.
Example of a good dataset
Important notes
If a image.png file doesn't have a corresponding image.txt, the script gives it a description as a concept name. For example, if the concept folder is named 6_photo, it will assume that the image.png file has a photo description.
Supported image formats: *.jpg, *.png, *.webp. Make sure you don't accidentally get *.jpeg.
Repeats are needed to give more weight to a particular folder. For example, you have a 2_HighRes folder with 20 images inside and a 1_LowRes folder with 10 images inside. That would add up to 50 (2 * 20 + 1 * 10) images, and the neural network would learn 80% (2 * 20 / 50) of the time on the first folder and 20% (1 * 10 / 50) of the time on the second, thereby reducing the impact of the folder with low quality images.
The regularization_images folder can be empty, the presence of regularization images is optional.
In theory, regularization images help improve training accuracy.
The regularization images allow you to "separate" the object being trained (concept) from the style of the image. During training, the network will be trained "in parallel" (actually sequentially, in the presence of regularizing images in a wise scenario the training time should be doubled) how concept should not look like. The transferability between models of such a LoRA network will become better (again, in theory).
If you are not sure whether you should use regularization images or not, I suggest you not to use them, unless you know what you are doing.
How to work with them
For example, if you are training a person's face (a man) and every description file has the words photo of a PersonName in it, it's a good idea to open the WebUI and generate images with the prompt photo of a man. How many? At least as many as the number of images of the man's face in the example. More is better.
Stock up on folders with 200 images 1boy, 1girl, photo of a man, photo of a woman and you'll be happy.
For sd_dreambooth_extension
The interface supports up to 3 concepts at a time.
If you want to train more concepts, you have to mess around with JSON. Example JSON for more than 3 concepts. Note the missing comma after the last concept.
The dataset for sd_dreambooth_extension has no special requirements to the folder structure.
One rule is that there is a separate folder for each concept (object, character, style, tag) that you teach the model to.
The folder can contain any number of images in PNG format (not required, but strictly recommended for some reason).
Images must be square, without transparency, resolution – 512x512.
Each image should be accompanied by a text file with a description (tags).
The presence of underscores in the tags does not matter, but since they consume tokens, I recommend to drop all underscores.
 Example contents of a concept folder
Training
kohya's script
- Clone the sd-scripts repository by kohya-ss or download it and unpack somewhere
- Download script (RMB -> "Save As...") (updates occasionally)
PowerShell
This script is for PowerShell, but that does not mean that it is only available to users of the latest versions of Windows. Not everyone knows this, but PowerShell is available for all versions of Windows starting with XP, on Linux, and on macOS.
Also if you have old PowerShell version, you might want to update it.
- Open PowerShell and execute the following commands one by one:
- After the last command the terminal will start asking questions, select the following:
In which compute environment are you running?
– This machine
Which type of machine are you using?
– No distributed training
Do you want to run your training on CPU only (even if a GPU is available)?
– NO
Do you wish to optimize your script with torch dynamo?
– NO
Do you want to use DeepSpeed?
– NO
What GPU(s) (by id) should be used for training on this machine as a comma-seperated list?
– 0 or all
Do you wish to use FP16 or BF16 (mixed precision)?
– fp16 or bf16
BF16 > FP16
If your hardware supports BF16, it is better to choose it.
If PowerShell is throwing errors when pressing the arrows
Turn off NumLock on your keyboard, use the 8 and 2 keys on numpad to select options. If you don't have a numpad.
- Editing the script
Open the script with any text editor and change the variables at the top of the file to suit your needs. All variables are clearly enough commented, so let's walk through the not-so-obvious ones:
$train_batch_size: if you increase this value, you might also want increase $learning_rate. Use linear rule: learning_rate for batch size 1 * your batch_size = new learning_rate.
$num_epochs: This variable is used to calculate the number of training steps. The more epochs, the longer it takes to train the network. As for the result on large and small values, see the description of the $learning_rate variable. There is no universal answer to how much to set.
$max_token_length: open your largest description file, copy its contents and put it into the WebUI Promt. The counter on the right will display the length of the token. If less than 75, put 75. If more than 75 – put 150. If greater than 150, then put 225. Values greater than 225 are not supported by the script (yet).
$clip_skip: 1 for SD-based checkpoints, 2 for NAI-based checkpoints.
$learning_rate: "master knob" for both UNet and text encoder learning rates, if they are not specified. 1e-4 is recommended for checkpoints based on SD 1.x. For 2.x - it is unclear, someone says that got terrible results with these settings. But I got decent faces at the recommended settings as well.
What is the difference between high and low speed?
- the low rate and low number of steps will cause the network to be underfit/undertrained. The network will have problems reproducing the concept.
- high speed and quantity lead to an overfit/overtrained network. You won't be able to generate anything but a concept, regardless of the promt you use. Also there's a risk of artifacts on generated image.
There is a website with a clear demonstration.
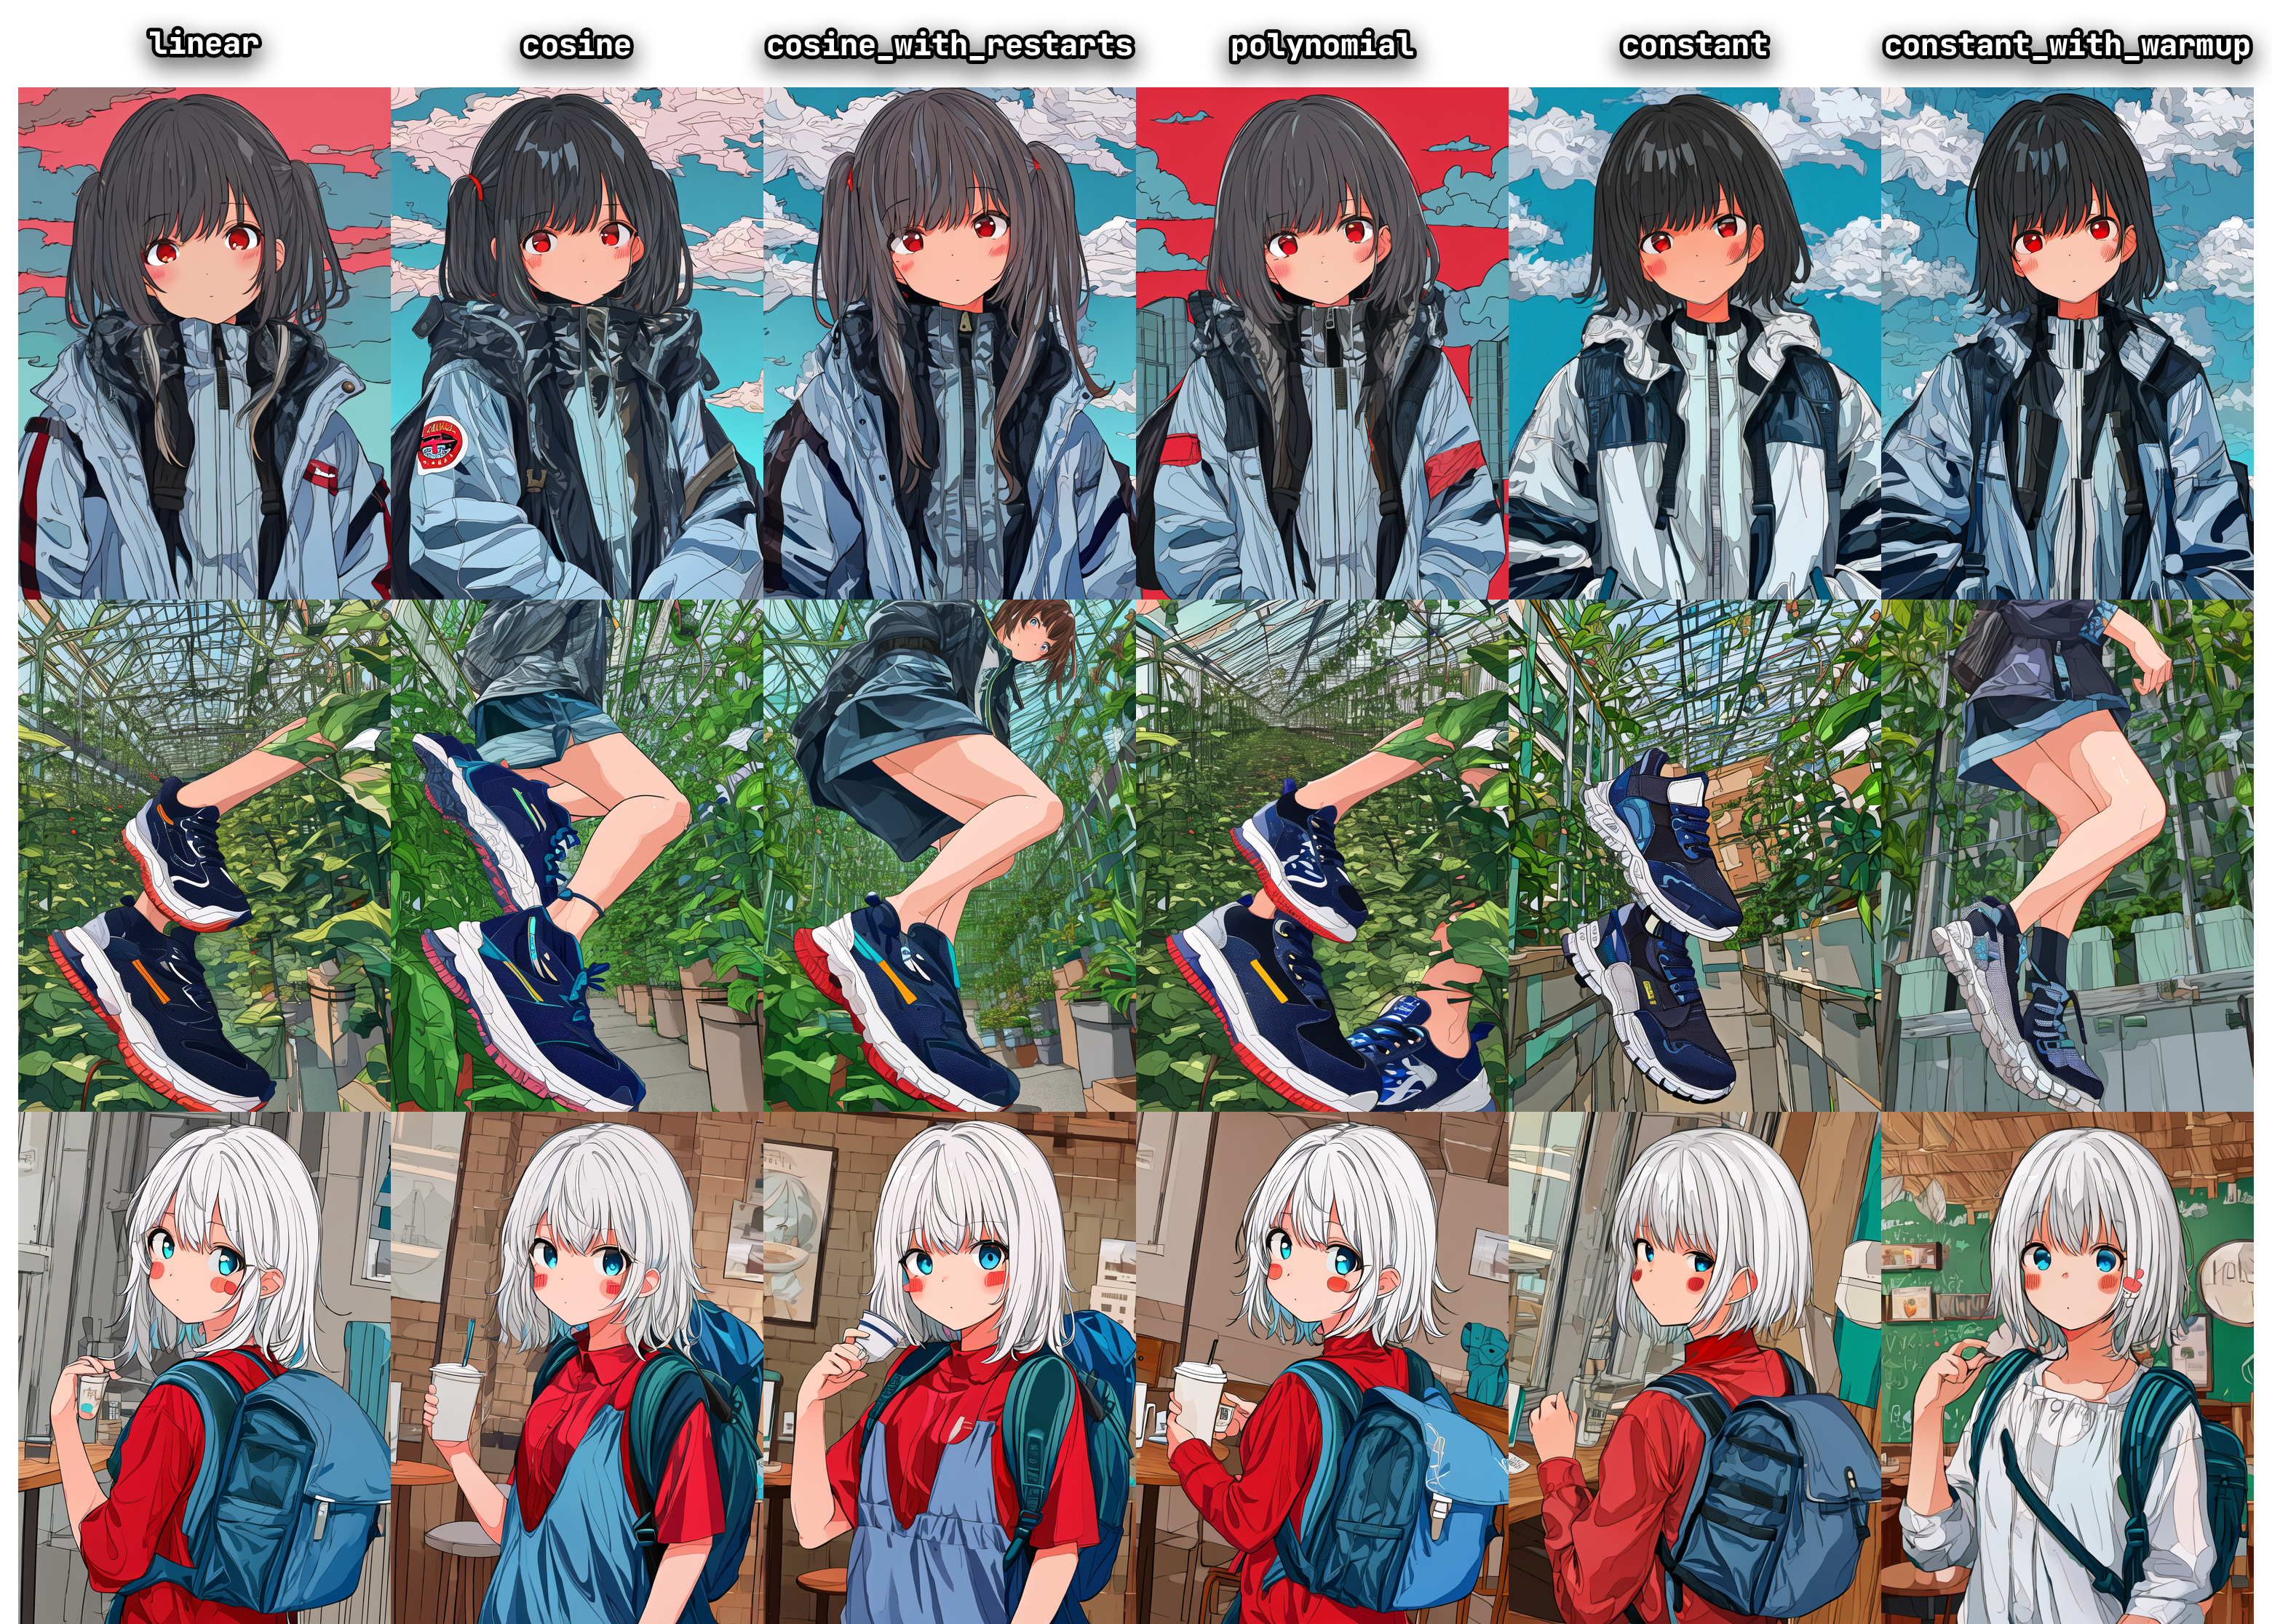
The following are grids comparing different learning_rate. All networks were trained on the same dataset (pixiv of the author), all images were generated on the same seed with different prompt. Note how the networks at different settings learned the following tags: harusameriburo (artist style), jacket, cloudy sky, shoes, ligne claire, backpack, blush stickers.
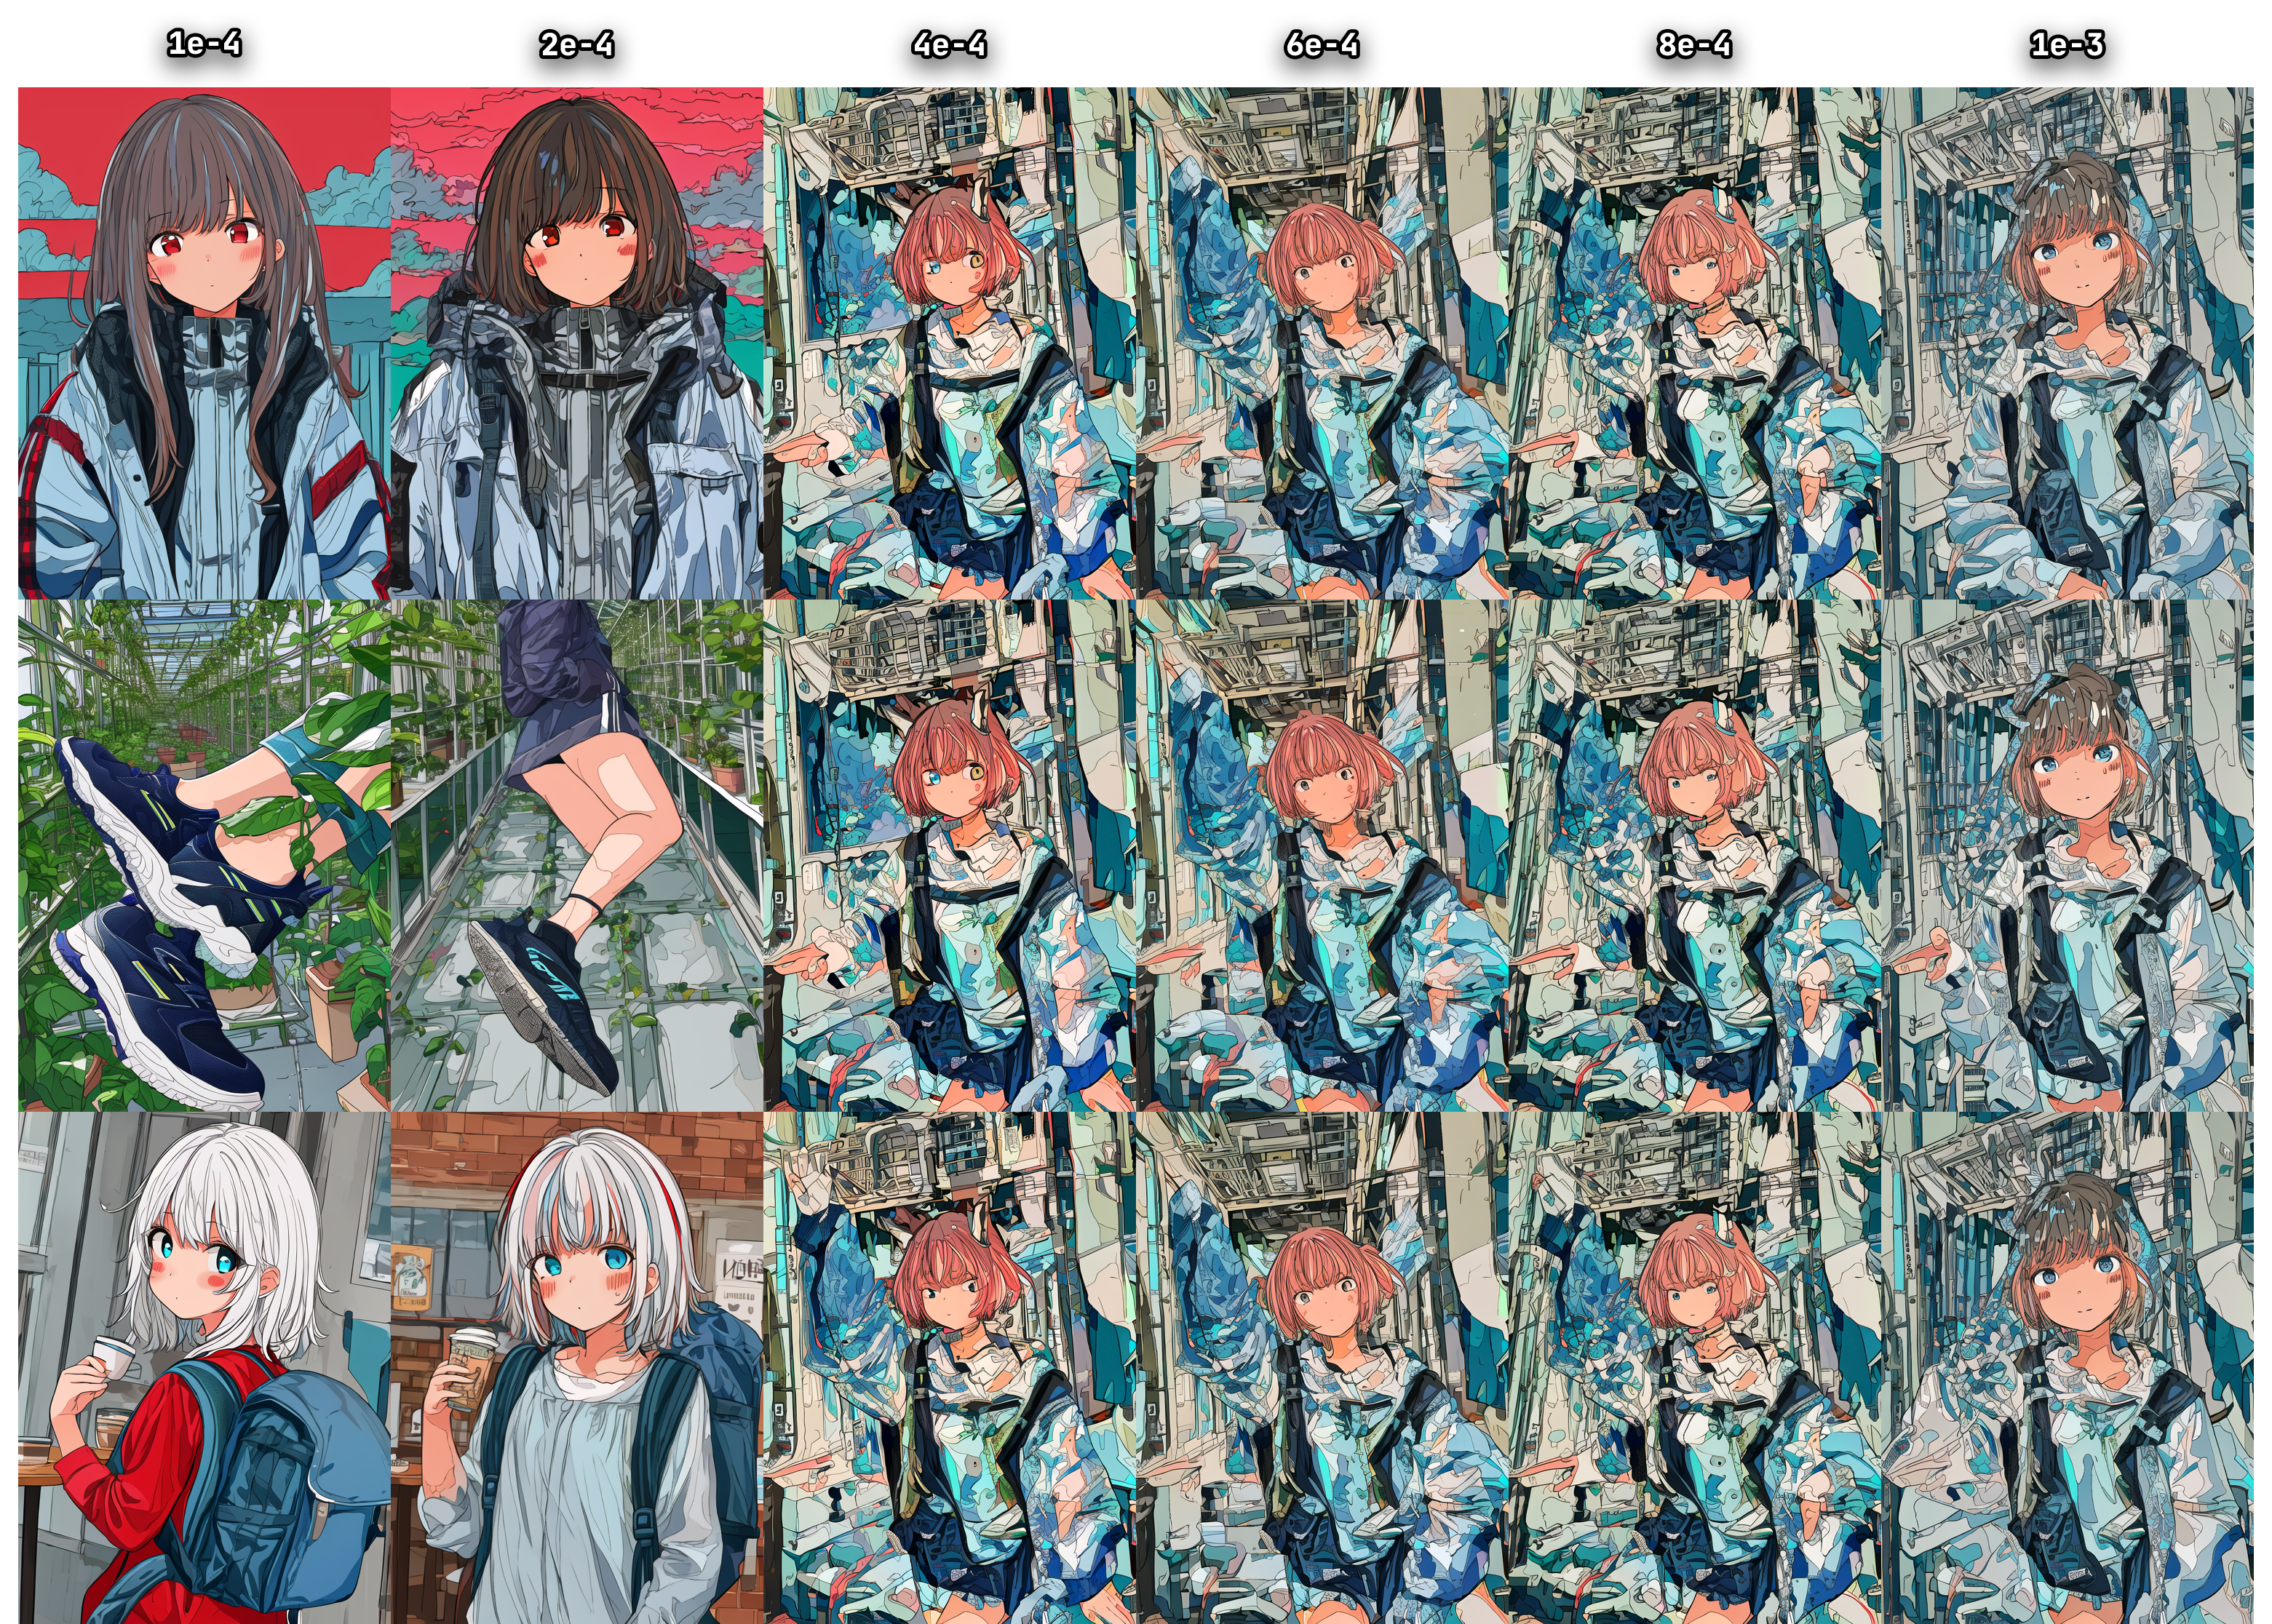
learning_rate = X, scheduler = linear
$unet_lr: U-Net learning rate. U-Net is responsible for converting noise into an image. Field for experimentation. Supercedes learning_rate value.
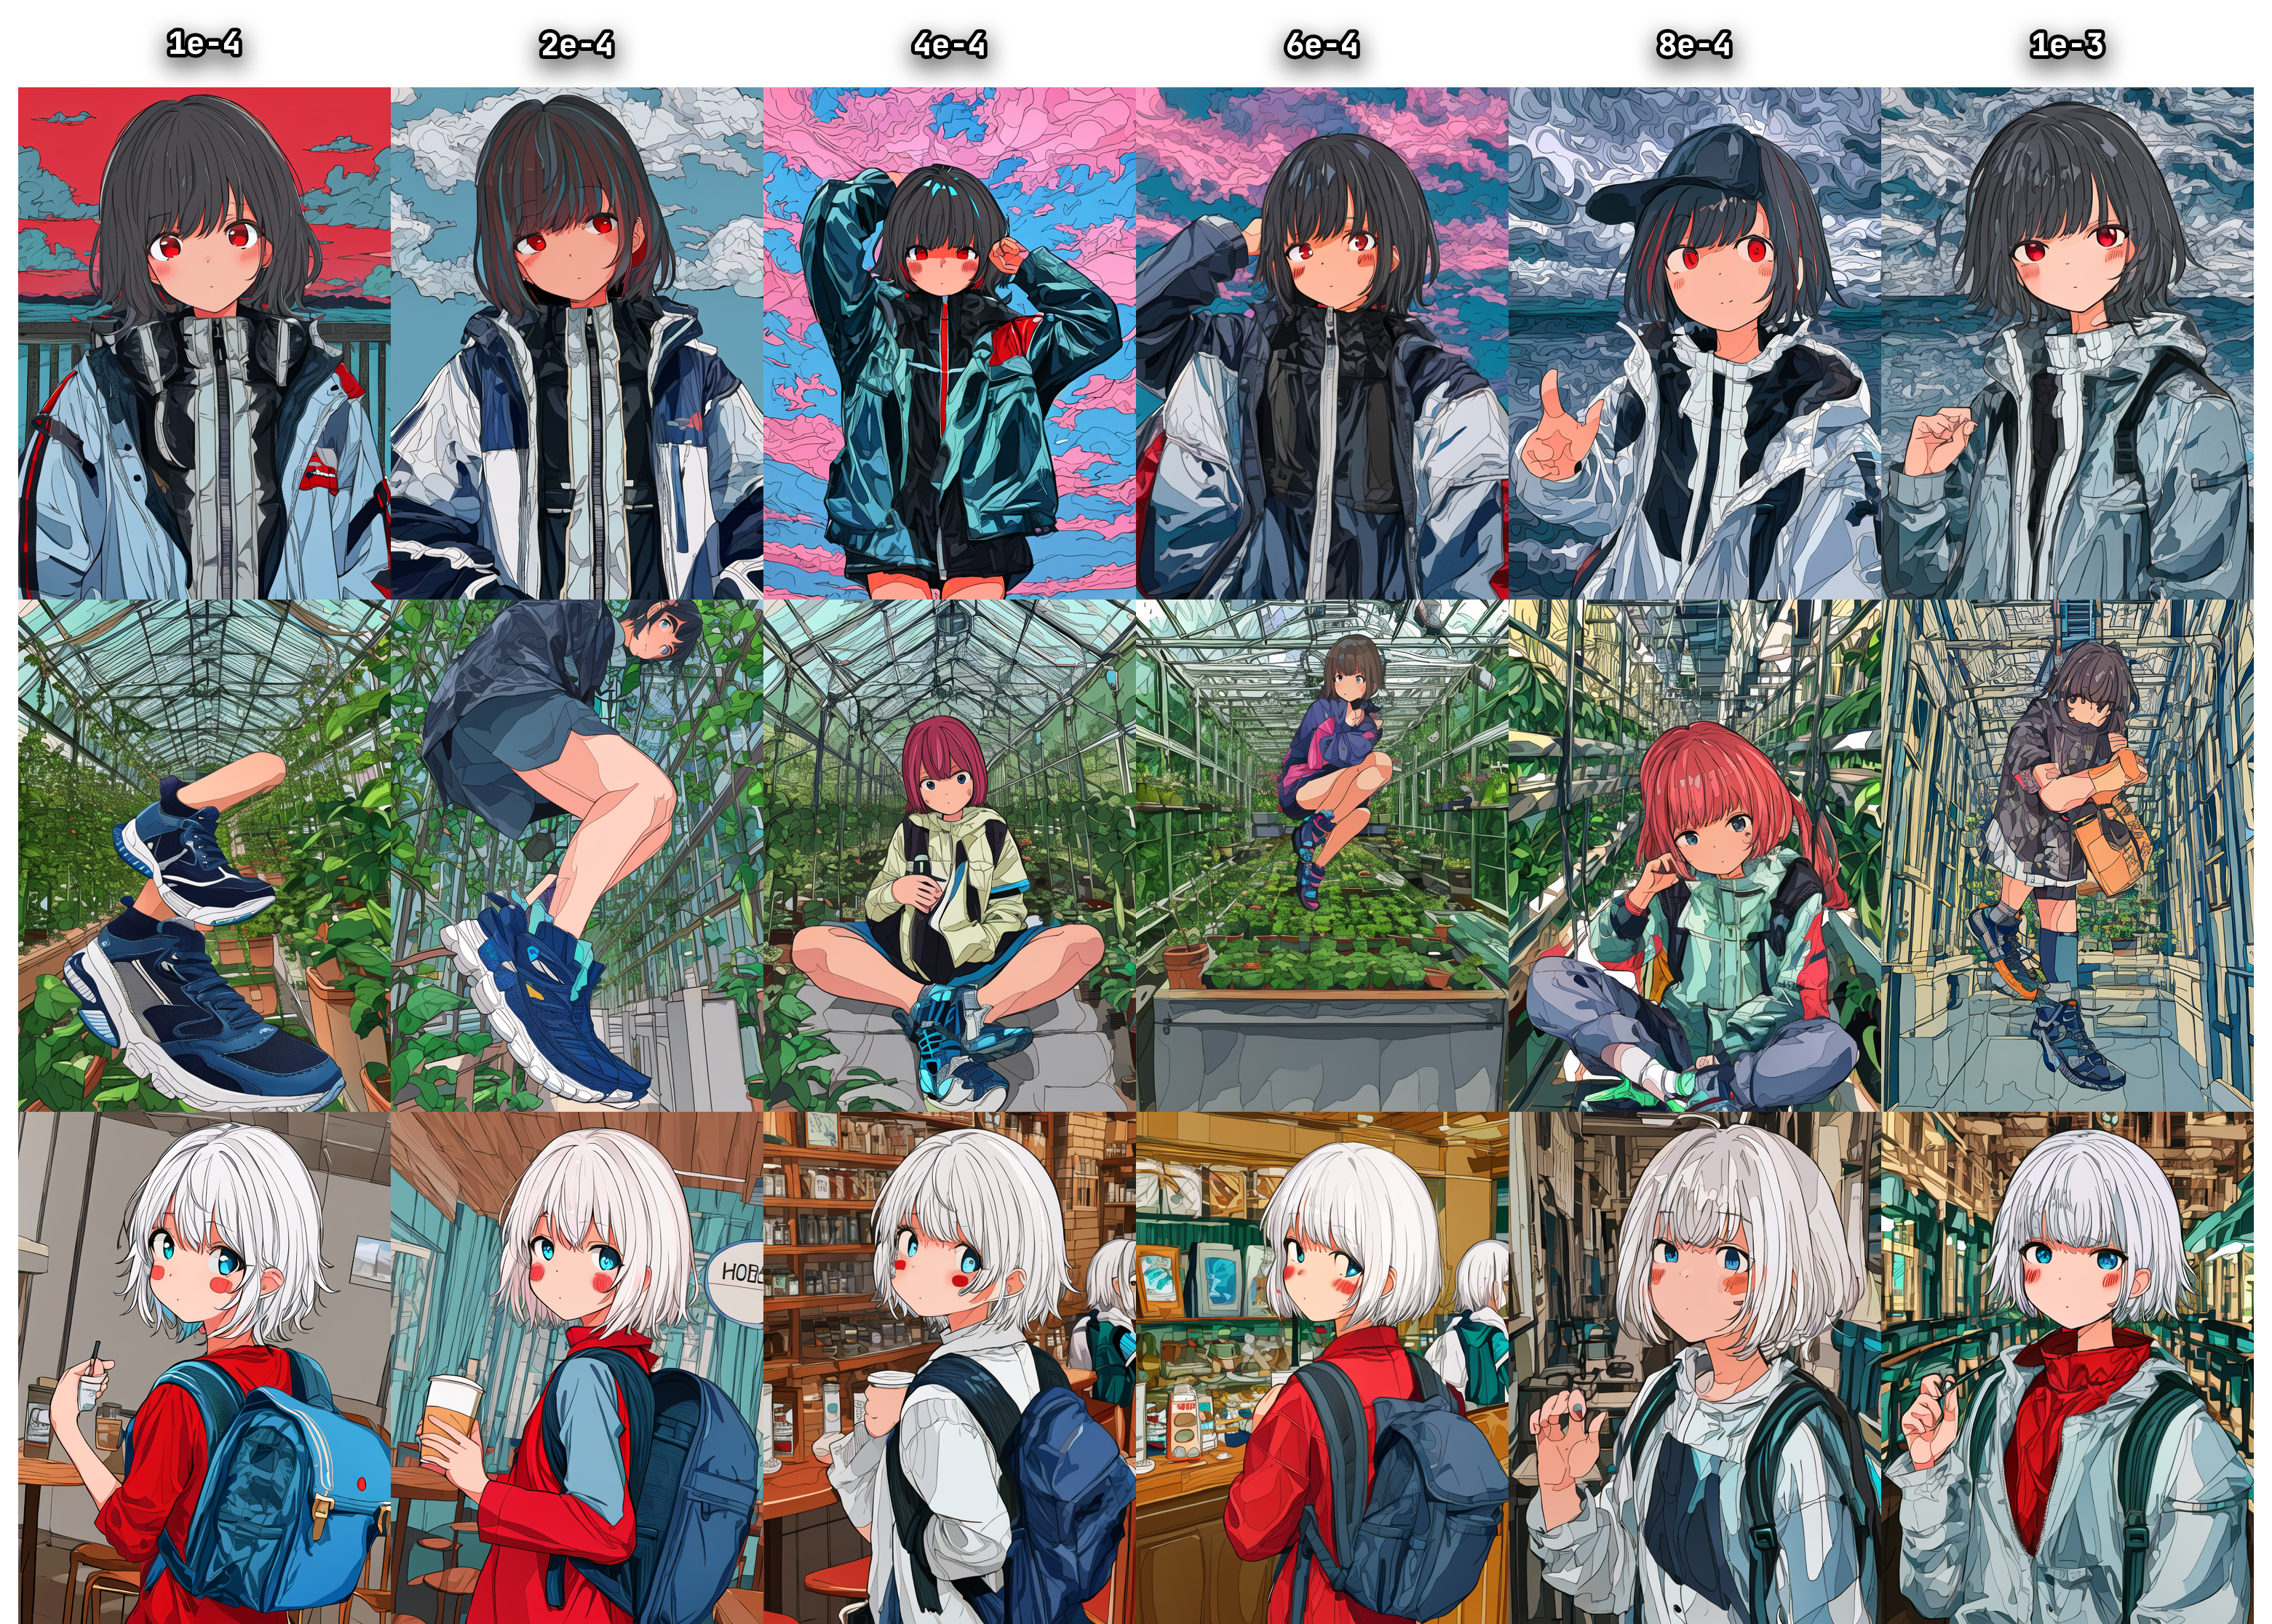
unet_lr = X, text_encoder_lr = 1e-4, scheduler = linear
$text_encoder_lr: the learning rate of the CLIP text encoder. Thanks to the text encoder the image corresponds to the text description. You might want to set this value 5-10 times less than unet_lr. There is information that teaching the text encoder is beneficial to faces. Field for experimentation. Supercedes learning_rate value.
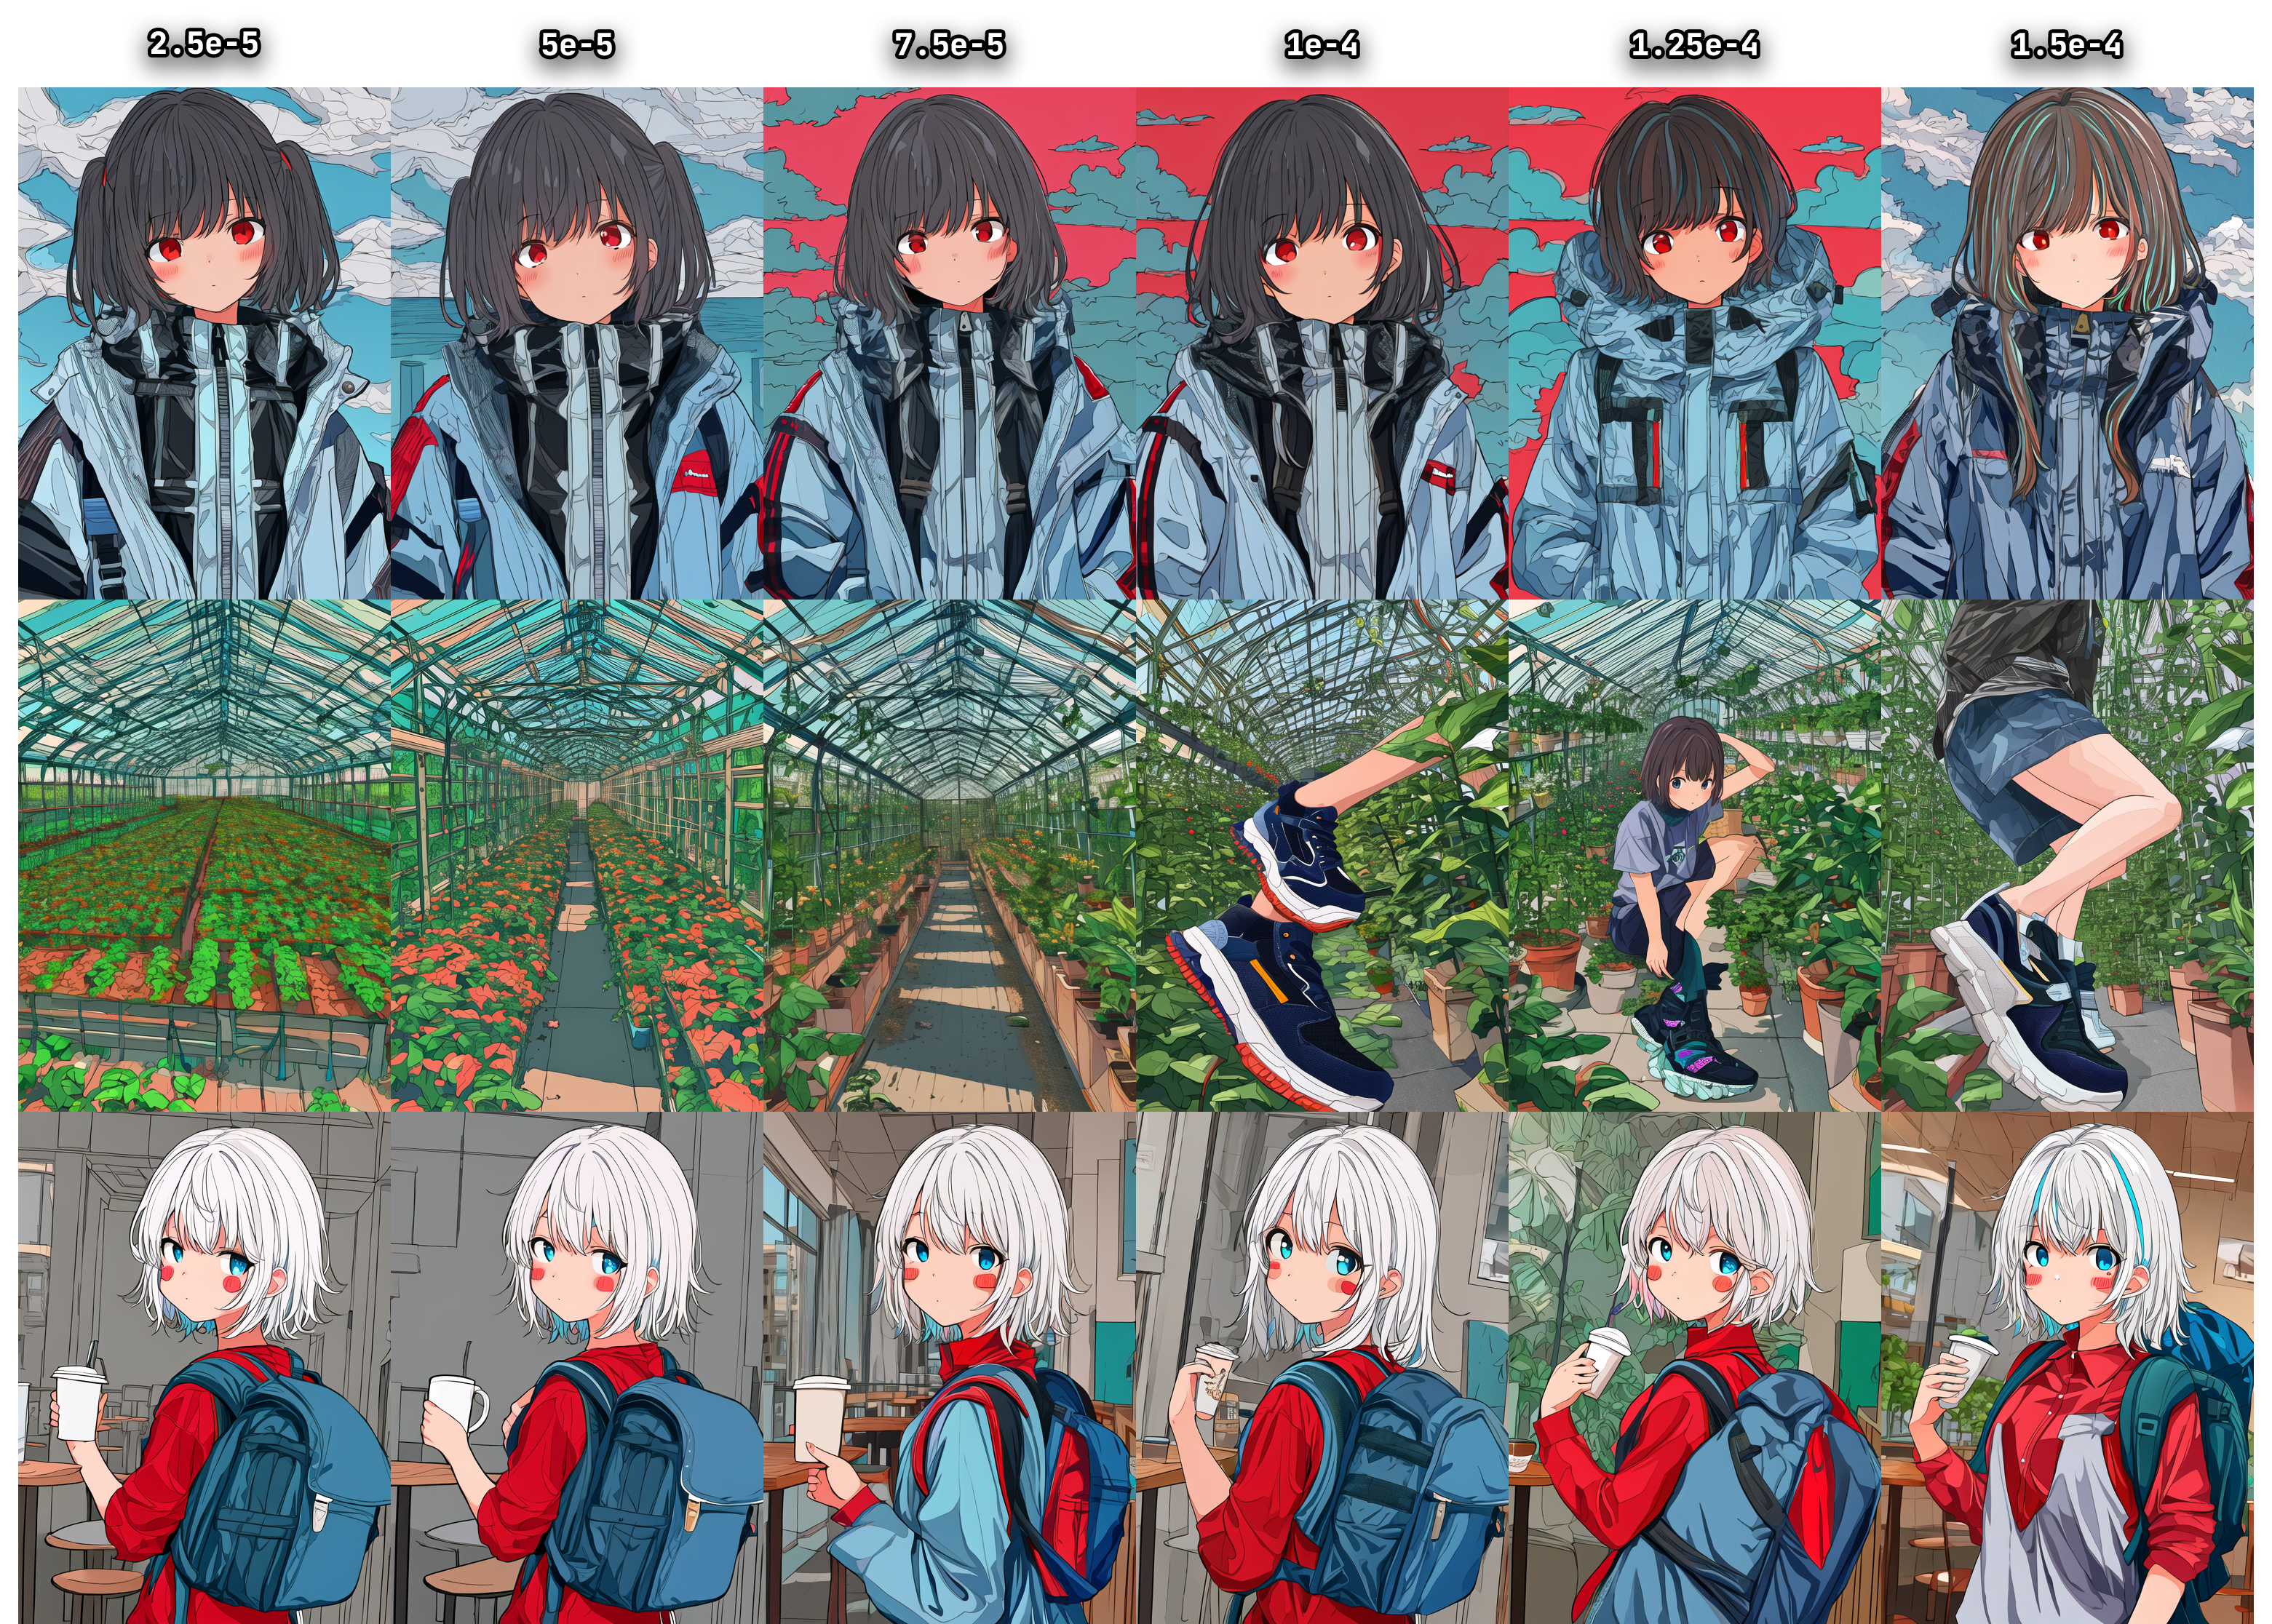
unet_lr = 1e-4, text_encoder_lr = X, scheduler = linear
$scheduler is the learning_rate curve scheduler:
- constant: learning rate does not change in time from the beginning to the end of learning. The only scheduler that does not use the variable lr_warmup_ratio. Default scheduler. There's information that LoRA suffers from constant rate.
All other schedulers use the variable lr_warmup_ratio and have the following wording:
After a warmup period lasting lr_warmup_ratio% steps, during which the learning rate increases linearly between 0 and learning_rate...
- linear: the learning rate decreases linearly from the learning_rate value to 0.
- cosine: the learning rate decreases following the value of the cosine function between learning_rate and 0.
- cosine_with_restarts: the learning rate decreases following the value of the cosine function between learning_rate and 0, with a few hard restarts.
- polynomial: the learning rate decreases as a polynomial decay from the learning_rate value to a value of 0.
- constant_with_warmup: behaves like constant.
learning_rate = 1e-4, scheduler = X
$lr_warmup_ratio: the percentage of steps starting from the first, during which the learning rate increases linearly from 0 to the learning_rate value. Small values or 0 allow you to capture a lot of information at the beginning of training and move on to finer "refinement" by the end. Values larger can help with the problem when the network overfits very quickly at the beginning of training. Here you need to experiment, dataset plays a very important role.
This parameter is not applicable for constant scheduler.
$network_dim: rank of the network, tells how much parameters of UNet and text encoder to train. Values can be different (I saw someone training at 1024), but it was found that values above 128 do not make a big difference. The more parameters you train, the higher the VRAM consumption and output file size. You can go as low as 1.
$network_alpha: added in version 0.4.0 of sd-scripts. Alpha (?) of the network. Scales output weights, multiplying them by (network_alpha/network_dim). Default value of 1 might be too low for your network.
$save_precision, $mixed_precision: As said before, bf16 > fp16, so if your hardware allows it, go for it.
$keep_tokens: if the option to shuffle text descriptions is enabled, this variable allows to protect the first keep_tokens tokens from shuffling.
Advice
Open list of all unique single-token words up to 4 characters, select any of them (for the character Tomoe Koga I found a successful token tk, for example), remove the full character name from all descriptions, insert in all descriptions the very first tag token you chose. Set shuffle_captions = 1, keep_tokens = 1. This will prevent from training on an existing tag and save some tokens.
- Running the script
If it does not launch by double-clicking
In the script folder, click in the free space -> "Open in Terminal" -> enter .\train_network.ps1 and press Enter.
sd_dreambooth_extension
The guide is based on the version c5cb58328c555ac27679422b1da940a9b19de6f2.
New versions do not fit into 8GB VRAM and may have other problems.
CKPT vs SAFETENSORS
The safetensors files are not (yet) supported! Good news: ckpt can usually be downloaded from the same place where safetensors was downloaded.
Install the sd_dreambooth_extension from the Extensions tab, restart webui and turn it off afterwards.
Download version c5cb58328c555ac27679422b1da940a9b19de6f2 here or on GitHub.
Extract the contents of the folder sd_dreambooth_extension-c5cb58328c555ac27679422b1da940a9b19de6f2 into stable-diffusion-webui\extensions\sd_dreambooth_extension\ (overwrite).
First, make sure that the checkpoint file we are going to study, <name>.ckpt is in the path stable-diffusion-webui\models\Stable-diffusion\, then:
| 1. Open a new tab | 2. Press the "Performance Wizard (WIP)" button |
|---|---|
|
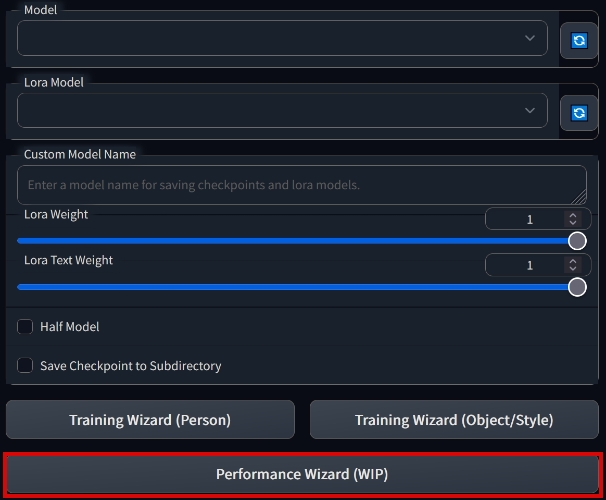 |
| 3. Come up with a name, select the source model "Source Checkpoint" and click Create | |
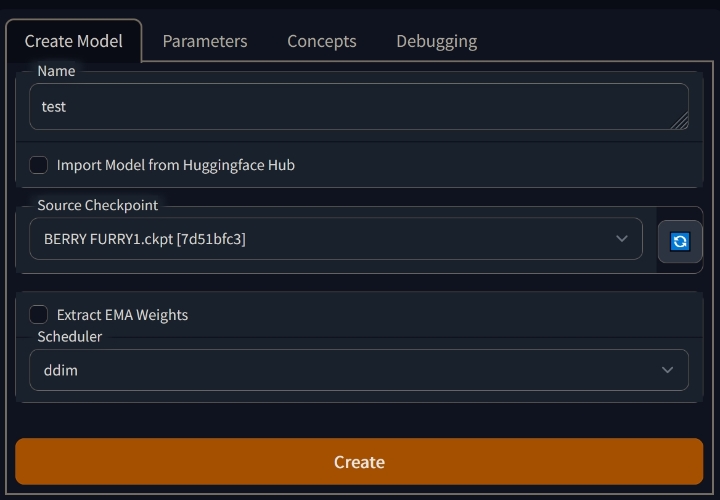 |
4. Check the settings in the "Parameters" tab (from top to bottom):
Intervals
- Training Steps Per Image (Epochs): 25 to 150.
More is better, but it takes longer. The number of iterations for EVERY image.
LoRA can be overtrained just like an embedding or hypernetwork. Too much training duration is not necessary.
- Max Training Steps: 0
- Pause After N Epochs: 0
- Amount of time to pause between Epochs (s): 60
- Use Lifetime Steps/Epochs When Saving
- Save Preview/Ckpt Every Epoch
- Save Checkpoint Frequency: 2000 or more
The more often the model is saved, the more choice you have from the younger versions if the newer ones start to go fucked up. They consume disk space! - Save Preview(s) Frequency: 500 or more
The more often the previews are saved, the faster you can see that the model is overtrained and starting to go fucked up.
Both "Save" options slow down learning because they essentially suspend it for their own business.
Batch
- Batch Size: 1
- Class Batch Size: 1
Learning Rate
Leave the whole "Learning Rate" section unchanged.
Image Processing
- Resolution 512
- Center Crop
Images must be cropped beforehand and meaningfully - Apply Horizontal Flip
Not recommended for asymmetrical characters
Miscellaneous
- Pretrained VAE Name or Path – leave blank.
- Use Concepts List
The "Use Concepts List" checkbox has priority over the settings in the "Concepts" tab.
"Use Concepts List" should be unchecked for 3 or fewer concepts and customize them through the interface, as described below. If using JSON for 3+ concepts, put the full path to the file into the "Concepts List" and check the box.
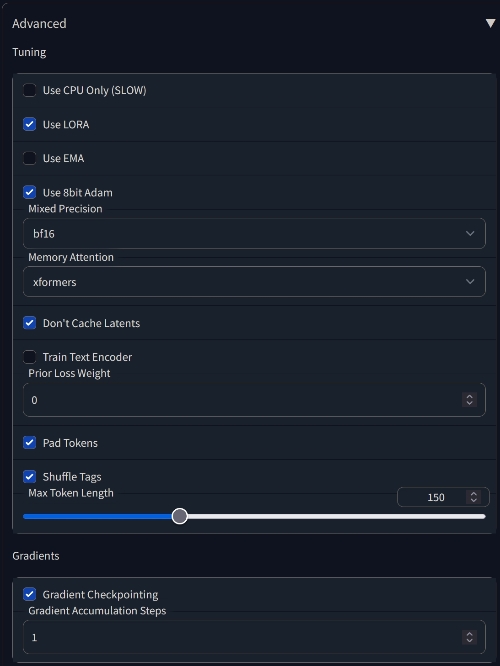
5. Open the Advanced submenu at the bottom and check the settings:
BF16 > FP16
If your hardware supports BF16, it is better to choose it.
Max Token Length
Open your largest description file, copy its contents and put it into the WebUI promt. The counter on the right will display the length of the token. If less than 75, put 75. If more than 75 – put 150. If more than 150, then put 225. The maximum value is 300.
6. Go to the Concepts tab and configure the concepts:
Example of a configured concept (long screenshot), set only the path to the folder with images and [filewords] in the fields "Instance Token", "Instance Prompt" and "Sample Image Prompt". All other settings leave as is (but just in case check with the screenshot).
After that, click "Save Settings" at the top and start the training with the "Train" button.
The previews are saved in the stable-diffusion-webui\models\dreambooth\<model_name>\samples\ folder. The pt files are stored in stable-diffusion-webui\models\lora\.
What settings can you tweak if you have 10GB of VRAM or more:
Training failed with an error – overdoing it, not enough VRAM, rollback.
You've closed all the background applications that also need VRAM, right?..
Continuing LORA training:
- Train Text Encoder
Should noticeably improve the result. - Use 8bit Adam
May slightly improve the result. - Don't Cache Latents
Should speed up learning a little.
Training a full-fledged dreambooth (generates complete models, watch out for free space): - Use LORA
It probably won't start if you don't have 24GB of VRAM. - Use EMA
Should improve the result slightly.
Troubleshooting
kohya's script
Q: There's some kind of problem with CUDA.
A: Probably not installed CUDA Toolkit.
Q: I have a 10-series card and I get an error when I start train. What to do?
A: Download alternative cuda libraries, rename the file libbitsandbytes_cudaall.dll to libbitsandbytes_cuda116.dll, put it in sd-scripts\svenv\Lib\site-packages\bitsandbytes\ (overwrite).
Q: The extension for loading LoRA networks does not work.
A: Make sure that there is no --lowvram argument in webui-user.bat. It's not working yet.
Q: I have Windows 7 and PowerShell crashes.
A: Install PowerShell 6.
Q: I get red console errors when I run a script!
A: Update PowerShell.
Q: I installed everything according to the guide, but it still does not find the modules! Do I have to install every dependency manually?
A: No, the preparation process was edited and specifically the --system-site-packages flag was removed. This flag was responsible for accounting for system libraries installed on the standard system path, and it often caused conflicts. Delete the venv folder from \sd-scripts and go through the commands again.
sd_dreambooth_extension
New and old versions
Strictly speaking, the new version might work fine. But as of 15.01.2023 the author of the guide could not train anything on it, except garbage (on two different PCs), while the old version works fine.
Settings in the new version are about the same – you can try it.
Q: The preview generates garbage instead of normal images
A: Make sure you roll back to the old version according to the guide. If that doesn't work, you probably have too fresh xformers, torch or torchvision. Create a separate webui directory for dreambooth (you can with the newest version of webui) and let it install the old version. It should work fine.
Q: My dreambooth interface looks different!
A: Check that you rolled back the version to the old one according to the guide. If you updated extensions in the extensions tab, it updated dreambooth as well. Roll back again in the same way. It's better to have a separate webui directory for dreambooth that you don't update. If it works, don't touch it.
Q: Training crashes with an error RuntimeError: CUDA out of memory
A: Check that you rolled back the version to the old version according to the guide. The functionality of the old version is confirmed with 8GB VRAM cards, and not confirmed with 6. The new version needs at least 10.