Pygmalion Guide
by Alpin

Listed below are 2 Guides (technically 3) for running Pygmalion. Use Colab if you're on mobile or have a low- to mid-range PC. If you have a beast of a machine, you should try running Pygmalion locally. Colab has quotas, and you can't leave the page inactive for more than 20 minutes without it asking for a captcha.
The guide might seem overwhelming - I recommend using the Table of Contents to navigate.
If you're on Windows and want to run locally, follow these sections in order:
System Requirements > Windows (NVIDIA) / Windows (AMD) > KoboldAI/Oobabooga > TavernAI (Optional, only install TavernAI if you did Kobold instead of oobabooga).
Colab Guide
Currently, we have 4 notebooks for Colab:
KoboldAI TPU (No mobile support)
KoboldAI GPU (No mobile support)
Oobabooga's Text Generation WebUI (Mobile support)
TavernAI (Mobile support)
Each Colab page includes a guide. They should be easy to follow. All you need to do is run the cells and you'll be done.
TPU vs GPU
Google Colab offers both GPUs and TPUs in their free plan. GPUs are a bit slower and you're limited to 1450 context size, but TPUs allow the maximum context size at 2048. Keep in mind that TPUs are rarely available as they're very popular.
To use TavernAI with the Kobold colab, follow this guide.
Local Installation Guide
System Requirements
You'll want to run the Pygmalion 6B model for the best experience. The recommended amount of VRAM for the 6B (6 Billion Parameters) model is 16GB. The only consumer-grade NVIDIA cards that satisfy this requirement are the RTX 4090, RTX 4080, RTX 3090 Ti, RTX 3090, and the Titan RTX.
For consumer-grade AMD cards, you're looking for the Radeon RX 7900 XTX, Radeon RX 6950 XT, Radeon RX 6900 XT, Radeon RX 7900 XT, Radeon RX 6800 XT, and Radeon RX 6800.
If your card isn't listed here, you can still run the 6B model! (Provided your card supports CUDA or ROCM, but we'll get to that later). Keep in mind that you'll need around 24GB of regular RAM if your VRAM is 8GB or below.
Setting up your GPU
NVIDIA
Windows
If you have an NVIDIA GPU, running Pygmalion is possible on both Windows and Linux. On Windows, simply download the Game-Ready Drivers for your specific GPU and it will install all the necessary components for you (such as CUDA).
Linux
For Linux, it'll be different for every distro. In this guide, I'll cover three popular base distros - Arch Linux, Debian, and Fedora. If you're running anything else, I'm going to assume you're smart enough to figure it out yourself.
Arch Linux
- Figure out what GPU you're using:
lspci -v | grep -A 2 -E "(VGA|3D)"You're looking for this part of the output:

- If your GPU is from the Maxwell (NV110/GMXXX) series or newer, simply install the
nvidiapackage:sudo pacman -S nvidia.
If you're using the LTS kernel, make sure you install the nvidia-lts package instead. You can figure out what kernel you're using by running uname -r in the terminal.
- Install CUDA and (optionally) cuDNN:
sudo pacman -S cuda cudnn. - Verify installations by running
nvidia-smi. The top row should contain both the Driver and CUDA versions:

- You're done!
Debian
- Figure out what GPU you're using:
lspci -v | grep -A 2 -E "(VGA|3D)"You're looking for this part of the output:
- If your GPU is from the Maxwell (NV110/GMXXX) series or newer, run this command:
sudo apt update && apt install nvidia-driver-525 - Install CUDA:
sudo apt install nvidia-cuda-toolkit. - Verify installations by running
nvidia-smi. The top row should contain both the Driver and CUDA versions:
- You're done!
Fedora
- Figure out what GPU you're using:
lspci -v | grep -A 2 -E "(VGA|3D)"You're looking for this part of the output:
- If your GPU is from the Maxwell (NV110/GMXXX) series or newer, run these commands in order:
sudo dnf update
https://download1.rpmfusion.org/nonfree/fedora/rpmfusion-nonfree-release-$(rpm -E %fedora).noarch.rpm
sudo dnf install akmod-nvidia - Install CUDA by running these commands in order:
su -c 'dnf install wget make gcc-c++ freeglut-devel libXi-devel libXmu-devel mesa-libGLU-devel'
cd ~/Desktop
wget http://developer.download.nvidia.com/compute/cuda/4_2/rel/toolkit/cudatoolkit_4.2.9_linux_64_fedora14.run
wget http://developer.download.nvidia.com/compute/cuda/4_2/rel/sdk/gpucomputingsdk_4.2.9_linux.run
chmod +x cudatoolkit_4.2.9_linux_*
su -c './cudatoolkit_4.2.9_linux_*'
When it asks you:Enter install path (default /usr/local/cuda, '/cuda' will be appended):
Type:/opt - Install GPU Computing SDK:
cd ~/Desktop
chmod +x gpucomputingsdk_4.2.9_linux.run
./gpucomputingsdk_4.2.9_linux.run
When it asks you:Enter install path (default ~/NVIDIA_GPU_Computing_SDK):
Pressenterto use the default path.
When it asks you:Enter CUDA install path (default /usr/local/cuda):
Type:/opt/cuda - Prepare CUDA:
export PATH=$PATH:/opt/cuda/bin
echo 'export PATH=$PATH:/opt/cuda/bin' >> ~/.bashrc
export LD_LIBRARY_PATH=$LD_LIBRARY_PATH:/opt/cuda/lib:/opt/cuda/lib64
su -c 'echo "/opt/cuda/lib" > /etc/ld.so.conf.d/nvidia-cuda.conf; echo "/opt/cuda/lib64" > /etc/ld.so.conf.d/nvidia-cuda64.conf ; ldconfig' - Compile CUDA
su -c 'yum install compat-gcc-34 compat-gcc-34-c++'
su -c 'ln -s /usr/bin/gcc34 /opt/cuda/bin/gcc'
cd ~/NVIDIA_GPU_Computing_SDK/C
LINKFLAGS=-L/usr/lib64/nvidia/ make cuda-install=/opt/cuda - Test if Installation is working:
~/NVIDIA_GPU_Computing_SDK/C/bin/linux/release/fluidsGL
You should see something like this:
- Cleanup
cd ~/Desktop
rm cudatoolkit_4.2.9_linux_*
rm gpucomputingsdk_4.2.9_linux.run - You're done! That was quite difficult wasn't it? Please use Arch if you can.
AMD
Windows
It's not possible to run language models (including Pygmalion) on AMD cards yet. Your only options are to either Install Linux or Dual Boot Windows and Linux. I recommend Manjaro, as it's easy to set up for running Pygmalion and also has a rather large community. Arch is the best distro for running LLMs, but installing it can be a hassle. Manjaro is an arch-based distro, but without the hassle of Arch. Once you've set it up, continue with the Linux guide for AMD.
Linux
I don't have an AMD GPU so I can't test the installations out. I'll assume you already have the GPU drivers installed, so I'll only link you to the official guides.
Please check if your distro supports ROCm!
Not all AMD GPUs are supported. Please use this list to figure out if your card supports ROCm.
Arch Linux
- Install GPU drivers:
Follow this guide on the Arch Wiki. - Install an AUR Helper. I'll use paru for this guide:
git clone https://aur.archlinux.org/packages/paru.git && cd paru
makepkg -si - Install ROCm:
paru -S rocm-hip-sdk rocm-opencl-sdk
Other Distros
There are no official packages shipped with other distros AFAIK. AUR for Arch isn't official either, but it works. If you're insistent on using a non-Arch distro, please follow the official AMD guide on this. Again, I don't have an AMD GPU to test this out.
Installing Backend
As of now, there are two popular backends to run the Pygmalion models, KoboldAI and Oobabooga's Text Generation WebUI. KoboldAI can be connected with TavernAI but Oobabooga is standalone and can't be connected to TavernAI.
KoboldAI
LINUX:
To install KoboldAI on your machine, follow these steps:
- Clone the repo by opening a Terminal instance and running this command:
git clone https://github.com/henk717/KoboldAI && cd KoboldAI - Start KoboldAI by running this command (make sure you're inside the KoboldAI folder. The previous command makes sure you're in the correct directory):
./play.shfor NVIDIA
./play-rocm.shfor AMD
WINDOWS:
- Download KoboldAI from here and run the
.exefile.
Make sure you don't have a B: Drive.
- When you reach the updater script when installing Kobold, PICK OPTION 2.
- Search for KoboldAI in the Start Menu and launch it.
Don't launch KoboldAI as Administrator!
Using KoboldAI
Once you've launched KoboldAI, click on AI on the top-left corner, then click on Chat Models, and select PygmalionAI/pygmalion-6b or whatever variant you want to use. Then click on Load.


You can view the download progress either from the Terminal or CMD window, or from inside the KoboldAI browser tab. You can close the browser if you want, but leave the Terminal/cmd running. If you want to open the KoboldAI UI again in your browser (provided you're running it on Terminal/cmd), enter this in your browser's URL bar: https://localhost:5000.
Oobabooga's text-generation-webui
If you're on Windows, simply download this file, extract it, and double click on install.bat. It'll install oobabooga and everything it needs on the same folder as the extracted file.
To download a model, double-click on download-model.bat. You can also start the webui by double-clicking on start-webui.bat.
MANUAL INSTALLATION (OPTIONAL):
It's pretty straightforward. All you need to do is installing miniconda and running a few commands in the terminal/cmd.
- Install Miniconda.
- Create a new conda environment named
textgen:
conda create -n textgen
conda activate textgen - NVIDIA only:
conda install torchvision torchaudio pytorch-cuda=11.7 git -c pytorch -c nvidia - AMD only:
pip3 install torch torchvision torchaudio --extra-index-url https://download.pytorch.org/whl/rocm5.2 - Clone the oobabooga repo and install requirements:
git clone https://github.com/oobabooga/text-generation-webui && cd text-generation-webui
pip install -r requirements.txt - You're done! You can open oobabooga in chat mode with the following command inside the
text-generation-webuifolder:
python server.py --model PygmalionAI/pygmalion-6b --cai-chat --auto-devices --no-stream
If you have a low VRAM GPU (below 16GB), add the --load-in-8bit argument when you launch the UI. According to my tests, it doesn't work well with GPUs with lower VRAM than 10GB, so for those you might want to stick with --auto-devices and offload to CPU/RAM instead.
You can view the full list of commands here.
Installing Frontends
Currently, the only recommended frontend is TavernAI. I'll add more here as they come up (currently considering miku.gg).
TavernAI
TavernAI is a nodejs app, so it can theoretically run on every platform that supports nodejs (sans ARM64 processors, such as Android devices).
- Install
nodejs:
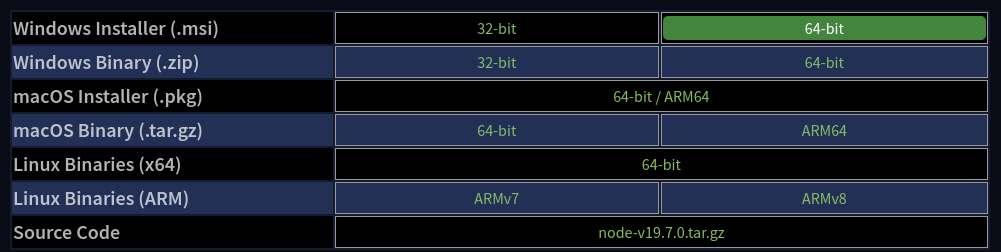
On Windows 10 and above, open this page and download the 64.bit.msiinstaller.
 On Linux, install
 nodejsandnpmwith your distro's package manager. e.g.pacman -S nodejs npm,apt update && apt install nodejs npm. - Install
git:
Gitcan be installed via Terminal/PowerShell.
Windows:
OpenPowerShelland run these commands in order:
Set-ExecutionPolicy RemoteSigned -Scope CurrentUser
irm get.scoop.sh | iex
scoop install git
Linux:
Use your distro's package manager, e.g.pacman -S git,apt install git. - Clone the TavernAI repo:
git clone https://github.com/TavernAI/TavernAI - Start TavernAI:
Windows:
Open thestart.batfile in the TavernAI folder by double-clicking on it. If it didn't work, run it as administrator by right-clicking on the file and choosing "Run as Administrator".
Linux:
Open a Terminal instance inside the TavernAI folder and run this command:npm i && node server.js. - Connect TavernAI with KoboldAI:
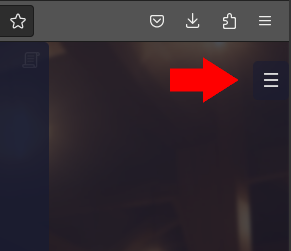
Click on the burger menu to the top-right corner of the Tavern screen. ChooseSettings, and input your KoboldAI URL inside the box. Add a/apiat the end of it. Then you can hit connect.
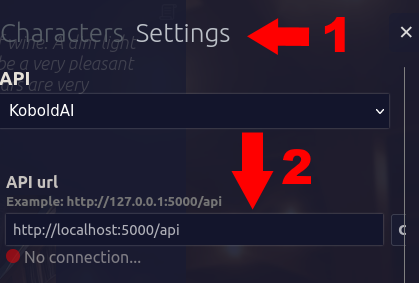
If you're using Google Colab, copy your remote URL instead. If it ends with a # or new_ui, remove them and replace them with /api. If they don't, simply adding /api will suffice.
Low VRAM guide
This section is for people who want to run the models locally but don't meet the requirements.
This section is for GPUs with less than 10GB of VRAM. If you have more than 10GB, you can simply use 8bit (currently only possible with oobabooga, at least officially). For GPUs that are 8GB or lower, you can offload to system RAM/CPU. Keep in mind that this will impact the inference speed - without offloading (if you have a 16GB or higher GPU) you can generate up to 90 tokens in ~5 seconds. With offloading, you can have speeds as low as 50 seconds to 3 minutes.
System RAM requirements
You need at least 24GB of System RAM if your GPU is 8GB or less. Recommended amount is 32GB.
Oobabooga
For Oobabooga, you can simply pass the --auto-devices argument and it'll sort it out for you.
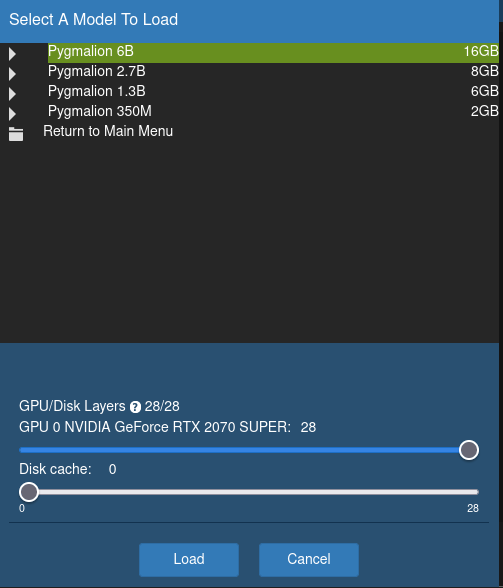
KoboldAI
When loading your model, you have the option to assign layers to GPU and Disk Cache. Don't assign anything to Disk Cache unless you have a very low amount of RAM. You could also potentially increase inference speed by several minutes if you're not using an M.2. NVMe. Any layers you don't assign to GPU are automatically assigned to RAM instead. In the example below, I'm assigning 12 layers to GPU, since the RTX 2070 Super has only 8GB of VRAM:
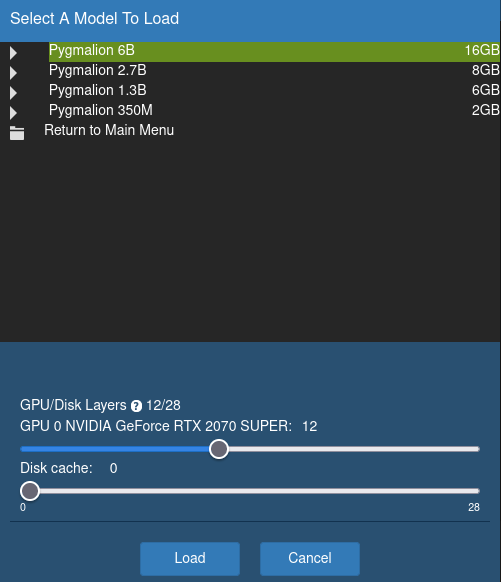
You will want to experiment for your specific GPU and see what layer amount works best. Make sure you lower the context size in Kobold or Tavern, or else you'll get Out Of Memory issues.