SayoDevice o3c Resources
The place for all resources related to the SayoDevice o3c keypad.
In addition to that, tips and tricks. Even troubleshooting solutions.
This site is not affiliated with any official Sayo personnel.
Start with checking the Index.
Or check FAQ if you have some questions regarding the site.
Have fun!
🇷🇺🇨🇳 Languages 🇷🇺🇨🇳
Index
Light/dark mode here....
Are you a newcomer? Check out Calibration - > Rundown of switch parameters first.
Input
Calibration
How?
- Press and Hold the knob.
- Scroll the knob down to Button, and click it.
- Go to Calibration, and select which key to calibrate for, then proceed.
- Gently press down until you feel the switch touching the bottom, then release immediately.
What
The "calibration" process is just defining the end point of the switch.
You should always do it gently because if you force it too hard, the latches on the switch will bend down and lower the switch, thus giving an incorrect reading.
Rundown of switch parameters
All values are RELATIVE to the switch's top (0.00mm), and they are built on the assumption that you're using 4mm travel switches.
(might wanna check the HE switches chart out)
Click the value to set it. Turn left/right to respectively increase/decrease, each notch you feel is 0.05mm.
The limit for all values is 3.95mm, and the minimum is 0.00mm (you'll have to turn the knob twice at 0.05mm to reach it, it's a "special" value.)
You can always click again to exit the visualiser and see what value you're at in numbers.
Normal Rapid Trigger
[Trigger] and [Release]
Every distance before [Release] is considered a "top deadzone", in that everything that happens there is effectively ignored. Everything.
For example,
If my [Release] is 1.00mm then 0.00mm -> 0.99mm is my "top deadzone".
If I try to set my [RT Area] in this "top deadzone" it's ignored as well. (For example [RT Top] 0.10mm and [RT End] 0.90mm with both [RT Trigger] and [RT Release] at 0.05mm, and nothing still happens.)
[Trigger] and [Release] constitutes an [Actuation Point], like in normal switches.
[Trigger] should always be bigger than [Release].
When the switch goes through [Trigger], the keypad registers a click and puts it into an "held down" state.
You may then press down as much as you like, until one of those things happens:
- You release back to whatever [Release] was set to, as that's the absolute release point for whatever's going on.
- You're in the [RT Area] and release back to whatever [RT Release] was set to.
With this, it's safe to consider that [Release] and [Trigger] are like absolute on/off switches for the entire keypad's operation.
The distance between both of them denotes how big your [Actuation Point] is, and it should ideally be at least 0.10mm.
You can have it as small as 0.05mm, but that tends to cause accidental and unwanted presses due to sensor chatter.
HOWEVER, there's a funny quirk.
If your [Actuation Point] is high up and is 0.10mm or smaller, it can cause random key presses at the top. see video
To fix this, extend the distance to 0.15mm minimum (perhaps even more if it still happens) instead of 0.10mm. see video
For example:
I want a 0.20mm long [Actuation Point] at 0.30mm
What I would like to do is:
Set my [Trigger] to 0.30mm so that the click registers exactly where I want it to be.
and set my [Release] to 0.10mm so that it also takes me exactly 0.20mm to release the key.
[RT Top] and [RT End]
Both of these constitute the area in which Rapid Trigger is effective, which shall be referred to as [RT Area]
[RT Top] defines the top of [RT Area].
If you wish to use Rapid Trigger all the time, just set it to equal to your [Trigger].
Any other value is for advanced usecases (such as only wanting to use rapid trigger for half of the switch, etc...)
Continuous Rapid Trigger and Disable Rapid Trigger also makes special use of this.
[RT End] defines the bottom of [RT Area].
For most people, the only time you'll ever want to touch this is:
- Your fingers are too shaky when holding down sliders, in which case you'll want to reduce it so that you won't accidentally trigger [RT Release]. This creates an "end deadzone" for your shake.
- Kinda like above, if you're experiencing sudden key release in general when bottoming out, reducing it will often help in most cases.
- Disable Rapid Trigger
Or if you're some freak who has their own ideas about how their gameplay should be, I dunno.
[RT Trigger] and [RT Release]
Those two variables take effect only in the [RT Area]. They govern operational sensitivity.
[RT Trigger] controls how far you have to press down for the key to register a click, and transfer into a "held down" state in [RT Area].
[RT Release] controls how far you have to release the key from its "held down" state for it unpress in [RT Area].
As with all other variables, change them according to your OWN preferences and comfort.
The general recommendation is to not use anything lower than 0.20mm for both of them. Unwanted inputs may occur otherwise.
Continuous Rapid Trigger
This "mode" is activated when you set your [RT Top] to 0.00mm, and [Trigger] EQUAL to your [RT End]. (for example, 3.95mm [Trigger] and 3.95mm [RT End])
(This is also how older firmware versions work.)
In this mode, the keypad basically works like Normal Rapid Trigger without an [Actuation Point].
[Release] becomes the old 1.2 firmware's [Deadzone]. Anything in the [Deadzone] is completely ignored.
You can still use [RT End] and [Trigger] to set a "bottom deadzone". (for example, on 3.70mm for both the keypad will ignore 0.30mm at the bottom)
(if you're looking to copy your old settings then just set it to 3.95mm, as the old firmwares never really had a bottom deadzone)
(also, if you're looking to copy your old settings, you can just keep [Press] and [Release] the same as before)
For example:
My old firmware settings were 0.10mm [Deadzone], 0.20mm [Press] and 0.25mm [Release]
To replicate these on the new firmware, I first set my [Release] to 0.10mm, then [RT Trigger] to 0.20mm and [RT Release] to 0.25mm
Then I set my [RT Top] to 0.00mm, then [Trigger] and [RT End] to 3.95mm to convert the keypad to Continuous Rapid Trigger.
The end.
Disable Rapid Trigger
How?
- Calibrate the switch PROPERLY. Press all the way down gently, until you feel the bottom out.
- Set [RT Top] and [RT End] both to 0.00mm (do it with [RT Top] first)
- Your [Actuation Point] is whatever you want in [Trigger], minus how long you want it to be resulting in [Actuation Length]
What
So I want a 3.2mm actuation point with a 0.10mm long [Actuation Length]
I do step 1, 2 and set my [Trigger] to 3.20mm and [Release] to 3.10mm (3.20 - 0.10 = 3.10)
NOTE: If you are looking to faithfully reproduce how it feels on MX Mechanical switches, they usually have an [Actuation Length] of around 0.40mm
The end.
Placeholder
Placeholder
Placeholder
Troubleshooting
Factory Reset
How?
Use Google Chrome/Chromium, Microsoft Edge or Opera for this!
Firefox and other browsers do not support WebHID which the site uses to communicate with the keypad.
🤓 [FOR LINUX USERS] Some changes must be made to udev rules.
sudo wget -P /etc/udev/rules.d https://raw.githubusercontent.com/lerh050/o3c/main/98-saybot.rules and sudo udevadm control --reload-rules.
A reboot might also be necessary.
- Plug in your keypad. If necessary, plug it in while holding down the knob.
- Go to
sayodevice.comand select your device when asked

- Go to the
Settingstab and select the 3 boxes to Open, as shown below

- Go to the
HID tab, select the option at the very bottom (that's the factory reset code), then click on the arrow to send it to the device.

- Replug the device.
Still doesn't work?
You might need to perform a hardware factory reset. Click here!
Hardware Factory Reset
For o3c++ users, there is a little permanent caveat. It's at the end of the guide.
If you're feeling bored and your o3c++ still works perfectly and you just want to dick around with this, then DON'T DO IT!!! The effect is NOT reversible!
- Download WCHISPStudio and install it.
- Download the base firmware package (click me!).
- Open WCHISPStudio and COPY those parameters EXACTLY.
You can change the language with on the top bar


- Remove the knob and keycaps off your unit, then screw off the top plate.
(bro tip: use the plate itself as a screw holder)
 Then get the screen off and hang it on the encoder shaft. You can use something to push it up or just shake it out like below.

- Get anything conductive (metal tweezer, paperclip, etc...) to short the 2 pins under the screen, then plug the unit into your PC while doing so.

- If something like this pops up on WCHISPStudio, you're doing it right.

- Now
 , then unplug the unit and repeat Step 5
- Select the base firmware package, tick the box, and


- Replug your unit and it should be working now, unless you use o3c++. If so, read below.
o3c++ users have extra stuff to do
Since the base firmware package in this guide was only built for o3c, o3c++ users have to do extra stuff when upgrading firmware (after doing the hardware recovery and for future updates).
The device will be seen as an o3c by the updater and thus be flashed with the incorrect o3c firmware, so to get around this they must:
- Delete the "app_o3c.bin" file in the "firmware" folder
- Rename "app_o3c_pp.bin" to "app_o3c.bin"
- That's it. You can run the bat file to upgrade like usual now.
Everything else works fine. The o3c++ that has been through this process will (surprisingly!) still be recognised correctly as an o3c++ on the site and software and all features will work just fine. (lmao what???)
Display & Importing Media
How media is imported
How?
Aligned to the top left corner, every single piece of media (GIFs are split into and processed frame by frame, then the file size for each frame is added together with no additional compression) goes through the following things:
- They are first downscaled by the software (very basic and ugly, only bilinar filtering)
- They're then converted to raw raster data. This could undo most image optimisations.
- Then they get put through the following algorithm:

This often results in a lower file size, but in rare cases it could be higher as well. This is due to the "converting to raw raster data" process.
What
Optimise your resolution when importing! This has a MAJOR impact. For example, if your GIF has a lot of frames, is square and should only fit to one side then set it to a lower resolution, like so:

Aspect ratios below 1:1 (say, 79:80) WILL break the selector!!! Try to work around that for now.
The processing is consistent and will result in around the same result (quality and file size after compression) all the time no matter how much you optimise your source material.
Despite this, you should still do the downscaling yourself with better algorithms (ImageMagick at ezgif). The software sucks ass at scaling (very basic, literally just bilinear filtering and nothing else).
Don't worry too much about source material quality because it'll almost always look like shit all the same in the end! Have fun.
How to import media
It is advisable to check out How media is imported first.
How?
- Get the software for your firmware. Could always check out the downloads section.
- Plug the keypad in and open the software.
- Click the Images tab, click the
+and a box should show up. ClickOpen Pictureand select your media.

- An adjustment box should pop up (it won't if you don't have anymore space), you can play around like below then click
OKto import.

Aspect ratios below 1:1 (say, 79:80) WILL break the selector!!! Try to work around that for now.
- Click this box
 to write the changes to your keypad.
What
Due to how janky the editor is, it's recommended to artificially enlarge your canvas for better adjustments.
 gets you
 gets you
Extras
HE switches chart
Max raws are grabbed on the latest o3c firmware version and north facing
(max raw can be different between the latest o3c and o3c++ firmware versions sometimes, and there's the South Facing Jank)
(Note: you can drag/scroll the chart around)
| Pic | Name | Mechanism | Start/BottomForce (gf) | Tactile/BottomOut (mm) | Max Raw (approx. range) | Where to get | OEM | Notes |
|---|---|---|---|---|---|---|---|---|
 |
Lekker Linear60 | Linear | 40/60gf | None/4mm | ~800-1400 | Wooting's Official Site | Gateron | |
 |
Lekker Linear45 | Linear | 30/45gf | None/4mm | ~800-1400 | Wooting's Official Site | Gateron | |
 |
Steelseries Omnipoint | Linear | 30/45gf | None/4mm | ~800-1400 | Disassemble | Gateron | Scratchy, very loose fit in the o3c, 0/10 |
 |
Gateron KS-20 White | Linear | 30/50gf | None/4mm | ~800-1400 | MechKeyShop | Gateron | |
 |
Gateron KS-20 Orange | Linear | 38/50gf | None/4mm | ~800-1400 | MechKeyShop | Gateron | |
 |
Yiqian Reds | Linear | 30/50gf | None/4mm | ~150-800 | Please don't. | Yiqian | 🍀 |
South Facing Jank
The LEDs on the o3c are mounted on top of the PCB, and protruding from it.

This causes some rather serious complications on south facing, like this:
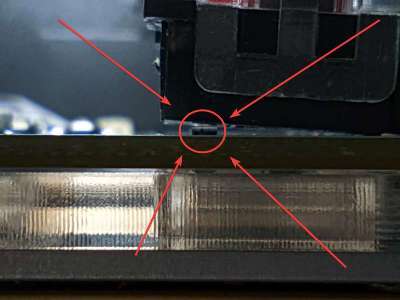
This forces at the switch at a weird angle resting on the LED, and thus reduces max raw, and makes the entire thing sound like shit because the switch is resting on the LED instead of hugging the PCB to make a warm, satisfying sound profile.
Most switches do not account for this, and sometimes the ones that do are still not enough.


Wooting doesn't have this issue because the LEDs on their products are mounted under the PCB, thus completely leaving the socket flat accomodating both orientations without any issues.

Replacement Parts
Knob: The knob uses a generic "EC11 Rotary Encoder", just google it. And make sure you get the correct knob for your encoder's shaft (or the other way around).
You will need a soldering iron to remove it.
Screen: Generic 0.96mm spliced TFT LCD display, here's a link (there are cheaper offers out there, just google them)
You do not need any equipment to replace it, just lift the clamp to get the cable out. Then push the new cable into the slot nicely and pull the clamp down again.
Downloads
Those are download links directly grabbed from official channels (discord server, site, etc...).
Firmware & Software
Flash the firmware by double clicking the upgrade.bat file, always.
Other Stuff
- Top Plate Template PSD File
You can use this to make your own covers for the top plate. Or make your own top plate out of other materials.
FAQ
go back?
Q:  ?
?
A: Here. That's the official Sayo Discord. You should know this already unless you didn't read the pamphlet or the link on it has already expired.
Q: Who runs this town?
A: No one.
Q: Who contributes?
A: See below.
Q: How do I contribute?
A: On GitHub. Just make an issue and someone will sort it out.
light/dark mode here (click it)
