The Absolute Retard's Guide To Running And Training ESRGAN Models
 last update 2023-10-09
This guide is now out of date. The ESRGAN fork used is no longer maintained. It might still work, but don't bet on it.
ESRGAN stands for some technical bullshit you don't care to understand. It's what you will use to run .pth models to upscale/enhance your images.
Below you will find step by step guides to installing ESRGAN and running it, as well as training your own models.
This guide will assume that you're on windows and that you've got a Nvidia GPU If you find a typo or have any suggestions, just write them in the thread. I'll probably see them.
Running
Installing ESRGAN
Python
- uninstall any version of Python you might have previously downloaded
- install Python (I'm running 3.9.5)
- the 64 bit version
- make sure to select Add Python to PATH
- make sure to install PIP
Download ESRGAN
- download this ESRGAN fork by clicking the "Code" dropdown on the right and clicking download zip. unzip where you want it.
- THIS FOLDER IS HEREAFTER REFERRED TO AS YOUR "ESRGAN FOLDER"
Install Requirements
- Open CMD and navigate to the folder you downloaded in the previous step.
- If you don't know how to do that, make a text file in the folder with the content
CMD, save it as a.batfile, and run it. - If that's still too challenging, download this bat file into the ESRGAN folder and run it. It's good practice to open any .bat files you download from the internet with a text editor to make sure they're not gonna delete your system32.
- If you don't know how to do that, make a text file in the folder with the content
- You should now have a CMD window open.
- Type the following commands and press enter:
python --version- If this does not show the version you have just installed, uninstall ALL versions of python on your system and try again.
- If this throws an error, you have not added python to your PATH, or windows is throwing a tantrum. A restart might help if you're certain you checked the PATH checkbox.
pip --version- This should not throw an error. If it does, you have not installed pip.
pip install -r requirements.txt- This will install the requirements listed in the
requirements.txtfile that was included with the folder you downloaded.
- This will install the requirements listed in the
- If you get an error along the lines of
Torch not compiled with CUDA enabledwhen trying to run a model, run this command:
pip install torch==1.9.1+cu111 -f https://download.pytorch.org/whl/torch_stable.html
Next we need a model to run.
Downloading Models
Likely the largest collection of ESRGAN models can be found here.
My personal recommendations include:
MangaScaleV3, for upscaling manga with screentoneseula_digimanga(dl) could also deliver very usable results depending on the situation
- The
JPGmodels by Alsa, for cleaning JPG artefacts - Whatever
bullshitmodel anon is currently shilling in the thread
Put these .pth files into the models folder.
Running ESRGAN
Now we're ready to process your pages!
- Put whatever you want to upscale into the
inputfolder. - Open CMD and navigate to the ESRGAN folder (see above if you forgot how to do this).
- Type
python upscale.py [your model filename here]- example:
python upscale.py 2x_MangaScaleV3.pth - You can also "chain" models like this:
python upscale.py 1x_JPEG_60_80.pth>2x_MangaScaleV3.pth
- example:
- Your input images will now process, and after a while, they will appear in the
outputfolder.
ESRGAN Wrapper
But typing this shit every time is a pain, right? I thought so too and wrote a script that does the typing for you.
- Download this zip.
- Unzip into the ESRGAN folder.
- Inspect all files with a text editor to make sure I'm not bricking your PC.
- Now you can run the
ESRGANwrapper.batfile and this window will pop up, showing all the models contained in yourmodelsfolder.
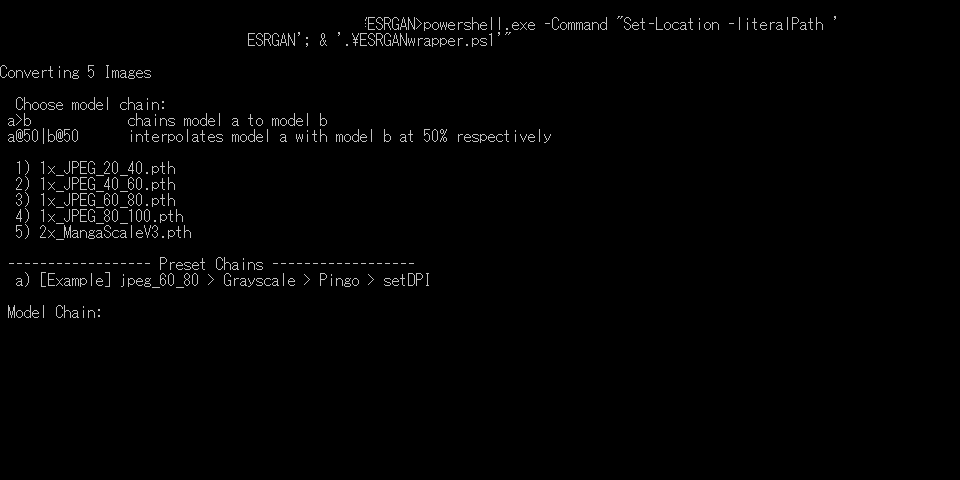
- A number has been assigned to each of your models, and instead of typing the full name of the thing, you can now just enter
3>5, and the script will run the JPEG_60_80, followed by MangaScale on the images in your input folder. - The ones of you who have a couple of nerves connecting your eyeballs to their excuse for a brain will have noticed that in the
[Example]preset chain, there is mention of grayscaling and pingo. To use this functionality do the following:- Download this zip, and extract the
.pthfiles into yourmodelsfolder. - Install ImageMagick.
[Required for the DPI and Grayscale functions] - Download Pingo to your ESRGAN folder.
[Required for the Pingo image optimization function]
- Download this zip, and extract the
- now when you run
ESRGANwrapper.batagain, at the top of your models you will see options for these functions. Note that neither their position, nor their order matters. These options will always be executed after your ESRGAN models, in the ordergrayscale>pingo>dpi.- Example:

The Model Chain6>1>2here will first run the JPEG_60_80 model, then Grayscale your images, then optimize them with pingo (note that the filesize decrease after grayscaling is often times negligible).
- Example:
- If you're adventurous, you can try to add your own preset chain. the code for that's located in
ESRGANwrapper.ps1around line 30.- You can also try to adjust the
setDPI.ps1script to match your usual DPI settings. You should only need to change the variables$origHeightand$origDPI.
- You can also try to adjust the
.bat
There's also the much simpler option of just making a couple .bats for your most used model chains, but where's the fun in that.
Training
But what if none of the models in the database suit your purpose?
What if you're insane and want to upscale your manga by 20 times?
You make your own model. The main difficulty with this is your training set.
Basic Concepts
Training Data
You're going to need a lot of images to train a model. The more you have, the better. There are some use cases where you can get away with less, but try to aim for around 400 images at least.
But what is training data? People throw this term around and you probably don't really know what it entails.
Your training data is composed of two components:
- HR (high resolution), or sometimes also called GT (ground truth) images. This is what you want the model to approximate.
- And LR (low resolution) images. These are downscaled versions of your HR images, and this is what the model will upscale and try to match the HR version.
To reiterate, you feed the model a LR image, and the model will upscale it. The image the model upscaled will be compared to the original HR image, and through magic algorithms, over time the model will learn to make something that's similar to the HR image from the LR image.
Preparing your Training Data
Choosing training data is an art in itself. Your images should be similar but not too similar. But since we're going to be training a model for manga, there's not all too much we can do. I'd recommend either focusing your training on a single manga, or go all out on diversity, with tons of pages from a variety of manga.
It's of note that your training data doesn't need to all be in the same resolution, but your LR images all need to be downscaled from the HR images by the same ratio. So you can have both 2048px images and 1600px images in the same training set, but the LR versions all need to be downscaled by 50% or whatever of their original resolution.
You can't have a set with LR images that are mixed 25% and 50% of the size of the HR images.
Collect all your HR images in a folder and use a tool of your choice to downscale them to 50% (2x), 25% (4x), or whatever to a new folder. You need both your HR and your LR images.
- Here's an imagemagick command you can use:
magick mogrify -resize 50% *.png
Keep these folders safe, you'll need them later.
Validation Data
Then, there is a validation set. Basically a set of images that the model should be able to scale, but wasn't in the training set. This serves as a control for your model's ability.
You will also need HR and LR versions of this.
It's a decent idea to just snatch a couple of difficult pages out of your training set and repurpose them for validation.
Note that you don't actually need to use full pages. To save time and vram, you can just crop a couple pages to a small region of interest and use that to evaluate shit.
These models work in 128px squares, so multiples of that are a pretty efficient way of going about it.
I also wrote a small script to make some quick and dirty comparison gifs, but if you want to use it, you'll have to figure it out yourself.

Pre-Trained Model
To start your training, you will need a pre-trained model for the program to use as a starting point. Just choose something from the model database that's kinda similar to what you want to do. It won't matter too much in the long run.
Alternatively, there are some more models here.
Downloading TraiNNer
- download this TraiNNer fork by clicking the "Code" dropdown on the right and clicking download zip. unzip where you want it.
- THIS FOLDER IS HEREAFTER REFERRED TO AS YOUR "TRAINNER FOLDER"
- For simplicity's sake, make a new folder here named
datasets- Also make one named
pretrained, and put your pre-trained model in here.
- Also make one named
- open it, make one named
trainand one namedval - in both of these folders, make one folder named
hrand one namedlr - Place your training images in
[TraiNNer folder]\datasets\train\hrandlrrespectively - Place your validation images in
[TraiNNer folder]\datasets\val\hrandlrrespectively
Installing Requirements
I'm assuming you've already installed Python. I'm also assuming you know how to open CMD in the TraiNNer folder by now. If not, see above.
- Open CMD in the TraiNNer folder.
- You can try to run
pip install -r requirements.txt, but it's giving me errors. - If the
requirements.txtroute isn't working, type the following commands:pip install PyYAML numpy opencv-python tensorboardXpip install torch==1.9.1+cu111 -f https://download.pytorch.org/whl/torch_stable.htmlpip install torchvision==0.10.1+cu111 -f https://download.pytorch.org/whl/torch_stable.html
- You can try to run
Setting Up your Config File
- Navigate to
[TraiNNer folder]\codes\options\sr. - Copy the
train_sr.ymlfile into thecodesfolder. - Open it with a text editor. Preferably something like N++.
Bear with me, this is going to take a while. We're going through relevant options from top to bottom. Adjust them as necessary.
name:the name of your modelmodel:the type of your model. In our case sr, "super resolution"scale:how much your model will scale the image-
datasets:In here are all options related to your datasetstrain:information and options related to your training setname:I call my training data Adalbertdataroot_HR/LR:This is where the path to your HR/LR training data goes.
You can also set multiple paths as is the case in the default options file, but one path works fine. Note that..in a path means "one folder back". So../datasets/train/hr1means, go one folder back from the codes folder (where thetrain.pyscript is located in), go into the datasets folder, then the train folder, then the hr1 folder.
You can also use absolute paths:
In case you followed my advice to put your datasets in the TraiNNer folder, your options for this should look like this
n_workers:Just leave this at default unless it complains about it. Then set it lowerbatch_size:andvirtual_batch_size:you want this high, but if you set it too high, you will run out of vram. I'd suggest starting at2or3and trying to go up. It's not the end of the world if it's low, just means your training's going to be a bit slower.image_channels:set this to3if you train with and want to output color images, set it to1if you plan on only doing grayscale stuff.use_flip:use_rot:rotates and flips your images. Good for diversity, can lead to weird behaviour in rare cases. Just be aware that this is something that the program does.
val:the validation set.name:Thy name shall be Aletheia.
Actually I'm not sure any more, but this might need to be the same name as the training set.dataroot_B:the location of your hr validation images../datasets/val/hrdataroot_A:the location of your lr validation images../datasets/val/lr
The same shit applies as withdataroot_HR/LR. Again your "starting directory" will be thecodesfolder.
path:here's where info about your pre-trained model goes.pretrain_model_G:path to your pretrained model. Again, the "starting folder" is thecodesfolder.
For example if you're using the "Faithful" model as a base, and you're following my recommendations, your path would be:
../pretrained/2x_Faithful_v2_130000_G.pth
train:rejoice, for basically everything here's too complicated to bother withval_freq:After how many iterations your model will be evaluated. We're too stupid to have letters in our numbers, so replace that5e3with5000or something.
Most of the time it tries to evaluate shit, My PC runs into some crypticran out of inputerror or something that may or may not be related to pickles, and when it doesn't it just doesn't log any of the results? I set it to9e9, and check my models manually.resume_state:Uncomment this (remove the#at the start of the line) AFTER YOU'VE BEGUN TRAINING YOUR MODEL, and replace thedebug_001_RRDB_ESRGAN_x4_DIV2Kwith the name of your model. You can check your model's folder in theexperimentsfolder (which will be generated when you start training your model) to make sure what the path here should be.
This is the "checkpoint" that will be used to resume training after you've stopped it. The program will always generate thelatest.statecheckpoint when you manually interrupt training. You can also choose any other of the.statefiles your training will generate. The starting folder is thecodesfolder.
logger:save_checkpoint_freq:how often you want to save a checkpoint.
5000 is fine. You can go lower, you can go higher. Doesn't really matter.
Training Your Model
Finally we're ready.
- Open CMD in the TraiNNer folder and run the following command:
cd codespython train.py -opt train_sr.yml- The program will now start up. Assuming that you've set up everything correctly, it will spit out all your settings, then some random info.
- After a minute or so of startup, it will start working.
- Ignore any warnings about
torch.nn.utils.clip_grad_norm_etc. it's not crashing the program so we don't care.
- Ignore any warnings about
- And your model is now training!
Basic Terms
It will spit out bullshit about iterations and epochs.
- Iter (iteration) tells you how many different versions of your model existed so far.
- An epoch is a pass over your entire training set.
So epoch:1086, iter: 72,348 means that after 72,348 different versions of my model, it has seen every image in the training set 1086 times.
Output Structure
The program will create an experiments folder in your TraiNNer folder. In that folder will be a folder named after your model.
Your model will save checkpoints (just think of these as your results) and training states at the intervals you set in the options file.
You can manually interrupt training by focusing the CMD where you ran the command and typing ctrl+c ONCE. ONCE.
It might take a little while, but this will save the current training state to the latest.state file in the training_state folder, meaning when you run the above command again, and if you set up the resume state like I told you to, it will resume training from exactly that point.
In the models folder, you will find checkpoints generated from your model while training. But what's this? There are two! [iteration]_D.pth and [iteration]_G.pth.
How ESRGAN works, is that it basically trains two models: The "Generator" model, the one with _G will be what you want to use. This is what processes your image.
The "Discriminator" _D model's purpose is to learn to figure out whether an image was an original from the HR set, or whether it was upscaled by the generator. If the discriminator was correct, the generator is "punished", if it couldn't differentiate, the generator is "rewarded". This is how your model improves over time. If you're interested in learning more, just google "generative adversarial network".
Validation
When your model is being validated, it upscales images in your validation set, and a couple of metrics measuring image similarity between the upscale and the HR image are computed. Namely psnr, ssim, and lpips.
PSNR
Peak Signal To Noise Ratio. The higher the better. Anon told me it should be above 28 for a good model at least.SSIM
Structural Similarity Index for Measuring image quality. The closer to 1, the better.LPIPS
Learned Perceptual Image Patch Similarity. This should be approaching 0.
Random Remarks
- You can change your training/validation set and continue training with the same model and settings.
- You can't change the image channels setting once you've started training.
- You can "overtrain" a model, and it will begin to lose performance. So be sure to check your checkpoints every now and then to make sure the model is still improving.
Colab
You can also use colab.research.google.com to run and train models. However from my limited experience, for some reason my own GPU is faster.
- First, click
Connectat the top right.- Wait for it to connect.
- Make sure you're running a GPU instance:
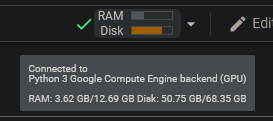
- If this does not say GPU, in the
Runtimemenu, clickChange runtime typeand selectGPU
- If this does not say GPU, in the
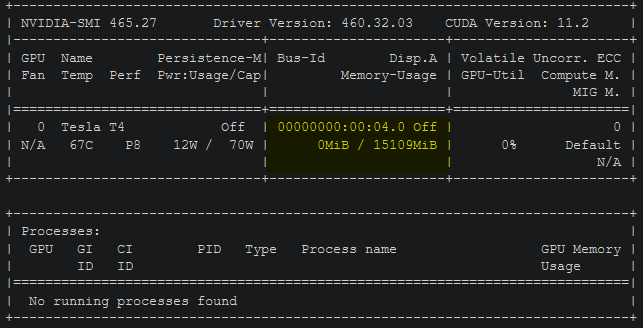
- For fun, create a new cell with the following command and run it:
!nvidia-smi- This will show you what kind of monster GPU your instance is running. The 11GB vram ones can handle batch sizes of up to 16 I believe. the 15GB ones probably around 20.
You can use the following code to connect your Google Drive to a colab
Then you can interact with your drive with the following path /content/drive/MyDrive/[all your stuff is here]. So you could save images you want to upscale, or training data in your drive, then access it in colab.
I won't go into detail with this, but these minimum working example should get you started:
ESRGAN
TraiNNer
This is more of a pain since you need to set up your options file again.
Just fill in the correct filepaths to your training and validation sets.
Since google also likes to throw you out without any warning, we need something that regularly exports our results to your drive, else you'll just loose everything
Errors
If you get an error running ESRGAN, it's probably because I forgot to tell you to install a package.
If you get an error running TraiNNer, it's likely that you ran out of vram.
Post a screenshot of your error and pray that some codemonkey's here to help you, or have a look at these common errors and fixes:
- ModuleNotFoundError: No module named '[module name here]'
trypip install [module name here] - some bullshit about torch reserving memory
congratulations, your torch shit itself. fastest way to get it working again is to restart your pc. else, just wait torch to stop claiming your vram, which can take anywhere from a few minutes to like half an hour. - CUDA out of memory
In some circles lovingly referred to as "COOM". Either it's the bullshit above, or you just ran out of vram. Try lowering your batch size.Or get a better GPU :^). - CUDA error: CUBLAS_STATUS_NOT_INITIALIZED WHEN CALLING [some bullshit]
Cuda failed to execute some function. Likely some obscure issue your cuda version has with your GPU. You can try installing a different version of cuda.
go here and search for different versions.
Take note of the relevant version numbers of torch and torchvision, then install them. Your pip command should look something like this:
pip install torch==1.7.1+cu110 torchvision==0.8.2+cu110 -f https://download.pytorch.org/whl/torch_stable.html
If it still doesn't work, you can continue trying to install even older or newer versions, but I wouldn't get my hopes up.