Windows/Office Installation Guide
Important steps highlighted like this
The rest is details if you're interested.
Step 0: Backup your data
Back up your folders and files in the following locations:
A) C:\Users\Username
If you've used this guide before and moved your user folders to a different partition/drive, you can safely bypass step A.
B) C:\Users\Username\AppData
The AppData folder is hidden, just type it into the path field.
Some game devs store saves here even though they really shouldn't.
Alternative: https://www.gamesave-manager.com to backup your game saves.
Safe to backup: game dev folders, 3rd party programs, etc
Probably shouldn't backup: Microsoft or other system related folders which contain system settings
Step 0.5: Choosing an edition
GAC editions (Home/Pro/Education/Enterprise)
Supported from 1.5-3 years
Regular weekly updates + full system upgrades when short support period ends
Gets support faster for large architectural changes like E-cores, which required rewrite of Windows CPU scheduler
The scheduler change was a once in 20 years change because of fundamental changes to how CPUs were made, similar to multicore transition in early 2000s
LTSC editions (LTSC & IoT LTSC) identical to Enterprise
Supported for 10 years, EoL for W10 IoT LTSC 21H2 is 2032
Preferred channel for stability and reliability
Gets security updates only, no feature updates or version updates ever
IoT LTSC 21H2 does not have support for Intel E-cores (12th gen+)
E-cores support added in IoT LTSC 24H2
AMD CPUs are not affected by using old scheduler as AMD uses the same microarchitecture for all their CPU core designs, only with scaled down cache to reduce power usage
Note on switching to different editions:
You can only enter a different key in system settings and switch between Home/Pro/Edu/Enterprise (GAC editions) to another GAC edition, or switch LTSC to/from IoT-LTSC.
If you're on Home/Pro/Edu/Ent and want to switch to LTSC/IoT-LTSC, there's no upgrade option, you'll need to do a clean install.
Another note on IoT LTSC:
IoT LTSC only comes in English, if you want IoT LTSC in a different language, you can install regular LTSC in the language you want, then use https://github.com/massgravel/Microsoft-Activation-Scripts to switch to IoT LTSC, then activate.
Step 1: Download and verify you have a legitimate Windows ISO
This guide uses IoT LTSC but the same steps apply to any non-VolumeLicense Enterprise/Education/Workstation edition of Windows.
Windows 10 IoT LTSC 21H2: en-us_windows_10_iot_enterprise_ltsc_2021_x64_dvd_257ad90f.iso
SHA-256: A0334F31EA7A3E6932B9AD7206608248F0BD40698BFB8FC65F14FC5E4976C160
Windows 11 IoT LTSC 24H2: en-us_windows_11_iot_enterprise_ltsc_2024_x64_dvd_f6b14814.iso
SHA-256: 4F59662A96FC1DA48C1B415D6C369D08AF55DDD64E8F1C84E0166D9E50405D7A
Torrent:
magnet:?xt=urn:btih:0d8165158c22430ebb5c0afced1c37833877192a
Direct downloads:
https://massgrave.dev/windows_ltsc_links.html
SHA-256 Source (VisualStudio subscription required for downloads, but viewing the SHA is free):
https://my.visualstudio.com/downloads
Search LTSC, select all downloads, then click the ( i ) link.
Verify SHA-256 with 7zip
https://www.7-zip.org/download.html
Install 7zip > right click ISO > CRC SHA > SHA-256
If the SHA-256 matches the one from visualstudio.com, then the file has not been tampered with.
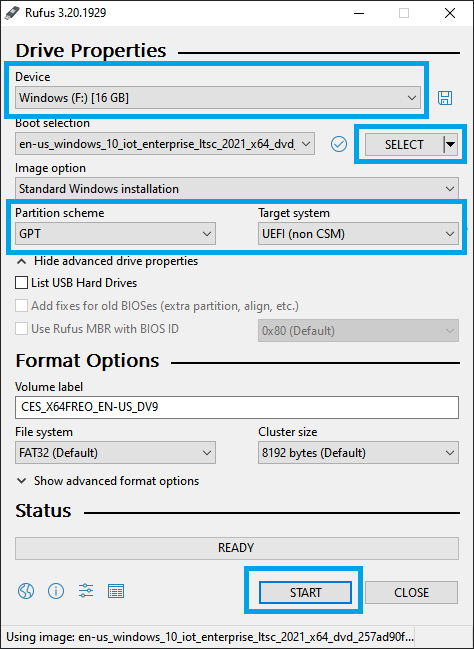
Step 2: Download Rufus and flash the ISO to a USB drive
Plug in a USB drive (at least 8GB)
Start Rufus, it should default to GPT partition scheme and UEFI (non CSM)
Select the ISO you downloaded and click Start to flash to USB
If you're installing on a PC with only one physical drive, proceed to the next step.
If you're installing on a system with previous installations and multiple physical drives, you'll want to install a free partition management tool like Minitool, and wipe the EFI partitions off all your non-OS drives.
https://cdn2.minitool.com/?p=pw&e=pw-free
The reason for this is because if you have a drive you used for a previous installation but never fully formatted it, it will still have an EFI partition and that EFI partition will be used by the Windows installer even if it's on a different drive than where you're trying to install Windows now, resulting in ugly scenarios such as having Windows on physical drive 1 and the EFI partition on physical drive 2.
In that scenario if you were to remove or format the drive with the EFI partition, you won't have an EFI partition and won't be able to boot anymore.
Wiping the EFI partitions off all other drives before installation will ensure that the EFI and system partitions are installed to the same drive.
If all this sounds too complicated for you, you can also just temporarily disconnect all drives except the drive you want to install Windows on, and reconnect them after installation.
Step 3: Booting to USB
Reboot and make sure it's set to UEFI mode in BIOS settings.
While you're in BIOS, you may also choose to disable TPM and/or SecureBoot to prevent the Win11 upgrade notice.
Restart PC and when the boot screen comes up press the key it says to on screen to access boot selection.
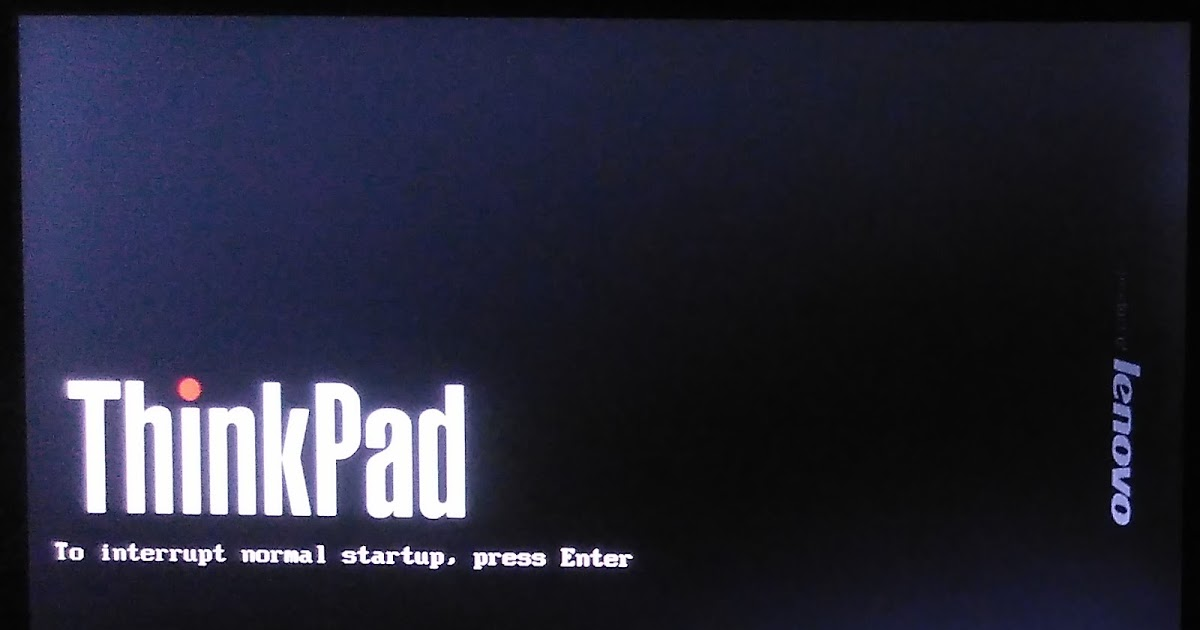
The key press required varies by OEM and could be F1, F2, F7, F10, F12, Delete, Esc, etc.
If unsure or it doesn't say so on screen, just mash all of them, restarting as needed to retry.
Once in boot selection, choose the USB drive and boot it.
Step 4: Installing Windows
At key entry, choose "I don't have a product key"
When choosing edition there will be two choices, LTSC and IoT LTSC, select IoT LTSC for HWID activation compatibility and longer support cycle.

At installation type, choose Custom Install. At the drive selection step it's important here to let the Windows partition take the entire drive first, then shrink it after installation if you want to add extra partitions.
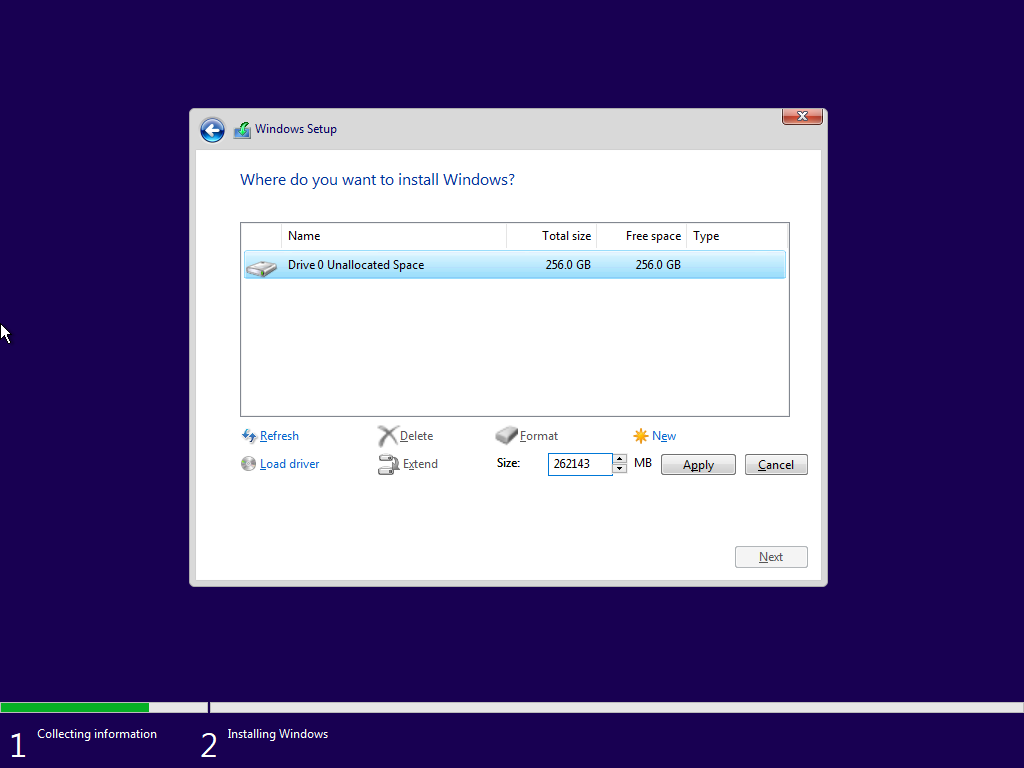
The reason being that the installer will create a 500MB recovery partition after the Windows partition, even if there's extra space left after it, leaving you with a difficult to move recovery partition in the middle of your drive. Letting the Windows partition use the entire drive first will ensure the recovery partition is placed at the very end of the drive, saving headaches on future resizing.

Don't let this happen to you.
Click next and the installer will unpack and install Windows to the drive.
After a restart, it will begin to detect hardware and install generic drivers.
Most default generic drivers should work fine with no issue, but LAN drivers should be manually updated if you want all functionality like Wake on LAN for remote desktop or file sharing over the network.
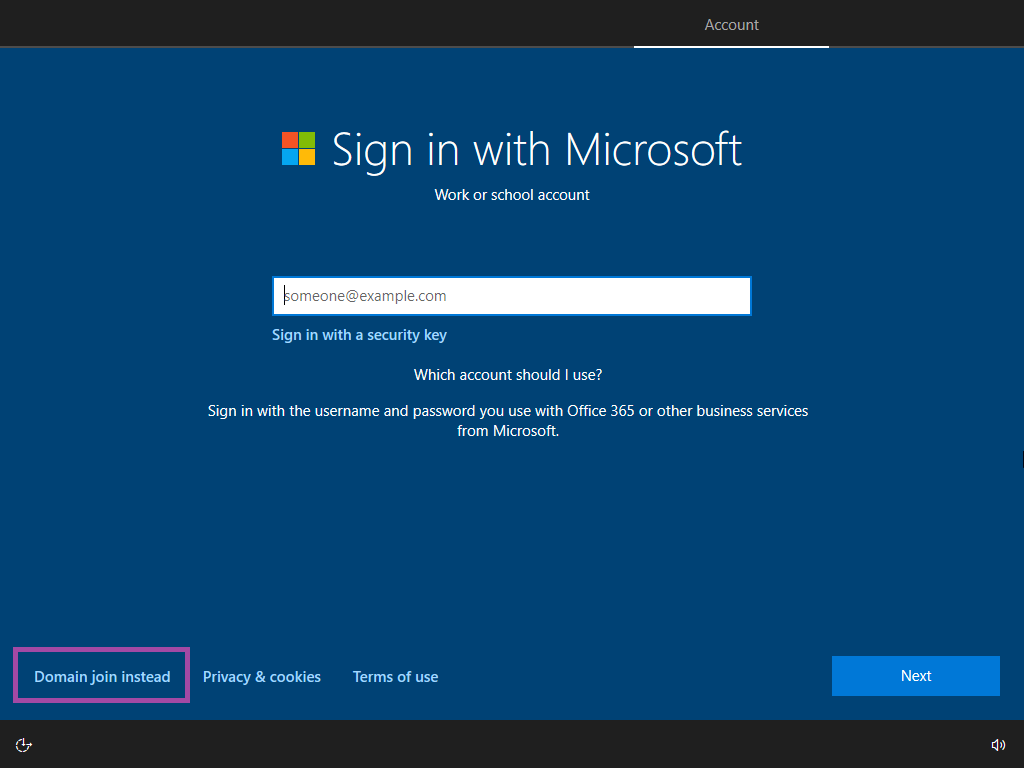
Account Creation
Click "Domain join instead" and create your local admin account.
The rest of the settings should be self explanatory.
HWID Activation
Open up Notepad, paste this into it, then save as .ps1
irm https://get.activated.win | iex
Run the script as admin, follow the on-screen instructions, done.
Official link: github.com/massgravel/Microsoft-Activation-Scripts
This activation is permanent and tied to your CPU/mobo/GPU/RAM combo and will persist through reinstalls, the only way to trigger a deactivation is if you change something like 10+ hardware components simultaneously, which would essentially mean a completely new computer, or a new motherboard with new USB controllers, PCIe controllers, LAN chip, audio chip, storage chip, ATAPI controller, etc.
Microsoft Store
IoT LTSC does not come with Microsoft Store by default, nor any of the basic preinstalled apps.
If you need the MS Store, simply type "wsreset -i" into CMD and wait for a minute or so and it should pop up on the Start Menu.

Without the MS Store and the default apps you may run into situations such as when starting a game you'll be prompted with "You’ll need a new app to open this 'ms-gaming overlay'. This is because the developer set the game to start the Xbox Game Bar overlay on startup. You can just go into the Game section in Settings to turn off the Game Bar and the notice will go away. You can also ignore this and it will not affect anything, but if you want to get rid of the issue permanently just install the MS Store as above, then search for the Xbox Game Bar in the store and install it.

If you're comfortable with CLI, you can also install it through WinGet:
https://github.com/microsoft/winget-cli
Step 5 (Optional): Installing Office
Office can be downloaded directly from MS servers with zero issues:
https://officecdn.microsoft.com/db/492350f6-3a01-4f97-b9c0-c7c6ddf67d60/media/en-us/ProPlus2021Retail.img
Win10+ has native support for .img, .iso, and other archive formats, just double click to mount and then run Setup.exe.
Activating Office
https://github.com/massgravel/Microsoft-Activation-Scripts
Download, run the activator, done.
Alternatively, you can use Office.com online if your needs are very minimal.
Be aware, using Office online will mean storing your documents in OneDrive by default unless you choose a different location when saving.
https://www.microsoft.com/en-us/microsoft-365/free-office-online-for-the-web
And as a last resort if you don't want Office, or dealing with activators, or using Office online, you can try OnlyOffice, LibreOffice, or WPS.
Some of these have their own file formats, so for compatibility go into settings and set it to always save as Office file formats (doc/xls/ppt/etc).
https://www.onlyoffice.com/download-desktop.aspx?from=home-use
https://www.libreoffice.org/download/download-libreoffice
https://www.wps.com/download
Do not bother with OpenOffice. Oracle fired all its devs in 2011 and donated the trademark and source to Apache who also has done nothing with it since 2014, and it doesn't even support modern Office formats like docx.
Step 6 (Recommended): Disable Automatic Updates
For the simplest way, you can use a 3rd party tool such as O&O SU10:
https://www.oo-software.com/en/shutup10
Official instructions from Microsoft
Open Start, type "regedit", press Enter, then follow the steps here:
https://learn.microsoft.com/en-us/windows/privacy/manage-connections-from-windows-operating-system-components-to-microsoft-services#bkmk-wu
If you do disable updates it's best to get into a habit of undoing it and checking once a month or every two months for security updates. Don't end up like the millions of retards that got fucked by WannaCry several months after MS already patched it, or the thousands today that still get fucked by it years after it was patched.
Step 7 (Recommended): Partition system drive and move user folders to reinstall-proof your data
By default, your user folder is stored in C:\Users\username, the problem with this is that if your install gets corrupted and you need to reinstall, all of your documents get wiped unless you have a spare computer to plug your drive into to pull the files first. Moving your user folders to a 2nd partition/drive avoids this problem.
For a 256GB+ SSD, a 100GB Windows partition should be plenty of space for Windows itself and whatever programs you need.
For a 128GB or smaller SSD, you'll want to have a 2nd storage drive for user folders.
Games and large suites such as Adobe CC can be installed to a separate partition/SSD.
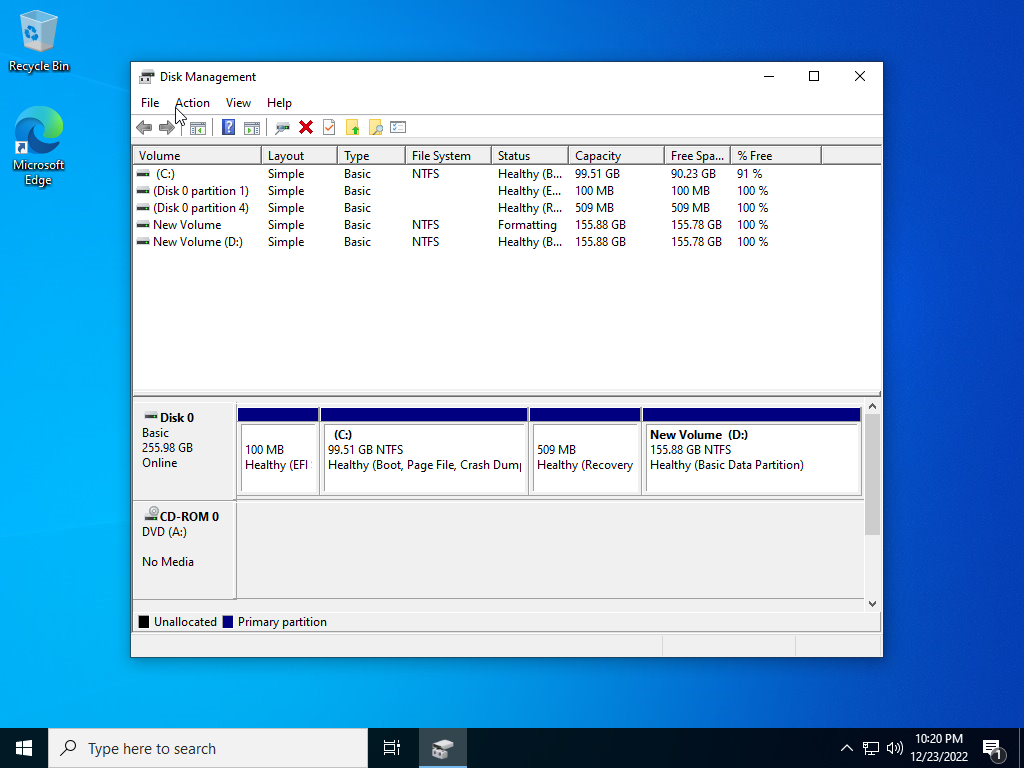
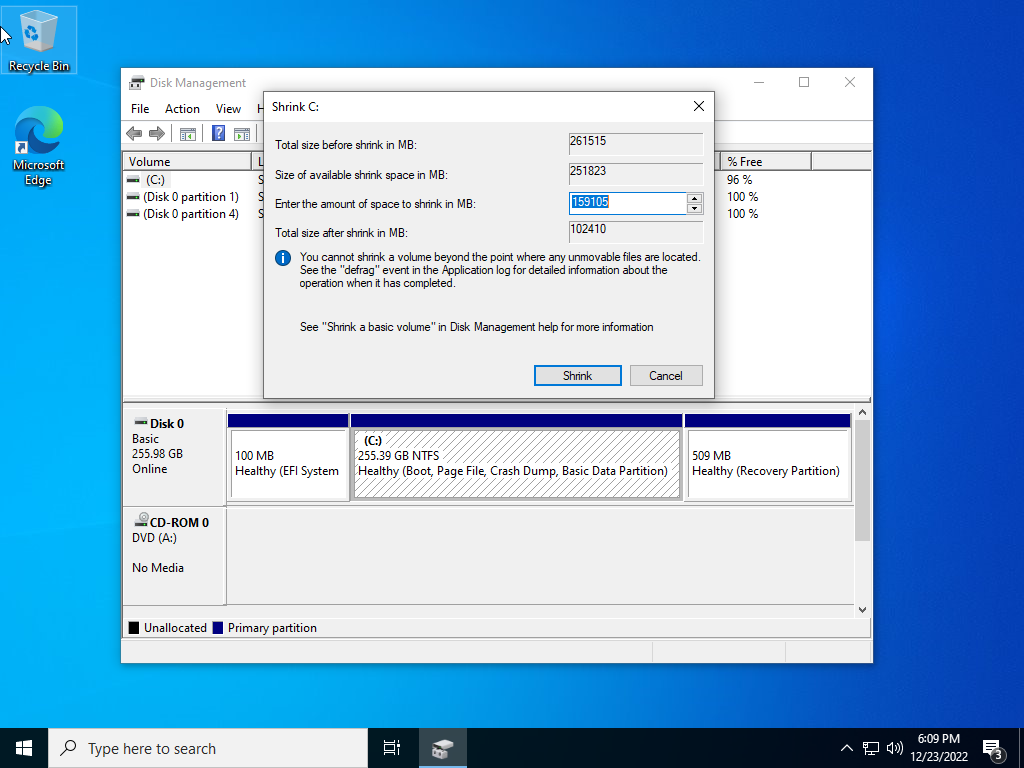
Partitioning:
Right click Start and select Disk Management.
Right click the [Windows (C:)] partition and select Shrink Volume, then enter in the amount to shrink in MB.
If you have a 256 GB SSD, you would want to shrink about 150GB, or 150000MB, then click Shrink.
If you have OCD and must have a nice round number, use a calculator to calculate 1024MB for each 1GB. So "Total size after shrink" for the Windows partition would be about 102410MB. (The extra 10MB will bump it up to display 100GB in Explorer instead of 99.99GB)
To get the amount you need to shrink, take your total partition size, subtract 102410, and you'll have your "amount to shrink" number.
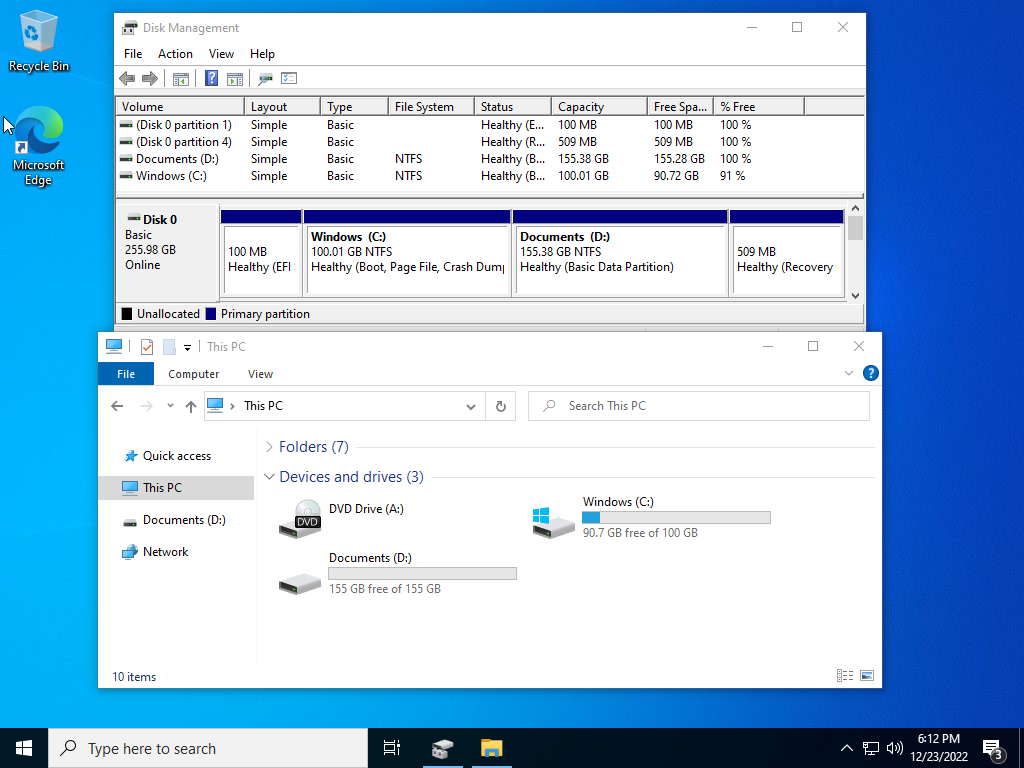
After it's done, right click the new Unallocated space and select New Simple Volume.
Change whatever settings here as needed, but the default settings are fine. Click through and select Finish.
You should now have a Windows partition on C:\ and an empty data partition on D:\ (or whatever letter you assigned it).
Moving user folders to second partition or 2nd drive
There are multiple ways to do this, cutting and pasting the user folders to their new location, manually though folder properties, or through Registry Editor. All methods make the exact same registry changes. The more complicated methods were necessary in older versions of Windows but are no longer necessary on current versions of Windows 10 and newer as it will automatically update the folder's registry settings.
Go into C:\Users\username.
Ctrl+click to select the folders you want to relocate (Documents/Pictures/Videos/etc), then cut and paste them to D:\ or whichever partition you want.
Windows will automatically update the system registry values to reflect the new locations where you moved these folders.
The location of the registry entries for reference:
Press Win+R, type RegEdit, and press enter to bring up Registry Editor, and go to:
HKEY_CURRENT_USER\SOFTWARE\Microsoft\Windows\CurrentVersion\Explorer\User Shell Folders
It's also possible to relocate the AppData\Roaming and AppData\Local folders to your secondary partition in Registry here if you're wary of storing it on C:.

After you're done, you can right click on the Key and export all of it to a .reg file to easily redo this on future reinstalls.
Step 8 (Recommended): Use portable apps to also save having to reconfigure on reinstalls
Hate losing all your browser shortcuts, tabs, bookmarks, settings, etc after a reinstall?
Just use a portable browser and install it to your secondary partition/drive.
The browser will be entirely self contained and isolated from Windows and can be updated in its own folder, so all your settings, tabs, bookmarks, etc are stored in the program folder and will be safe from reinstalls.
https://portableapps.com/apps/internet/firefox_portable
https://portapps.io/app/ungoogled-chromium-portable
https://portapps.io/app/brave-portable
https://vivaldi.com/download (installer allows installing in portable mode)
Other browsers:
https://portableapps.com/apps/internet
Other useful portable apps:
https://portableapps.com/apps
https://portapps.io/app/qbittorrent-portable
All-in-One Visual C++ runtimes installer
A must run on any new install if you have any portable programs or games, since they likely won't have their runtimes installed.
https://github.com/abbodi1406/vcredist
Step 9 (Optional): Disable Telemetry
https://github.com/troennes/private-secure-windows
https://wpd.app
https://www.oo-software.com/en/shutup10
https://github.com/builtbybel/privatezilla#download
https://github.com/AveYo/fox/blob/main/Edge_Removal.bat
https://www.ntlite.com/download
https://www.ntlite.com/community/index.php?threads/guide-custom-iso-downloads.3484/
https://www.ntlite.com/community/index.php?threads/guide-installing-windows.2986/
https://github.com/builtbybel/ThisIsWin11/releases
https://learn.microsoft.com/en-us/windows/privacy/manage-connections-from-windows-operating-system-components-to-microsoft-services
https://download.microsoft.com/download/D/9/0/D905766D-FEDA-43E5-86ED-8987CEBD8D89/WindowsRTLFB.zip
Make sure you understand how to undo the changes these tools make in the inevitability that you break something you want to reenable later on.
The best way to manage privacy settings however, is to use Group Policy as this is the method officially created for Enterprise admins that need control over these settings. Some of these tools simply apply Group Policy settings and are easily reversed, others apply registry hacks or even delete system files and can royally fuck your install. Do your research. You've been warned.
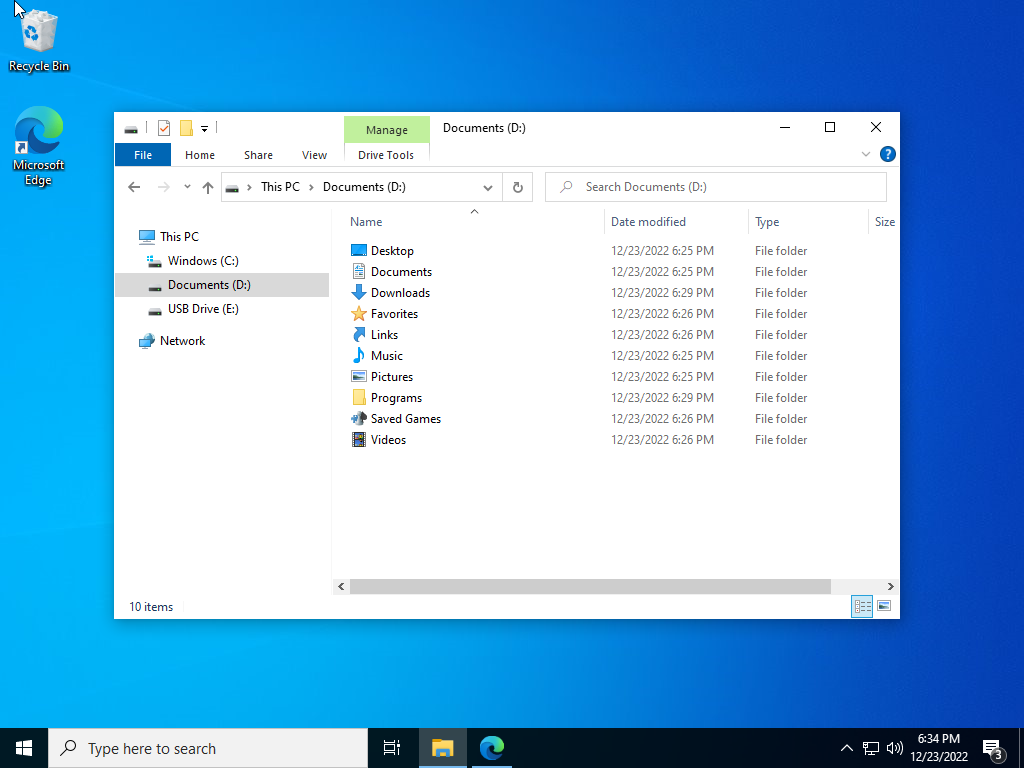
Step 10 (Optional): Removing extraneous icons from Explorer's navigation pane
Lastly, if you hate all the QuickAccess/Pictures/Music/Videos/Documents/DuplicateRemovableDrives/etc folders in the Explorer navigation pane, you can remove them with the following .reg files.
Before you begin, go into Explorer > Change Folder and Search Settings > View tab > and disable Hide Extensions for Known File Types.
This will ensure you can properly rename .txt files to .reg files.
Find the highlighted section with the icon you want to remove, then copy and paste the section of white text under it and paste it into Notepad and save it as a text file, rename it to .reg, then run it. Repeat with additional icons you want to remove, then restart Explorer.
You will end up with a simplified Explorer listing of just C:\ D:\ E:\ etc ala Win9x all those decades ago.
This pairs well with moving all your user folders to D:\ or another partition.
You can also use an all-in-one remover like this one:
https://www.majorgeeks.com/content/page/how_to_add_or_remove_user_folder_in_file_explorer.html
Restarting File Explorer or Windows is sometimes needed for the change to take effect for specific icons.
BEFORE
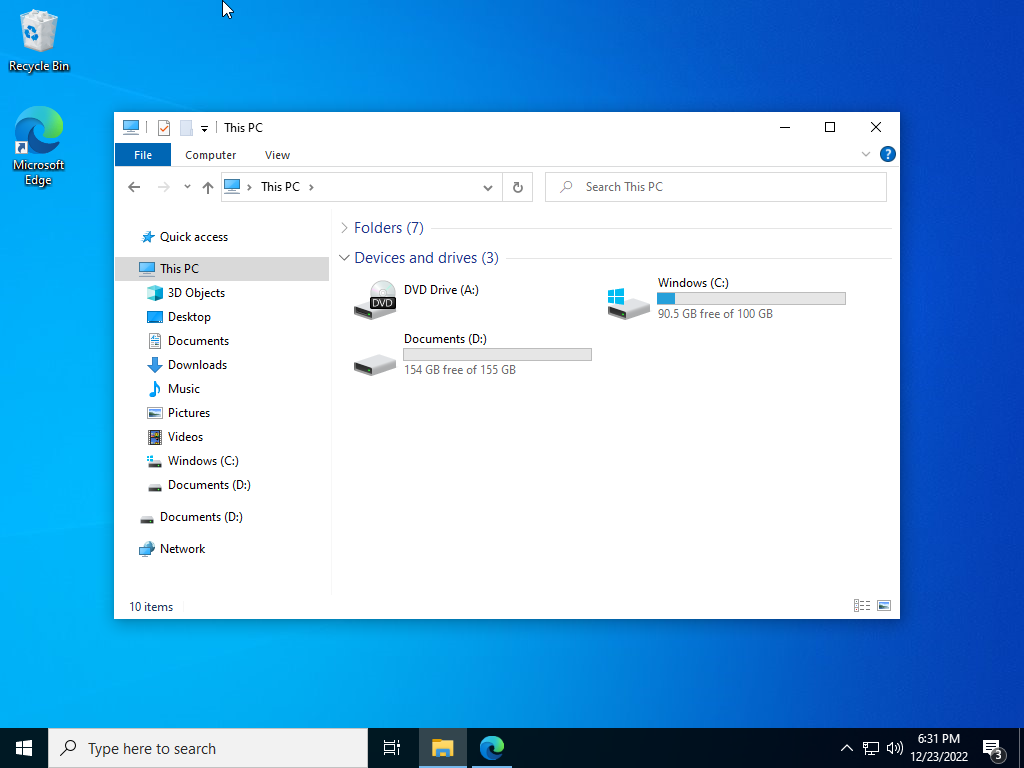
AFTER
Remove Junk from Navigation Pane
Remove Quick Access from Navigation Pane.reg
Windows Registry Editor Version 5.00
; Remove Quick Access from Navigation Pane
[HKEY_LOCAL_MACHINE\SOFTWARE\Microsoft\Windows\CurrentVersion\Explorer]
"HubMode"=dword:00000001
Remove Music from Navigation Pane.reg
Windows Registry Editor Version 5.00
; Remove Music from Navigation Pane
[HKEY_LOCAL_MACHINE\SOFTWARE\Microsoft\Windows\CurrentVersion\Explorer\FolderDescriptions{a0c69a99-21c8-4671-8703-7934162fcf1d}\PropertyBag]
"ThisPCPolicy"="Hide"
[HKEY_LOCAL_MACHINE\SOFTWARE\Wow6432Node\Microsoft\Windows\CurrentVersion\Explorer\FolderDescriptions{a0c69a99-21c8-4671-8703-7934162fcf1d}\PropertyBag]
"ThisPCPolicy"="Hide"
Remove Pictures from Navigation Pane.reg
Windows Registry Editor Version 5.00
; Remove Pictures from Navigation Pane
[HKEY_LOCAL_MACHINE\SOFTWARE\Microsoft\Windows\CurrentVersion\Explorer\FolderDescriptions{0ddd015d-b06c-45d5-8c4c-f59713854639}\PropertyBag]
"ThisPCPolicy"="Hide"
[HKEY_LOCAL_MACHINE\SOFTWARE\Wow6432Node\Microsoft\Windows\CurrentVersion\Explorer\FolderDescriptions{0ddd015d-b06c-45d5-8c4c-f59713854639}\PropertyBag]
"ThisPCPolicy"="Hide"
Remove Videos from Navigation Pane.reg
Windows Registry Editor Version 5.00
; Remove Videos from Navigation Pane
[HKEY_LOCAL_MACHINE\SOFTWARE\Microsoft\Windows\CurrentVersion\Explorer\FolderDescriptions{35286a68-3c57-41a1-bbb1-0eae73d76c95}\PropertyBag]
"ThisPCPolicy"="Hide"
[HKEY_LOCAL_MACHINE\SOFTWARE\Wow6432Node\Microsoft\Windows\CurrentVersion\Explorer\FolderDescriptions{35286a68-3c57-41a1-bbb1-0eae73d76c95}\PropertyBag]
"ThisPCPolicy"="Hide"
Remove Duplicate Removable Drives from Navigation Pane.reg
Windows Registry Editor Version 5.00
; Remove Duplicate Removable Drives from Navigation Pane
[-HKEY_LOCAL_MACHINE\SOFTWARE\Microsoft\Windows\CurrentVersion\Explorer\Desktop\NameSpace\DelegateFolders{F5FB2C77-0E2F-4A16-A381-3E560C68BC83}]
[-HKEY_LOCAL_MACHINE\SOFTWARE\WOW6432Node\Microsoft\Windows\CurrentVersion\Explorer\Desktop\NameSpace\DelegateFolders{F5FB2C77-0E2F-4A16-A381-3E560C68BC83}]
Remove 3D Objects from Navigation Pane.reg
Windows Registry Editor Version 5.00
; Remove 3D Objects from Navigation Pane
[-HKEY_LOCAL_MACHINE\SOFTWARE\Microsoft\Windows\CurrentVersion\Explorer\MyComputer\NameSpace{0DB7E03F-FC29-4DC6-9020-FF41B59E513A}]
[-HKEY_LOCAL_MACHINE\SOFTWARE\WOW6432Node\Microsoft\Windows\CurrentVersion\Explorer\MyComputer\NameSpace{0DB7E03F-FC29-4DC6-9020-FF41B59E513A}]
Remove Downloads from Navigation Pane.reg
Windows Registry Editor Version 5.00
; Remove Downloads from Navigation Pane
[HKEY_LOCAL_MACHINE\SOFTWARE\Microsoft\Windows\CurrentVersion\Explorer\FolderDescriptions{7d83ee9b-2244-4e70-b1f5-5393042af1e4}\PropertyBag]
"ThisPCPolicy"="Hide"
[HKEY_LOCAL_MACHINE\SOFTWARE\Wow6432Node\Microsoft\Windows\CurrentVersion\Explorer\FolderDescriptions{7d83ee9b-2244-4e70-b1f5-5393042af1e4}\PropertyBag]
"ThisPCPolicy"="Hide"
Remove Documents from Navigation Pane.reg
Windows Registry Editor Version 5.00
; Remove Documents from Navigation Pane
[HKEY_LOCAL_MACHINE\SOFTWARE\Microsoft\Windows\CurrentVersion\Explorer\FolderDescriptions{f42ee2d3-909f-4907-8871-4c22fc0bf756}\PropertyBag]
"ThisPCPolicy"="Hide"
[HKEY_LOCAL_MACHINE\SOFTWARE\Wow6432Node\Microsoft\Windows\CurrentVersion\Explorer\FolderDescriptions{f42ee2d3-909f-4907-8871-4c22fc0bf756}\PropertyBag]
"ThisPCPolicy"="Hide"
Remove Desktop from Navigation Pane.reg
Windows Registry Editor Version 5.00
; Remove Desktop from Navigation Pane
[HKEY_LOCAL_MACHINE\SOFTWARE\Microsoft\Windows\CurrentVersion\Explorer\FolderDescriptions{B4BFCC3A-DB2C-424C-B029-7FE99A87C641}\PropertyBag]
"ThisPCPolicy"="Hide"
[HKEY_LOCAL_MACHINE\SOFTWARE\Wow6432Node\Microsoft\Windows\CurrentVersion\Explorer\FolderDescriptions{B4BFCC3A-DB2C-424C-B029-7FE99A87C641}\PropertyBag]
"ThisPCPolicy"="Hide"