Limbus Company Modding Guide & Mod Archive
This Rentry displays images using Catbox.
Disclaimer
 Do not repost this on social media.
This guide has been ripped directly from the Limbus Modding D*scord server and Lethe website/D*scord, with edits in the form of formatting, typo and ESL grammar corrections, as well archive links and info found at the end of this Rentry. It is otherwise unmodified. I have no further interest in continuing to mirror this shit, but hopefully it still proves useful to some people. I will not be linking the servers directly out of hatred for D*scordfags (Discord invites can also expire or change often and I'm not gonna periodically check for that). If you, for some godforsaken reason need to join either server, the Limbus Modding D*scord server is linked in Limbus Mod Loader Github, and the Lethe D*scord server is linked directly on their website.
You may get banned for using visual mods that utilize Limbus Mod Loader or similar methods. However, visual mods seem to be safer than methods that utilize private servers. So far, nobody has reported being banned for visual mods, but you should still understand that installing visual mods could potentially put your account at risk.
However, private servers and mods for them (Lethe) are explicitly against TOS and are bannable. You are expected to do your due diligence to prevent that from happening. If you get banned, I, nor the creators of these tools and guides take responsibility.
- Limbus Company Modding Guide & Mod Archive
- Useful Programs and Links
- Limbus Mod Loader (LML) Guide
- AssetStudio Datamining Guide
- UABEA Modding
- Modifying Images
- Modifying Audio
- Streamlining Your Workflow
- Change of Bounding Boxes
- Miscellaneous
- LML Mod Archives
- Lethe Private Server & Zwei Launcher (D*SCORD FAGGOTRY REQUIRED)
- Credits
- Contact
- Changelog
Useful Programs and Links
The following are programs and links that are used for or useful for modding:
(Thanks to qifeetrying and 11451481019 for their contributions.)
- UABEA (Unity Asset Bundle Extractor)
- Used for modifying game files.
- AssetStudio (Zhangjiequan Fork)
- Used for easier viewing and extraction of game files.
- Using this fork is recommended as it is the most stable.
- Under "Options" -> "Specify Unity version", input "2021.3.28f1" for Limbus Company.
- Under "Debug", disable "Show error message". (Recommended)
- Krita
- Recommended for exporting images with transparency.
- SuperPNG
- Recommended plugin for exporting images with transparency in Photoshop.
- To export an image as a SuperPNG, go to "File -> Save a Copy" or hit "Alt + Ctrl + S" and save as a SuperPNG.
- Limbus Company - Organized Assets
- A Google Drive containing Limbus Company assets, extracted and organized.
- Limbus Company - Modding Index
- A spreadsheet indexing the contents of each folder/file.
- Refer to this when needing to find the location of a certain identities sprites, etc.
- Limbus Company - File Locations: The game files of Limbus Company are stored in three locations:
- Primary:
"C:\Users\<User>\AppData\LocalLow\Unity\ProjectMoon_LimbusCompany" - Steam:
"SteamLibrary\steamapps\common\Limbus Company" - FMOD Banks (Audio):
"C:\Users\<User>\AppData\LocalLow\ProjectMoon\LimbusCompany\Assets\Sound\FMODBuilds\Desktop" - You will likely be modifying the first one, use this directory in UABEA and AssetStudio.
- Primary:
Limbus Mod Loader (LML) Guide
Many images in this guide have been shrunk. To view the full size, open the image in a new tab.
- You can also read the tutorial on the Github itself but I've pasted the D*scord guide here anyways.
- This guide is for version 1.6. Other versions may work a bit differently.
- Download version 1.6 of LML here. You need to download build.zip file.
- Next, unpack the build.zip file somewhere. Inside it there should be a "main" folder, which you should place somewhere.
- After unpacking, open "main" folder. It should look like this, with 2 files: _internal and main.exe

- Next, you should change Limbus Company launch settings. Open Steam, right-click on Limbus Company, choose the lowest option (highlighted on the screenshot)

- Copy the path to your "main.exe" file in the "main" folder you have unpacked earlier. You can click here to select entire path, then copy it. Watch this video guide if you don't know how to do this.

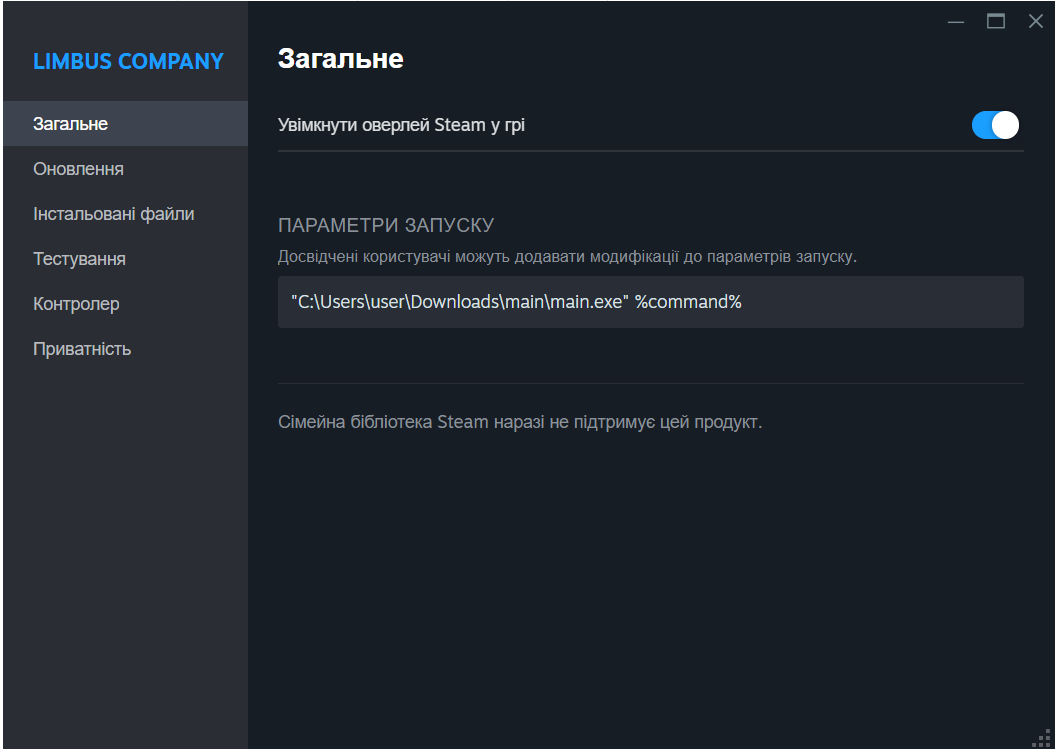
- Put this path into Limbus Company launch options, and modify it a bit.
- Example:
My path to the main.exe file is "C:\Users\user\Downloads\main". - So in options I should include this path, add \main.exe in the end, put quotation marks (") on both sides, and add %command% at the end. It will look like this
"C:\Users\user\Downloads\main\main.exe" %command%. - Remember to put spaces between the last quotation mark(") and %command%.
- Example:
- After that, launch Limbus and exit it after you get in. Please do not exit the game using alt+f4, it may break things. Exit the game normally and wait for terminal to close itself.
- A new folder will be created - "LimbusCompanyMods". It is located here:
C:\Users\user\AppData\Roaming\LimbusCompanyMods
- In this folder you put .carra files, or if mod doesn't have a .carra file, a zipped file of the mod.
- To uninstall a mod, move the .carra file somewhere else or delete it.
- If something doesn't work, you make a mistake, or a mod is not showing/working, or something else - ping qifeetrying or Zenocara, and include log.txt from
C:\Users\user\AppData\Roaming\LimbusCompanyMods. (lol)
Again, do not exit the game using alt+f4, it may break things. Exit the game normally and wait for terminal to close itself.
Known Issues
Known issues:
(0x0) "Failed to start process" - Most likely, your launch parameters are wrong. Check if they lead to the main.exe file, has %command%, has quotations marks on both sides, etc.
(0xE1) "File contains a virus" - Your anti-virus doesn't trust the modloader.
(0x7B) "Failed to start process" - Missing a space between ...\main.exe" and %command%
(0x4C7) - File path is wrong.
"Corrupted file detected" - Most likely means you had installed mods before installing LML. Uninstall all mods, then try again.
If that didn't help - find the mod folder on which LML says "corrupted", and delete it manually. Remove launch options, launch Limbus, wait for it to redownload files, then exit, put back launch option, launch Limbus with mods.
[WinError5] Access is denied - Most likely caused by you using Alt+F4 or Steam to kill the game process. You can fix this by manually deleting the folder where the error occurs.

AssetStudio Datamining Guide
- AssetStudio (Zhangjiequan Fork)
After you install and launch it, do two things:
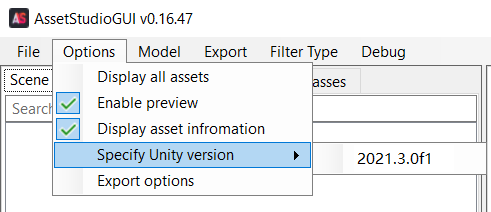
- Specify Unity version, for Limbus it is:
- 2021.3.0f1 (Always needed)
- Disable error messages (optional)

- After specifying the Unity version, AssetStudio can get you files.
- To find them, go to:
"C:\Users\user\AppData\LocalLow\Unity\ProjectMoon_LimbusCompany (instead of "user" - your username)"
- You will then see a bunch of folders with strange and scary names.
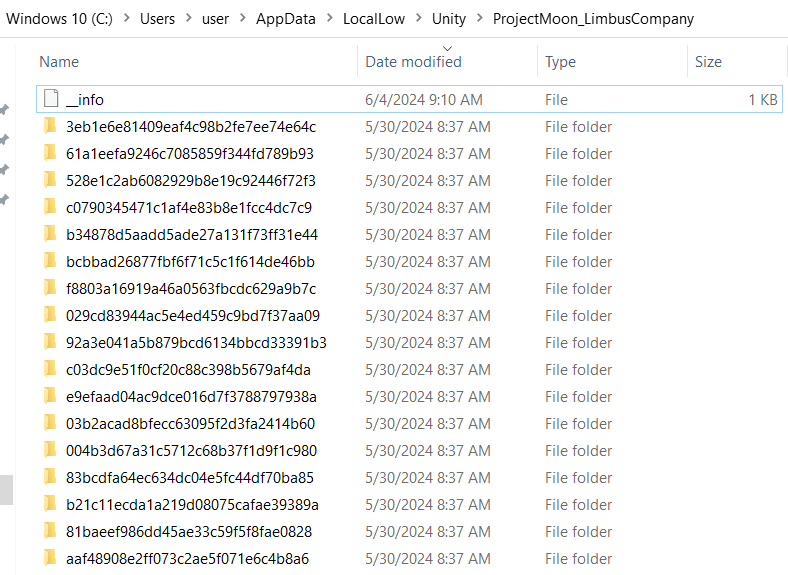
I usually just sort them so that newest folders are shown first, then put them one after another in AssetStudio. To put it in AssetStudio, just drag the folder out of"ProjectMoon_LimbusCompany"into AssetStudio. - After it loads, you will see something like this.
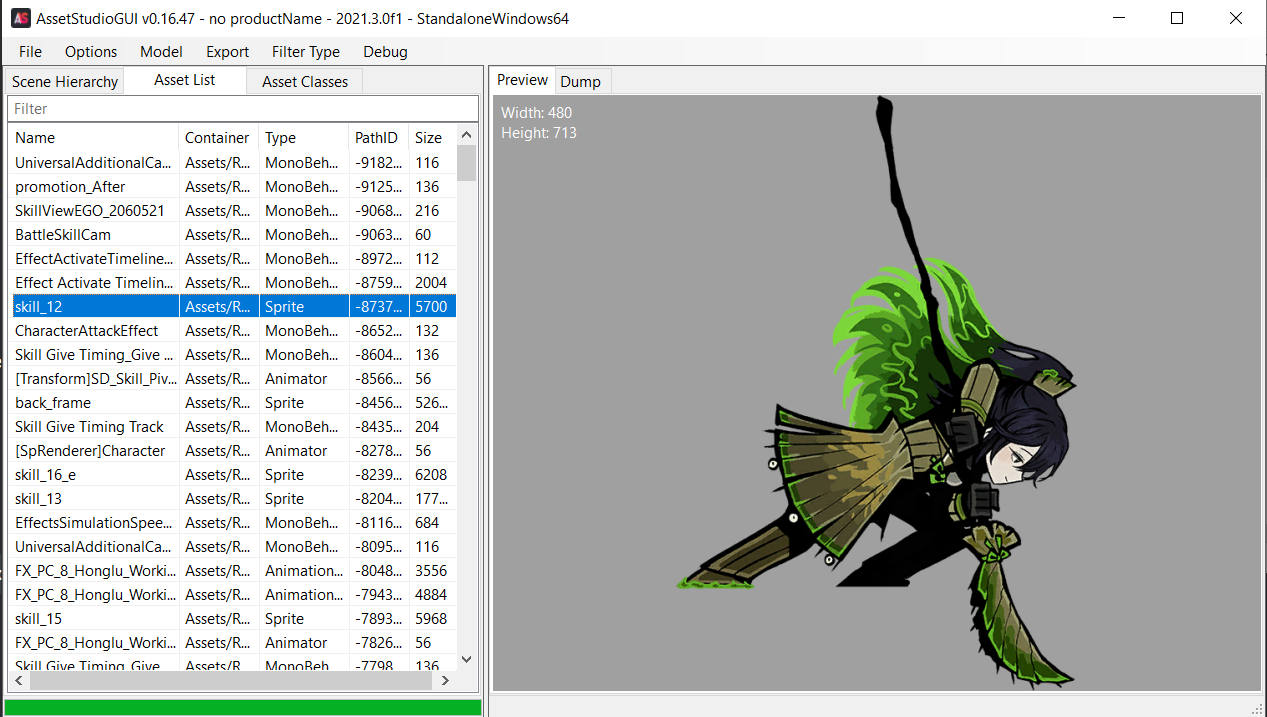
- After that I usually sort by "Type", or "Name", depending on what I want to see.
"Animation-things"and"MonoBehavior"are useless."Sprite"is just singular pictures/poses."Texture2D"contains many pictures/poses/parts of battle background, et cetera."TextAssets"are hard to read at first (unless they're effect settings for the story.)
UABEA Modding
- Video Guide
- A guide on how to use UABEA:
- ("Modify" is used interchangably with the words "change"/"replace"/"import".)
- ("Modify" is used interchangably with the words "change"/"replace"/"import".)
- With UABEA open, click "File" -> "Open".
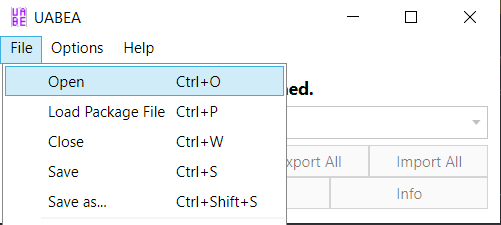
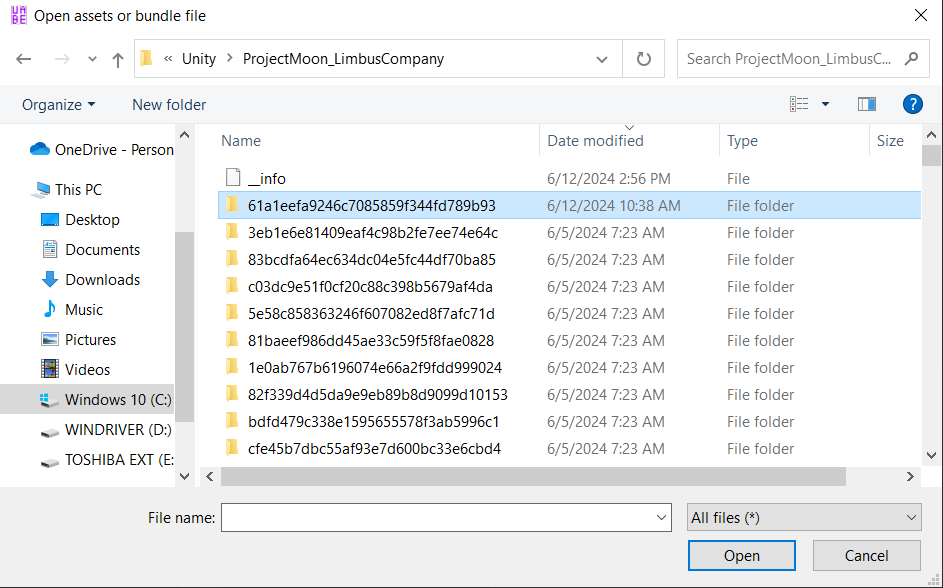
- Locate the asset bundle folder that contains the files you want to modify. (Refer to the index.)
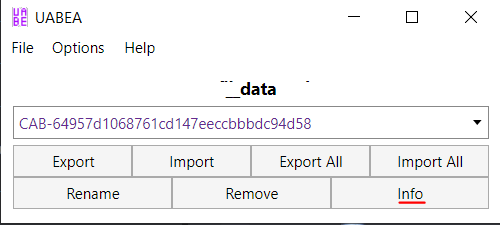
- Open the folder, open the folder inside of it, then open the "__data" file.
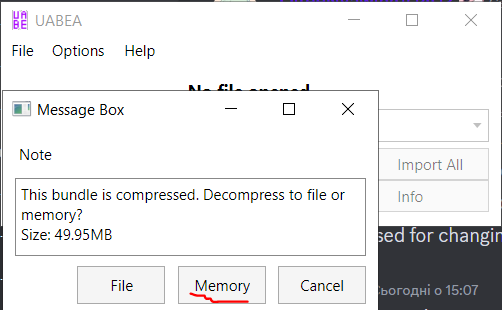
- Click "Memory".
- Click "Info".
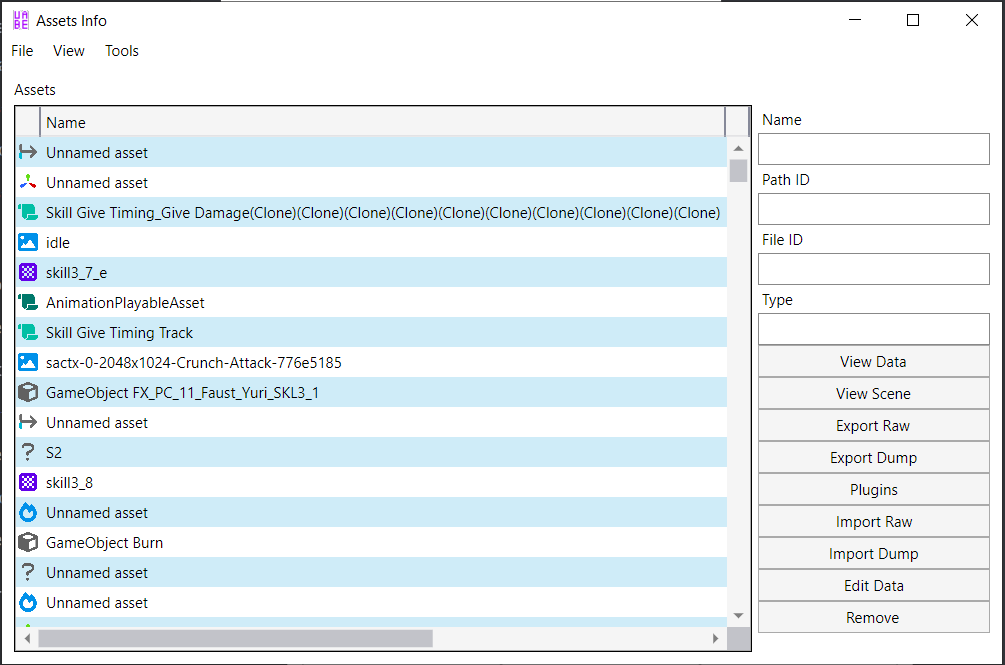
- You can filter for a specific type of asset under "View" -> "Filter".
- Sprite sheets are "Texture2d".
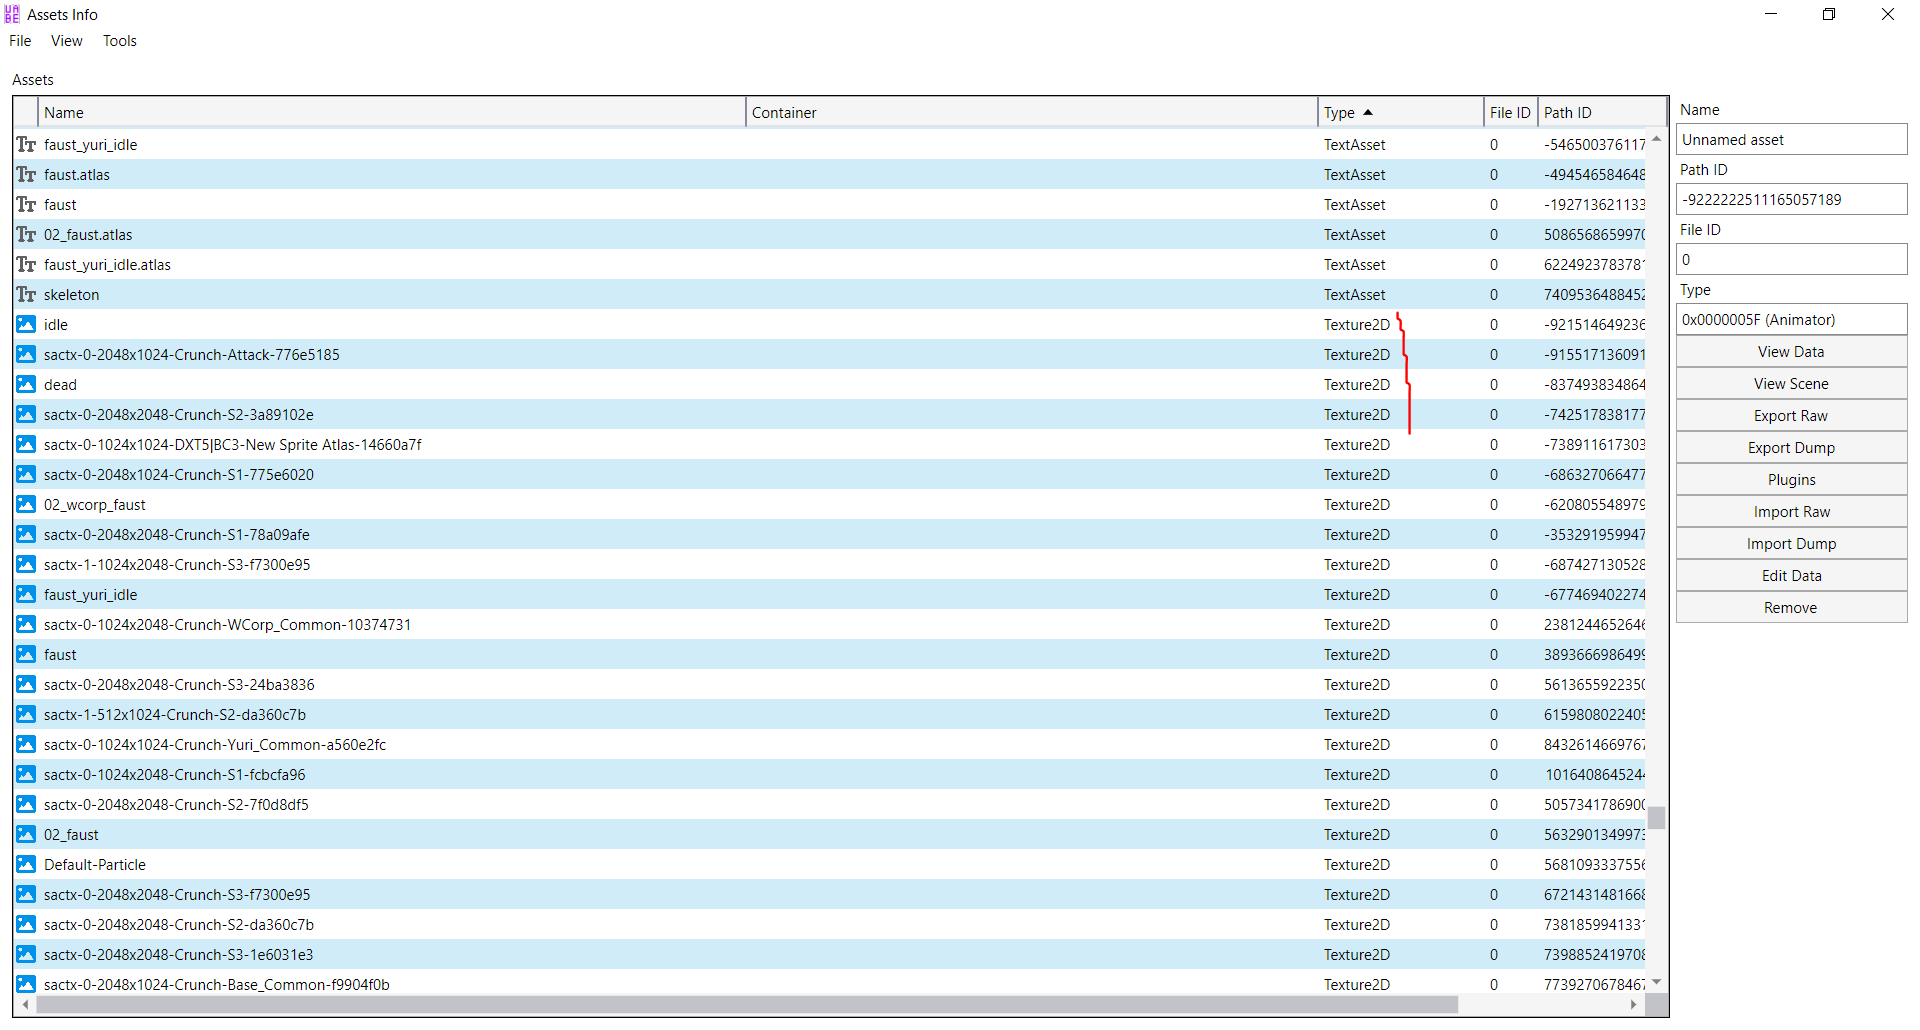
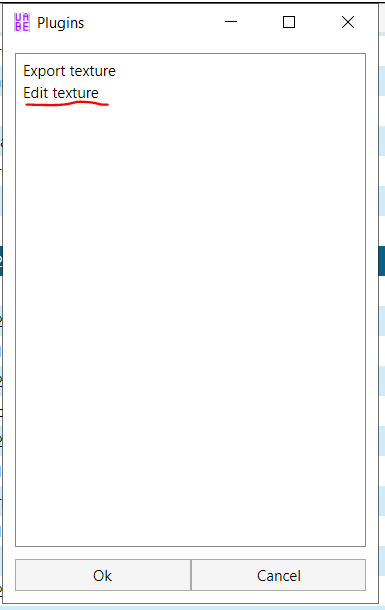
- Find and select the file that you want to modify, on the right side of the program, click "Plugins".
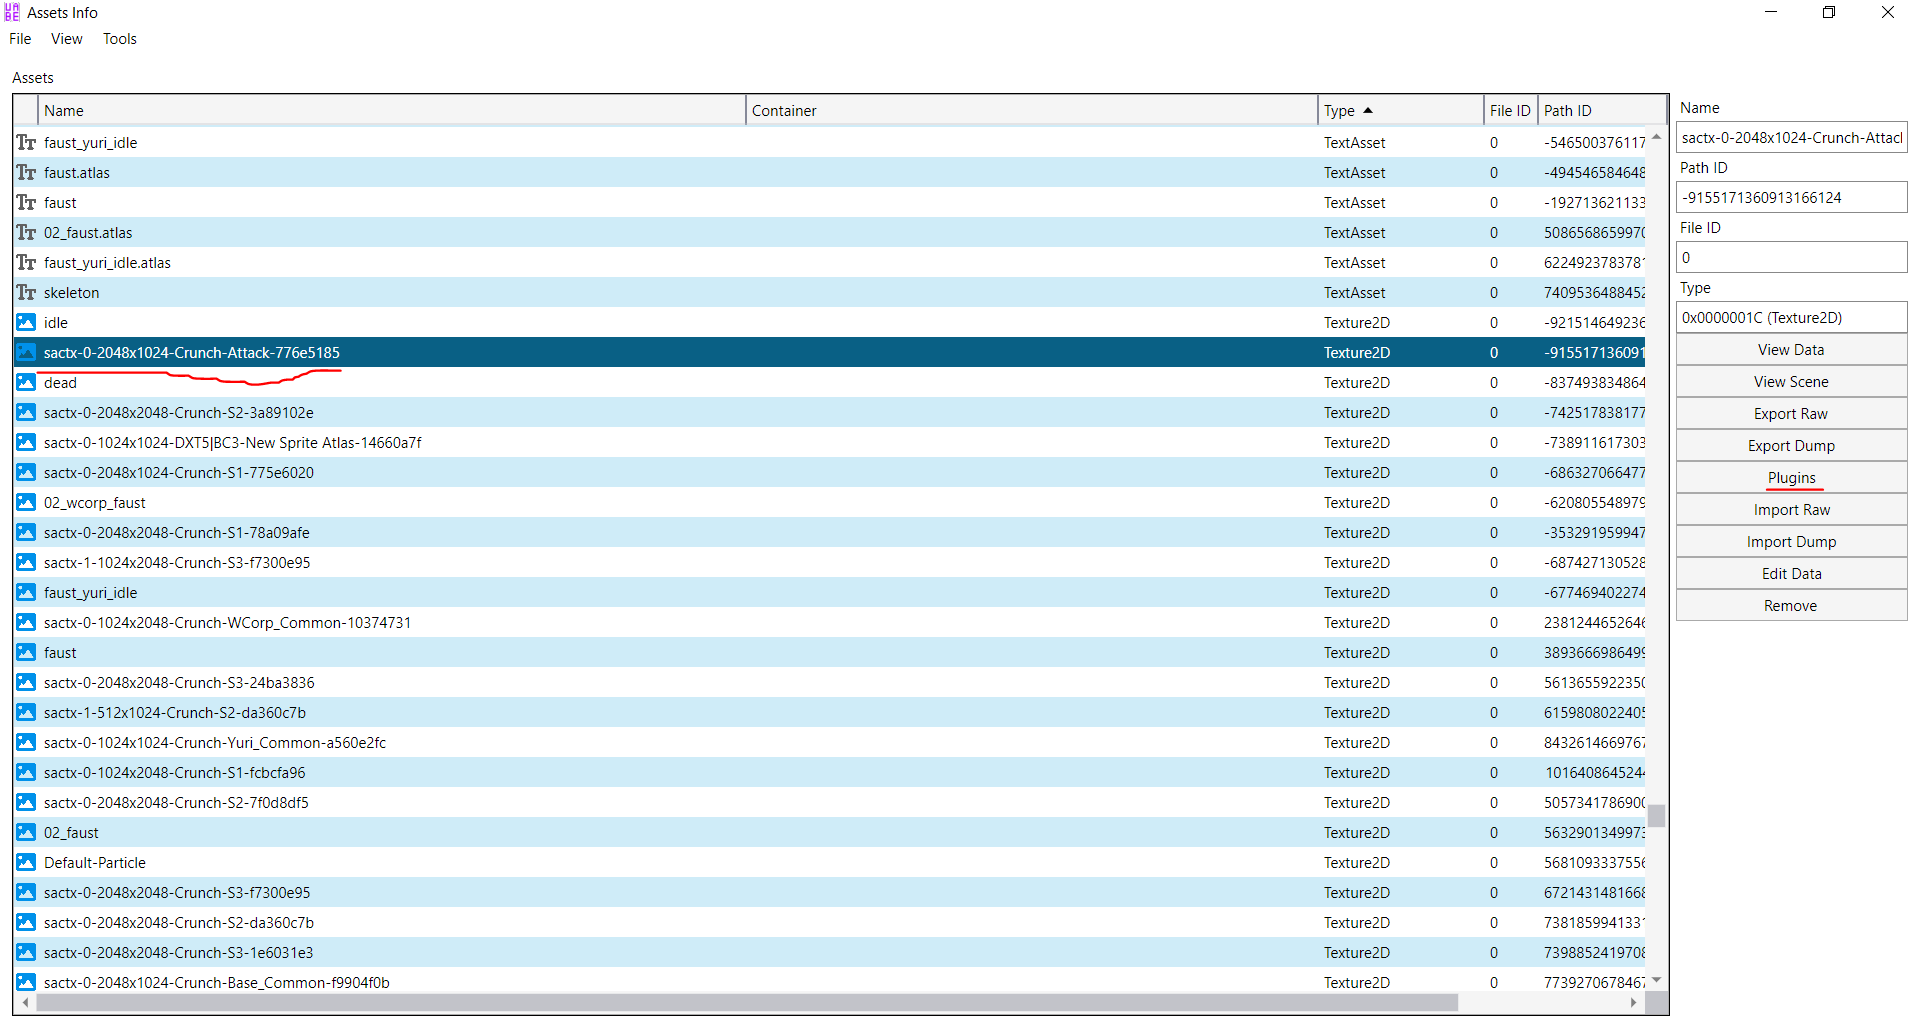
- Click "Edit texture", then click "Ok".
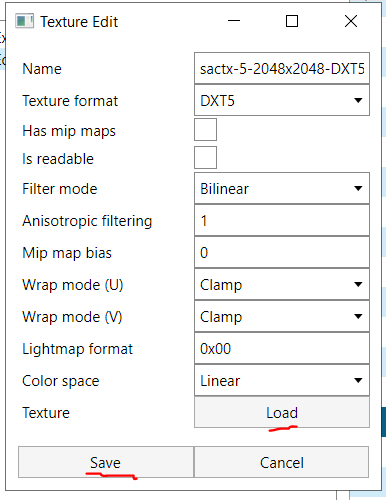
- Click "Load", select the new file you want to replace with, then click "Save".
- Click "File" -> "Save", then "File" -> "Close".
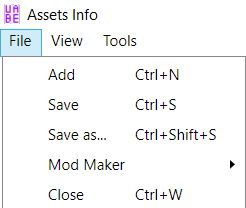
- In the main UABEA window, click "File" -> "Save", and your file will be imported.

- Uninstallation: To "uninstall" a mod, delete the folders you have modified, launch Limbus Company, and the game will redownload the original files.
- For example, Yuri Faust's folder is 5bca887cae8b737971e7c696d419ccd8, so I delete that folder to uninstall the Yuri mod, and the game will redownload those folders and files when it is launched.
- Or alternatively, you can keep a copy of the original files and replace with those when you want to uninstall.
- It is not necessary to relaunch the game when modifying files, just leaving and entering a battle is enough to load newly modified files.
- Sharing: For easier sharing, installation, and uninstallion by other users, use this .rar file.
- Move your modified files from
"C:\Users\<User>\AppData\LocalLow\Unity\ProjectMoon_LimbusCompany\*"to the "Installation" folder. - Move the original files to the "Uninstallation" folder.
- Modify the "READ ME" as you see fit.
- Move your modified files from
Modifying Images
-
Exporting Images
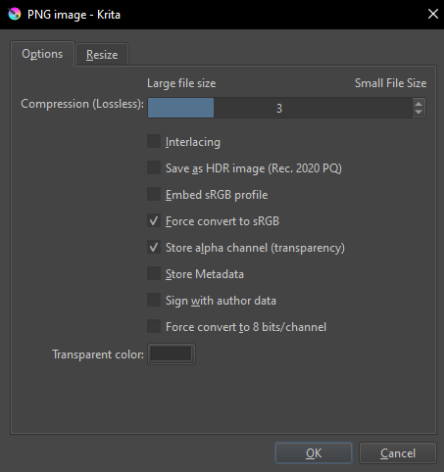
- When exporting images with transparency, such as sprites, it is recommended to merge them all to one layer and export that one layer through Krita with default export settings.
- You might otherwise encounter issues with unwanted white pixels appearing in-game around your sprites.
- Other programs may not encounter this issue, test at your own discretion.
-
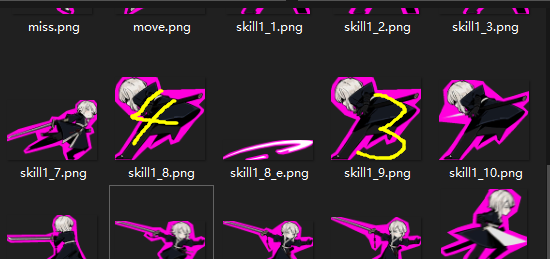
Visualizing Battle Sprite Bounds
- Export the sprite sheet's "Texture2d" using AssetStudio or UABEA.
- Fill the background with a color that stands out from the sprites.
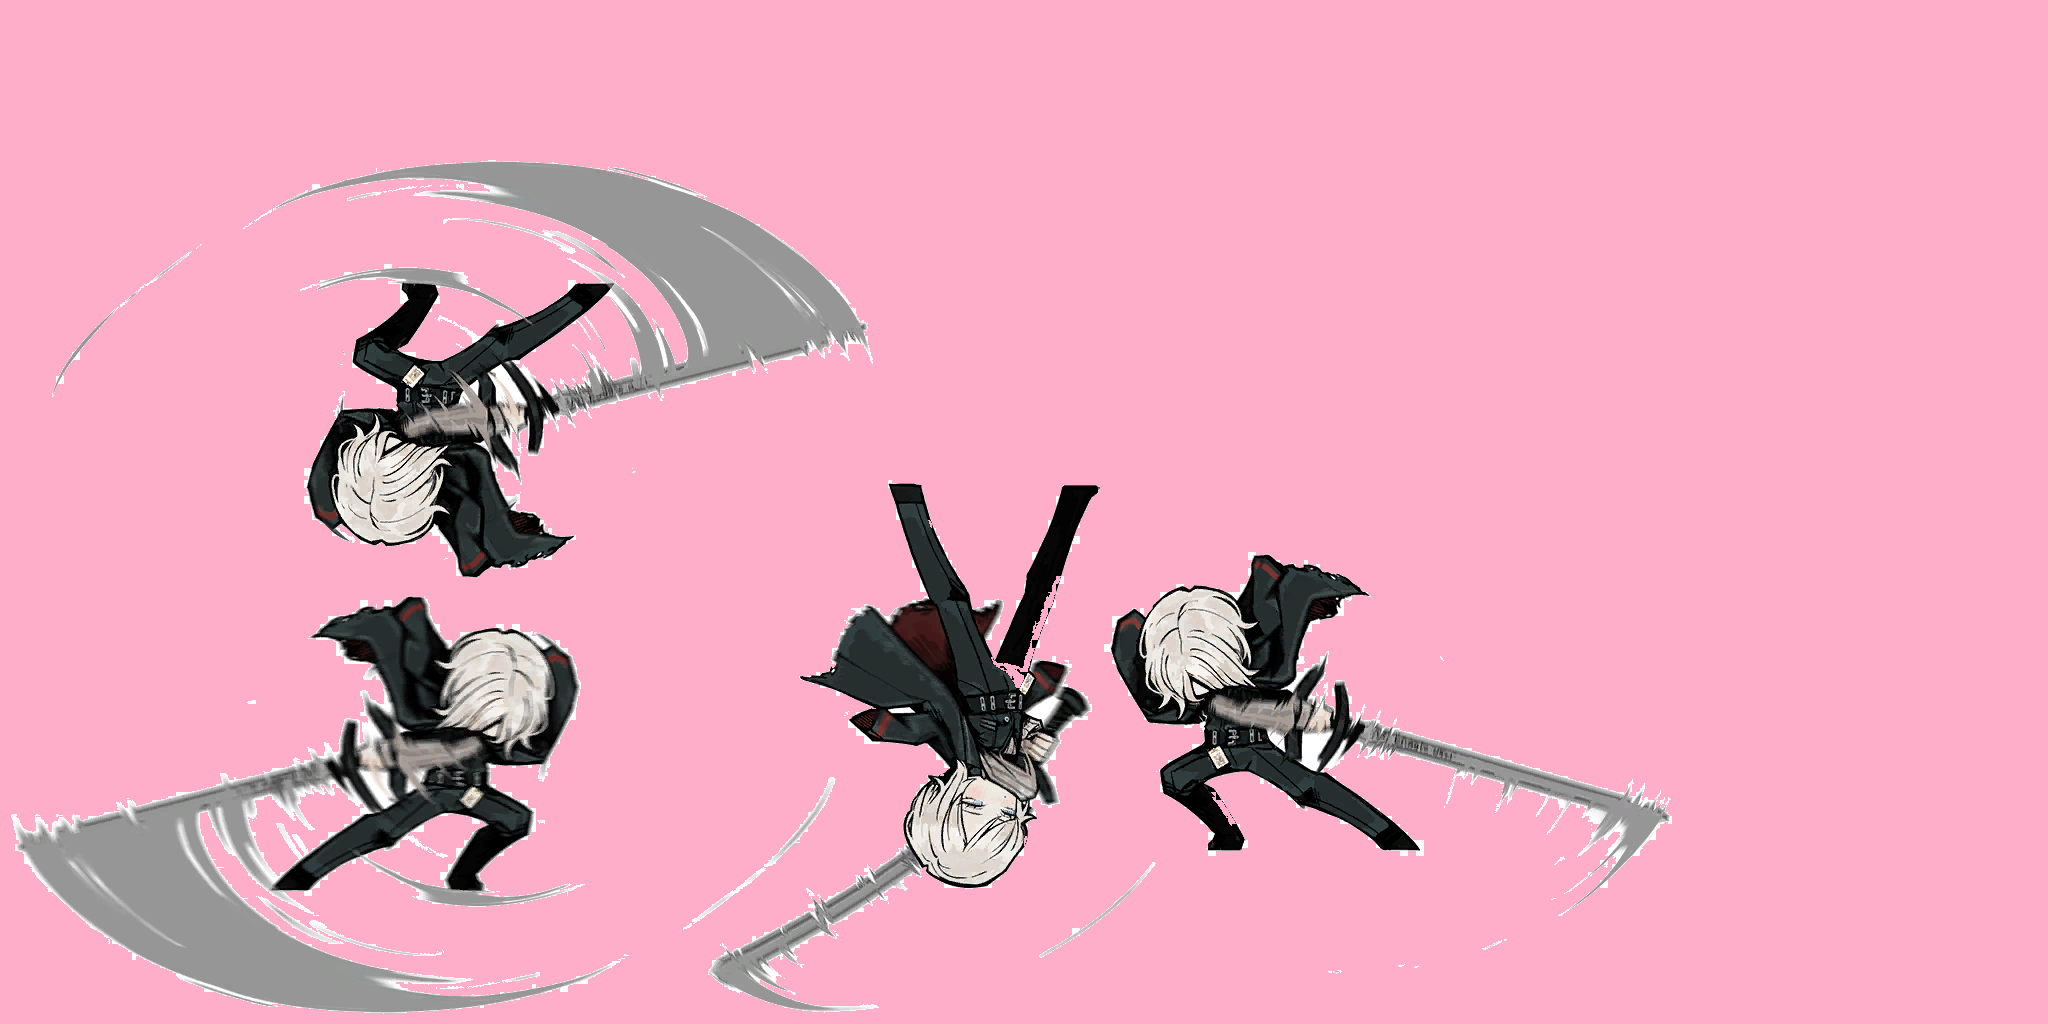
- Import the "Texture2d" using UABEA.
- Export the "Sprite" (Asset type) using AssetStudio.
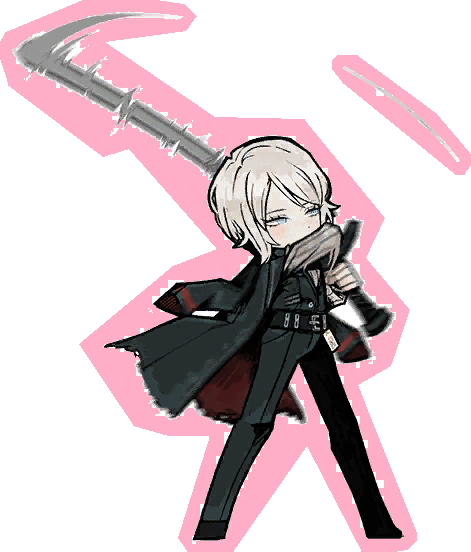
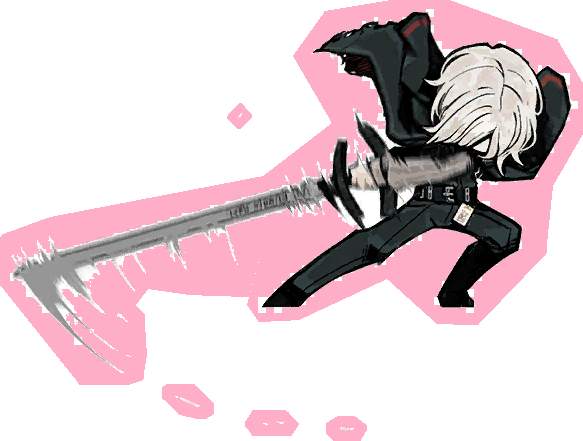
- You can also label sprites in order to distinguish them from similar sprites.
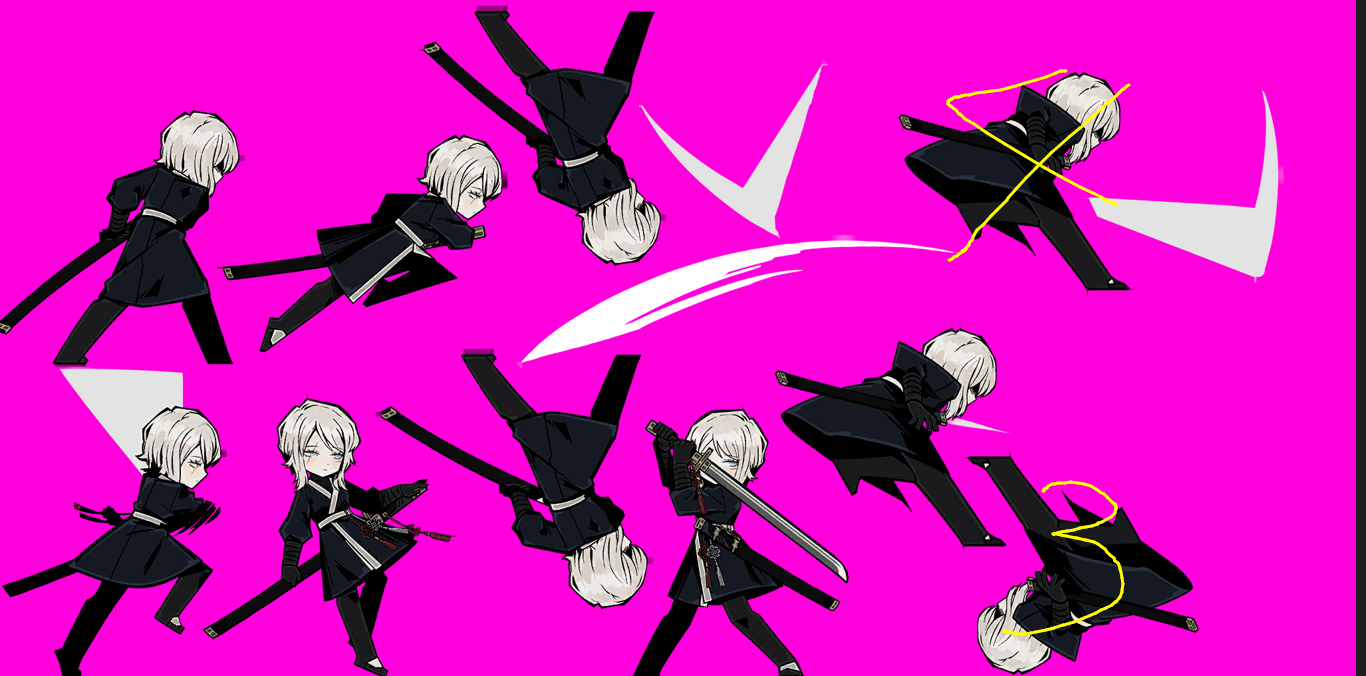
-
Visualizing Idle Sprite / UT3 Animation Bounds
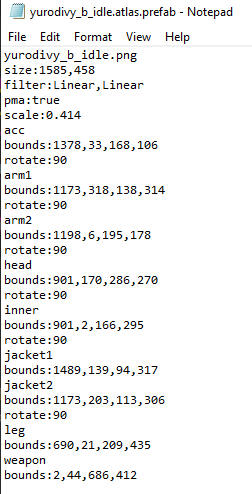
- The bounds of idle sprite elements are defined in the atlas file found in the same asset bundle file as the idle sprite.
- These atlas files define the true size of the sprite sheet and the bounding box coordinates of each element.
- In the example below, the true size of the sprite sheet is 1585x458, with the bounds defined as (x, y, width, height), with some being rotated 90 degrees, the coordinates define the top left coordinate of the bounding box.
-
Idle Sprite White Pixels Issue
- You may encounter an issue with idle sprites where there are shapes of unwanted white pixels in your idle sprite.
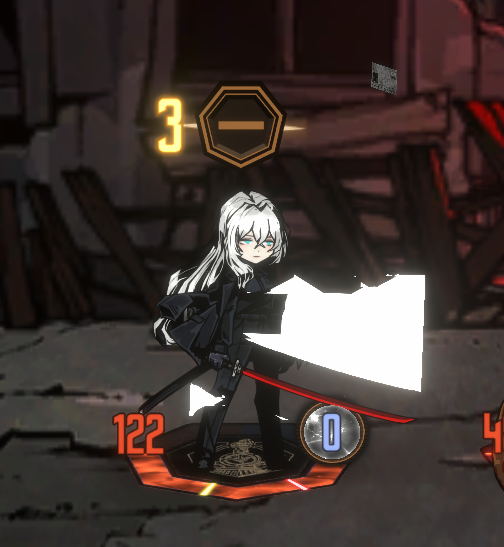
- You may encounter an issue with idle sprites where there are shapes of unwanted white pixels in your idle sprite.
- This is caused by transparent/opaque pixels in the sprite sheet which are disconnected from the parts, and need to be erased.
- The likely explanation for this issue is that animations require a part to be fully connected, therefore creating a white shape to connect those transparent pixels to a part.

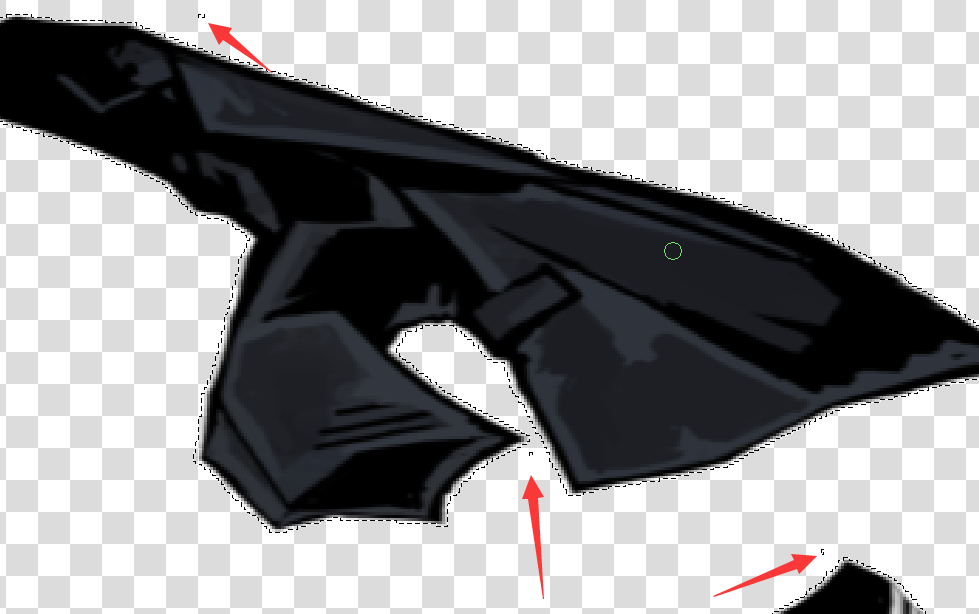
- The likely explanation for this issue is that animations require a part to be fully connected, therefore creating a white shape to connect those transparent pixels to a part.
- There is another solution to this issue via using scripts. You put an image through and it just works
 .
.
There is one provided by developer from RedHook, devs of Darkest dungeon.
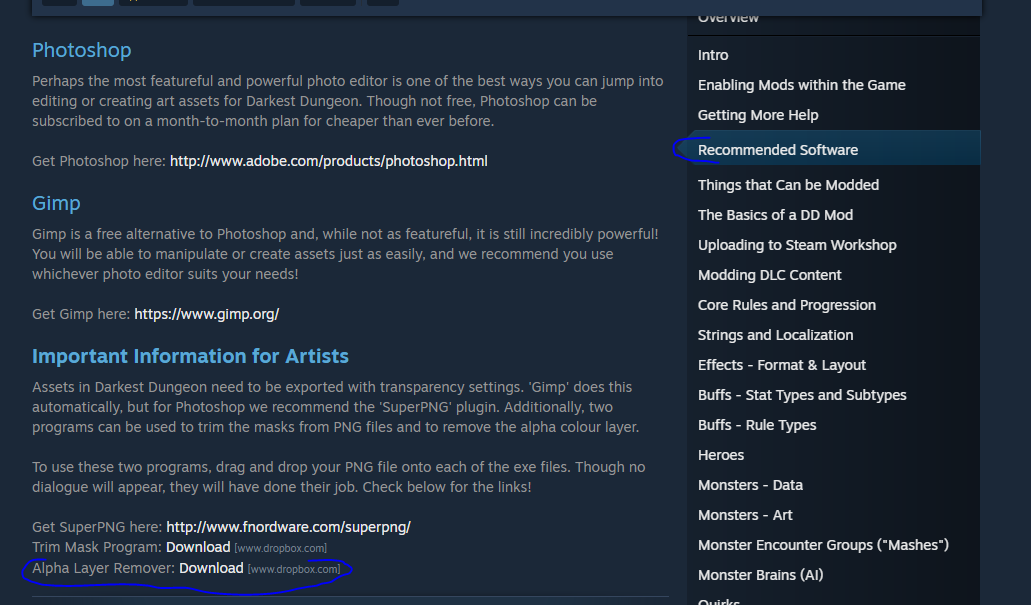
Or just download the file right here
Replacing Idle Animations
- Dynamic idles: Idle sheets that have parts that are hidden or shown after conditions are met
- Some examples of Identities with dynamic idles are: T Corp. Don, R Corp. Meursault, R Corp. Heathcliff, Priest Gregor, Barber Outis, Dulcinea Rodion...
- Non-dynamic idles are idles that don't have this trait, so basically most Identities.
Replacing Non-Dynamic Idles
For this example, I will replace Pirate Gregor's idle animation with Smee's.
- Locate Smee's
texture2didle sheet, theskeletonandatlastext assets. They all share the same name so it's not hard to find.

- Export dump all three files with UABEA and export the png of the texture2d file with AssetStudio.
- Open Gregor's bundle with UABEA and find the same files, his texture2d, skeleton and atlas
- 'Import dump' Smee's texture2d file onto Gregor's texture2d file.
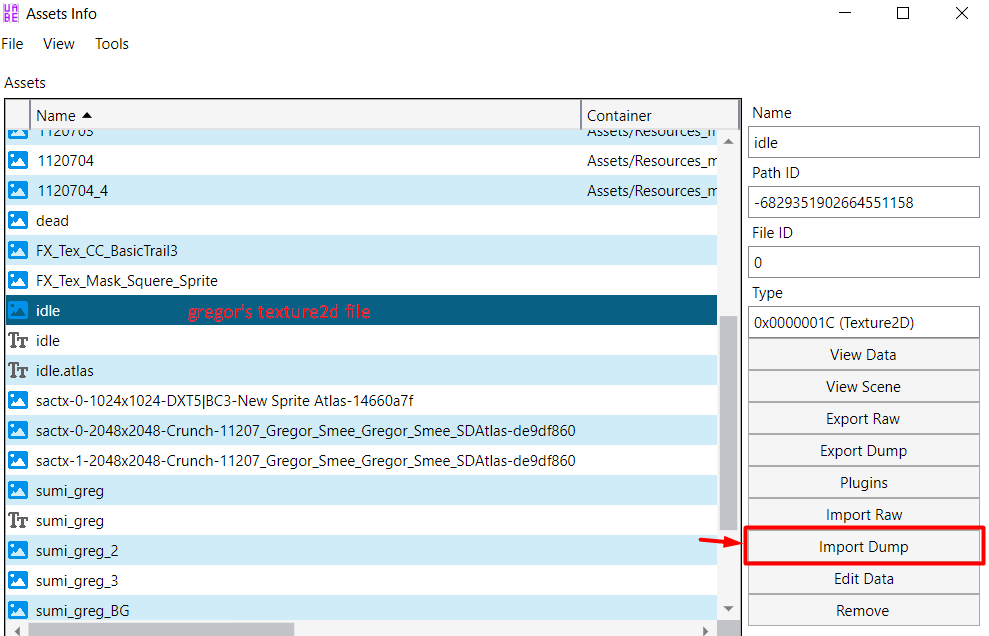
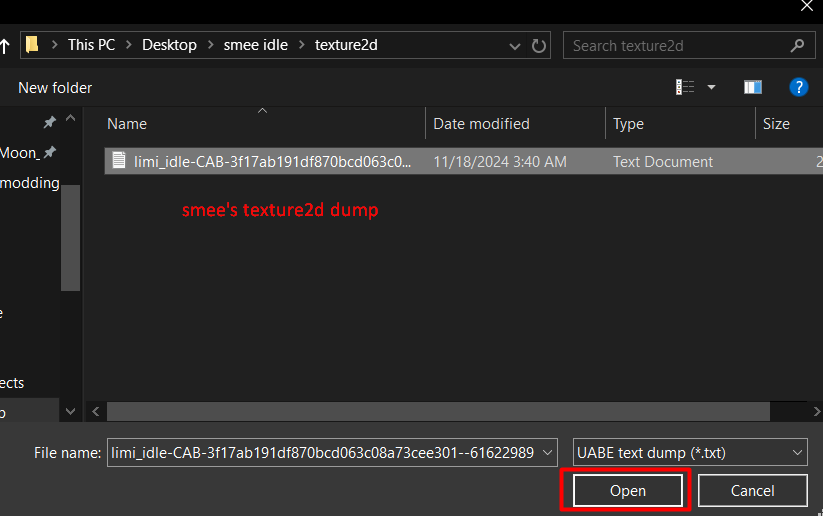
- Import the png to the texture2d file. Refer to the UABEA modding guide if you don't know how.
- Import dump the textasset files, just like we did with the texture2d files. Make sure you are importing the correct file. Skeleton file with skeleton, and atlas with atlas.
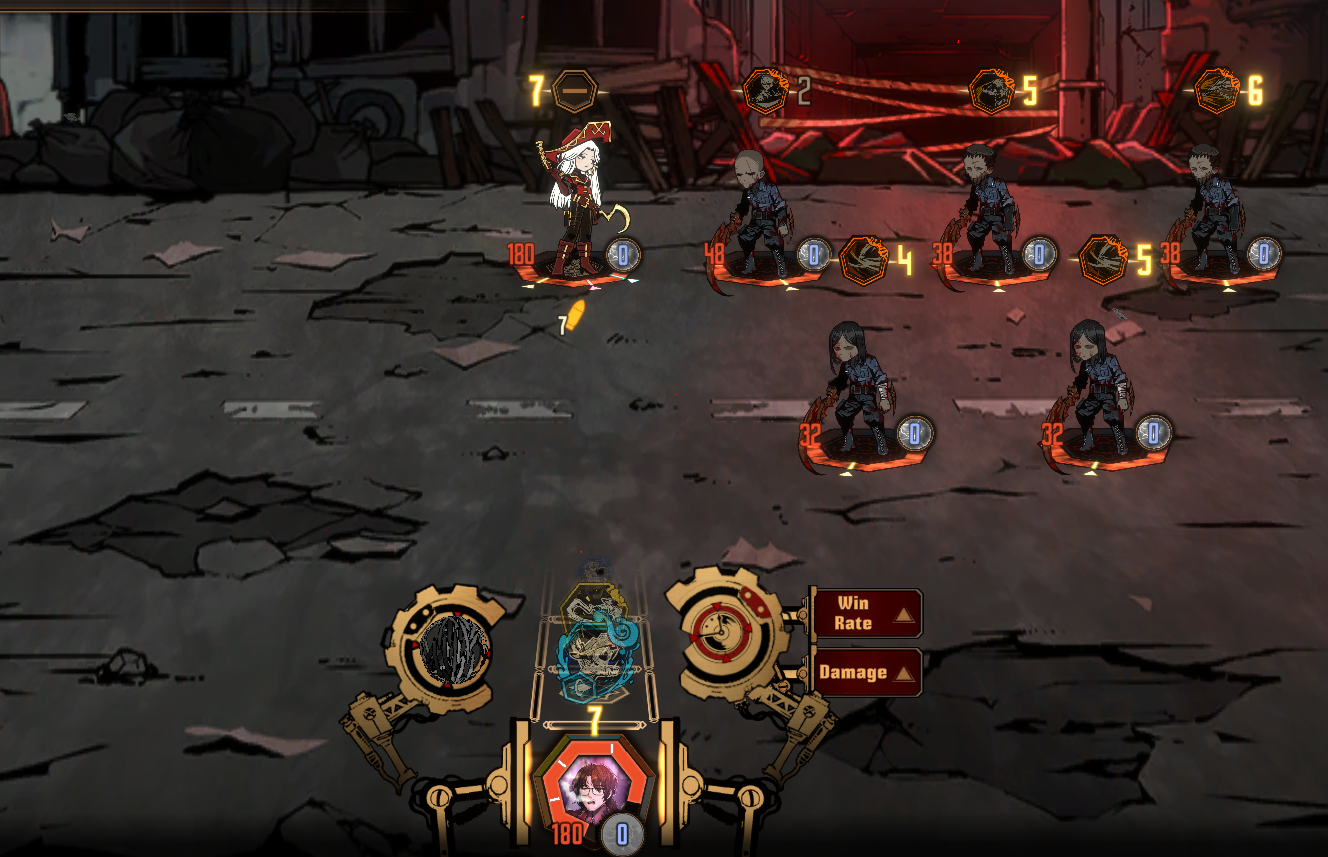
Your idle should be overwritten, but if you replaced an enemy idle, the idle will be looking away from the enemies. To fix this we'll have to take another step.
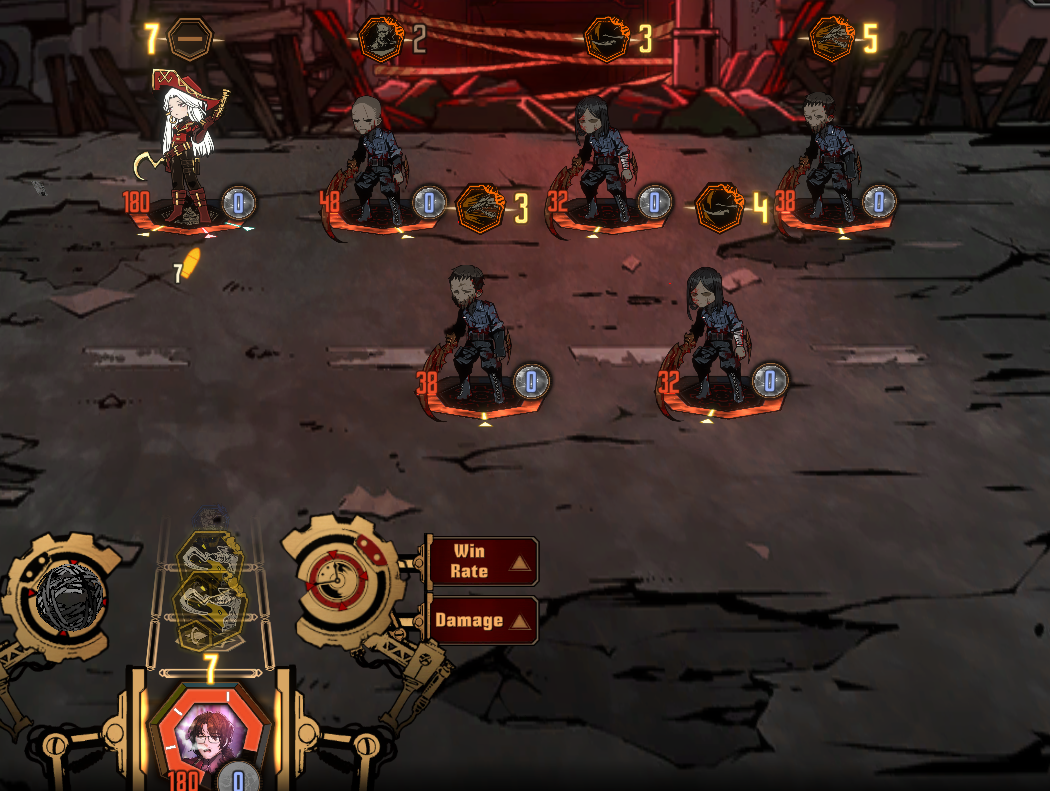
- In UABEA, In Gregor's bundle, Filter by monobehaviour and look for a file named
skeletonanimation. Then edit data and changeinitialFlipX = 0toinitialFlipX = 1
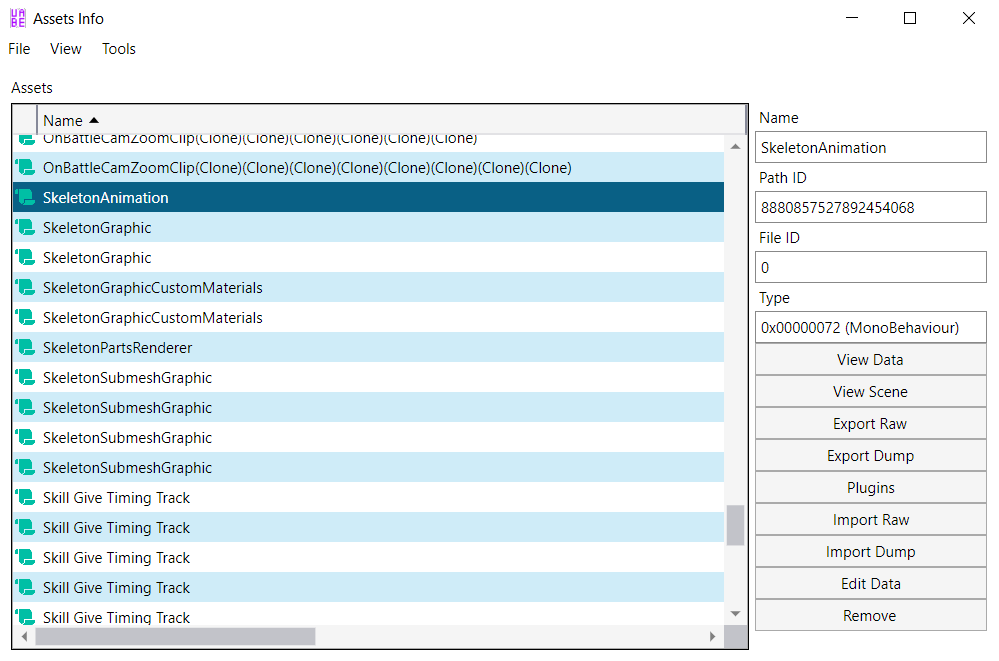
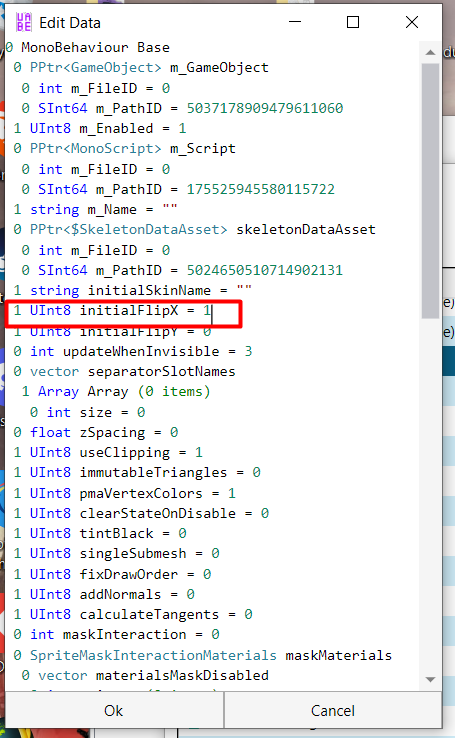
Your idle is now succesfully replaced and looking the right way!
Replacing Dynamic Idles
Replacing dynamic idles
In this example I will replace Barber Outis' idle with the enemy Barber idle.
First, follow all steps above and continue with this section once you have followed the above.
- Find Barber's
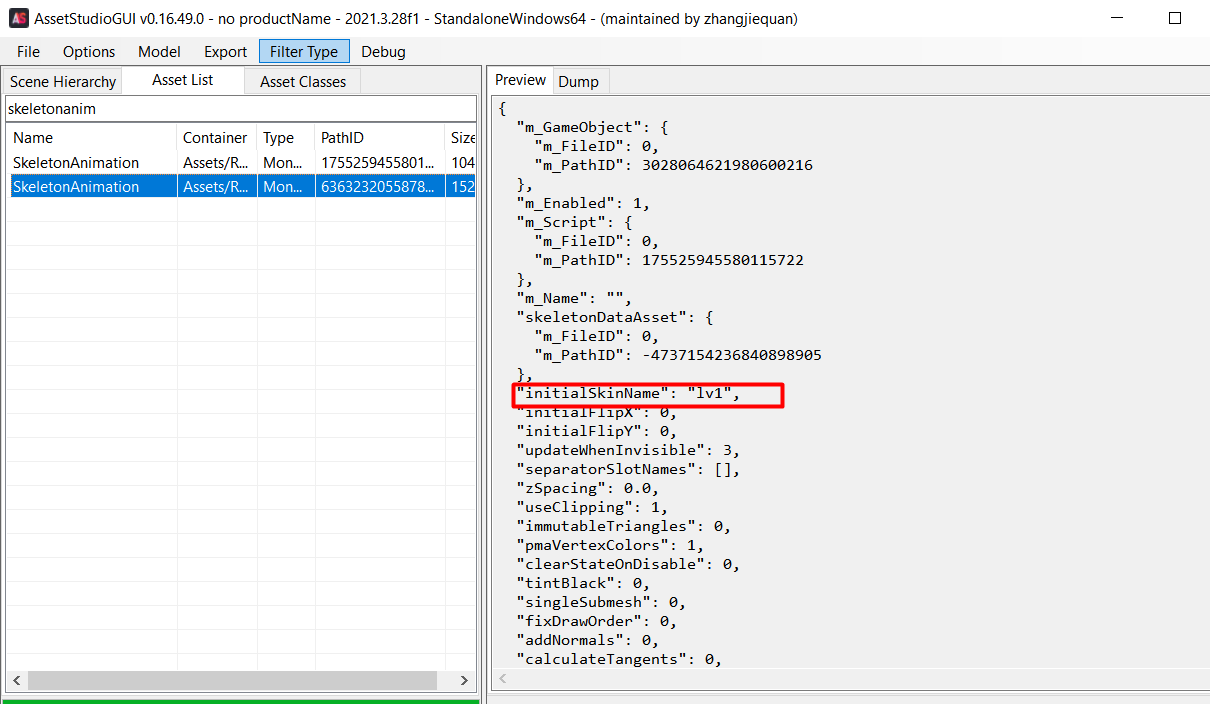
skeletonanimationfile and note herInitialSkinName. We can see it's simply called "1st". This corresponds to her first stage appearance and her stage 2 and 3 would be named "2nd" and "3rd"
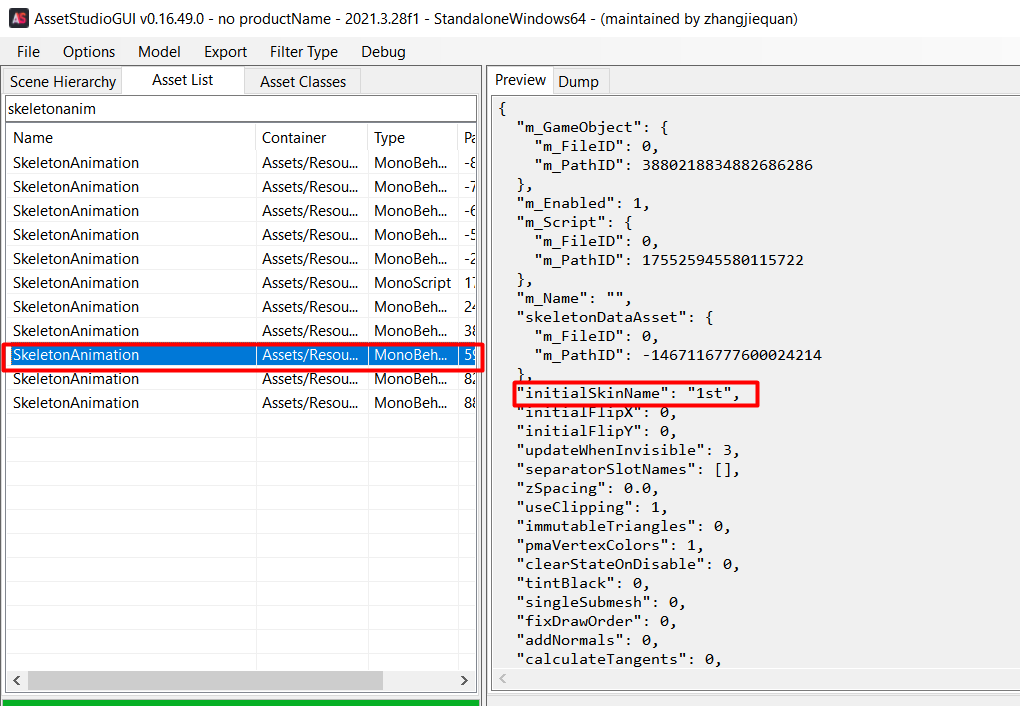
- Do the same for Outis. Notice that she follows a different format. Rather than being "1st" "2nd" and "3rd" she uses "lv1" "lv2" and "lv3"
- This means we have to go to the skeleton file (the one we replaced in step 5 in the previous guide) and change all instances of "1st" with "lv1", "2nd" with "lv2" and "3rd" with "lv3". If the format happens to match then you can ignore the next step.
- This means we have to go to the skeleton file (the one we replaced in step 5 in the previous guide) and change all instances of "1st" with "lv1", "2nd" with "lv2" and "3rd" with "lv3". If the format happens to match then you can ignore the next step.
- In UABEA, find the skeleton file and replace all instances of "1st" with "lv1", "2nd" with "lv2" and "3rd" with "lv3".
Search for them with the quotation marks included.
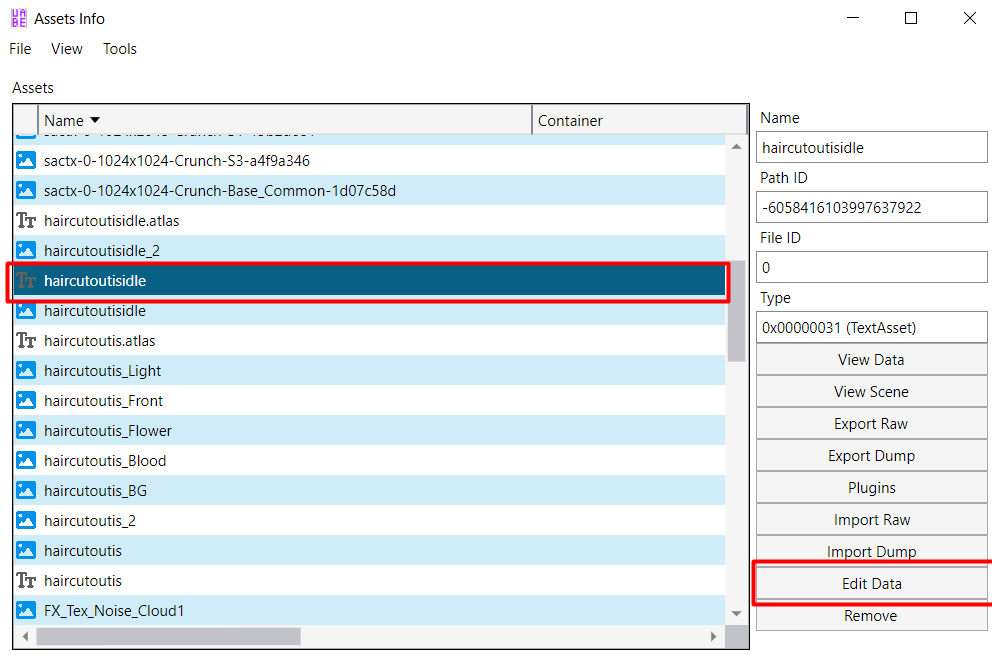
And you're done!
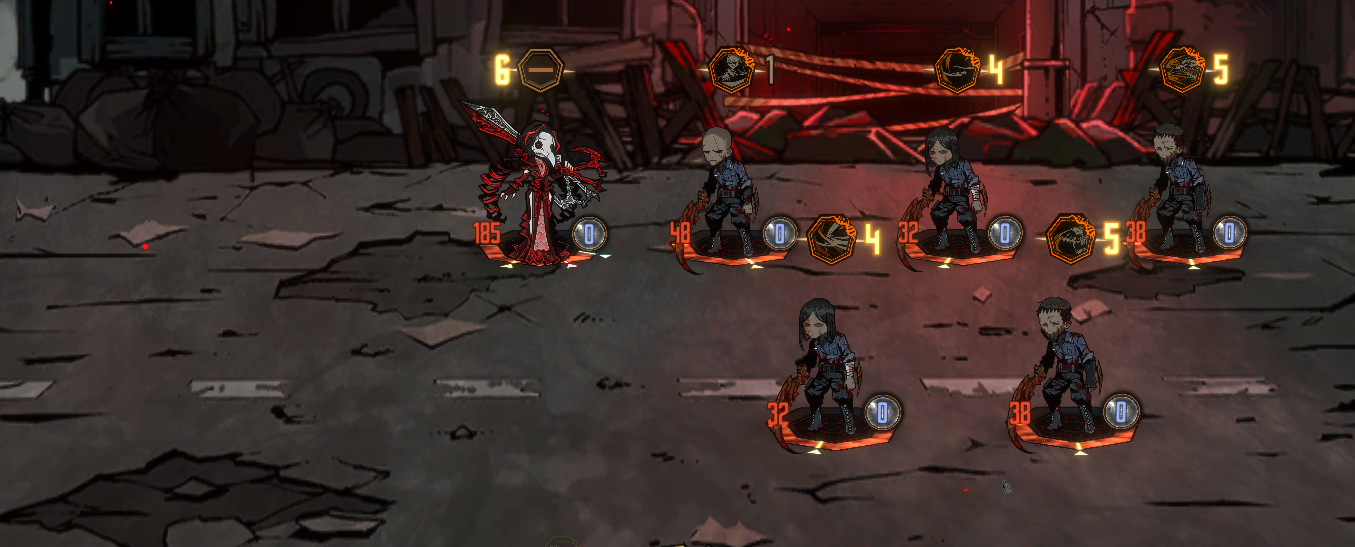
Replacing Idles With More Than One Texture2d Idle Sheet**
There are some enemies/ids who need more than 1 texture2d idle sheet to render. If you want to replace an id with 1 texture2d sheet with an idle that needs 2 texture2d files you'll have to do the following.
For this example I'll replace Dulcinea Rodion's idle with Dulcinea's. Rodion only has 1 texture2d sheet while Dulcinea has 2.
First, do the steps above as necessary, in the case of this example you'd have to follow the dynamic idles guide.
- In UABEA, find Dulcinea's idle 2
texture2d.- Export dump it and note the
pathid. - In assetstudio, export the png of the file.
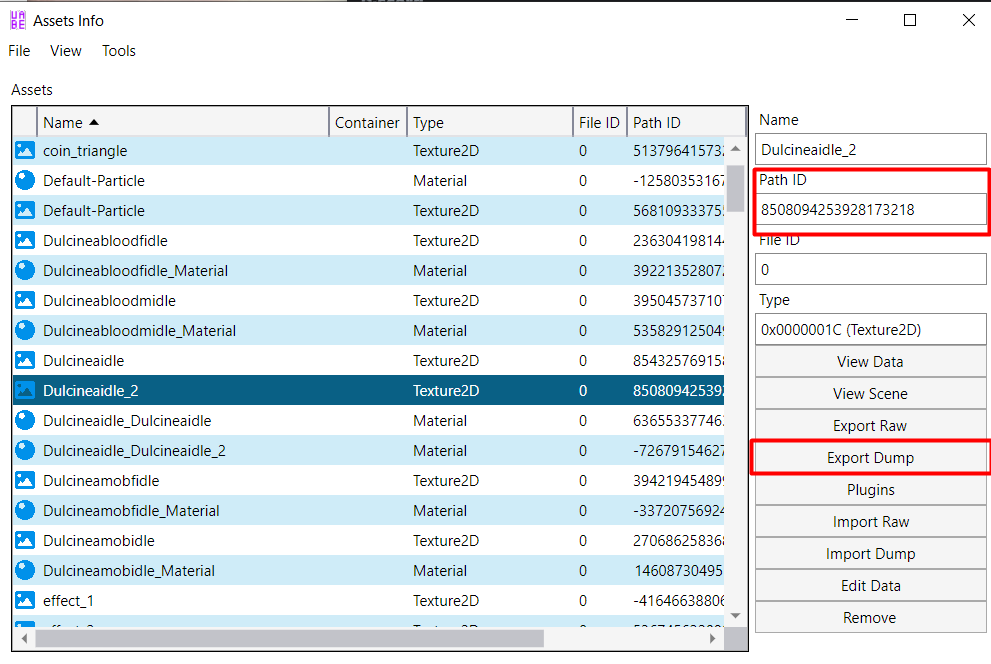
- Export dump it and note the
- In Rodion's bundle, add a new file.
- Copy the path id and type
Texture2Dfor the type.
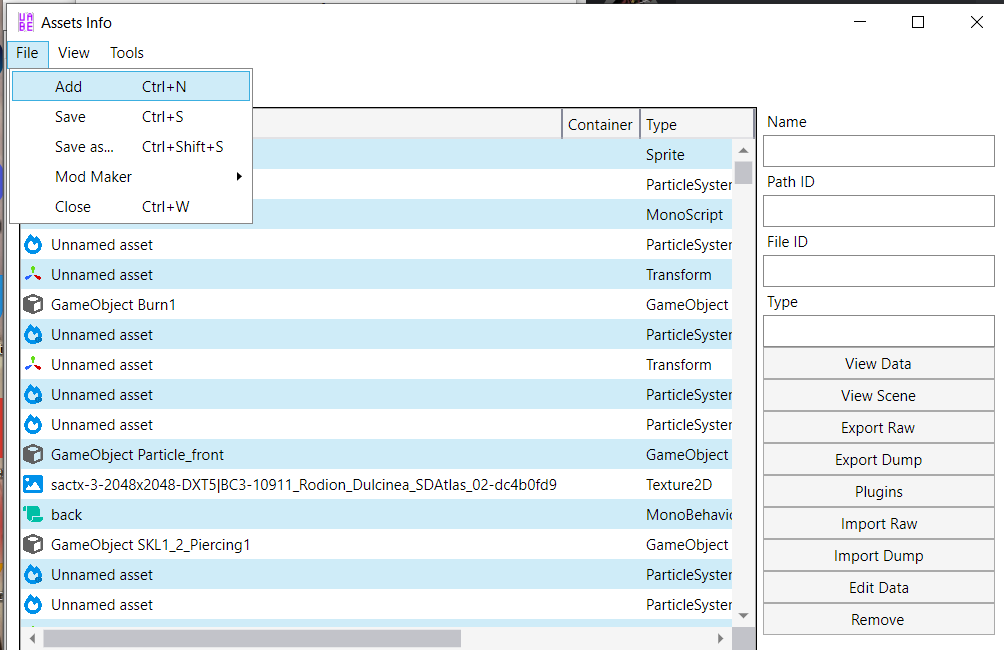
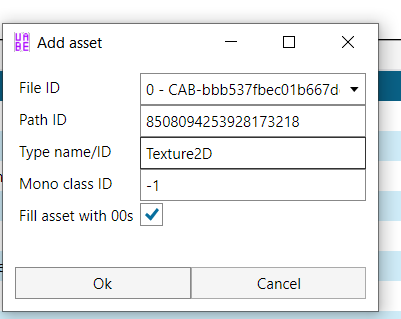
- Copy the path id and type
- Import dump the idle you exported on your new item and add the png.
- In Dulcinea's bundle, find the
materialfile tied to her second idle. It usually follows the same name so in her case it's calledDulcineaidle_Dulcineaidle_2.- Export dump and note the pathid.
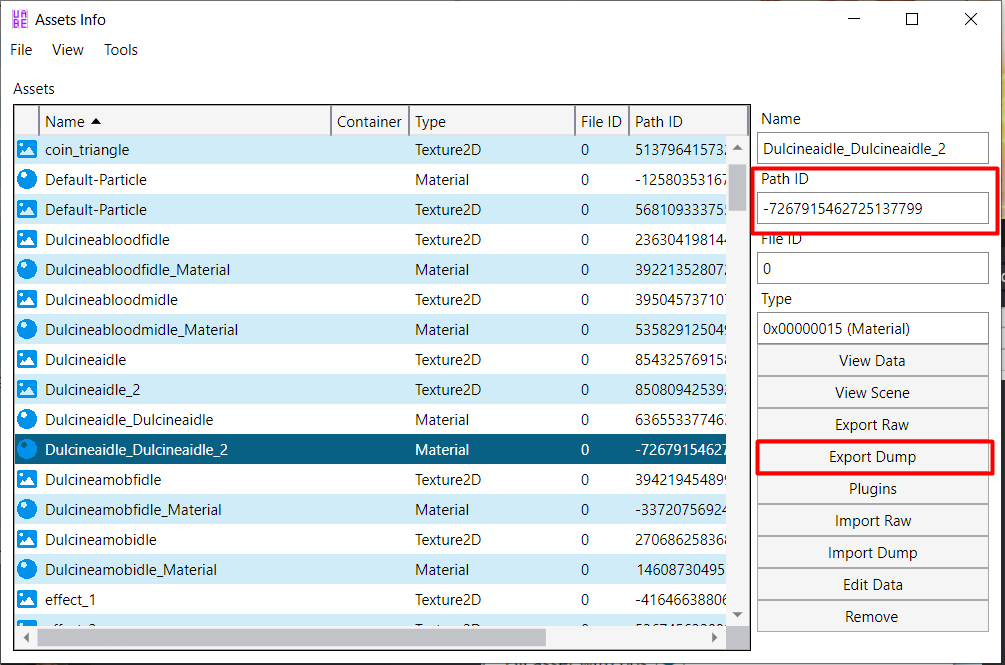
- Export dump and note the pathid.
- In Rodion's bundle, add a new file.
- Copy the pathid and type
Materialfor the type.
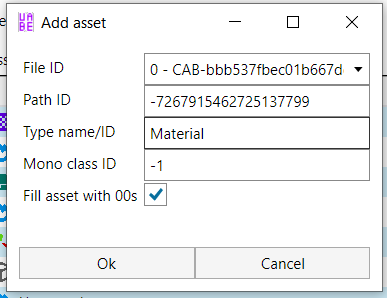
- Copy the pathid and type
- Import dump the material dump from step 4.
- Look for rodion's
MonoBehaviourAtlas file.- Click edit data and increase the size of the array (I forgot to do it on the screenshot but just type 2 instead of 1) and add the path id of the material you just added.
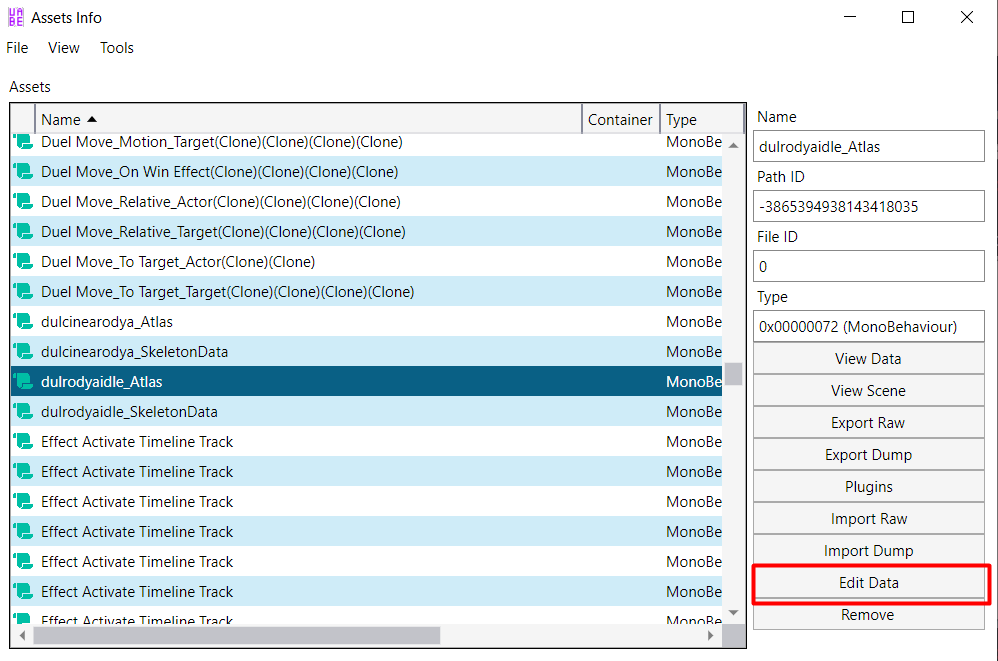
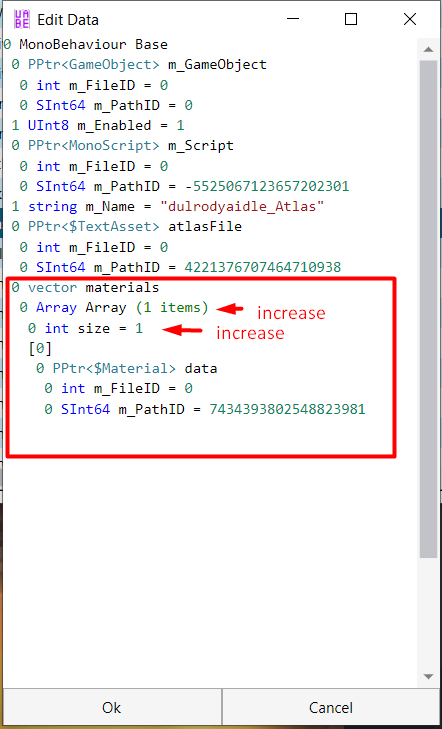
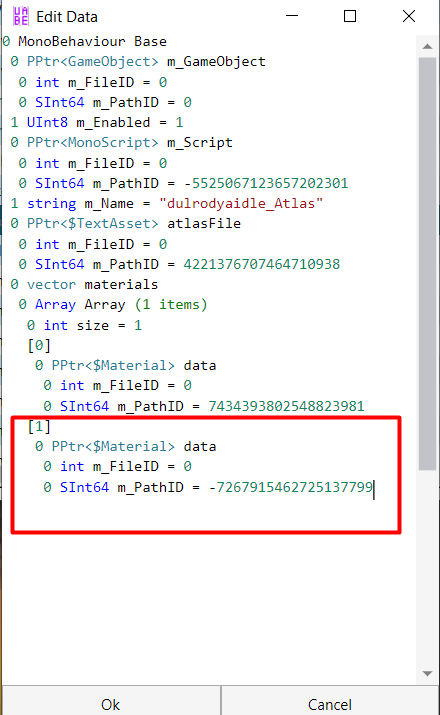
And that's all!
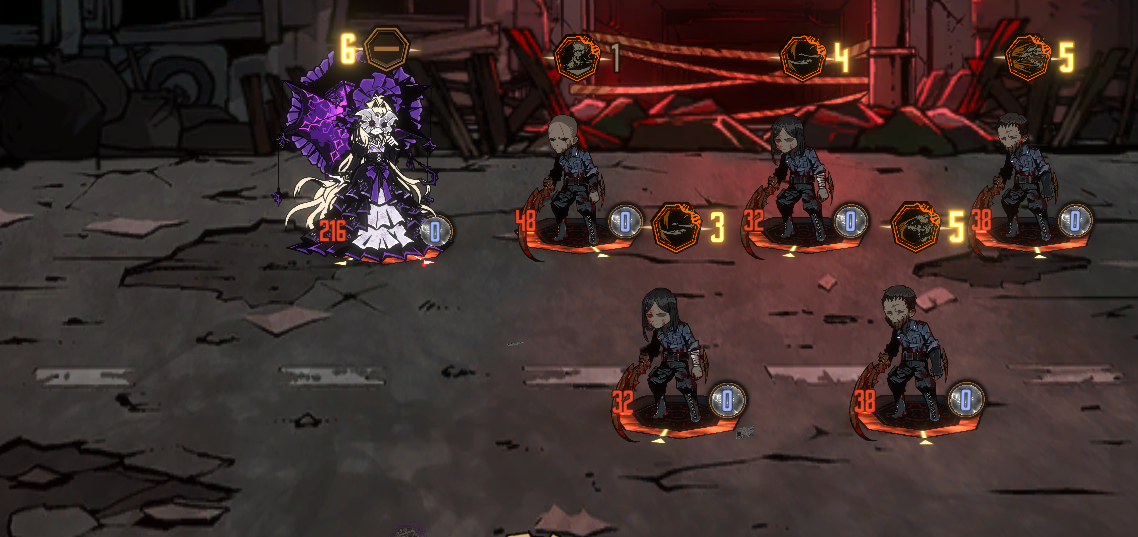
- Click edit data and increase the size of the array (I forgot to do it on the screenshot but just type 2 instead of 1) and add the path id of the material you just added.
-
Animation Issue
- Sometimes, even if you follow the bounding boxes of an idle sprite or UT3 animation, there may be issues caused by the way it is animated, such as a "splitting" animation causing sprites to become disconnected.
-
Modifying Audio
Since LML v1.7 there is some rudimentary support for sound modding. Below is a guide on how you can do sound modding. Info might change in the future when I (hopefully) eventually implement a better form of sound modding support.
Tools
- Fmod Bank Tools, necessary for building modded sound bank files.
- Foobar, allows you to quickly inspect the content of a sound bank file.
- vgmstream component for foobar, required to correctly decompress
.bankfiles in foobar.
Workflow
Locate the sound bank files
- Sound assets in limbus are stored in .bank files, which you can think of conceptually as zip files of .fsb files, and .fsb files can also be thought as just zip files of the actual audio files (which are usually either .ogg or proprietary FMOD format sound file)
- Bank files location:
%localappdata%low/ProjectMoon/LimbusCompany/Assets/Sound/FMODBuilds/Desktop - Modify file with extension
.assets.banknot the one with.bankonly. - New audio file must have same or shorter length than the original one.
- The name of the bank files give you some hint as to what sound assets they contain. You can use the foobar tool to inspect the content of the bank files.
Create mod .bank:
- In
Fmod Bank Toolsfolder, drop.bankneeded to mod inbankfolder. - Run .exe,
File -> Extract - Prepare
.wavfile to replace the original one, rename it to match original name. - Go to
wav/<bank name>folder, overwrite.wavfile you want. If the folder contains any .wav files with special characters (such as Korean character, parentheses, and commas), delete the special characters, otherwise fmod build tool will fail. - Open
<bank name>.txtfile, delete the name of .wav you changed, and also any special characters in the .txt file. - Run .exe again, this time
File -> Build, new .bank file will be created inbuildfolder.
Apply mod .bank:
- Simply put the bank file in the LimbusCompanyMods folder as you would with .carra files
- If you have a bank file present in the mod folder, you should see a pop up of something like "You are about to download 4xx bytes of data" when you enter the game. This is to be expected due to how LML detects when to insert the modded sound bank files
- The modded bank files should take effect after you get to the main lobby.
Known issues
Some modders reported sound asset with Korean names cannot be modded. A workaround for this problem has been found, just remove the Korean from the file names, including in the txt.- Fmod build tool will report a warning "Windows 10 untested version found" on Windows 10. This shouldn't prevent the tool from working. But if you get that warning and no other text starts loading after that, then that's your sign something is wrong and it won't build.
Quick Note
- Audio files are stored in
.assets.bankfiles, not.bank. Use foobar to check those files. - You can't use foobar to inspect content of modded
.assets.bankfile due to a corrupted chunk in it, refer to lml source code if you still want to check the content.
Here is an index of the list of sound assets and their corresponding bank file names. This is only up to date to cantos 7 part 1.
Here is an archive of the fmod bank tools in case the download link stops working.
Remember to install vgmstream component for foobar to correctly decompress .bank files in foobar.
Streamlining Your Workflow
A personal guide on how to streamline your modding workflow, reiterating some things from other threads, based on my workflow.
Battle Sprites
- When editing or drawing over battle sprites, working directly on the sprite sheets is inconvenient, as you are missing critical information. Such as knowing the bounds and when it's used. Visualizing battle sprites with their bounds, numbers for identification, and figuring out when they are used for is useful for this.
- To visualize battle sprite bounds, along with numbering for easier identification, get your sprite sheets and overlay a number over each sprite. In my example, the first number is what sprite sheet it is (sactx-0), and the second is to distinguish it from other sprites in the same sheet. Then add a color background that is easily distinguishable from the sprites.
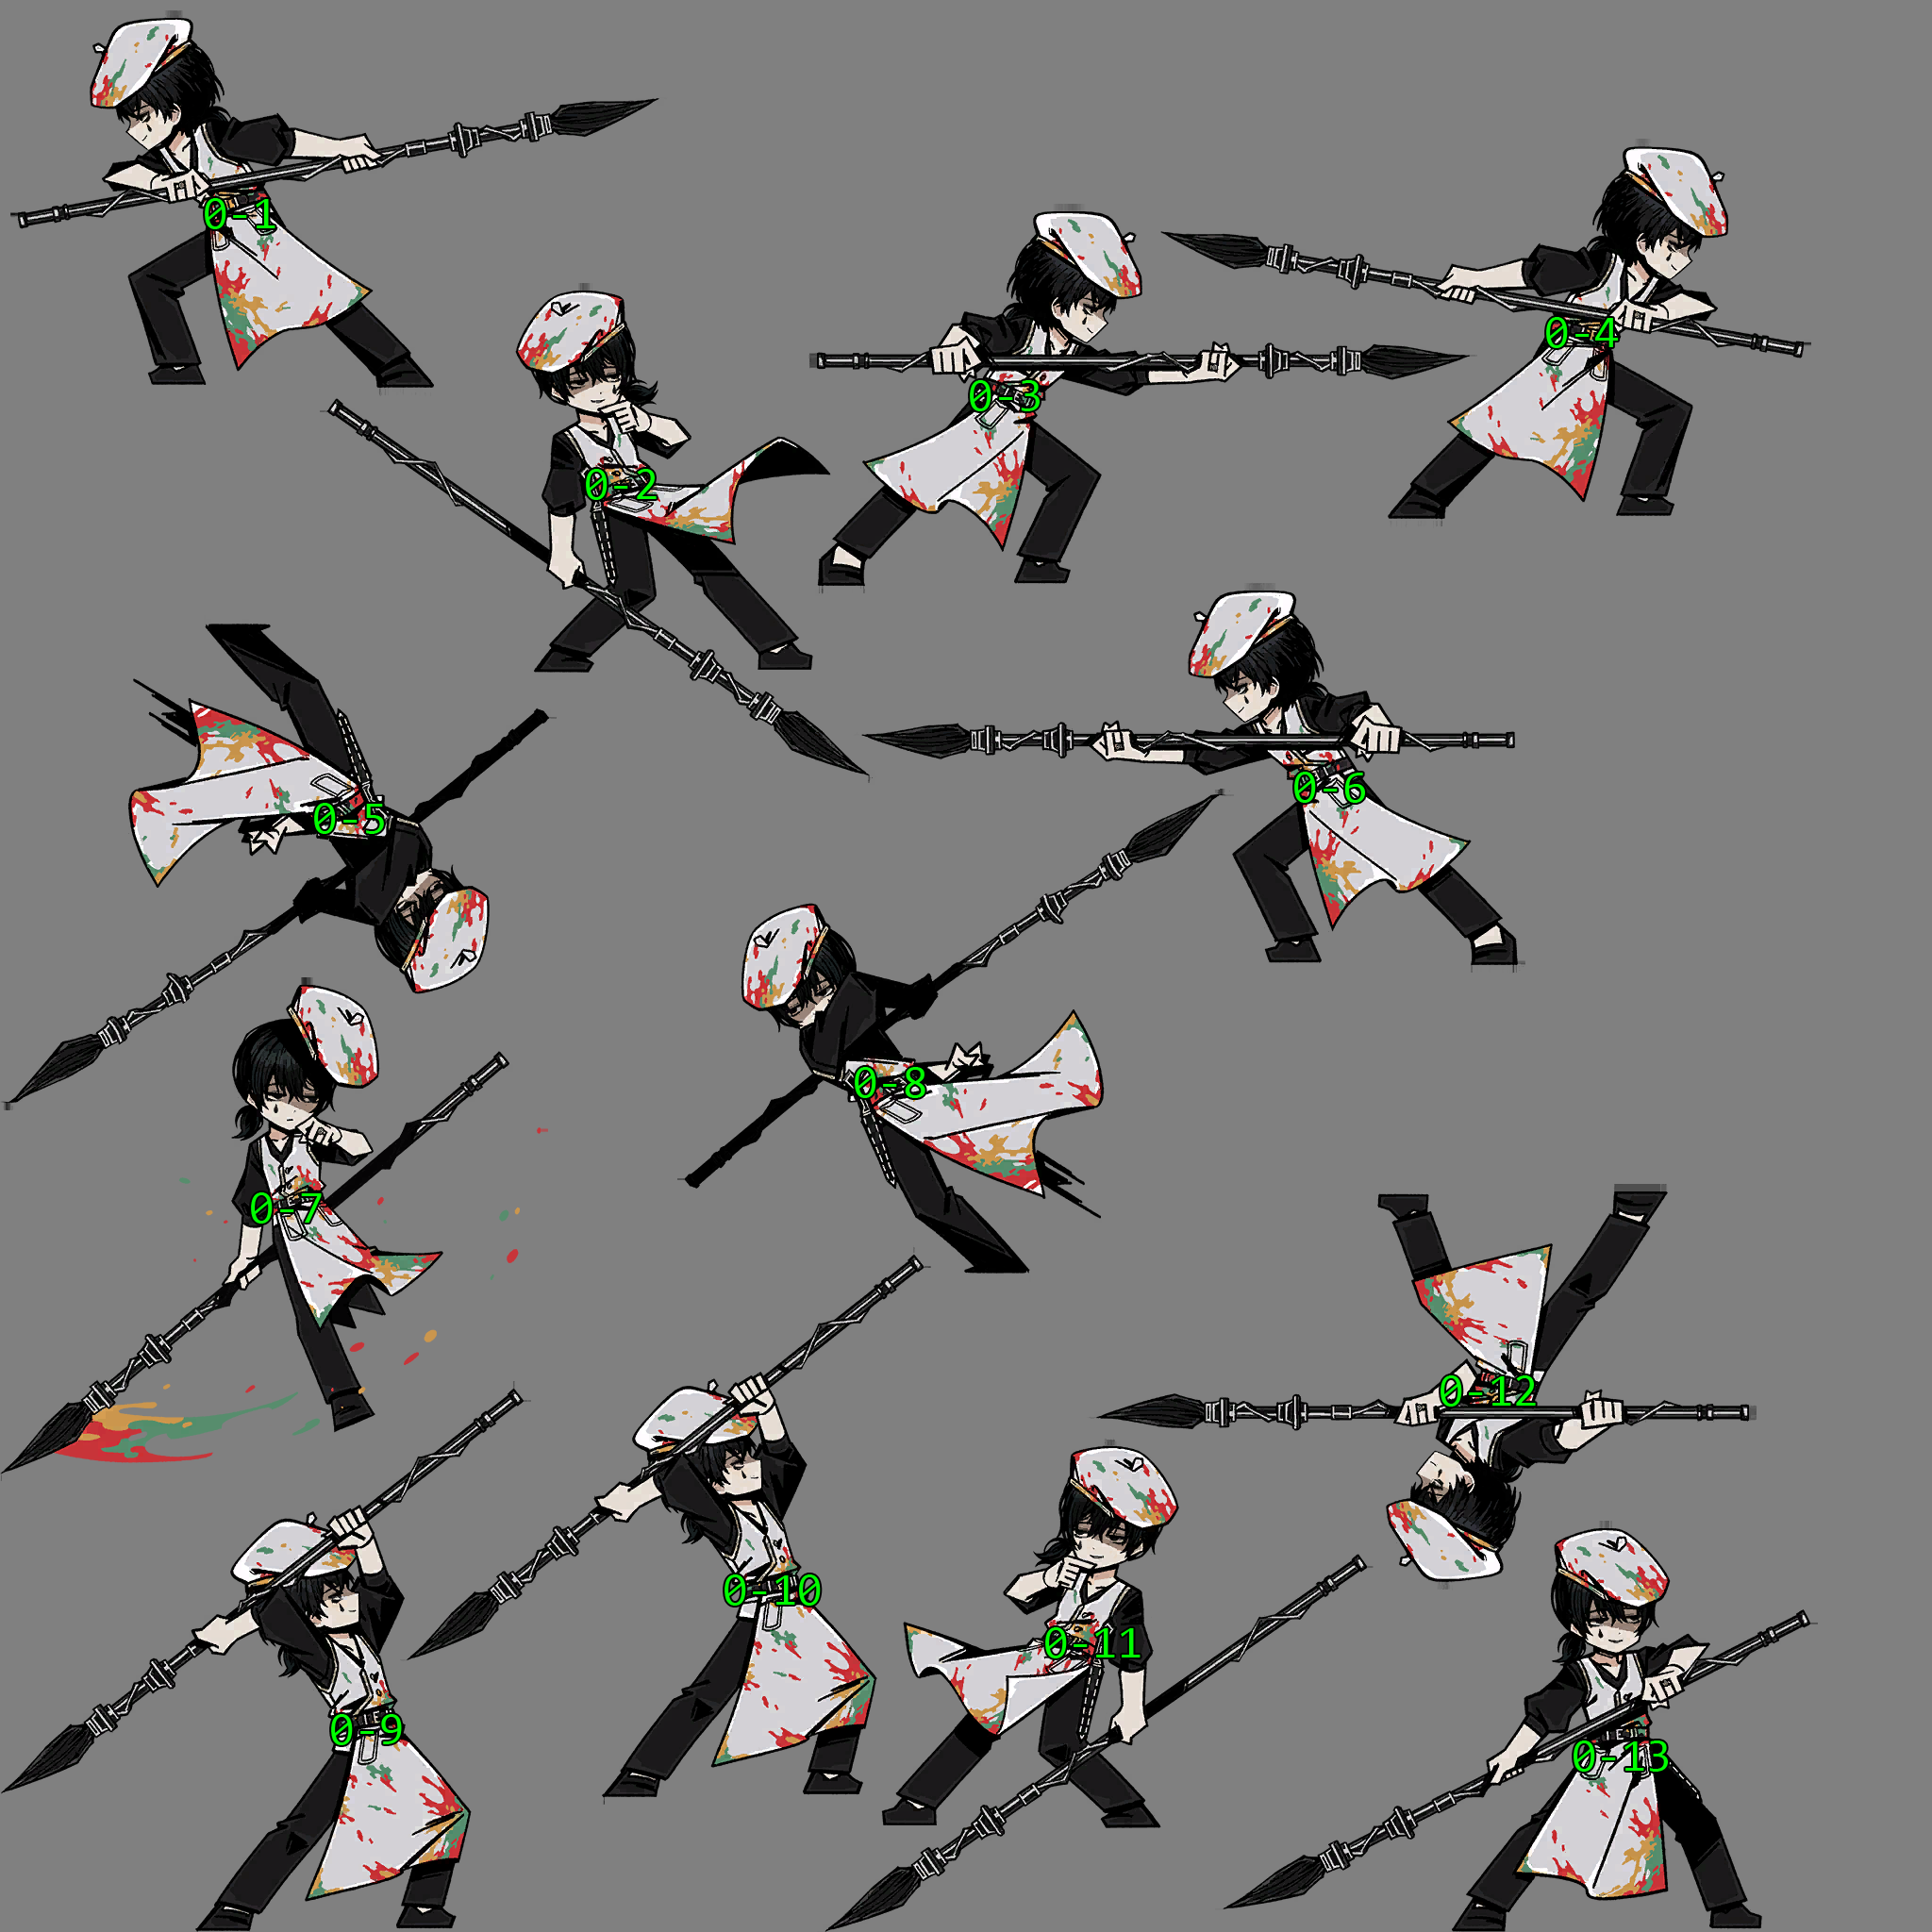
- Import the sprite sheets into Limbus Company using UABEA.
- Export the Sprites (Asset type), AssetStudio recommended. The file names specify when they are used, such as "dmg" for when they are damaged, "gud" for "guard, "miss" for evade, "skill1_1" for the first sprite of skill 1. Although keep in mind that other sprites may be reused for other situations.
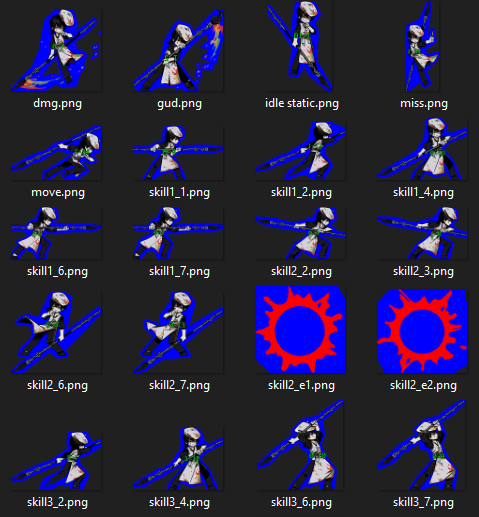
- You can view the sprites in-game to see for yourself when certain sprites are used.
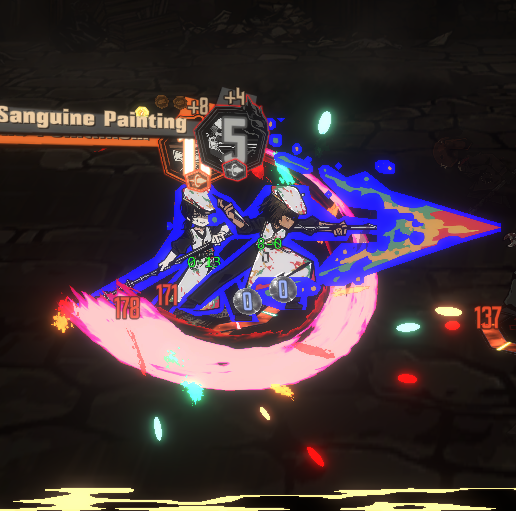
- You can also work on the sprites outside of the sprite sheet, which makes working more convenient. Then you can align the sprites in the sprite sheet when you're done.


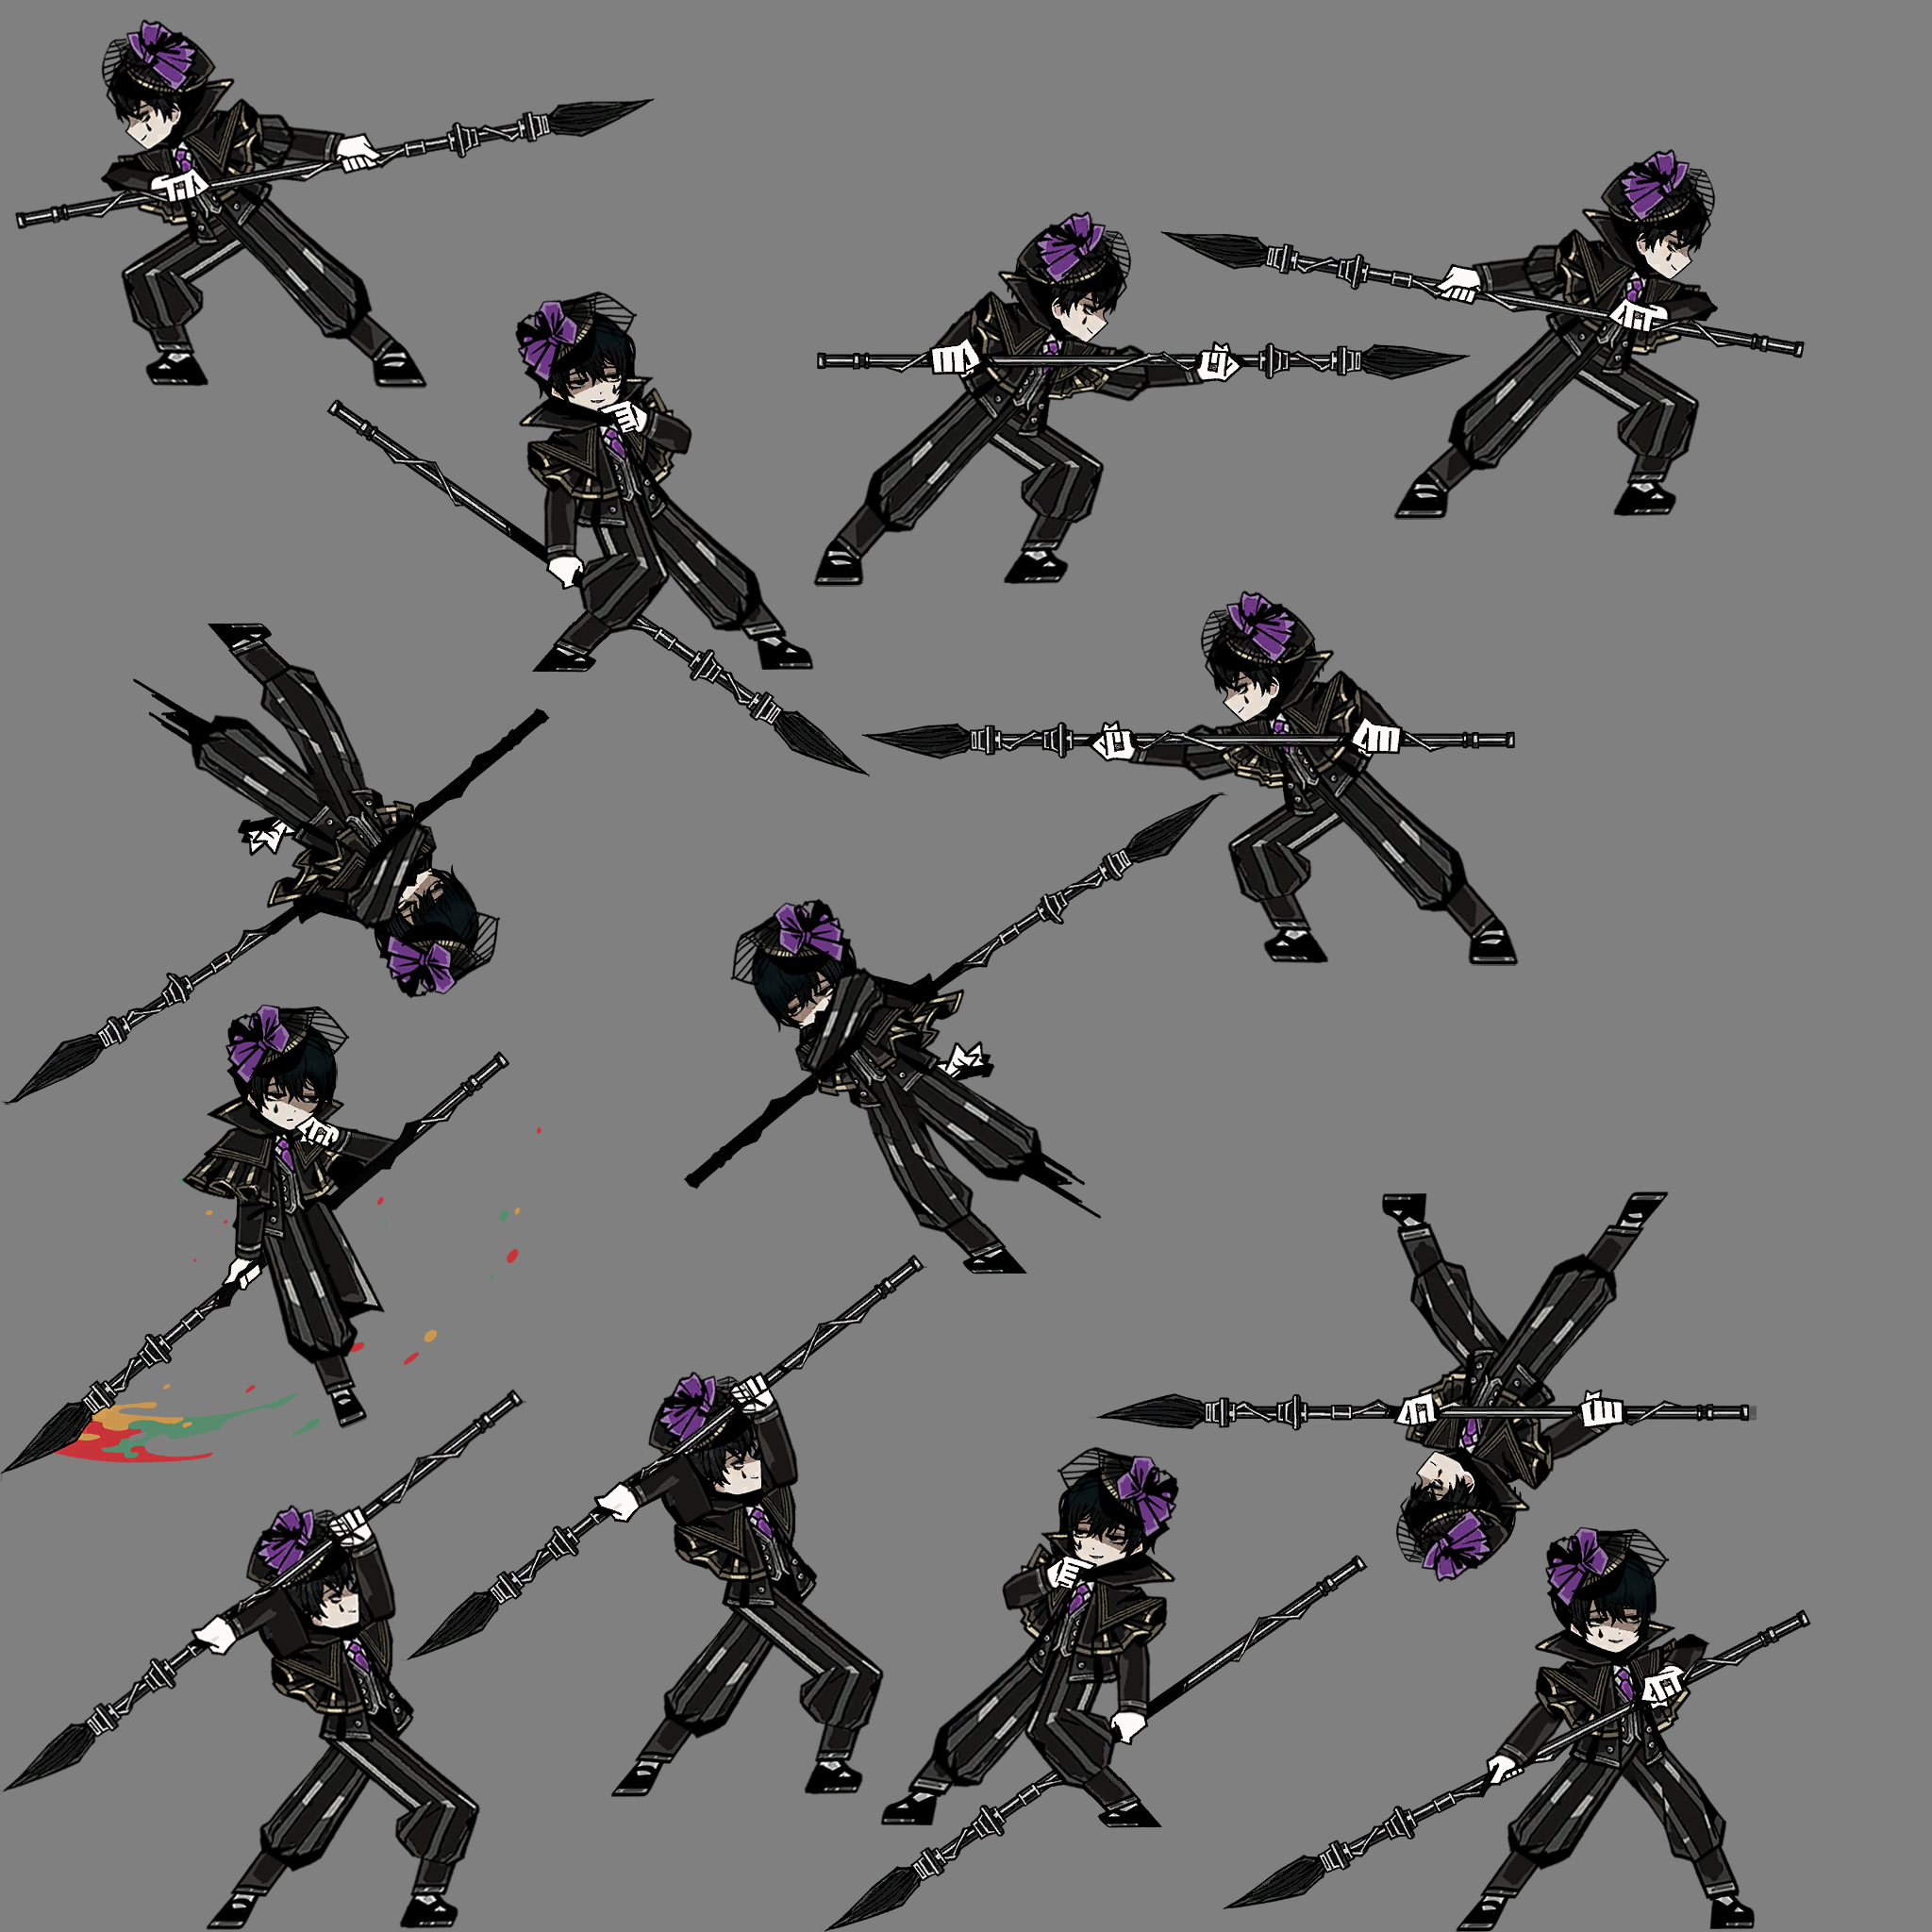
Idle Sprites and UT3 Animations
- The assets Limbus Company uses for idle sprites and UT3 animations are stretched from their original/true sizes, this makes it inconvenient to work on them directly. And similar to battle sprites, knowing the bounds is also useful, but this uses a different method.
- Both the original size and the bounds are defined in an atlas prefab file that can be found in the same asset bundle as the UT3 art itself.
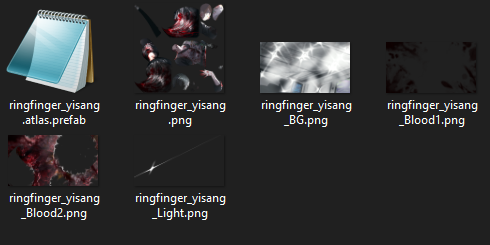
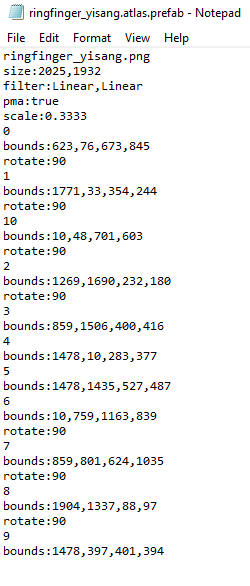
- Defined in the file is the size, which is 2025x1932 in this case, and the bounds of each part, defined as such (x, y, width, height), with x and y being the top left coordinates, sometimes having a rotation as well.
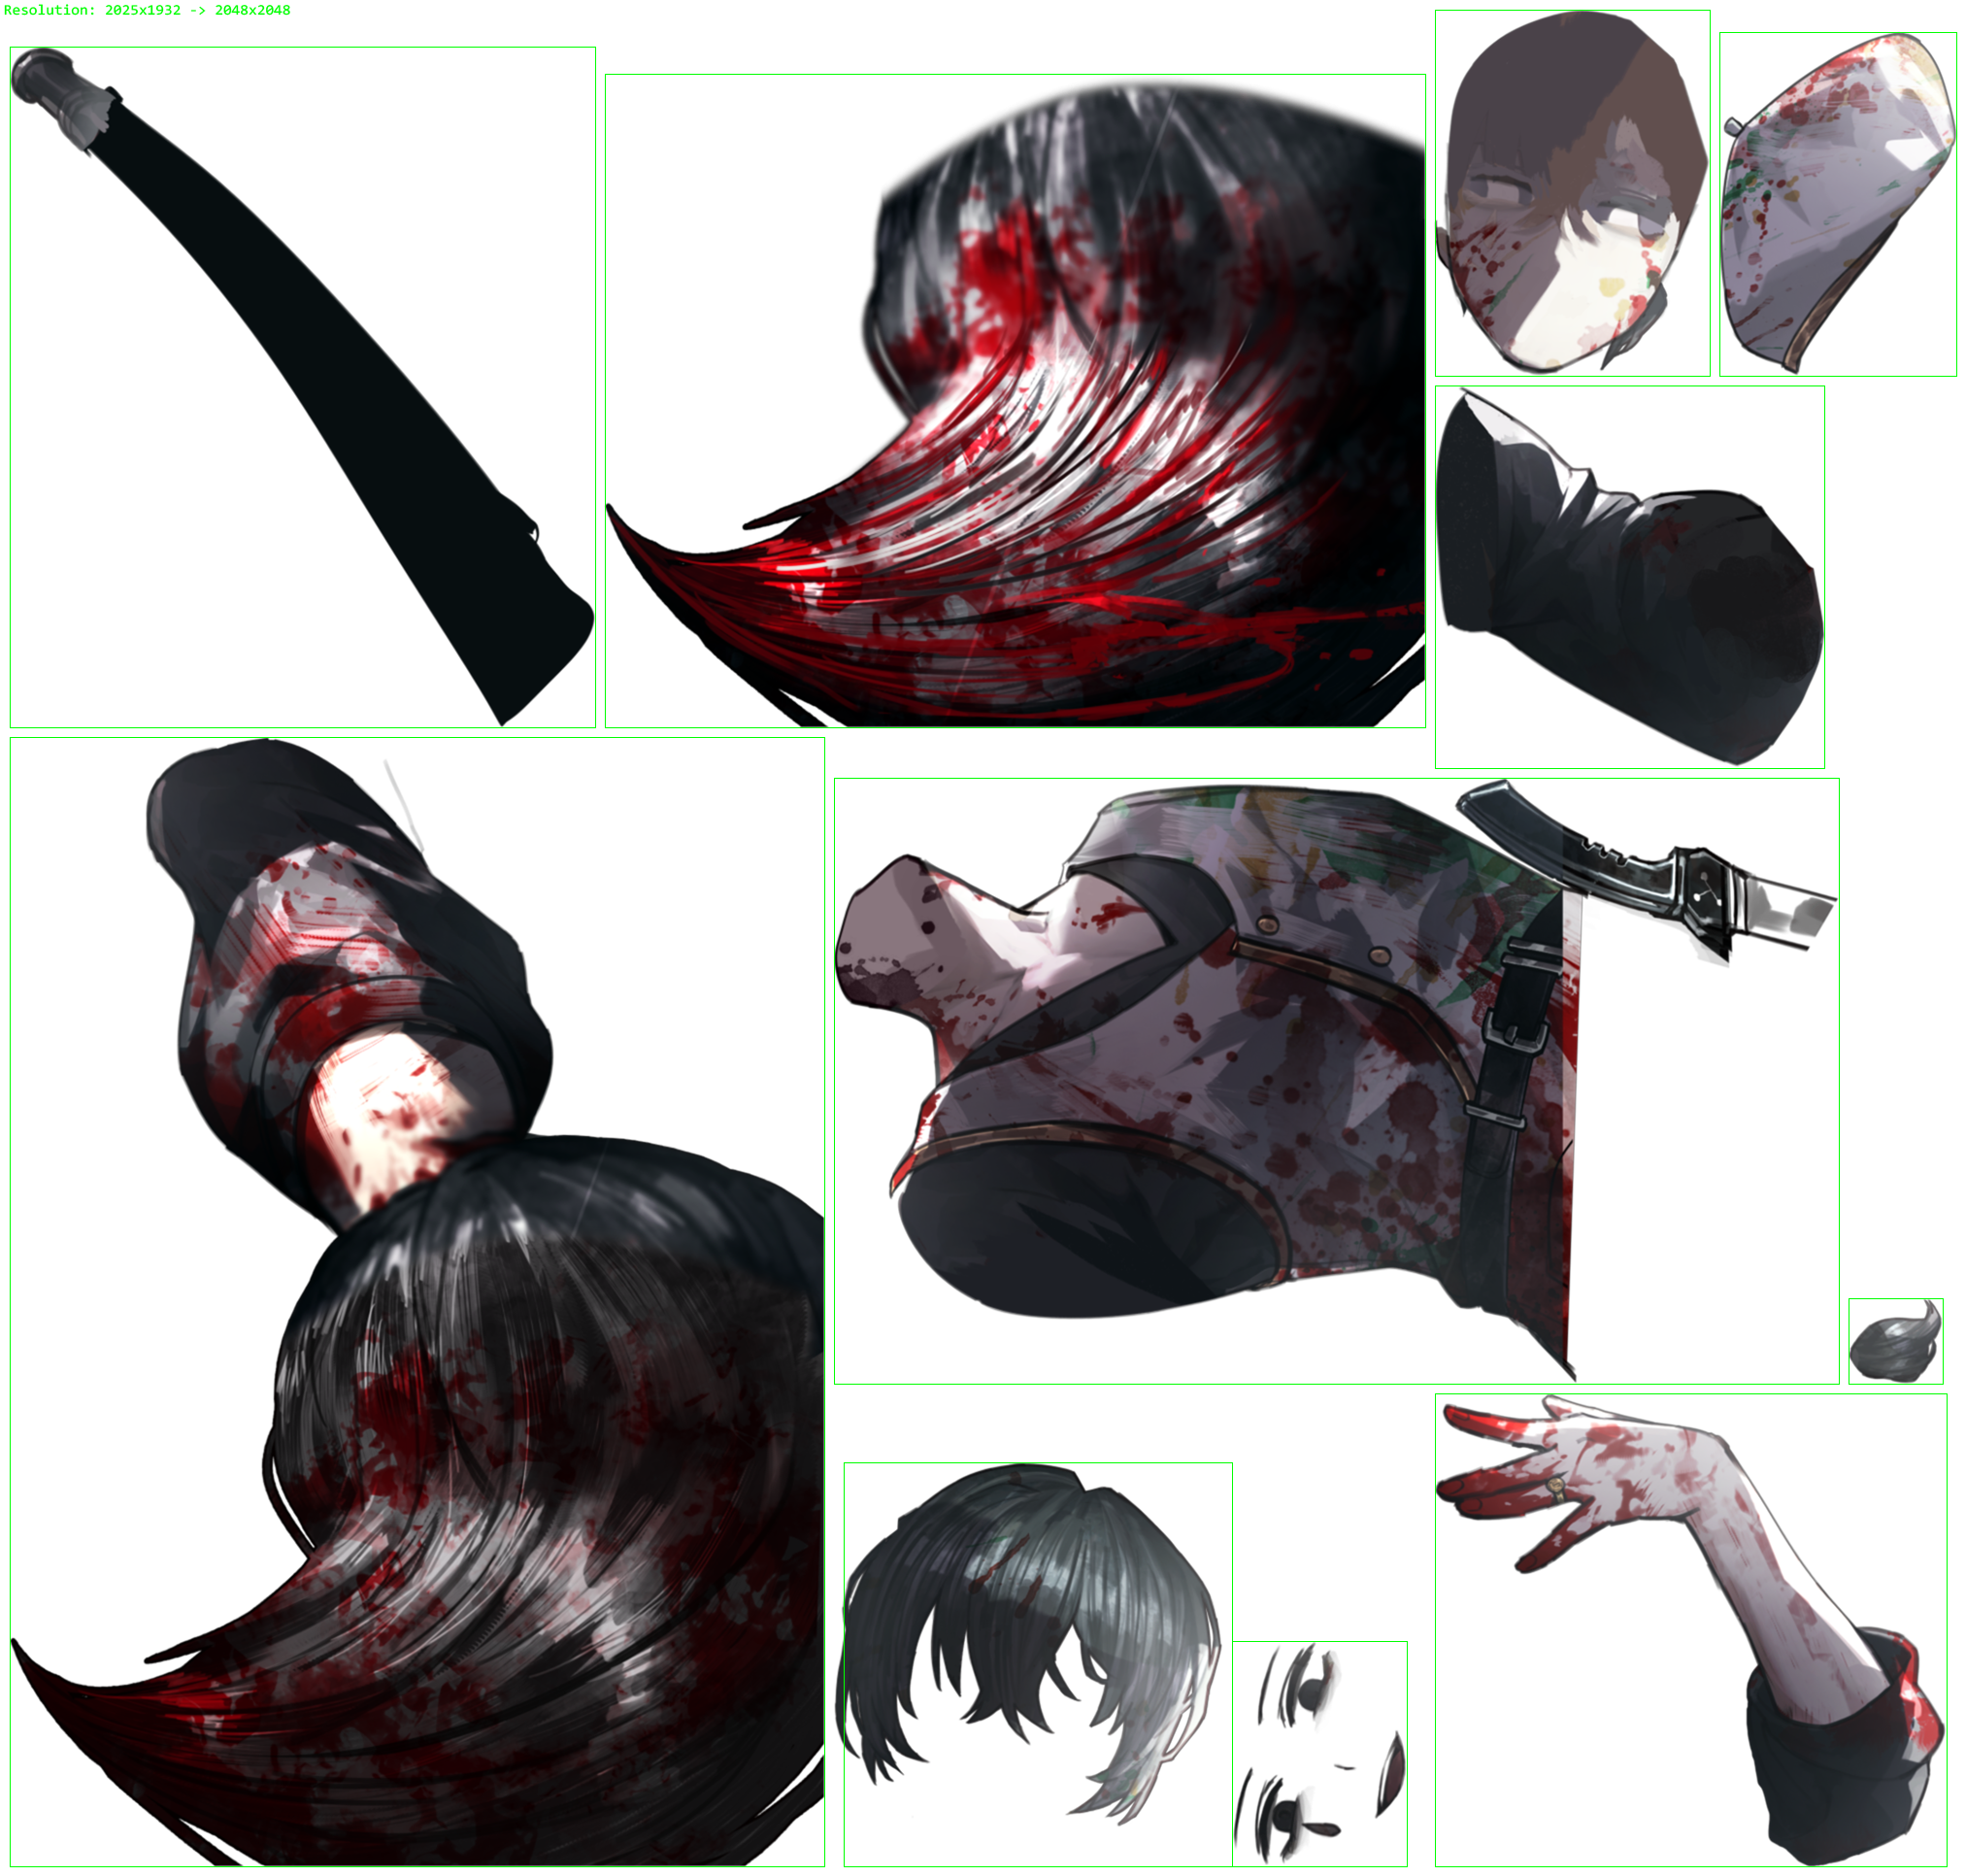
- Resize the UT3 animation layers into their original size and draw the bounding boxes.
- You do not need to resize it back when you're done, it will work just fine if imported with its original size. In some cases, you might even encounter issues with importing it in its stretched size.
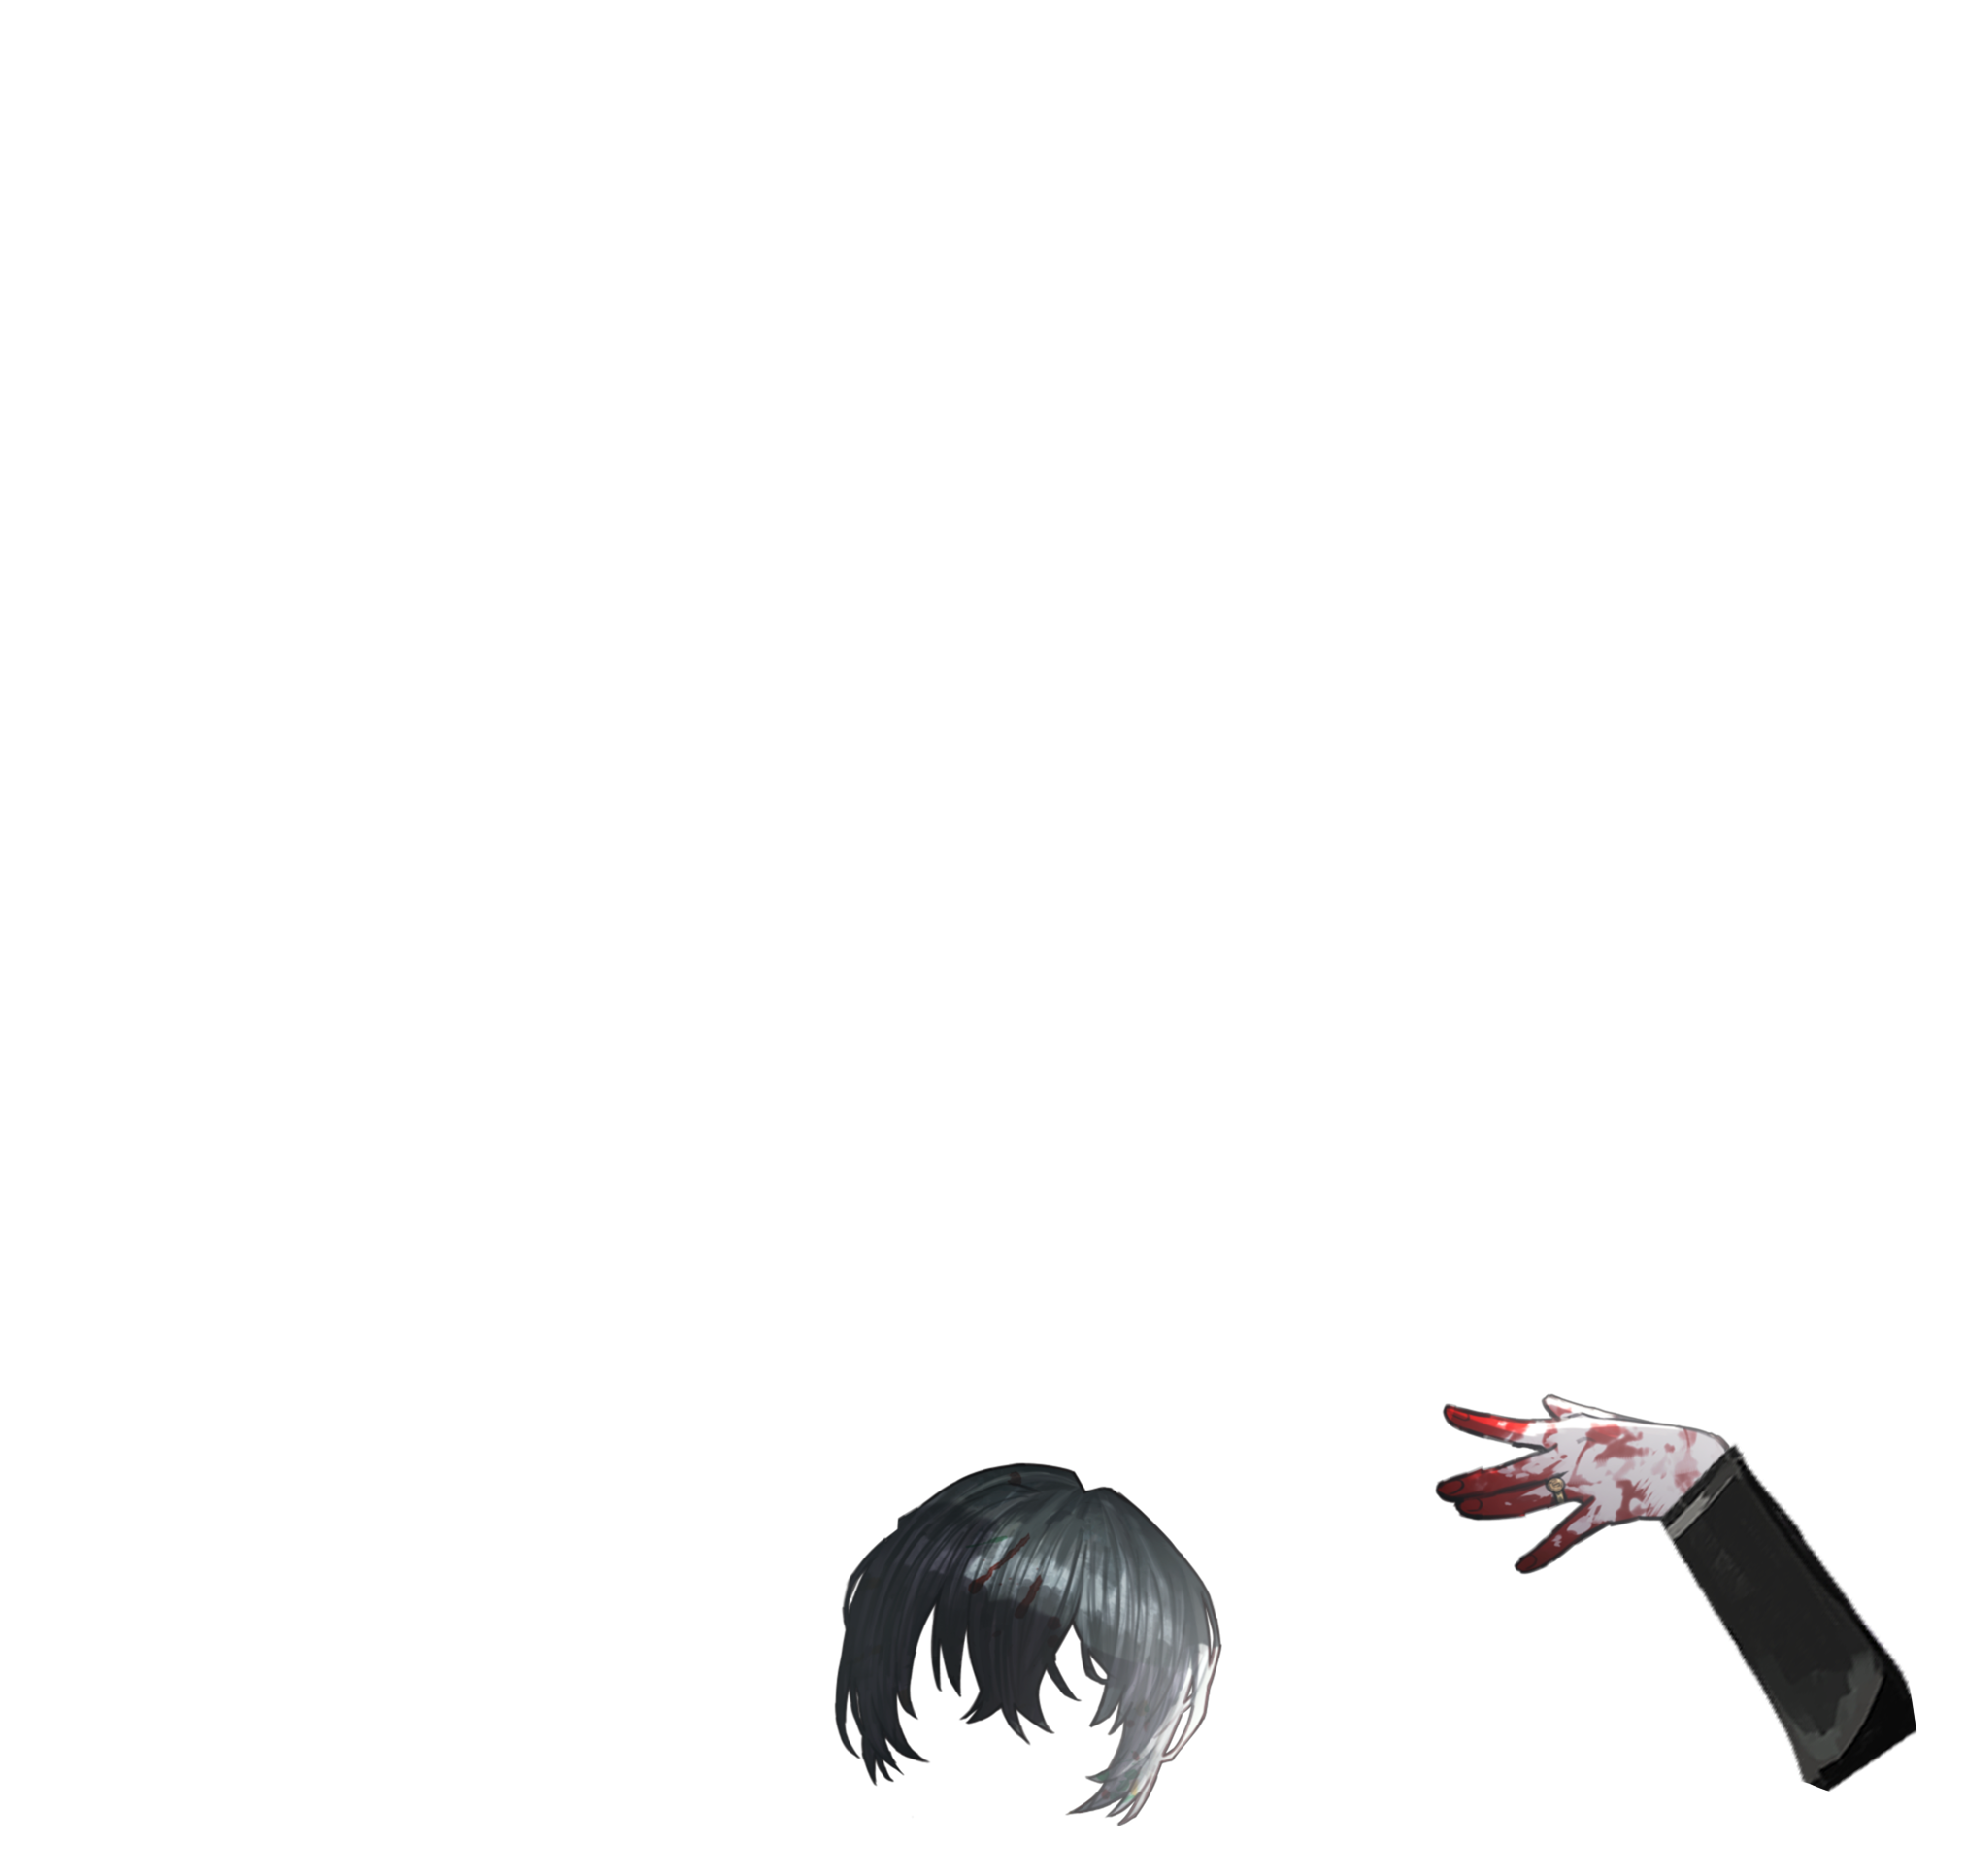
- A work-around to going beyond the bounding boxes is to make use of the other layers of the UT3 animation, though keep in mind these other layers won't have animations and might have other effects.
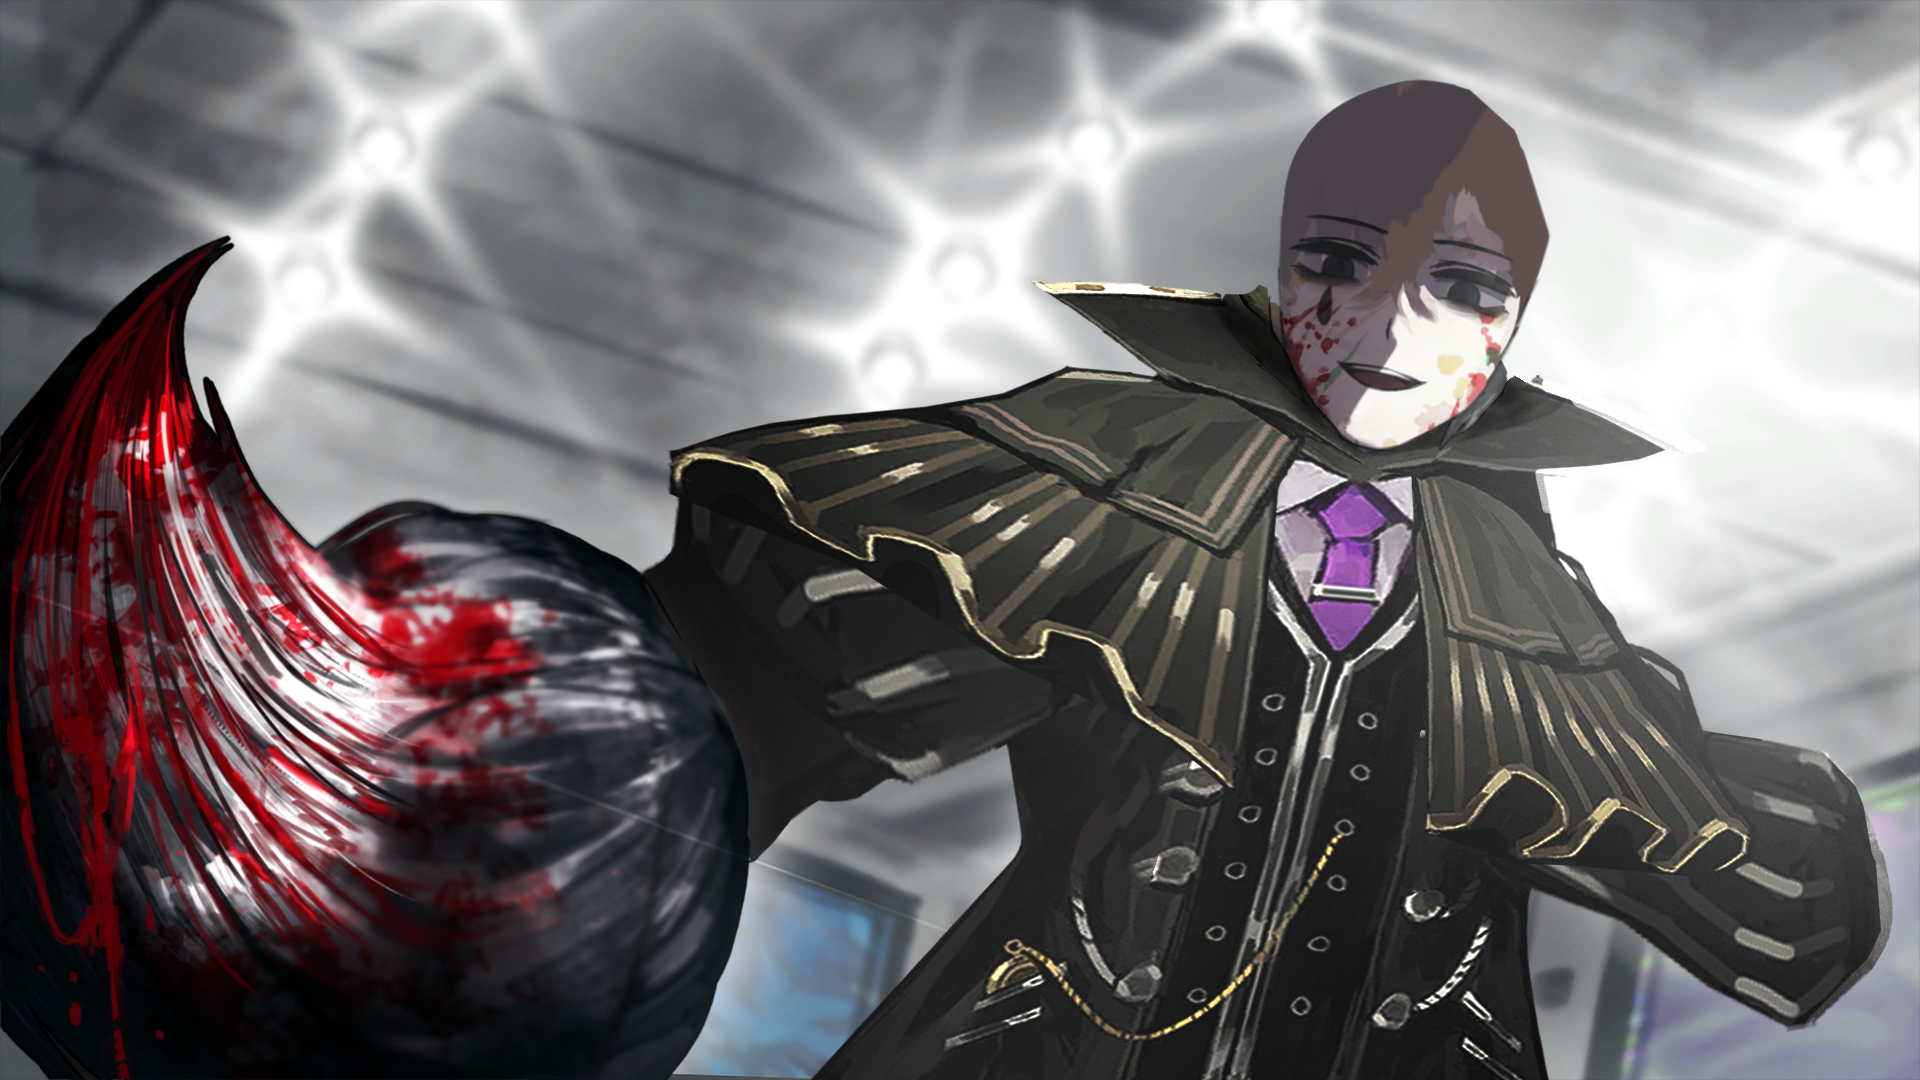
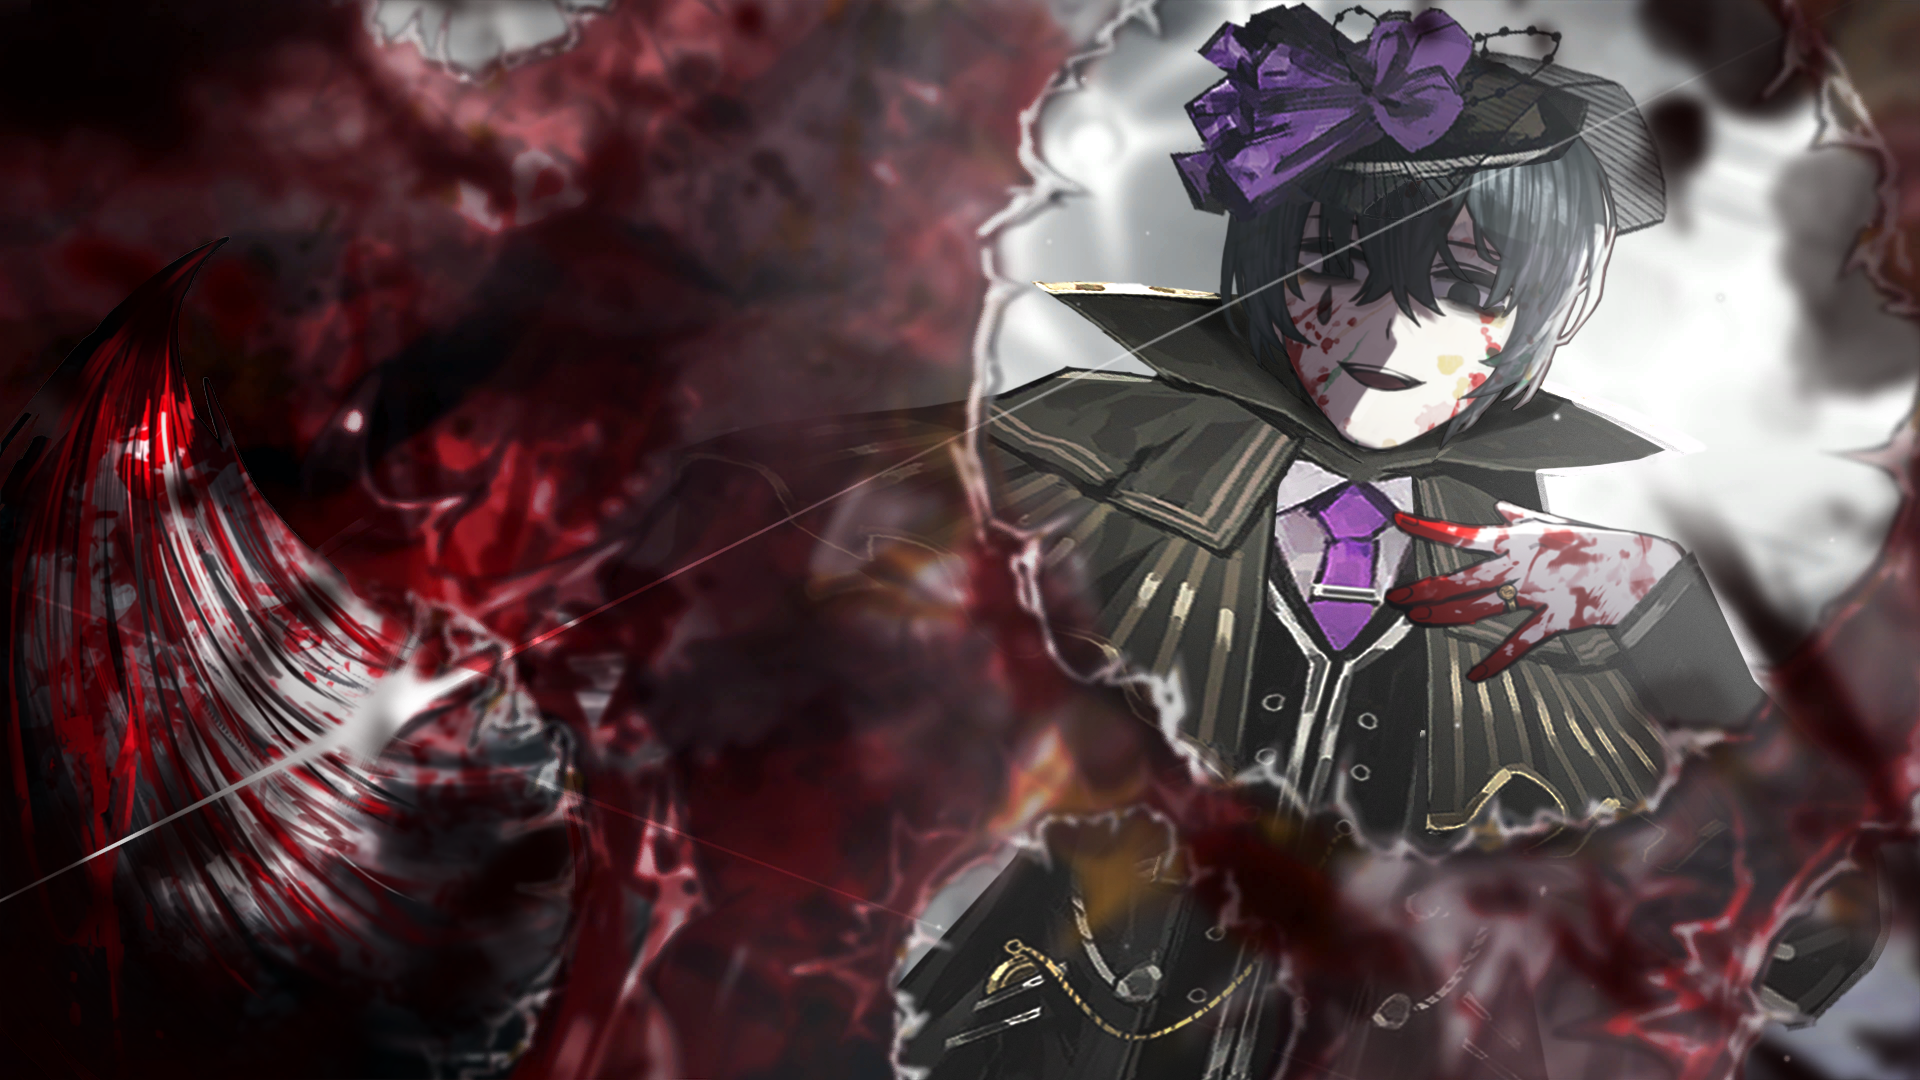
Skill Icons
- Skill icons have a style to them, I have tried to replicate this style as close as possible with adjustment layers and filters
- Skill icons always use an existing sprite, try to find this sprite and use it in your skill icons.
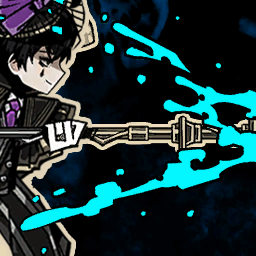
- Here are the .psd files of these skill icon edits, including the adjustment layers and filters used. (1) (2)

Idle Sprites
- When modifying idle sprites to have certain elements be longer than the original, such as changing an identity with short hair to have long hair, you can use the bounds of other elements to achieve that.
- In the Yuri mod, I used the left and right arm as an extension of the hair, otherwise it would not fit. Allow for overlapping to avoid issues with anti-aliasing.
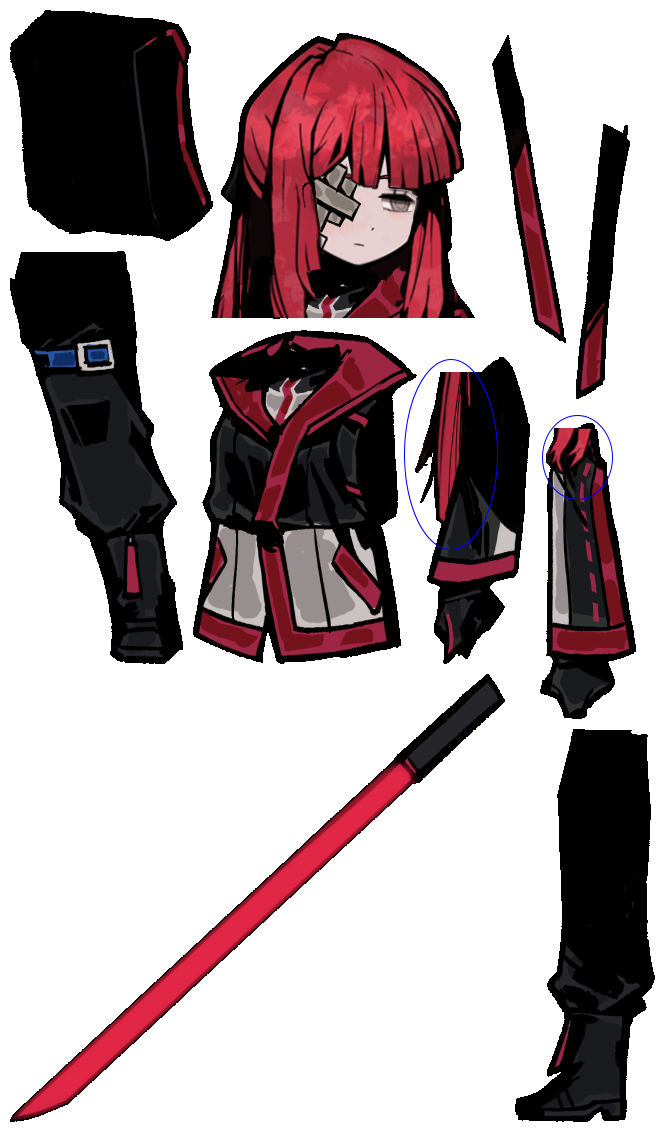
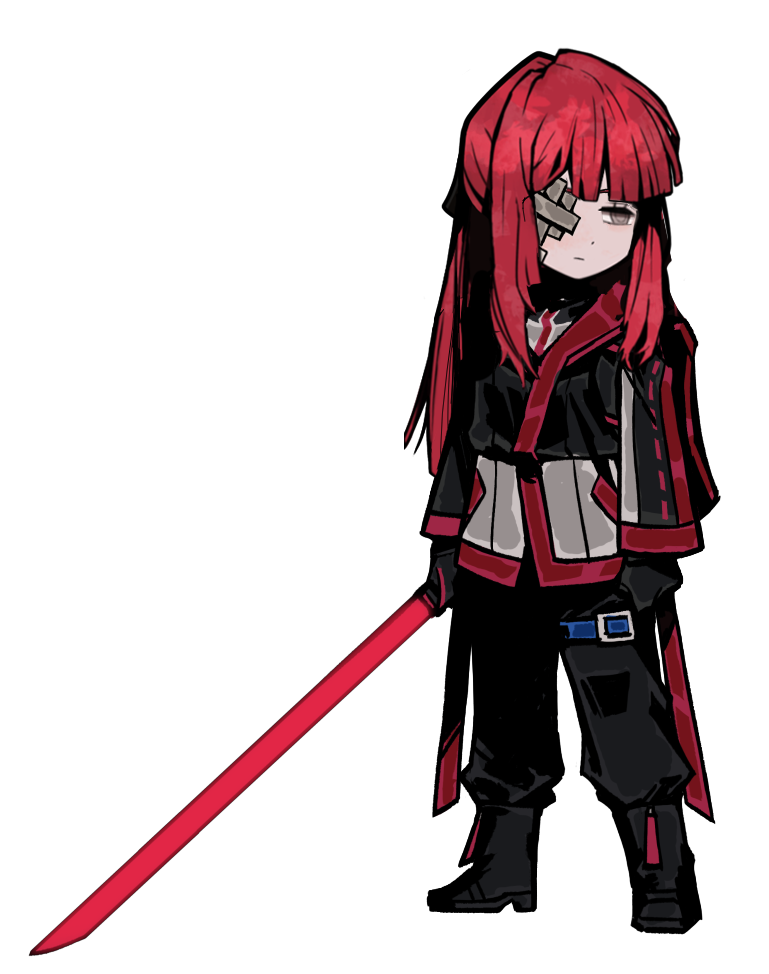
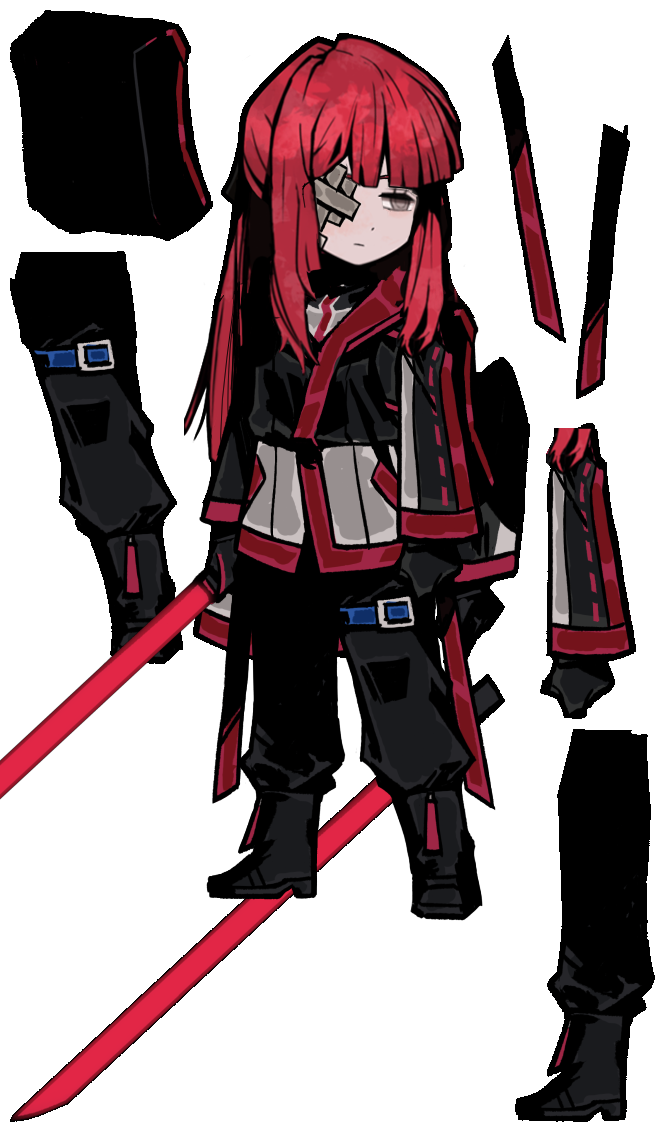
- In order to properly line this up, it's useful to know how these sprites connect, you can figure this out by using the static idle sprite as a reference point. You can use the unmodified static idle sprite.
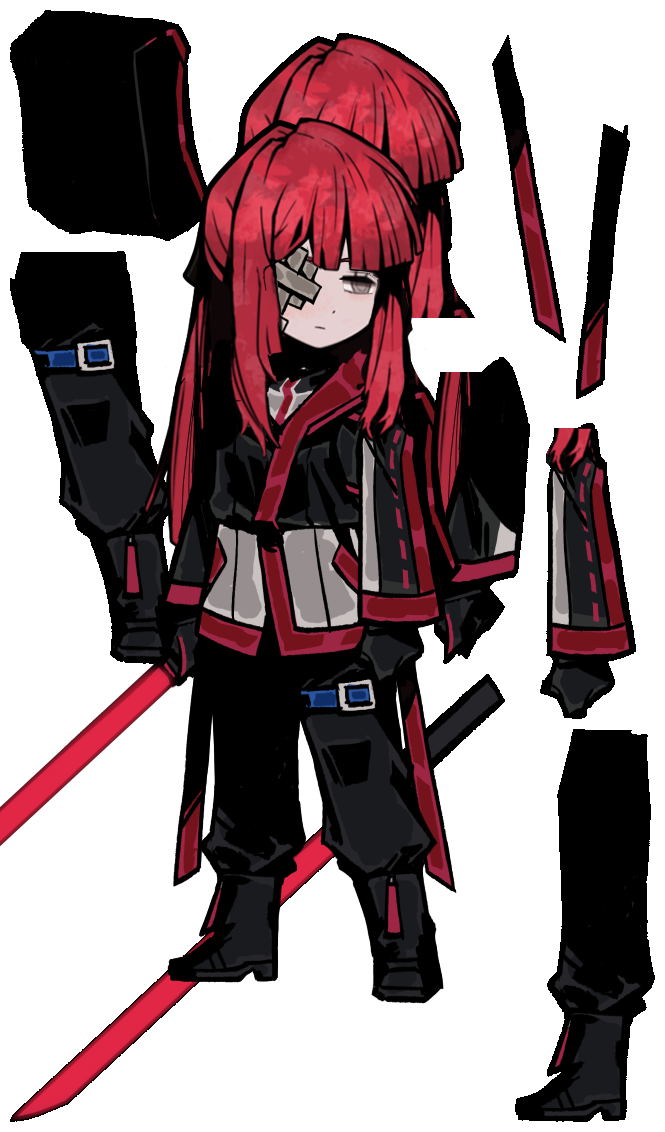
Change of Bounding Boxes
New PDF guide for expanding bounding boxes.
Direct download (you will probably prefer this)
Google Docs link
Old Guide
As an archivist I've decided to keep the older guide here anyways, but you probably want the new guide linked above.
- This guide assumes you have AssetStudio and UABEA and understand guides associated with them
(Special thanks to Microdosing)
- You will need Unity.
- You will need to download Unity version 2021.3.x (any version should be okay).
- Create a new project, remember to use 2021.3.x version, use "2D (Built-in Render Pipeline)".
- Add this file into Unity.
- Drop the file in "Assets".
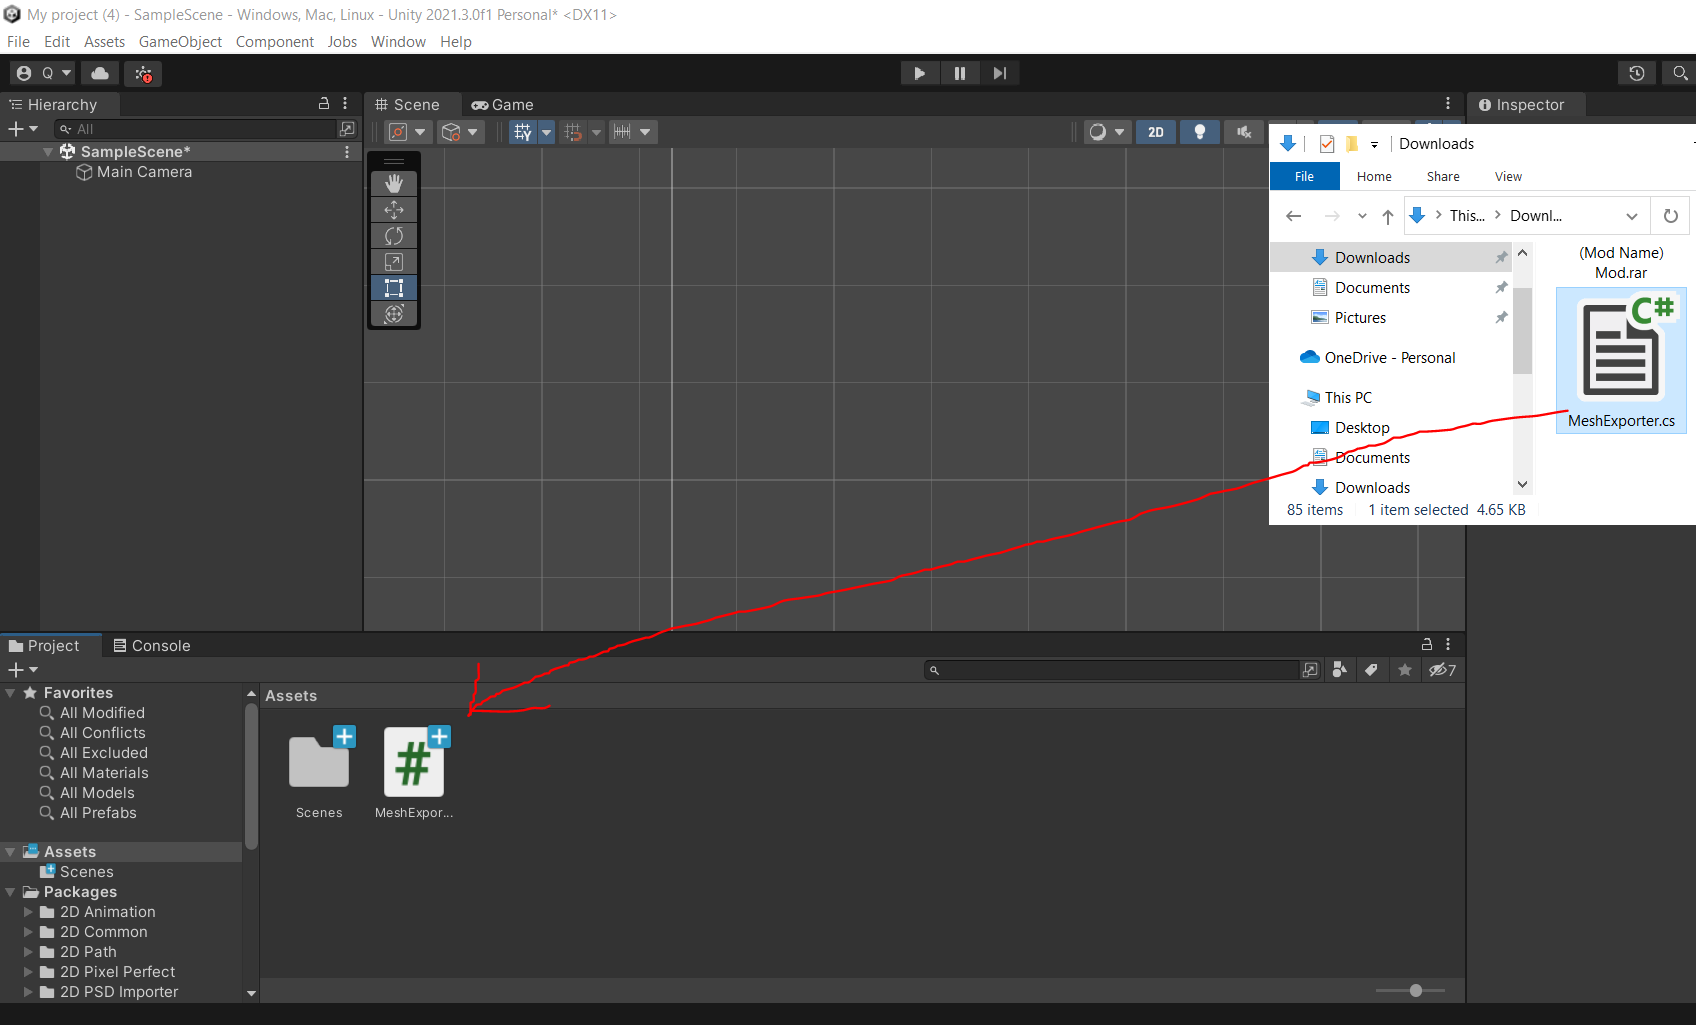
- Next you should add the sprite for which you want to change bounding boxes of.
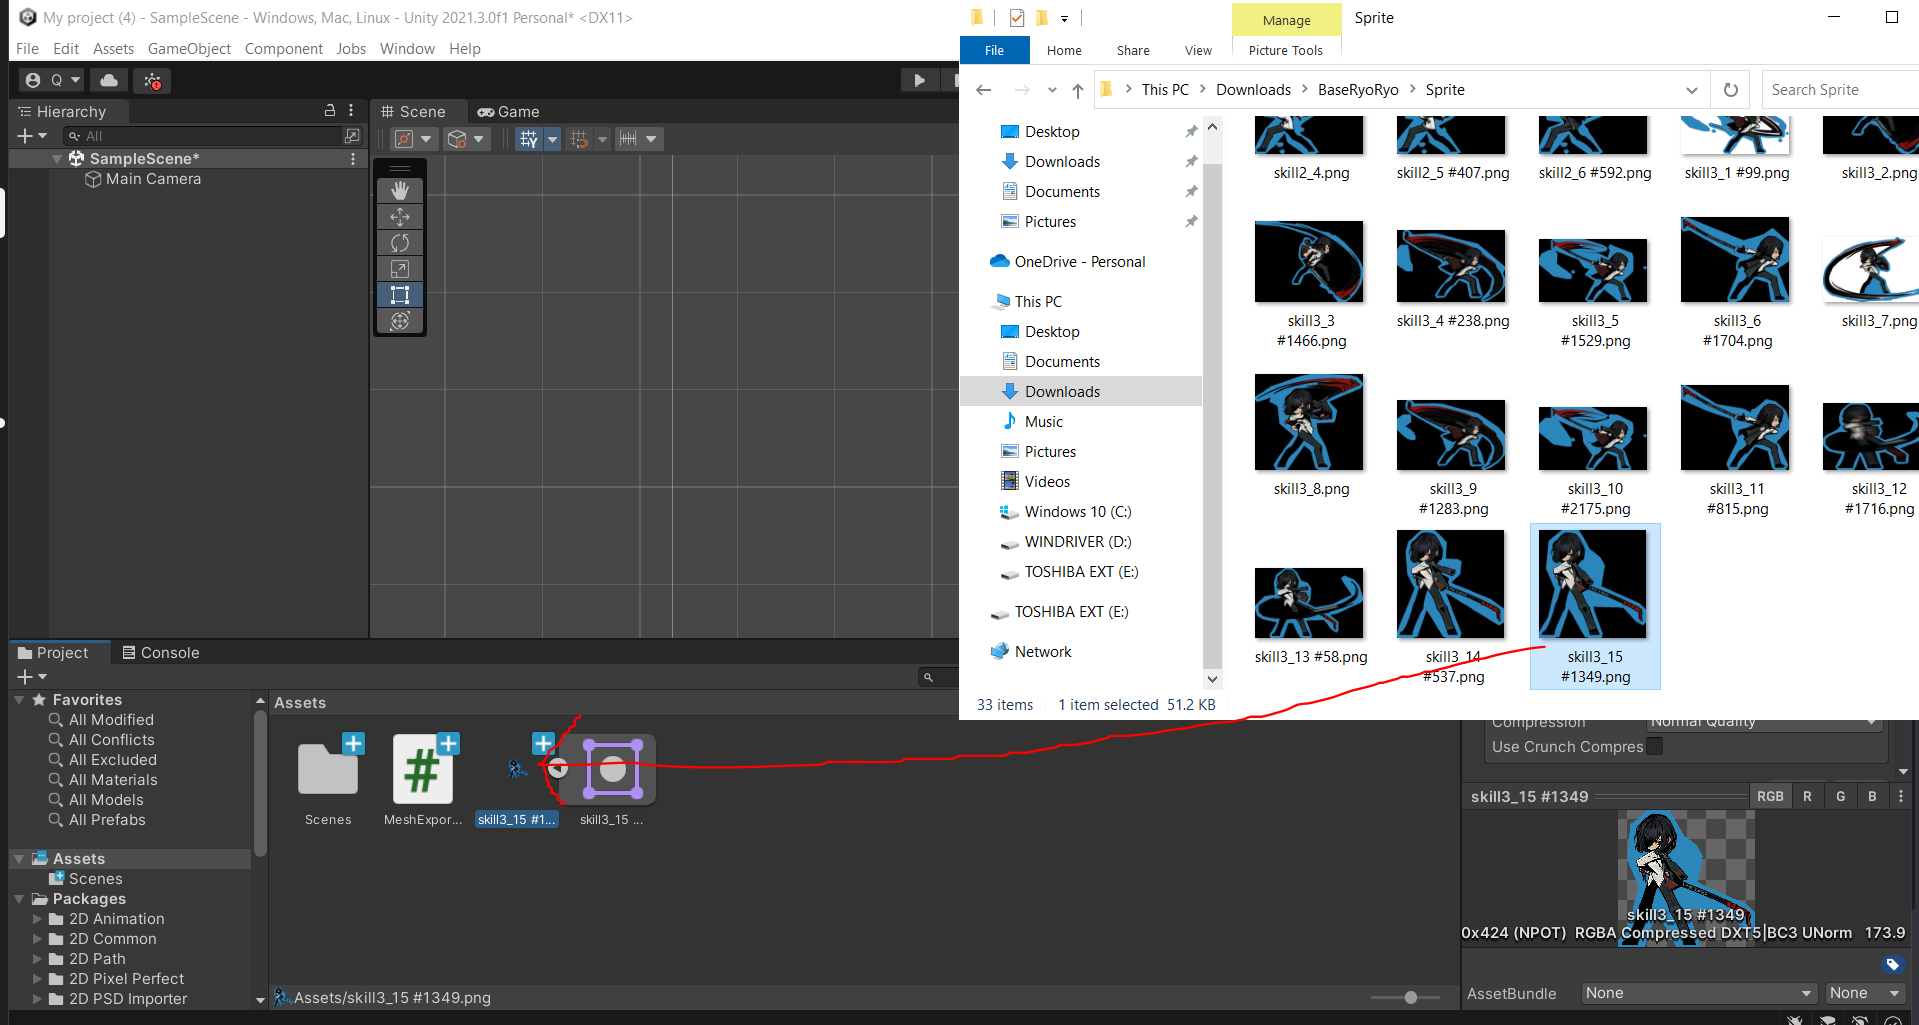
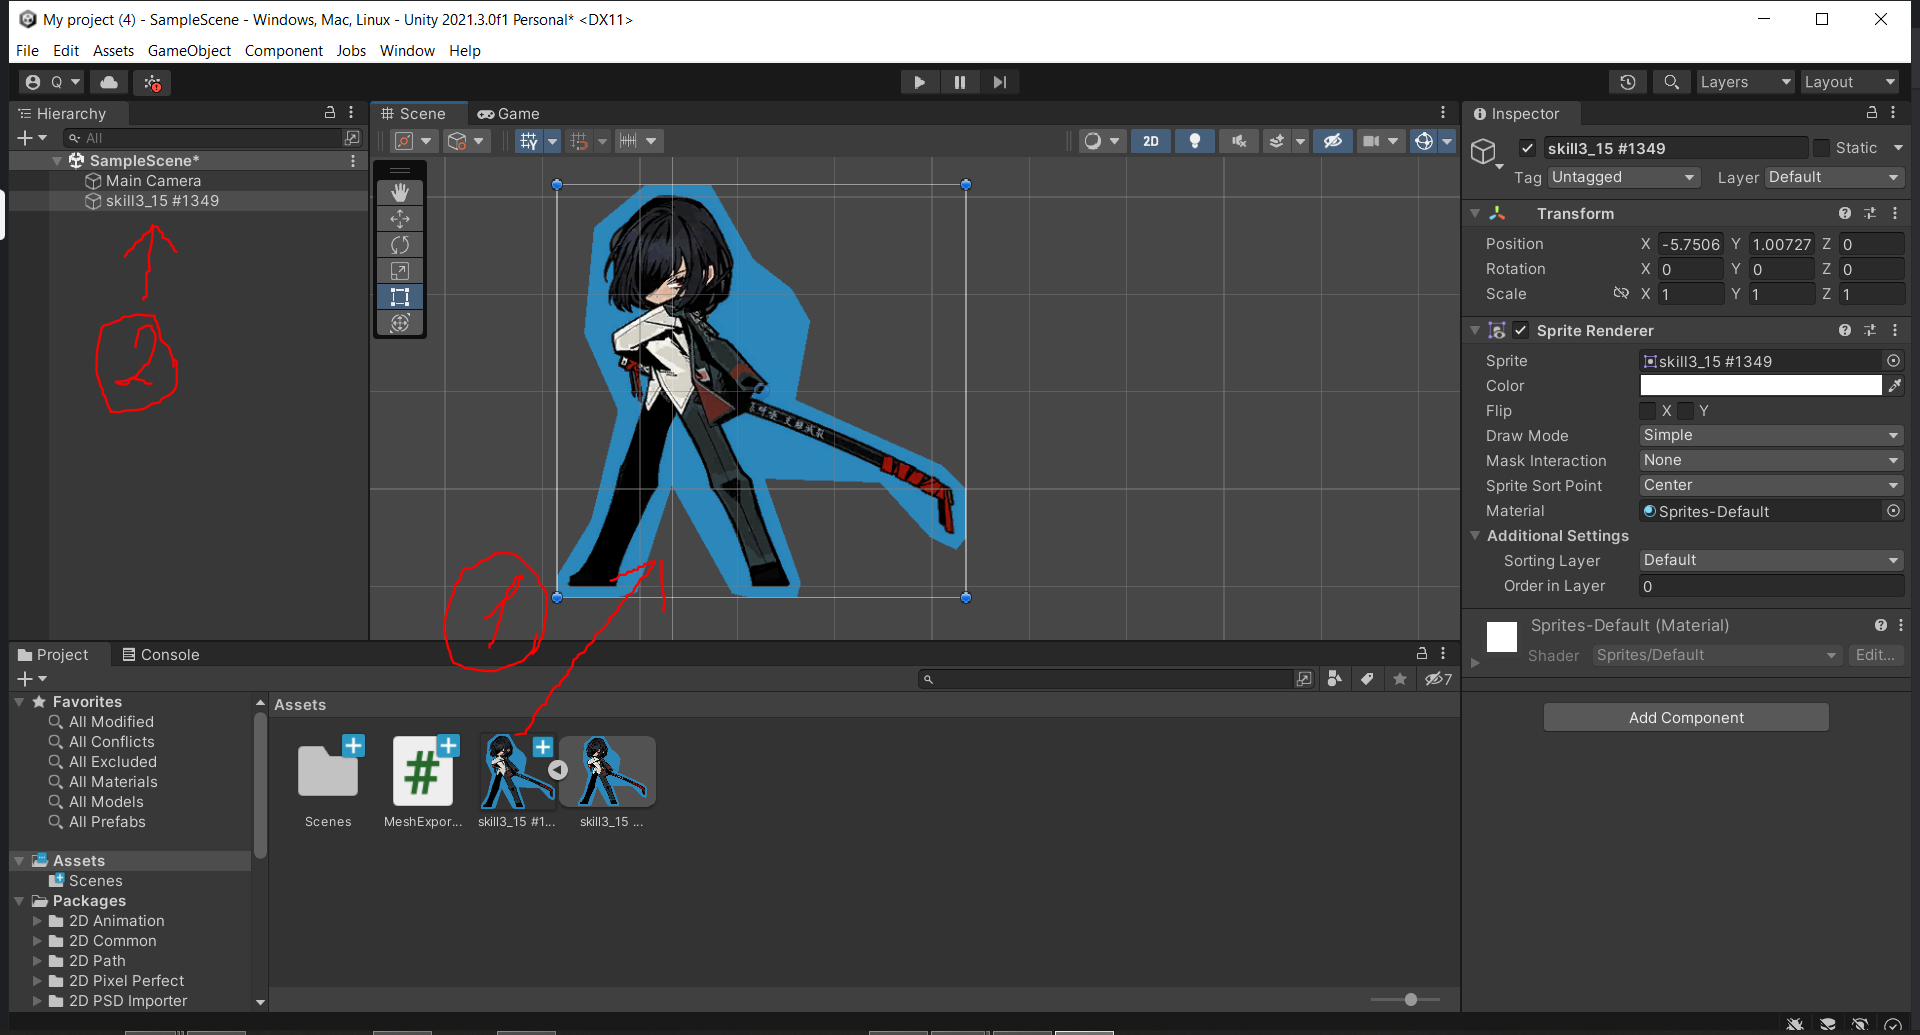
- Drag the sprite in the "Scene" zone (1). This will cause a "GameObject" with the sprite name (2) to appear.
- Select the sprite (1).
- Select "Sprite Editor" (2).
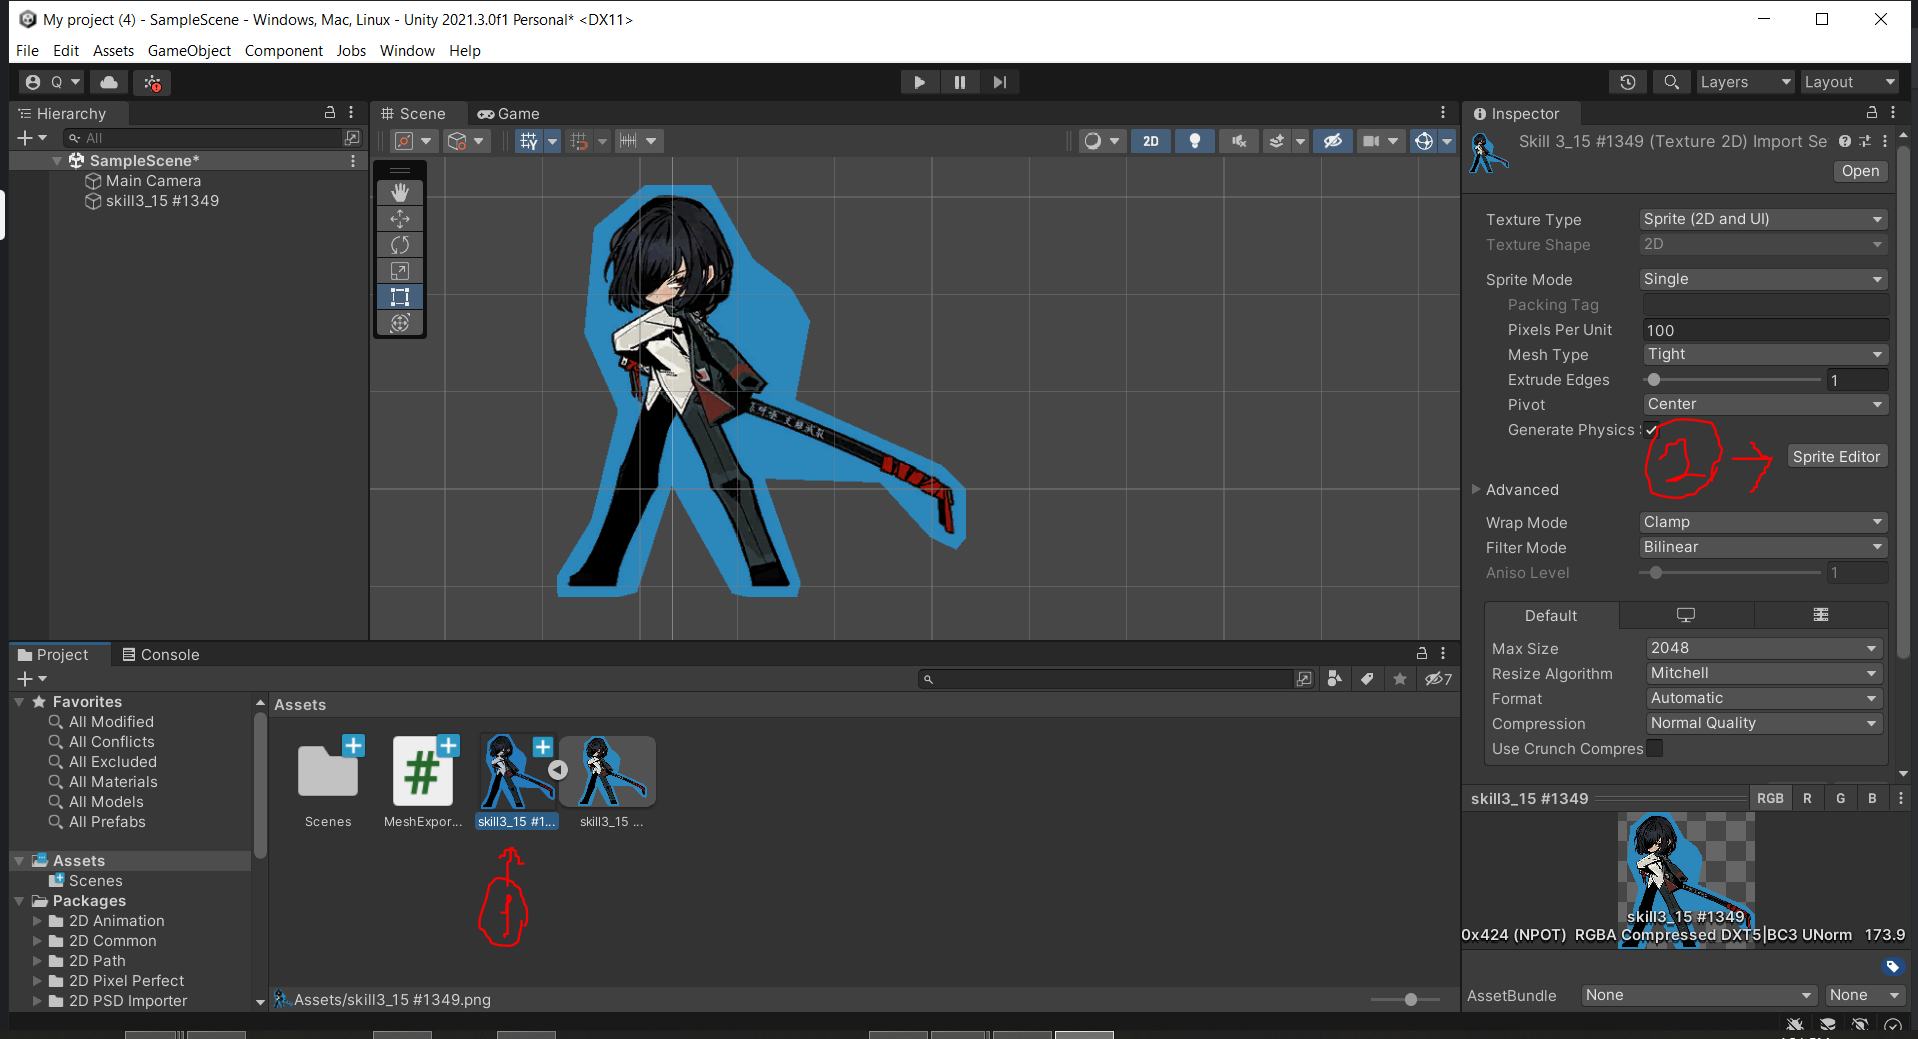
- Click "Sprite Editor" (1).
- Select "Custom Physics Shape" (2).
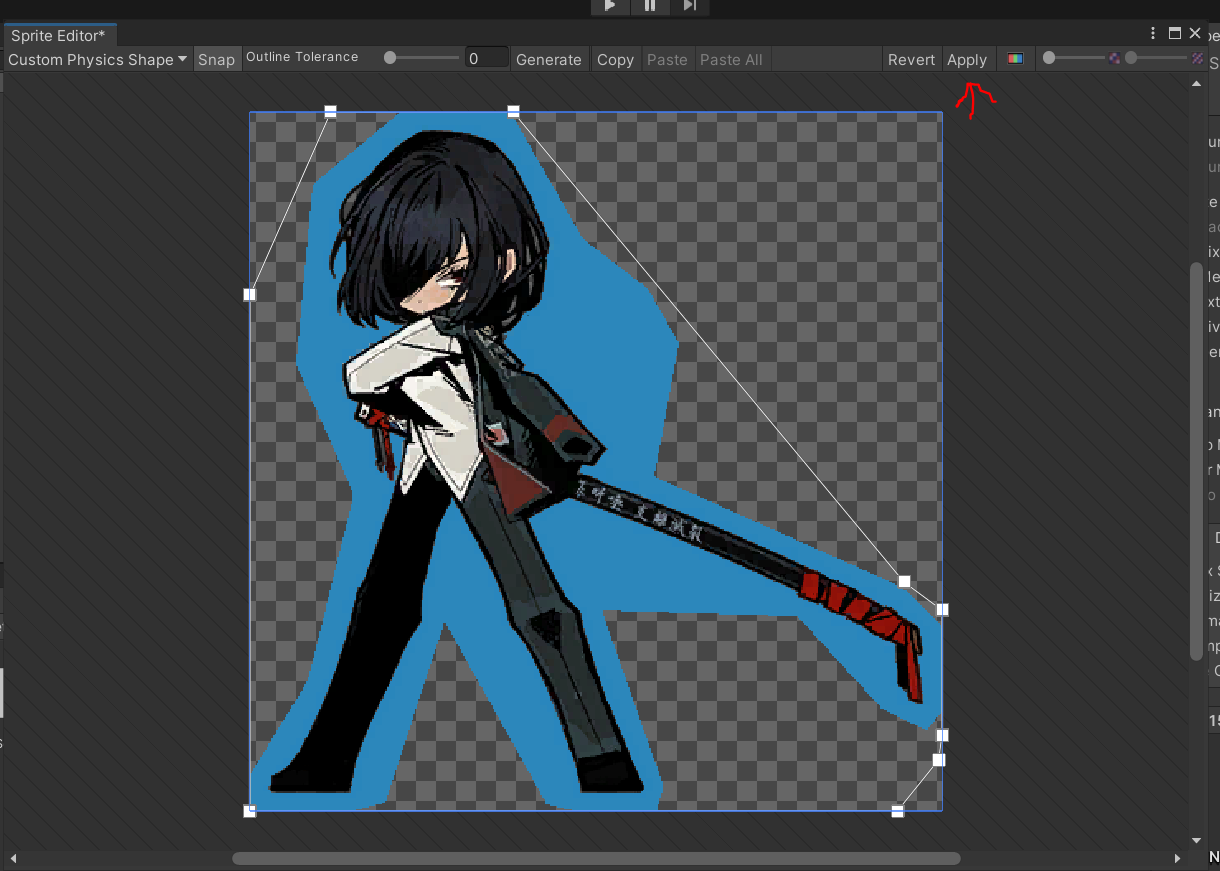
- You can make a custom shape, or use the "generate" button (3).
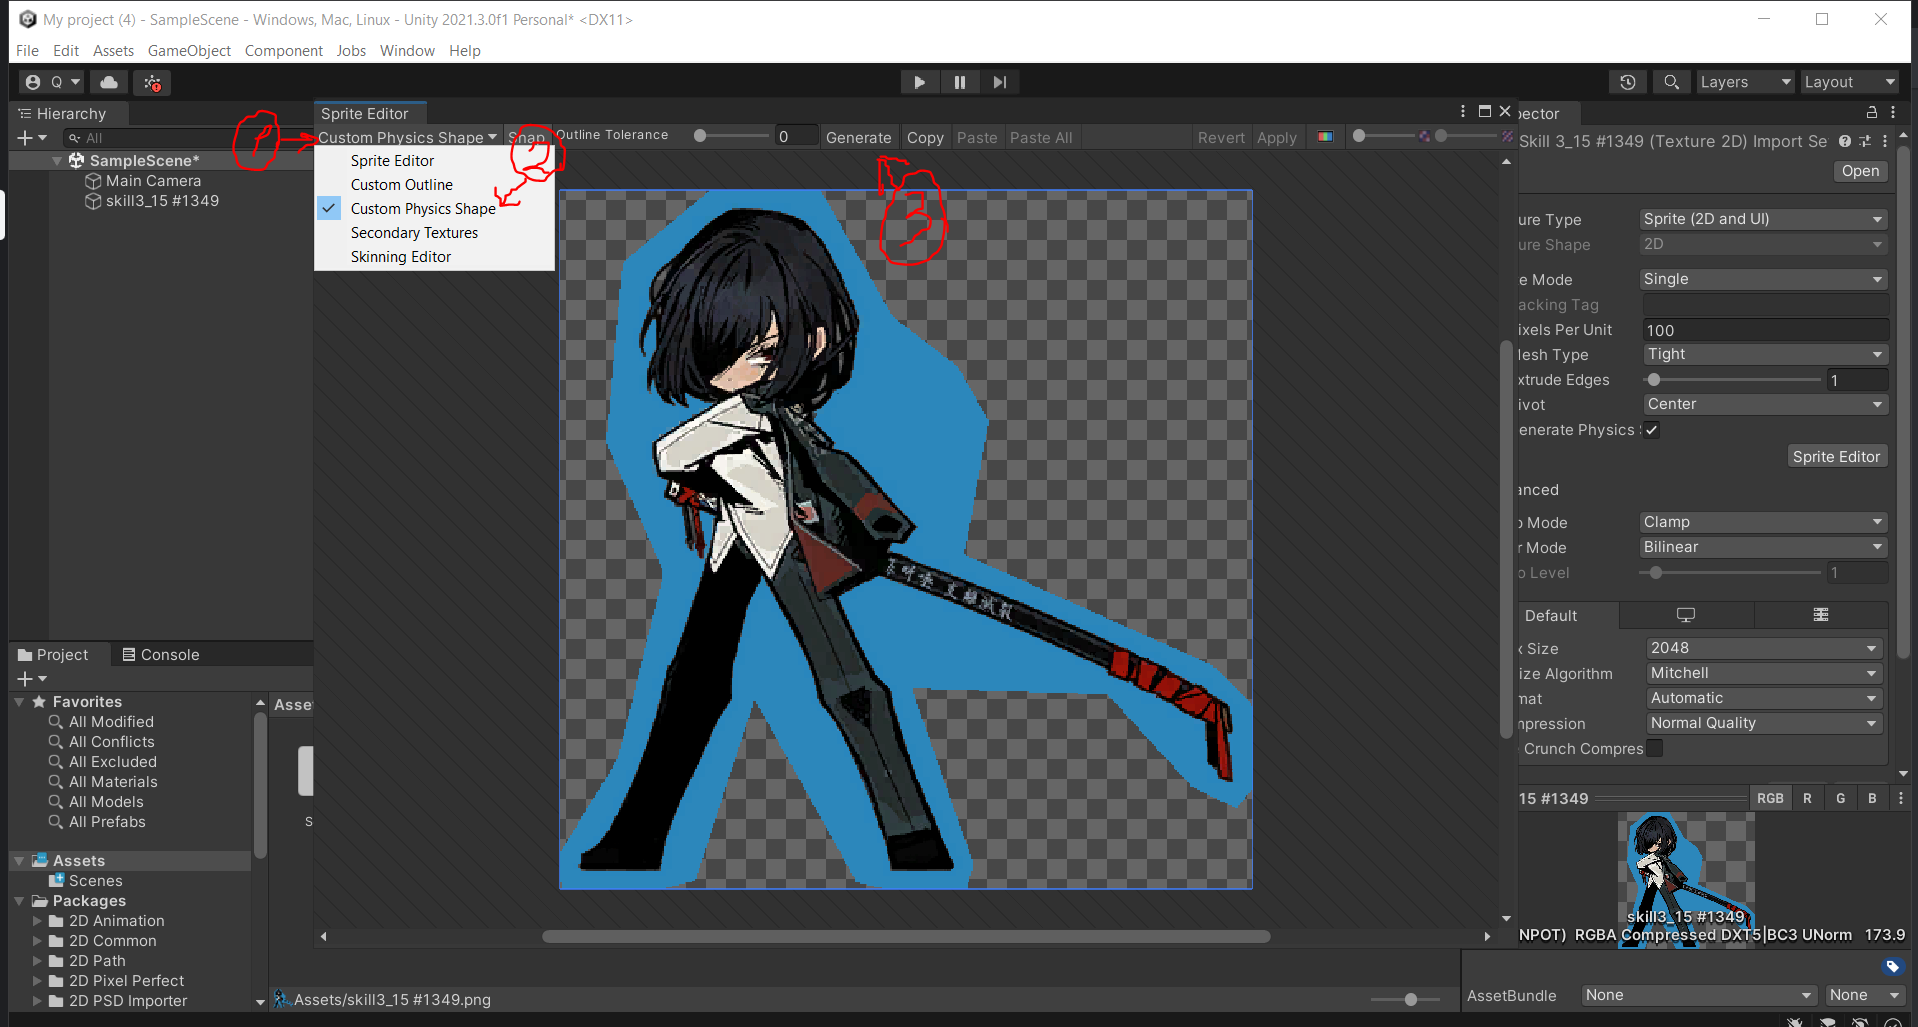
- After you are done with Shape, click the "Apply" button.
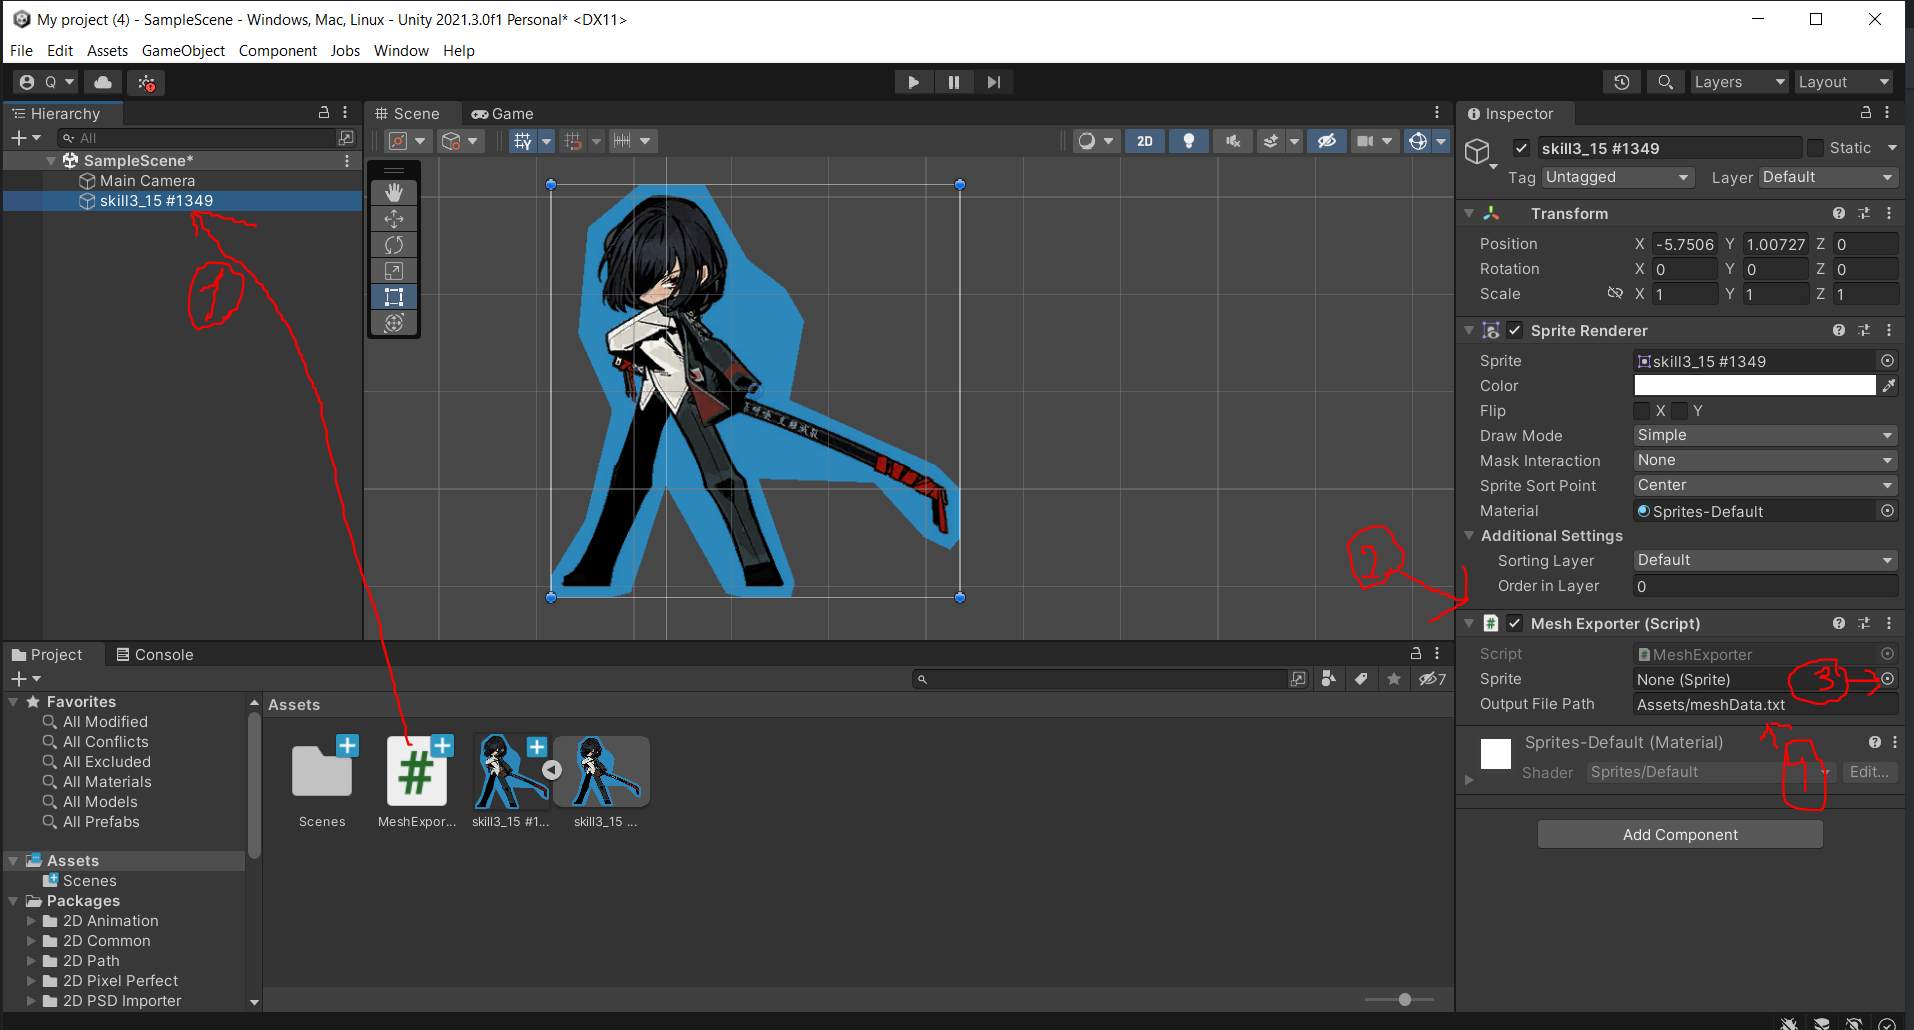
- Drag the "MeshExporter" file into "GameObject" with sprite name (1) Because of this, When you select GameObject, you will be able to see "MeshExporter (script) on the right side (2).
- You need to select the sprite in "Sprite" (3). The needed object will have same name as GameObject (skill3_15 #1349 in this case)
- It is recommended to change the file path to access it easily in (4). Change it to something like ..../folder in which you have everything for this mod/name of the .txt file you want
Miscellaneous
- Multiple Mods:
- Multiple mods that modify the same file will overwrite one another, unless manually imported with UABEA.
- Game Updates and Mods:
- If the file you modified gets updated by a new patch, the mod will be deleted unless you use Limbus Mod Loader (might require restart after updating game to load mods).
- For example, most text file are stored in the same file and are updated each patch, if you were to change the text on any of them, the next time Limbus Company is updated, these modifications would be deleted.
LML Mod Archives
Preface
If your ISP is blocked from Catbox or whatever scream at me and I'll upload these on Mega or something. Also, if any of the links are down, contact me and I will reuploaded an archived version.
Most mods use .carra files which are meant to be used with the Limbus Mod Loader (LML). Some mods follow an older installation procedure which involves you running .bat file in the folder you downloaded. Run it, and it will install the mod for you. Also, any .rar or .zip file can be used with LML too I think.
Where can I get more LML mods?
- Nexus Mods Because the Nexus mods page for Limbus Company has achieved greater popularity, I will no longer be manually updating the below section. Please use this site to search for any recent mods.
- Limbus Company Modding D*scord server (the section below contains every mod linked there prior to 9/12/24. The last mod I archived was the neco arc Ryoshu so start there if you're going to go there to look for more mods)
- Sometimes people upload showcase videos on Youtube with the mod link in the description.
Yi Sang
- Cherry Blossom Spicebrush Yi Sang
- Rose Velvet Spicebrush Yi Sang
- Bluebell Spicebrush Yi Sang
- Spicebrushless Yi Sang
- Jerma Mod (Pointillist Yi Sang)
- Rain Molar Yi Sang
- Black Silence Yi Sang
- Hidden Eyes Spicebrush Yi Sang
- Ring Researcher Yi Sang
- Padawan Jedi Yi Sang
- Bygone Days Yi Sang (cute plushy edit)
- Wishing Cairn Yi Sang (cute plushy edit)
- E.G.O Page::Solemn Lament
Faust
- Yuri Faust
- Angela Faust
- PS1 N Corp. Faust
- Maskless Regret Faust (Battle sprite only)
- Silent Girl Faust (N Corp. replacer)
- Kromer replacer (N Corp. replacer)
- Butler Angela
- Regret Angela
Don Quixote
- Armorless N Corp. Don Quixote
- Angelica Don Quixote
- Emu Otori Cinq Don Quixote
- Red Gaze Shi Don Quixote
- Tengen Uzui Don Quixote (W Corp. replacer)
- Tengen Uzui Don Quixote 2 (W Corp. replacer, with replaced CG art)
- LobDon Titan Mod
Ryoshu
- Ryoshu Amongus
- Purple Tear Ryoshu (Seven replacer)
- District 20 Yurodivy Outis (Ryoshu replacer)
- Awe, Contempt Ryoshu replaces Kurokumo Ryoshu
- Neco Arc Spider Ryoshu
Meursault
- Distorted Bamboo-Hatted Kim Meursault
- Negative Dead Rabbit Meursault
- Mattsault
- Unbroken Hat Blade Lineage Meursault
- Middle Themed Chains of Others
- Meursault? (Changes Dead Rabbits Boss Meursault battle sprites to look more like boss from 6-34)
Hong Lu
- K Corp. Hong Lu, but helmet is always on
- Sans Hong Lu (Hooklu replacer
- Udjat Hong Lu (LCB replacer
- Dieci Hong Lu but He's Wielding A Comically Large Spoon (The spoon is regularly sized in his idle)
- MultiCrack Hook Office Fixer Mod
Heathcliff
- HOPEcliff
- Dongbaek Mod
- Bluntcliff (Combat sprite only, base ID)
- Roland Heathcliff (Shi replacer)
- Chicken Headed Heath (Base ID replacer)
- **Queequeg (Pequod replacer)
- Roland (Seven replacer)
- Chief Keef (LCB replacer)
- Wild Hunt Chief Keef (Wild Hunt replacer)
- WHAT'S WRONG WITH MY HUNTCLIFF'S SKILL 3???
- Wild Hunt Heathcliff to Erkling Heathcliff
- Wild Hunt Heathcliff With Stock Image Horse
Ishmael
Rodion
Sinclair
- Male to Female Tranny Sinclair lol. You can pretend that this one is a genderbend mod, since the mod maker didn't make him an ugly troon
- Tranny Masectomy Scar Sinclair lol
- Catboy N Corp. Sinclair
- Jerma (Plip replacer)
- Genderbent Dawn Office Sinclair
Outis
Gregor
Other
- A Certain Person Heard That You're Pretty Strong
- "Replaces one of the hard dungeon floor pack images with Goku. Place in C:\Users\USERNAME\Appdata\LocalLow\Unity\ProjectMoon_LimbusCompany"
- Hatless Dongrang
- Jang Schna Dante Announcer Replacer
- Joyous Company
- "Changes all the Sinner's(minus Ishmael) animations/menu assets to include joyous propeller hats and lollipops 😁 🍭
- Joyous Dante Announcer
- "Makes Dante joyous (no text changes)
Lethe Private Server & Zwei Launcher (D*SCORD FAGGOTRY REQUIRED)
Now this is actual modding. It's not just skins you slap onto the game with zero gameplay changes. All those Youtube videos of people making story bosses fight each other are using this exact tool.
The sad part is, you are required to download a custom launcher and login to it using your D*scord account, and obviously any mods are solely uploaded on the D*scord. Unlike with the Limbus Mod Loader, I can't just mirror the guide and pass on a few download links and send you on your way. As sad as it is, you have to use your own D*scord account for this process. Because of this, I won't be archiving any Lethe mods either, because if you're willing to let some weird Discord application have access to your account you might as well bite the bullet and join the server as well. Luckily, a lot of the guides for it are found on their website rather than their Discord which is a breath of fresh air. I will still be mirroring any info found only on the Discord server, since that is the point of this Rentry.
The other sad part is that this puts you at real risk for getting banned. Lethe does come with the ability to block or bypass checks for private servers, but one day there could be an update that fixes this and gets you banned. To stay safe, follow all instructions exactly, do not post any screenshots or videos of your user ID alongside modded content, and most of all, just accept the possibility that you may get banned. You can also make another Limbus account and switch between it every time you want to play modded, which is probably a good option if you want to be extra cautious.
You will be expected to refer to the Lethe Website itself for installation and modding instructions not found on the D*scord. The website has basically everything laid out nice and neatly, so don't worry
- Lethe is a BepInEx mod for Limbus Company which acts as a private server and mod platform for Limbus Company. It allows loading custom identities, fights, skills and other stuff. You have to login and do everything through D*scord.
- Installation guide
- Modding guide
- The Lethe private server is closed source and there are zero plans to make it open source. However, they have released an open source standalone version of the private server here. However, it does not come in with the built-in bypasses and blocks for private servers that Project Moon added, meaning you will likely get banned for using it. It is also not in active development and there are no plans to continue it.
- The above guides for LML might help you when it comes to making visual changes, but for anything else you need to refer to the modding guide on the Lethe website.
- Zwei is a launcher for the private server. It streamlines the installation process for BepInEx and Lethe, while also providing tools to manage updates, prevent Steam interactions, and more. From what the Github says, it handles everything for you. Zwei is not required and not a lot of people use it. I also cannot guarantee that it will be 100% up to date.
Below this point is any guides or notes that are only found on the Lethe Discord.
Common Issues
My Identity/Skills/Whatever no Worky
- Make sure your files are proper json files, i.e. the format is correct. Usually people mess up their files because they are missing a comma or a bracket or whatever. So it is HIGHLY recommended you use a proper editor like VSCode or Notepad++ that will point out any syntax errors in your JSON files. If for whatever reasons your editors don't support it, you can use something like Json Formatter to format and verify your JSON files.
- Make sure the ID number of your skills do not clash with other existing skills. You can replace existing vanilla identities / abnos by making a custom identity / abno with the same ID number, but for skills it will fail. You can just search the ID number in LimbusStaticData to quickly check if it is already occupied.
Cannot Log into The Private Server
- The mod should automatically launch you to the lethe website when you start the game. If you see this and your game is stuck at a black screen, make sure your browser plugins like adblocks for example are not interfering (one user reported this issue). If it still doesn't work, open your browser's debug page by pressing F12, go to the network tab, and send a screenshot in the Lethe Discord's tech support channel.

- If you can boot into the game but get a connection error when you try to connect to the server, first try logging out then logging back in on the Lethe website, and restart the game. If it still doesn't work, again go to tech support.
- If it's related to the open source private server (FurinaLC), make an issue on the GitHub page instead of asking in tech support.
My Drive Screen/Menu is Black
- Go to https://lethelc.site/user (Make sure you are logged in)
- Click on the "Reset Dungeon Save Info" button
- Restart your game

How to Disable Mods?
Once you have installed BepInEx, rename winhttp.dll to something else to disable the mods. To turn them back on, rename it as it once was.
BepInEx Does not Make Folder on First Launch
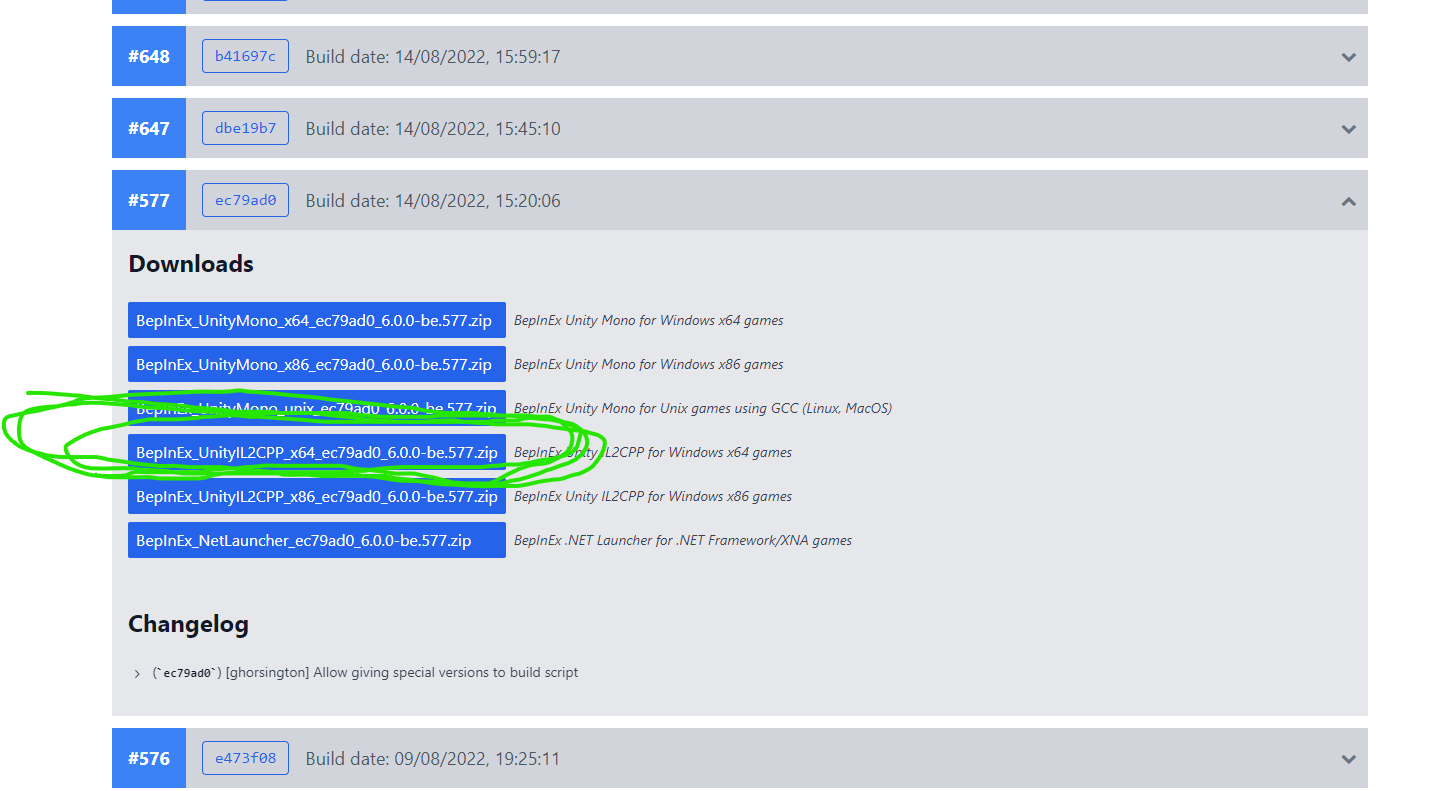
BepInEx should create a plugin folder for you automatically when you first launch the game. The first launch should take a little while. If it doesn't work, chances are you installed the wrong BepInEx.
Make sure it's
#577 NOT #557
il2cpp NOT mono
x64 NOT x86
And make sure it's WINDOWS even if you're on Linux/Proton or MacOS/Whisky
BasePlugin / DLL Mod Help
There is a template repository for making actual dll mods that has everything pre-setup for you to start coding. Download it here. It should be noted that this also copies the mod directly to your game’s plugins folder if you use the BIE pipeline.
Credits
Limbus Mod Loader guide by Lunartique07 with contributions by multiple D*scordfags.
Lethe mod launcer from Lethelc.site
Everything linked is made by D*scordfags, not me. I just added extra text and edits for readability.
Contact
Reply to the current OP with questions, critiques, or concerns, I appreciate any and all advice.
If you have any burning questions about modding I won't be able to help. I have no idea how this modding stuff works and have no interest in learning it or using any mods in the first place. There might be anons in the threads who can help you, but if that fails I regret to inform you that asking the D*scordfags directly may be your only option. I hope it doesn't have to come to that.
Changelog
6/23/24: Created Rentry and mirrored the entire guide, also archived every Limbus mod I could find.
7/3/24: Updated the guide and added new mods. Why can't these faggots use anything other than D*scord? Also, NEVER let someone who's not fluent in English write a guide like this. Most of the updates this time were additions by some ESL where I had to manually correct the grammar to be readable and consistent with the rest of the guide.
8/9/24: Added new mods to the archive. There doesn't seem to be any changes made to the guide.
9/12/24: Updated the guide and adding new mods to the archives. I meant to do this update earlier, sorry.
11/13/24: updeautateawde.
2/23/25: Added "In-Depth Modding" and "Replacing Idle Animations" section. 