Up-to-date ComfyUI guide for 1girl and beyond
ComfyUI is a powerful imagegen frontend, but its power comes with a steep learning curve. This guide will teach you an array of techniques you can use to elevate your 1girls, and how to set up the nodes for them. You can drag every workflow screenshot in this guide into ComfyUI to import it. (If it doesn't work, save them on your PC first.)
Once you've learned to use every technique in this guide, you'll be able to generate state-of-the-art 1girl pictures, and even multi-character pictures.
You don't need to apply everything in this guide in one go. Learn one topic, then come back another day to learn another. Feel free to skip any section on a subject that you're already familiar with.
Let's start!
A warning regarding custom nodes
I'll recommend some very popular custom nodepacks in this guide, though I tried as much as possible to stick to built-in nodes.
You need to know that custom nodes have been used as an attack vector in the past. ComfyUI security has greatly improved since, but it is still recommended to do your own due diligence when installing custom nodes and to only install custom nodes from sources you trust.
The only way to be 100% safe is to run ComfyUI on an offline machine, or in a containerized environment like Docker. Note, however, that as with everything you run an a computer with network access, Docker itself could be the subject of zero-day exploits. No computer with network access will ever be 100% safe, so act accordingly. At a bare minimum, secure your important online accounts with MFA.
⁂
Model choice
Illustrious-based models are currently the best for anime pictures, with excellent quality, tag-based prompt adherence, and lora availability. If you don't know what checkpoint to get, just download the popular WAI 16.
There are lots of worthwhile alternative trains and merges, and I'm not familiar with enough of them to make recommendations.
The big choice you're making when picking a model is whether to use a merge or an unmerged finetune. Popular merges (like WAI) are considered to be easier to use, have more stability (consistent quality across seeds), but less creativity. If you're looking to try something different from typical merges, check out the finetunes Noob, or RouWei. The Illustrious base model might also be worth playing with. Suggesting Illustrious 1.1.
Illustrious-based models, like all SDXL-based models, go in ComfyUI's folder models/checkpoints/.
For more detailed information, refer to /localmodelsmeta#image-generation-models-anime.
⁂
Prompting
Using Danbooru effectively
A good way to get started is to find images you like and look at their tags. The special tag order:score can be useful to see the most voted images first.
The tag wiki is very helpful. For example, if I want a certain hair style but I'm not sure what its tag is, I'll first look up any hair-related tag e.g. long_hair, and it'll likely have a link to its related tag groups; in this case, tag group: hair styles, which lists every supported hair-related tag.
You can use the tag explorer to find face, hair, style, composition and artist tags.
Tag everything you want to see
SDXL isn't like Midjourney where minimal prompts result in detailed images. You need to load your prompt with tags for every element you want to be included.
For canon characters, you can look up your character on danbooru and copy the tags from a well-tagged post. A character description might look like:
1girl, hatsune miku, hair ornament, twintails, aqua hair, aqua eyes, aqua necktie, grey shirt, collared shirt, detached sleeves, black sleeves, red tattoo, aqua trim, pleated skirt, black shirt, thigh boots, black boots
A background description might look like:
bedroom, bed, mirror, school bag, vaulted ceiling, calendar, hanging plant, potted plant, poster \(object\), teddy bear, door, window, blue sky, cumulonimbus cloud
Escape parentheses with backslashes. poster (object) (unescaped) will be interpreted as poster object because parentheses are used for tag weights.
Adding background tags tends to make your character smaller, so it's perfectly acceptable to use a minimal background prompt when you want the focus to be on the character. Another scenario in which minimal background tags are useful is when you're hoping to get an abstract background with hard-to-tag abstract elements. In those situations, a lot of rerolling may be required.
A composition prompt might look like:
dutch angle, from behind, perspective, foreshortening, solo focus, pov, hand grab, looking at viewer, looking back, outstretched arm, smiling, excited, blush, happy, pointing forward
Refer to the tag group:image composition wiki page.
Use tag weights
Tag weights are very useful, but easy to skip out on when starting out. If a tag is not working, or is working too weakly, just increase its tag weight. The syntax for it is (foreshortening:1.3), (painting_\(object\):0.9).
Sub-1 tag weights also have their uses when a tag is too strong (for example, paintings appearing all over the image when you only want one).
This is checkpoint-dependent, but 1.3 is usually as high as I'd expect a tag weight to work without artifacts, although I often go as high as 1.5 if it doesn't have negative side effects.
If you're coming from A1111 or Forge please note that ComfyUI tag weights work slightly differently.
You can use limited natural language
This is (again) checkpoint-dependent, but Illustrious models can understand some limited concepts that do not exist as danbooru tags. For example, blue blade isn't a danbooru tag but will work. Even wordier tags like (tickling feet with cat teaser:1.3) might work. When it doesn't, remember to try increasing the tag weight.
Finding art styles
Other than picking up tags from other people's gens, a great method to find artists is to leverage social media algorithms. I like pixiv; the recommendations are great once you follow a few artists, and whenever you follow a new artist pixiv makes some good recommendations for similar users. Of course, not all of them will have checkpoint or lora support, so you might have to train a few of your own style lora. (I'll link a guide here when I find an up-to-date one.)
You can also use this site: https://tagexplorer.github.io/#/artists
⁂
Misc. tips
- Keep your seed constant while tweaking your prompt. When you're happy with your prompt, you can start seed hunting, but you'll get a much better idea of what your tags and tag weights are doing if you keep the same seed across all iterations.
- You can get tag autocompletion inside ComfyUI with ComfyUI-Autocomplete-Plus.
- Quality positive and negative tags like
masterpiece, best qualityandmissing fingers, worst qualityare a bit of a can of worms because they are highly checkpoint-dependent, they do matter a lot for some checkpoints, and it's not always clear what the best ones are. Your best bet is to steal them from a high-quality gen that uses the same checkpoint you do, or from the checkpoint developer (if they supply them, or shared gens with metadata).
⁂
Total beginners: explaining the basic text2img workflow
The default ComfyUI text2img workflow looks something like this:
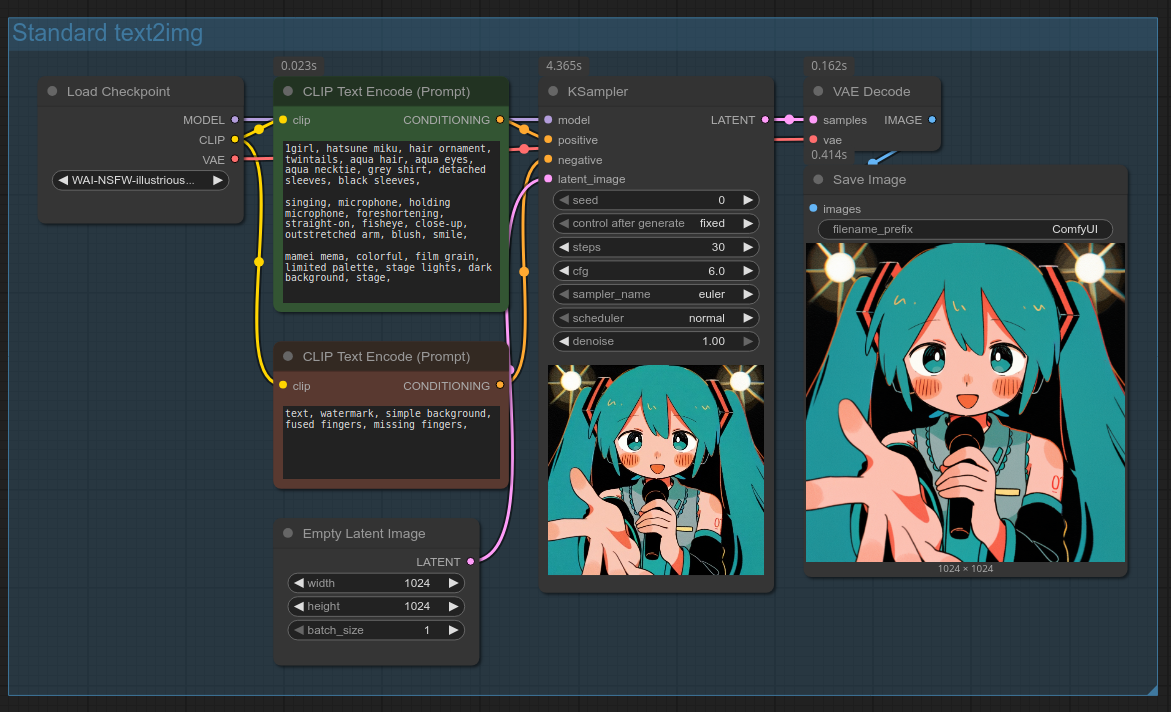
You can also open the workflow by dragging the above screenshot into ComfyUI. (If it doesn't work, save it on your PC first.)
Let's walk through every part of it so you have a solid foundation to build on. Feel free to skip over sections you're already familiar with.
- The blue background in the workflow is a Group. You can create one in two ways:
- Right click -> "Add Group"
- Select the nodes you want to put inside a group with CTRL+drag, then right click and select "Add Group For Selected Nodes"
- Load Checkpoint: This node loads your SDXL-based model, which is traditionally bundled with a CLIP model and a VAE model. It outputs three values:
- MODEL: The checkpoint, used by KSampler and other nodes that perform denoising (i.e. generate image outputs).
- CLIP: A model that is capable of turning your text prompts into "conditioning", aka numeric tokens that checkpoints can understand.
- VAE: A third model; this one capable of converting images into latent space and vice versa. Latent space is a representation of an image that KSampler works with that has 64x fewer pixels.
- CLIP Text Encode (Prompt): Takes a text prompt and turns it into conditioning.
- Empty Latent Image: Lets you set the resolution of your gen by giving the KSampler a base image full of noise. Lots of leeway as to the exact pixel count and aspect ratio here, but for best results it is recommended (required on base SDXL) to stick to 1-million-pixel resolutions, where the sides are divisible by 8 (1024x1024, 1152x896, 1216x832, 1344x768, 1536x640, and portrait equivalents).
- KSampler: The node that performs the generation. Let's look at its settings:
- model: Self-explanatory
- positive: positive prompt (visual elements that you DO want to see in your gen)
- negative: negative prompt (visual elements that you DO NOT want to see in your gen)
- latent_image: Input image. For text2img, this is an empty latent image. For img2img, it takes an existing image (converted into latent).
- seed: A number which controls the random noise generation. In theory, running a workflow with the same seed and other settings will always produce the same image. (Not entirely true in practice; that's a whole other topic.)
- control after generate: fixed/increment/decrement/randomize - how you want the seed to change in between generations. You can change this control to "control before generate" in your ComfyUI settings, under "Widget control mode".
- steps: The number of iterations the denoising process takes. Common values between 20 and 35. Optimal values dependent on checkpoint and prompt. Higher values take more time to generate and may produce higher-quality outputs, with diminishing returns above 30. May also produce more saturated/fried images.
- cfg: Influences how closely the sampler follows the prompt. Higher values may be less creative, and more fried. Conversely, lower values may be too unsaturated. Optimal values are somewhat sampler- and prompt-dependent. 5~6 is a good starting value.
- sampler_name: Algorithm used during denoising. You can experiment with this setting, or stick to the default Euler, or copy the setting from any gen you like, or from your checkpoint's recommended settings (always check your checkpoints' official documentation).
- scheduler: The "rate" (or more accurately, schedule) at which noise is removed. Removing noise faster or slower at different steps of the denoising process may increase or decrease generation quality. Same advice as for sampler_name applies.
- denoise: Only relevant for img2img. The lower the value, the closer to the original image the output.
- VAE Decode: When the KSampler has finished, you have to convert the result from latent space (64x smaller than actual images) to a full-sized image. The VAE model is used for this.
- Save Image: Self-explanatory.
⁂
Using loras
Loras add styles, concepts, and characters that base models may not support (or support poorly). You can find a lot of them on CivitAI. Before using a lora, I'd suggest checking if your checkpoint doesn't already support the lora subject first. This is because:
- There are a lot of poorly-made loras, a concept already baked into your checkpoint might work better.
- Loras aren't a "free" enhancement; they don't always combine gracefully, and might alter outputs in unexpected ways.
- There are a lot of Illustrious loras for subjects that Illustrious already supports. Sometimes the support is spotty, justifying the use of a lora. Quite often, the lora is completely unnecessary. Some reasons for this phenomenon include:
- Lora trainer ignorance
- Lora trainers porting their loras from older models to Illustrious without checking support
- Clout and buzz (CivitAI currency) farming
In order to use loras, take the standard text2img workflow, but add a "Load LoRA" node in after "Load Checkpoint"; as many "Load LoRA" nodes as loras you want to use. "Load LoRA" will apply the lora to your "MODEL" and "CLIP" values, before you wire those into other nodes. In this example, we'll use the Rozen Maiden Style lora and the Darkness lora.
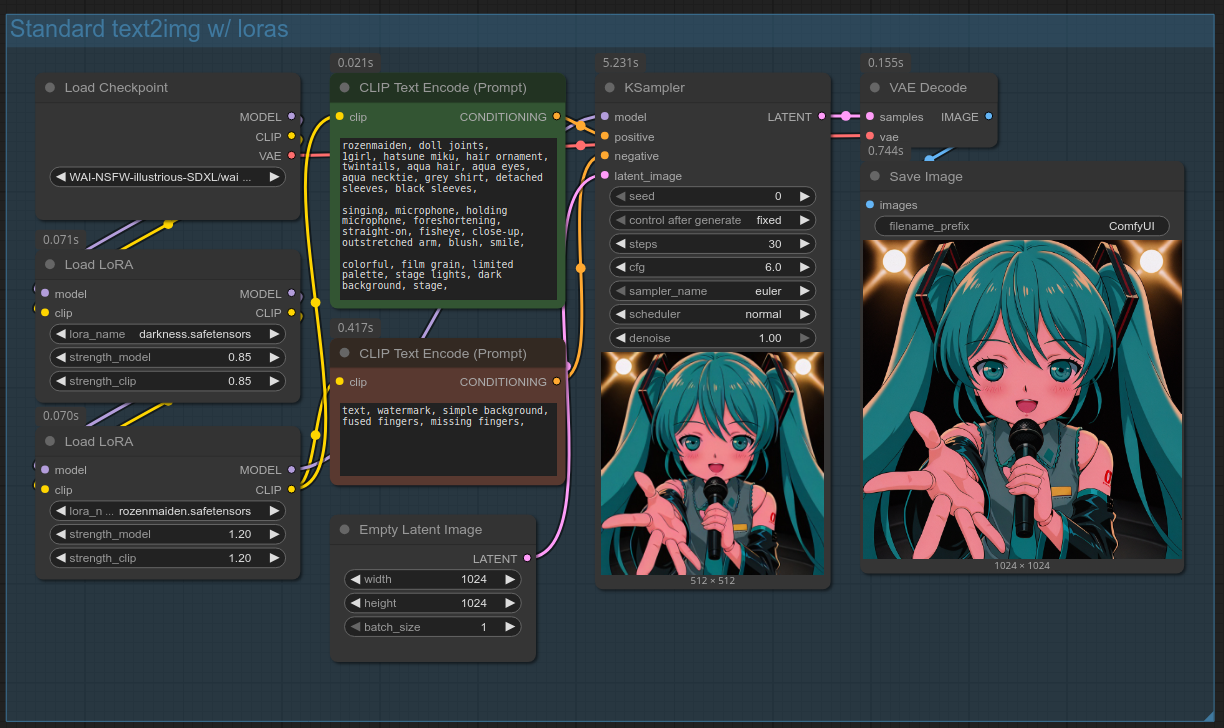
You can also open the workflow by dragging the above screenshot into ComfyUI. (If it doesn't work, save it on your PC first.)
NEW Why this guide no longer recommends LoraLoaderModelOnly
This guide previously recommended using "LoraLoaderModelOnly" over "Load LoRA". "LoraLoaderModelOnly" is simpler because it only applies the lora to the "MODEL" value. Not applying the lora to the CLIP essentially makes the lora's trigger words unnecessary; however, this can be detrimental if the lora knows multiple concepts and you don't want to generate all of them (e.g. a multi-character lora), or if you're doing regional prompting and only want to trigger the lora in specific regions. You can still use "LoraLoaderModelOnly" in the majority of cases, but you'll avoid any gotchas in the future by sticking to "Load LoRA".
⁂
Lora usage tips
- Always check the creator's recommended activation tags (if any)
- Lora strengths can go above 1, you can get some great results going above 1 on certain loras.
- Keeping strength_model and strength_clip identical works well for all intents and purposes.
- To use only one node for multiple loras, and other QoL features, I highly recommend the "Power Lora Loader" node from rgthree-comfy. Notably, it allows you to right click on a lora and select "Show Info" to download and save CivitAI metadata such as activation tags and example images.
- You can also archive lora metadata immediately (in case they get deleted from CivitAI) while downloading it using this browser extension or the CLI tool civitdl.
⁂
img2img
Img2img is very useful for multiple tasks. You can use it for:
- Hiresfix (upscaling images with denoise)
- Generating variations of base gens
- Changing the style of an image; in some cases even turning a doodle or live action image into an anime-style illustration, although ControlNet might be more appropriate for those tasks.
- Detailing and inpainting are also applications of img2img
We're going to start with our basic text2img workflow, and edit it to generate variations of a base gen. Variations are very useful when you have a base gen with compositional aspects you really like, but you're still not quite where you want to be.
We'll replace the KSampler's latent_image input: instead of an Empty Latent Image, we'll use the "Load Image" node and turn the image into latent space with the "VAE Encode" node. We'll also lower the KSampler's denoise setting to somewhere in the 0.6~0.9 range to retain some aspects of the original image.
QoL
- You can quickly add a node anywhere by double-clicking on an empty space in your workflow.
- You can quickly use a base gen as input without saving it on disk first by right-clicking it and selecting "Copy", then clicking your "Load Image" node, and hitting CTRL-V
- A more convenient way to use an output as input is to use the "Load Image (from Outputs)" node. It automatically (or by a button click) loads the latest output. If you don't see the node, update ComfyUI.
Whenever using img2img, you'll want to ensure that your text prompt still describes what you want to generate.
Here is what your workflow should now look like:
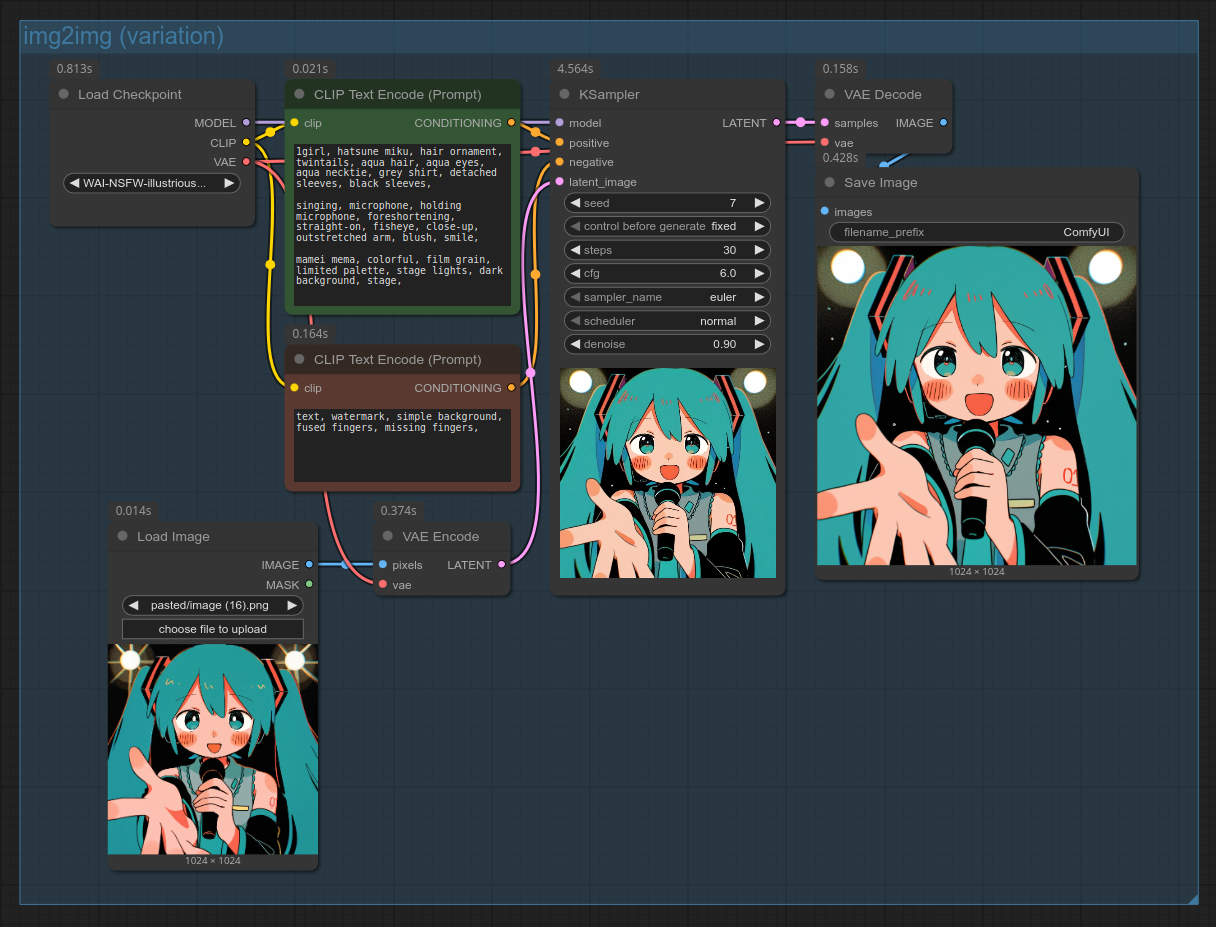
You can also open the workflow by dragging the above screenshot into ComfyUI. (If it doesn't work, save it on your PC first.)
And here's the exact same workflow, except the artist tag was changed from mamei mema to ilya kuvshinov:

⁂
Hiresfix
"Hiresfix" is jargon that refers to upscaling the image, and then resampling it with medium denoising (usually in the .25~.6 range) in order to add detail and improve lines.
There are multiple ways to do this, but my own workflow consists of genning base images at standard 1-million-pixel SDXL resolutions, upscaling, then running an img2img with the same prompt and denoise set to .25~.6.
You can generate at your target resolution from the start; however, the bigger your resolution is, the more time you'll spend iterating on prompts and seed hunting due to increased generation times, and the more likely you will get weird object duplication and other visual glitches. Running an img2img on a base image sidesteps the glitching issue somewhat.
How much you should upscale your image by is prompt-dependent (certain styles are more resilient to upscaling than others). I upscale my images by a factor of 1.2~2.
To hiresfix a gen, we're going to build on the img2img workflow we made in the previous section, and make slight changes to it: before encoding the input image into latent space with the "VAE Encode" node, we'll upscale the image with the "Upscale Image By" node. Your workflow should now look like this:
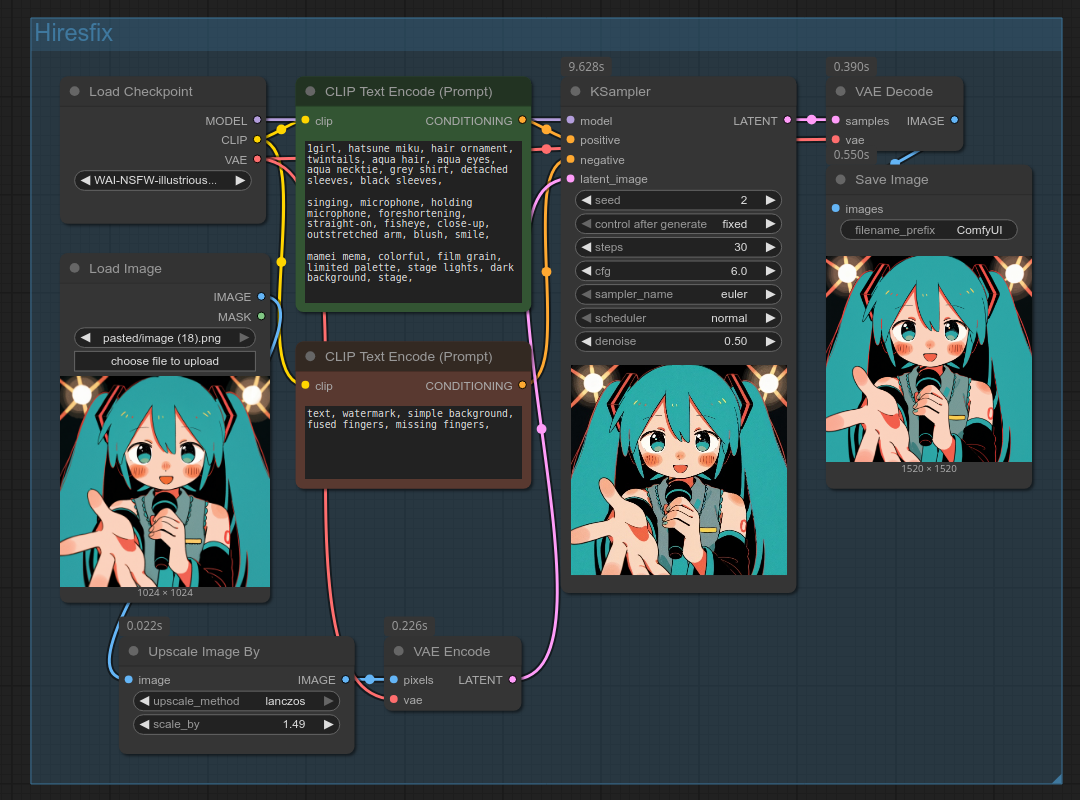
You can also open the workflow by dragging the above screenshot into ComfyUI. (If it doesn't work, save it on your PC first.)
In rare cases, my base gens have certain facial features or compositional qualities that are lost during resampling, so I do not upscale at all. But you can still upscale without resampling, in which case you'll likely want to use an AI upscale model for that. You can also use an AI upscale model for hiresfix too, although the improvements are marginal if your denoise is above ~.25. Because AI models upscale by a fixed factor that is often >=2, you'll have to then downscale your image back to your target resolution before resampling. You can view an example by dragging this image into ComfyUI.
Not covered here, but there are some variations you can add onto this process, like adding a ControlNet to be able to increase denoise while preserving composition, or using Latent Upscale instead of Image Upscale, which gives different results (e.g. thinner lines). The basic attached workflow is perfect for most purposes, though.
⁂
Face and hand detailing
AI struggles with small details: the smaller the element, the more messed up it will look. To fix this, we need to simulate the element being the focus of a close-up gen by performing an img2img on a cropped (and upscaled) version of the element. This is sometimes called ADetailer (after-detailer) from the name of the old A1111 extension. We'll start with faces and hands, because there are really good detector models for those, sparing us having to manually mask them.
Some people do detailing before their upscale/hiresfix step. This means your hiresfix has to be very low denoise in order to preserve the details you added, which is why I prefer to do detailing work after hiresfix.
Take this gen as example (open it in ComfyUI for the workflow):
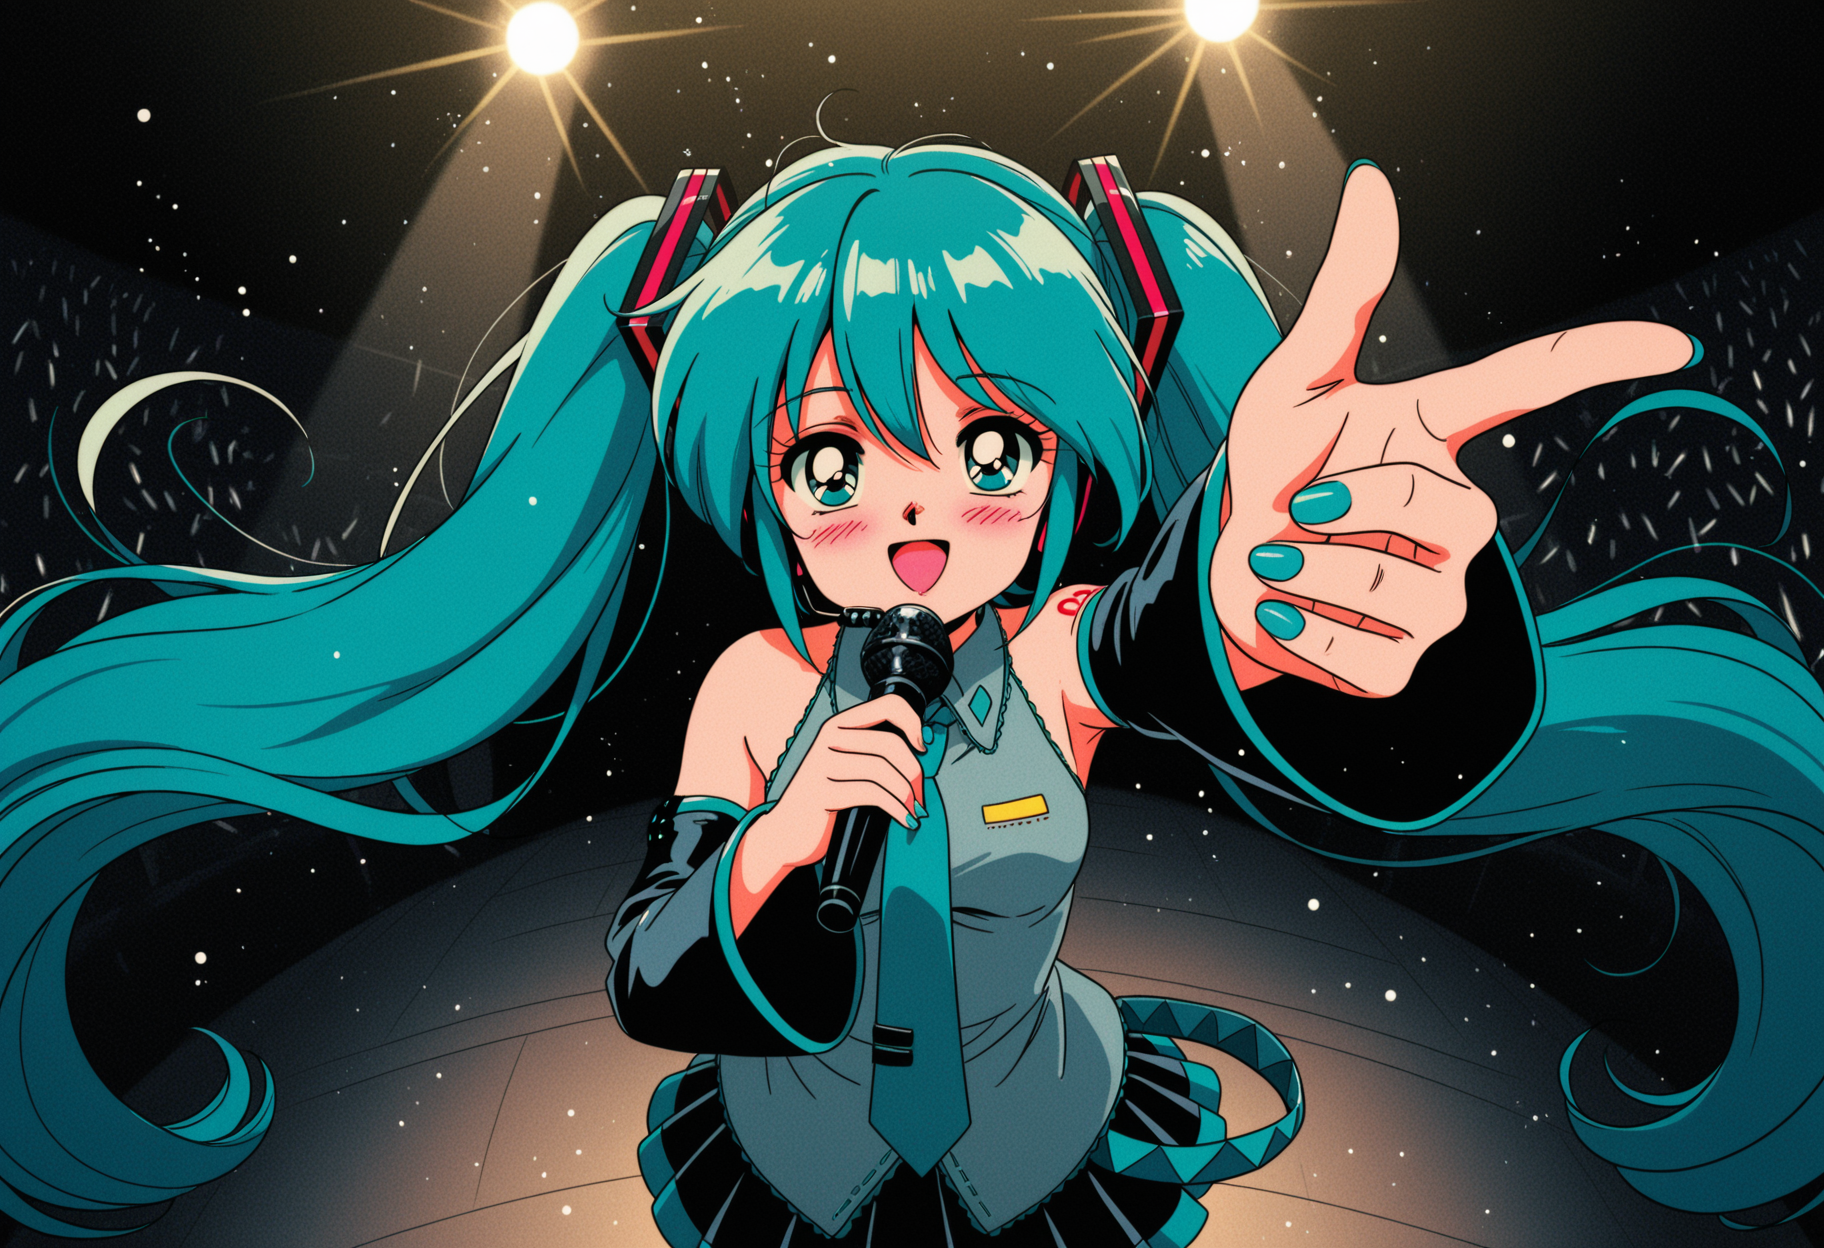
Hiresfix helped a lot already, but her right hand could definitely look better. Let's set up the nodes to fix that.
First install the custom nodepacks ComfyUI-Impact-Pack and ComfyUI-Impact-Subpack. If you don't have ComfyUI-Manager yet, I recommend installing it too for easier custom node management. (ComfyUI-Manager is now part of ComfyUI.)
Important
Make sure you've read this warning about custom nodes. At present, I don't know of any sane and effective way to perform detailing and inpainting without the use of custom nodes. For what it's worth, the creator of the Impact nodepacks is a member of Comfy-Org. This is not an endorsement.
Aftey installing Impact's nodes, set them up as below. You don't need to try and copy those exact settings; the nodes' default settings are perfectly fine to start with. The bbox and SAM models should have already been downloaded by Impact.
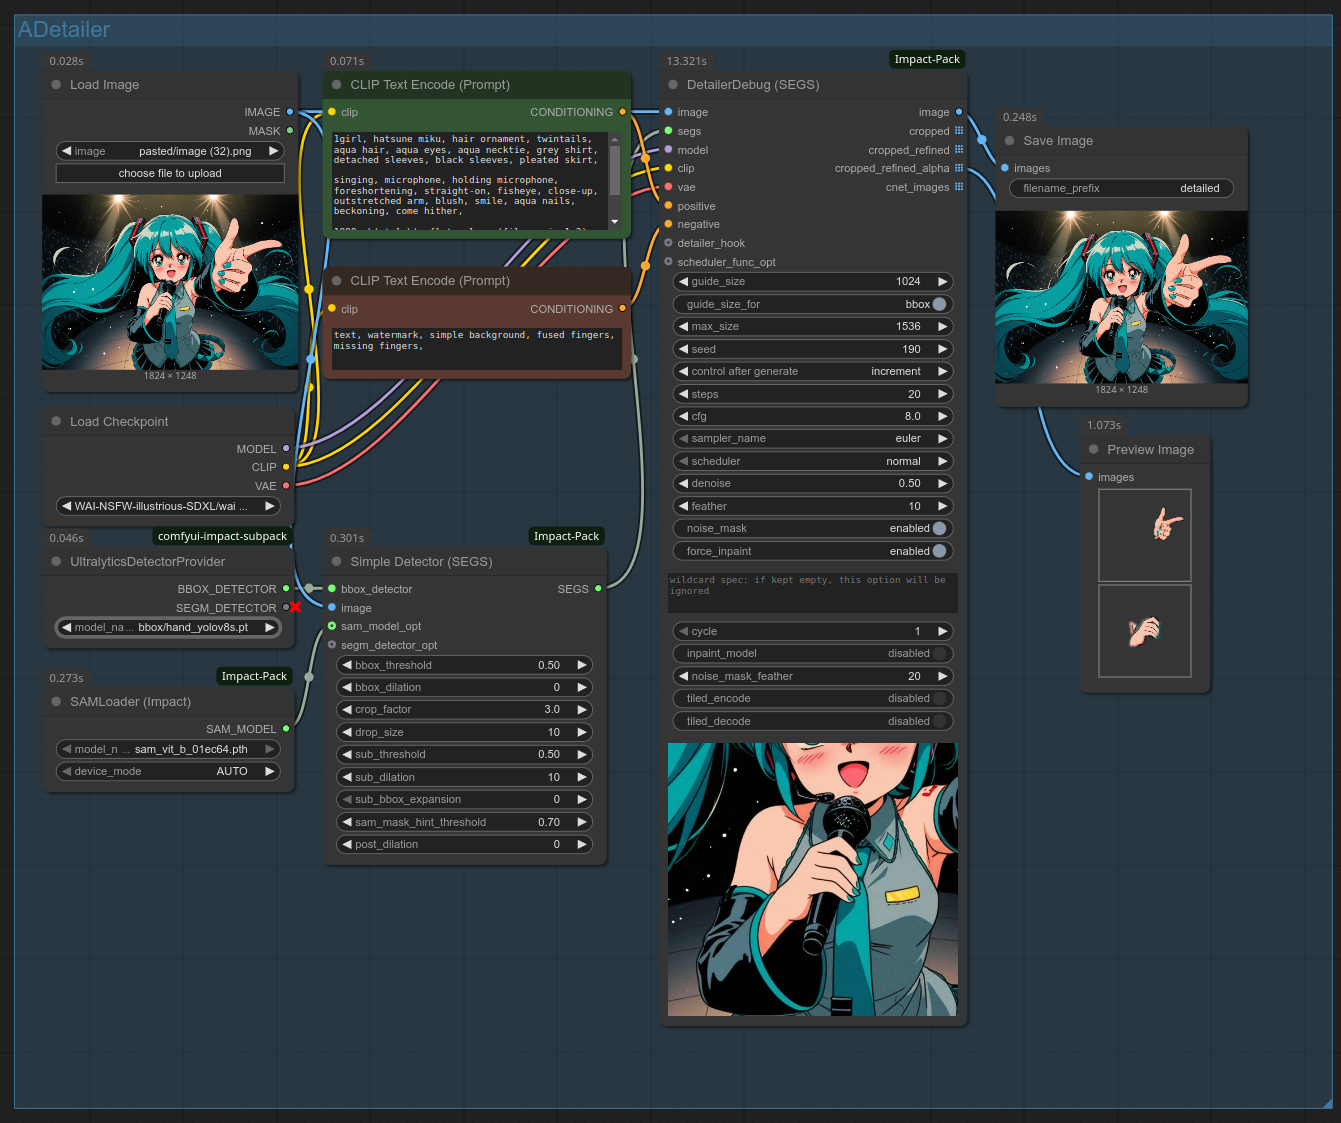
You can also open the workflow by dragging the above screenshot into ComfyUI. (If it doesn't work, save it on your PC first.)
Running the workflow, we get this before/after:
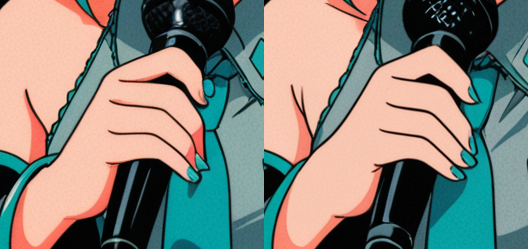
Pretty good result! That's a lot of settings, but don't worry, you don't need to use most of them. The default settings will work fine for most applications, so you don't need to understand them to start improving your gens. That said, here are the main settings you'll want to tweak for better results:
- DetailerDebug (SEGS)
- denoise:
- lower = less changes, higher = more changes
- The default .5 is a great starting point, I use values in the .4~.6 range.
- noise_mask_feather:
- The length (in pixel) of the soft fade-out at the edges of the inpainted area. (This also influences differential diffusion: the more transparent the pixel, the lower its denoise value)
- A common scenario where you might want to tweak this is to lower the value if your detailed area is very small; if you don't, not enough of your detailed area might be visible on the final image.
- noise_mask:
- Always leave this enabled. It causes the sample to resample only the masked area and blend it with every step with the areas you didn't mask. Turning this off will cause visible seams.
- denoise:
- Simple Detector (SEGS)
- crop_factor:
- This is how it works, using example values:
- 1 = the canvas is cropped to the hand only
- 3 = the canvas is cropped to the hand's dimensions * 3
- lower = more details added, somewhat less changes, less context to work off of to maintain structural coherence
- higher = less details added, somewhat more changes, more context to work off of to maintain structural coherence
- This is how it works, using example values:
- crop_factor:
(As far as I can tell, SEGS is just the silly name that Impact's creator gives to the complex masking data used to identify the area to detail.)
To detail faces, simply change the UltralyticsDetectorProvider node's model_name widget to face_yolov8s.pt, which is also automatically downloaded by Impact.
When it comes to face and hand detailing, you can often re-use your base image's prompt and have great results. But if you reduce crop_factor or increase denoise, you might have to adjust your prompt to only describe your cropped area. Otherwise, you'll get a 1girl inside your 1girl!
As a footnote, it might be good to know that there are a lot of alternative detailers on Huggingface and CivitAI. I don't use any of them (I prefer to inpaint), but you might have use cases for them.
Important
Detector models use the .pt/pickletensor format, which is less secure than .safetensors. Only install pickletensors from sources you trust. As with custom nodes, your own due diligence is required. If you do not want to run pickletensors at all, manually masking faces and hands is very easy and effective. See the Inpainting section for more details.
⁂
Inpainting
Inpainting refers to running an img2img on only a part of an image. Face and hand detailing is a form of inpainting using automatic detectors. This section will cover inpainting by manually selecting the inpainted area.
Inpainting jobs range from improving the details on fuzzy/melted areas (i.e. detailing), to tasks like adding completely new elements, removing elements, or changing their color or shape. There are two major pain points with inpainting that can make it difficult for first timers:
- Making small areas more detailed requires cropping (and upscaling) the inpainted area to simulate a close-up. This is what we've seen Impact's detailer nodes automating for us.
- Although this guide will not use this method, the ComfyUI-Inpaint-CropAndStitch node pack is also great for this purpose.
- Inpainting tends to create visible seams, and the higher the denoise, the more problematic the seams. When making larger changes than simply detailing fuzzy areas, higher denoise is required and seams become a bigger problem. Here are the main techniques used to address seams (don't worry if this doesn't make sense for now; we'll simplify this):
- Mask feathering (compositing the inpainted area onto the base image with a "soft" edge that gradually transitions from visible to transparent)
- Differential diffusion (taking the edges of a feathered mask, and applying a denoise strength relative to the mask' opacity)
- Latent noise masking (only resampling the masked area, this is the
noise_masksetting in the Detailer node, equivalent to ComfyUI's "Set Latent Noise Mask" node) - Drawing a rough sketch over the base image to reduce the required denoise value (no drawing skills required; this can be toddler quality)
- Doing a lower-denoise second pass after the first high-denoise pass
- Inpaint ControlNet
- Dedicated inpainting models
We won't use inpaint ControlNets and dedicated inpainting models in this guide, but it's good to know they exist.
Detailing arbitrary areas
We will inpaint using Impact's detailer nodes that we used in the Face and hand detailing section, except instead of automatically detecting faces and hands, we'll manually select which area we want to inpaint. Impact's nodes come with not just cropping built-in, but differential diffusion too! They are in fact perfect for inpainting.
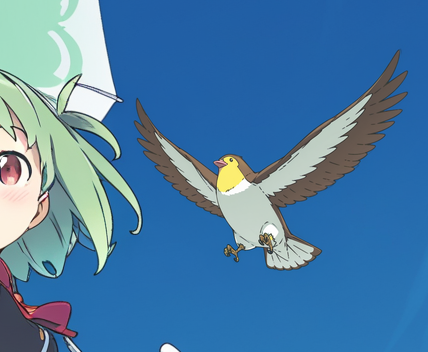
Let's start with this basic gen, and try to improve the bird. (As always, you can drag the gen into ComfyUI to import its workflow.)
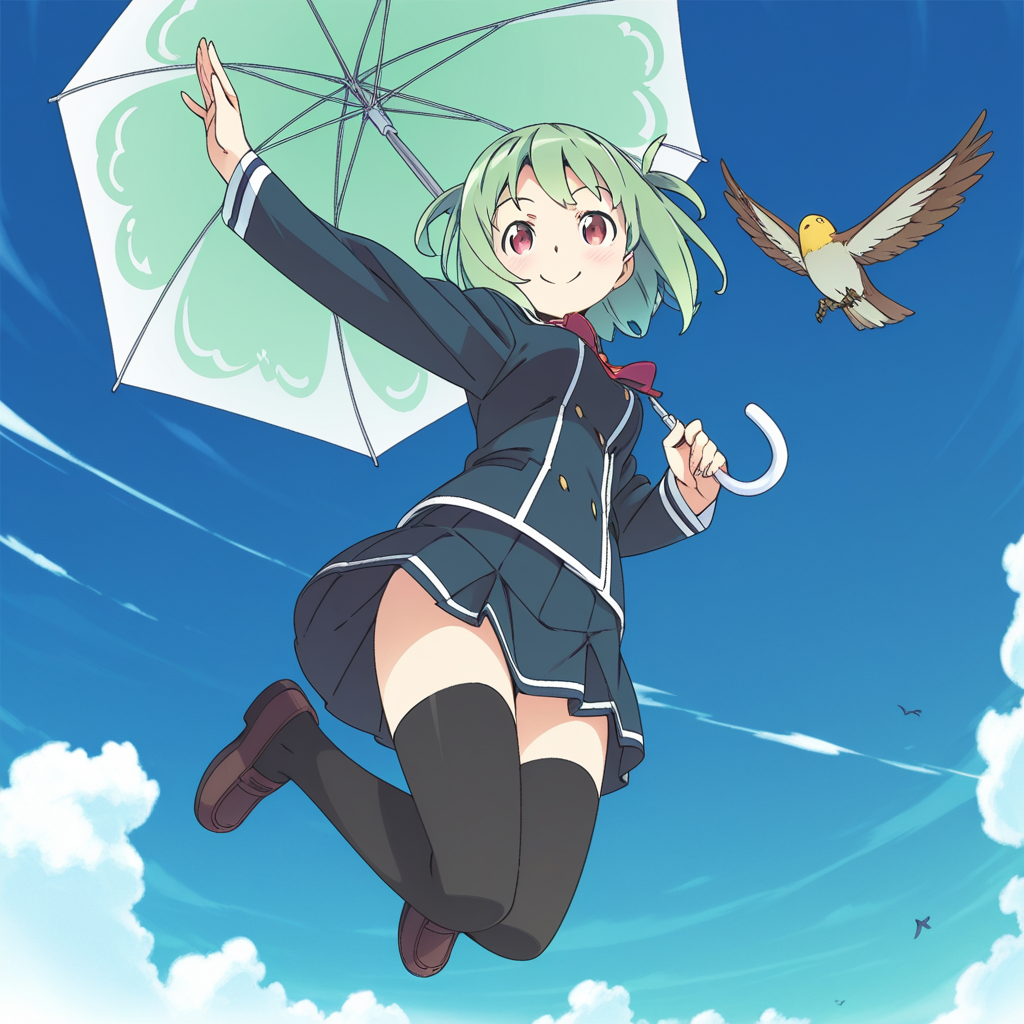
The full prompt, for reference, is 1girl, kanzaki hiro, green hair, smile, school uniform, holding umbrella, from below, blue sky, jumping, black thighhighs, bird, bird on hand,.
Let's take our ADetailer workflow from the previous section. Change the "segs" input that we supply to the "DetailerDebug (SEGS)" node to receive a manually-selected area instead of an automatically-detected one:
- First, delete the "UltralyticsDetectorProvider", "SAMLoader (Impact)" and "Simple Detector (SEGS)" nodes. We aren't using automatic detectors here.
- Next, we'll add a "MASK to SEGS" node, and connect our "Load Image" node's "MASK" output to it. Then we can connect the "MASK to SEGS" node's "SEGS" output to the "DetailerDebug (SEGS)" node's "segs" input.
- Finally, we can now right click on our loaded image in the "Load Image" node, then click "Open in MaskEditor", and select the image the area that we want to inpaint by painting some black over it. In this case, we will select the bird.
The MaskEditor UI looks like this:
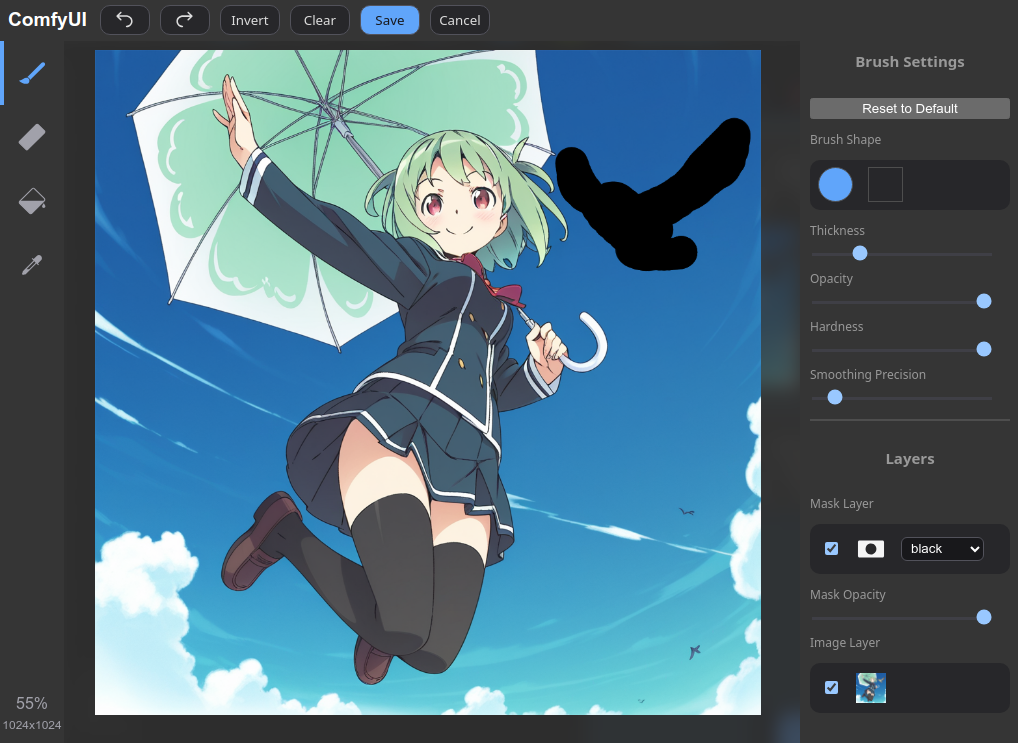
And your workflow should now look like this:
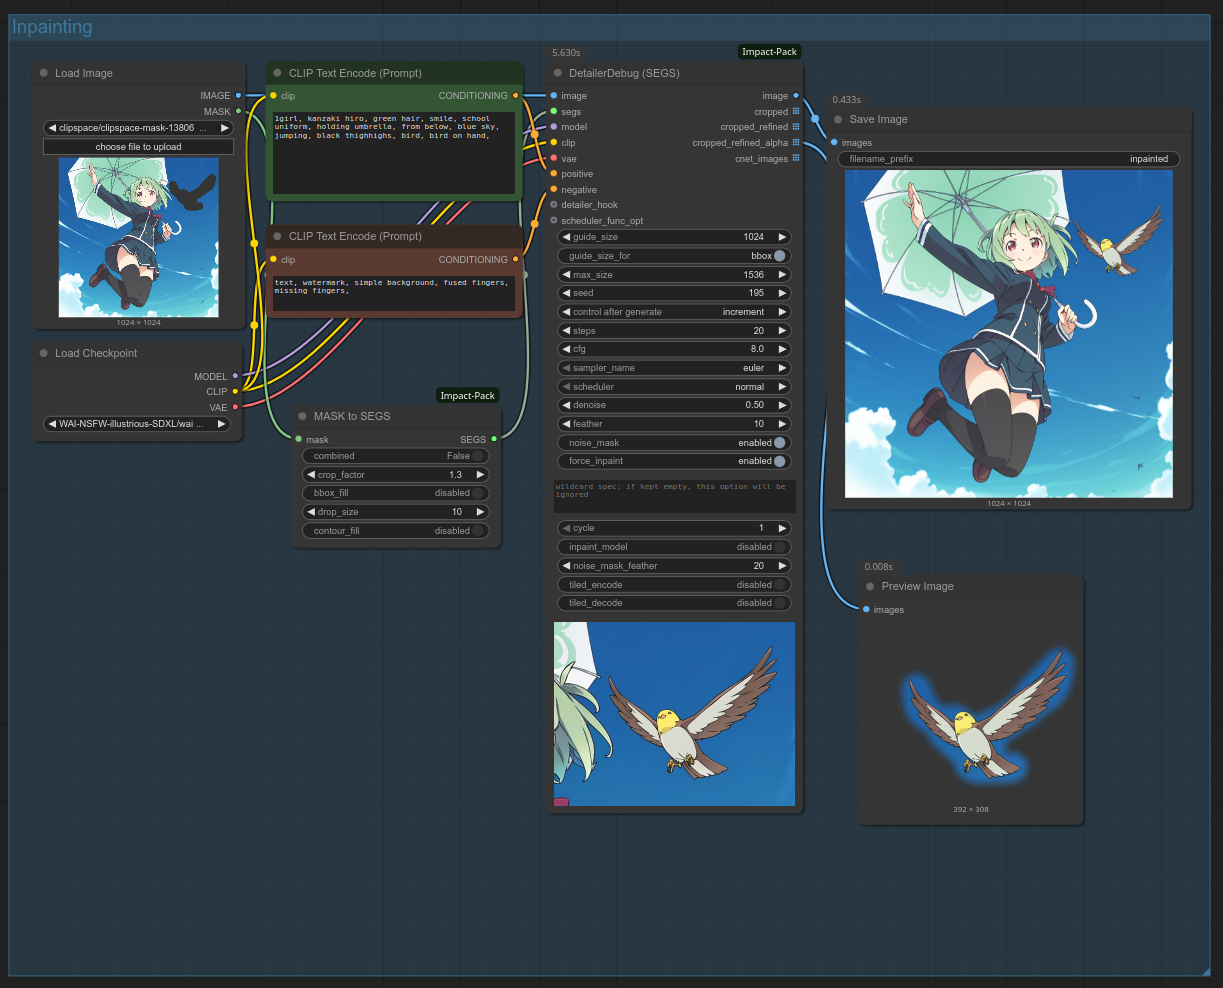
As always, you can open the screenshot in ComfyUI to get the workflow; however, you'll have to import the base image and mask the bird yourself in MaskEditor, because ComfyUI sadly doesn't export loaded image data.
Here is the before/after:
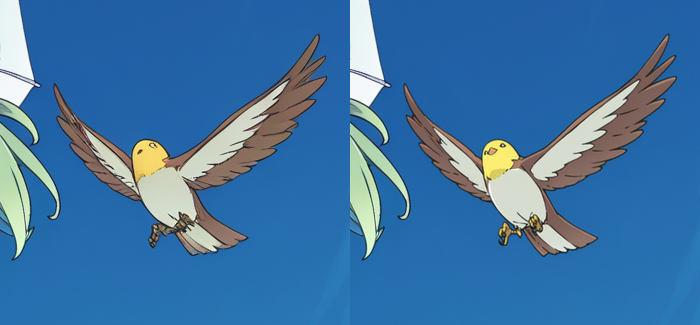
Note how I decided to reduce crop_factor to 1.3 to really crop in on the bird, while keeping denoise to default 0.5. Those are good settings to add detail to a small area.
Making large changes to an area
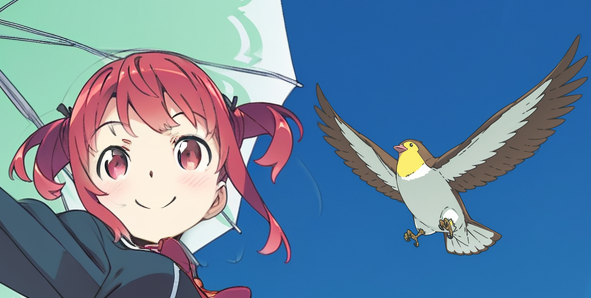
What if I want to roll for an substantially different bird? Let's see what happens if I increase denoise, perhaps to 0.7. Here's the result:

Oops; with higher denoise, the KSampler gave our bird a school uniform. To fix this, simply change your prompt to only include the parts relevant to your inpainted area. Changing the prompt to kanzaki hiro, bird, blue sky yields this result:
Much better!
Changing colors
Let's now look at an example that will require more involved techniques. What if I want to change the 1girl's hair color to red? That will be difficult to do with the techniques we've applied so far, because img2img is bad at changing colors. Here's what we get with the prompt set to 1girl, kanzaki hiro, red hair, holding umbrella, blue sky and 0.7 denoise:
Not very effective. We are forced to crank up the denoise and crop factor. Here is with 0.85 denoise and crop_factor 4:
It's better!... But still a bit funky. There are visible seams, and her hair feels too thin as a result of high denoise changing the composition too much. In some cases, it is worth fiddling with feathering settings or doing a second inpainting pass with lower denoise for detailing, but here we'll just sketch over the original image in ComfyUI or an image editor (e.g. MS Paint), then import our sketch inside the "Load Image" node and re-draw our mask.
NEW The latest version of ComfyUI now supports sketching inside the MaskEditor.
The more detailed your sketch, the lower your denoise needs to be, and the more guaranteed your results. In most cases, however, a basic doodle with moderately high denoise will work just fine. Here's the sketch I used, with .75 denoise and crop_factor 2:

Now that worked!
Conclusion
That's all you need to know about inpainting inside ComfyUI. You should also know about krita-ai-diffusion, an alternative inpainting UI for ComfyUI. It offers a more user-friendly experience, but perhaps less control. It is definitely worth looking into if you have a drawing tablet and some drawing skills (although those are not required).
⁂
ControlNet (pose transfer)
ControlNet is a very useful technique to transfer an image's composition/pose to your gens. It can be useful for compositions that SDXL models can't achieve with bare prompting, whether for single characters or multi-characters (especially in combination with regional prompting).
We are going to take our the standard text2img workflow and upgrade it to be able to optionally use a ControlNet using the built-in "Apply ControlNet" node. Let's explain its inputs and outputs and see what the resulting workflow looks like.

This node takes your positive and negative conditioning values, and outputs new positive and negative conditioning values with the ControlNet applied. That means you can disable ControlNet by simply clicking/selecting the "Apply ControlNet" node and bypassing it with CTRL-B: if bypassed, it will output the positive and negative values with no changes applied.
The "Apply ControlNet" node also takes takes a control_net input, which we need to supply using the Load ControlNet Model. We'll use diffusion_pytorch_model_promax.safetensors from xinsir/controlnet-union-sdxl-1.0, which works great with SDXL models. It also is capable of handling most types of ControlNet as well as detecting the type that your input image is made for, so we don't need to switch between different ControlNet models or bother with the "SetUnionControlNetType" node.
The "Apply ControlNet" node also has an image input, which needs to be a ControlNet hint image. The easiest way to generate a ControlNet hint image is to chain the "Load Image" node with the "AIO Aux Preprocessor" custom node from comfyui_controlnet_aux. You can also connect the "AIO Aux Preprocessor's" IMAGE output to a "Preview Image" node to inspect what your ControlNet hint image looks like.
Important
Make sure you've read this warning about custom nodes. For what it's worth, the official ComfyUI docs suggest comfy_controlnet_aux. This is not an endorsement from them or me.
"Apply ControlNet" also requires a VAE model, so connect the VAE from your "Load Checkpoint" node to it.
Let's check in before we explain the settings you might want to tweak. This is what your workflow should look like:
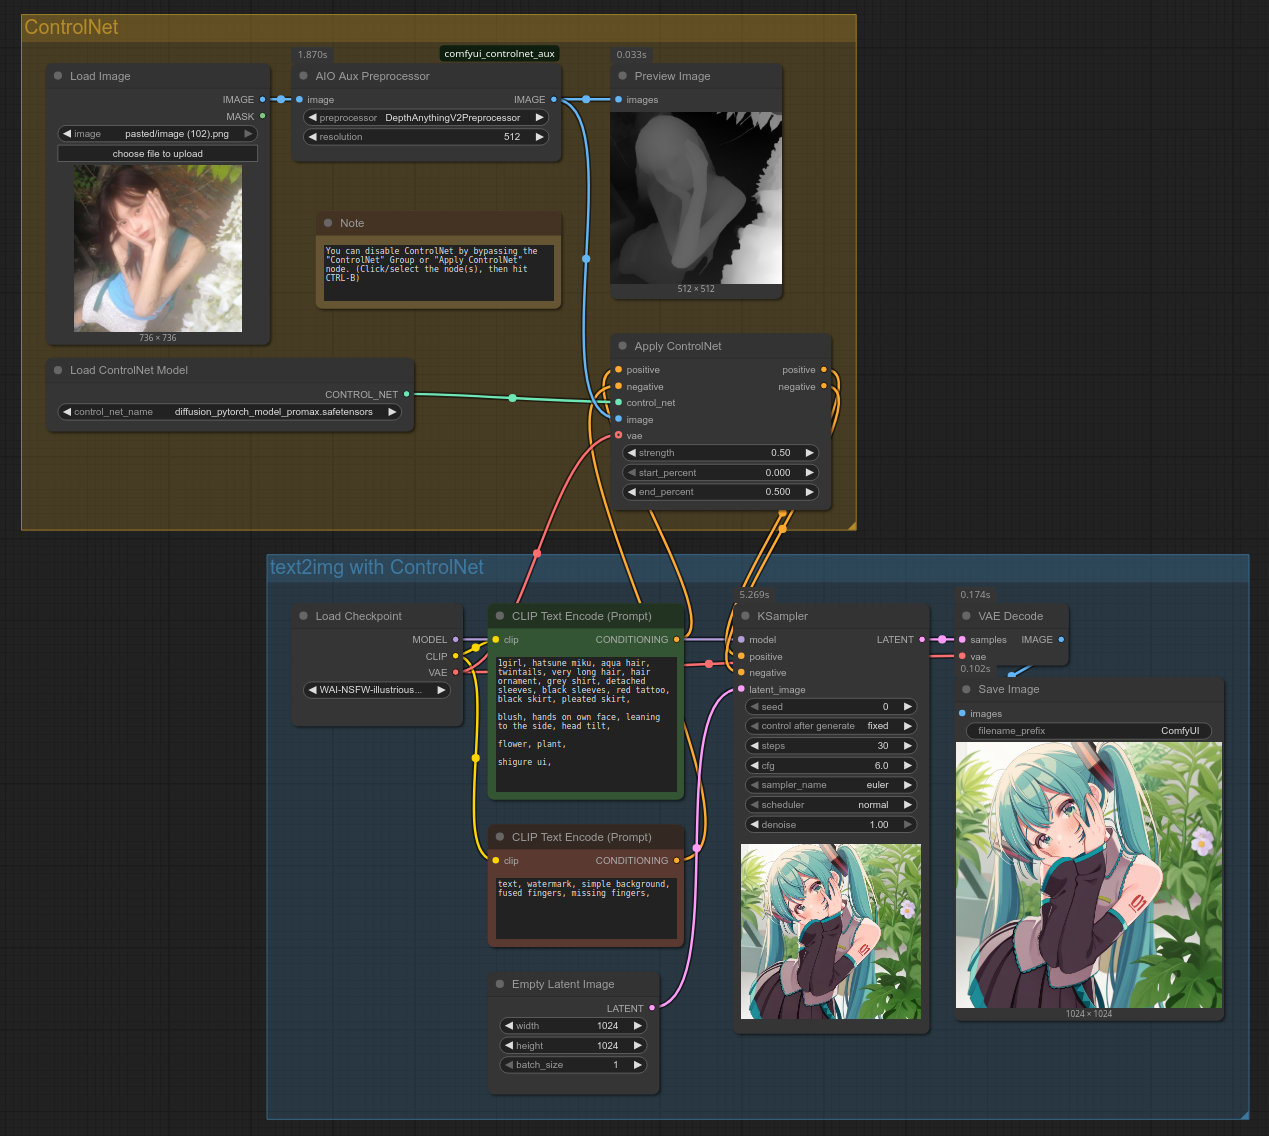
You can also open the workflow by dragging the above screenshot into ComfyUI. (If it doesn't work, save it on your PC first.)
And here are the ControlNet source image and output gen:
| Source | Output |
|---|---|
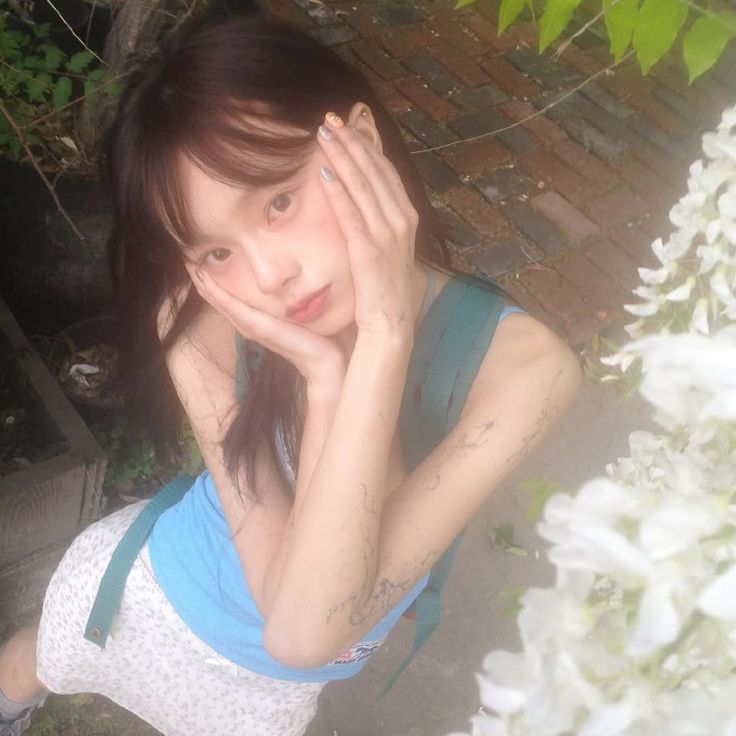 |
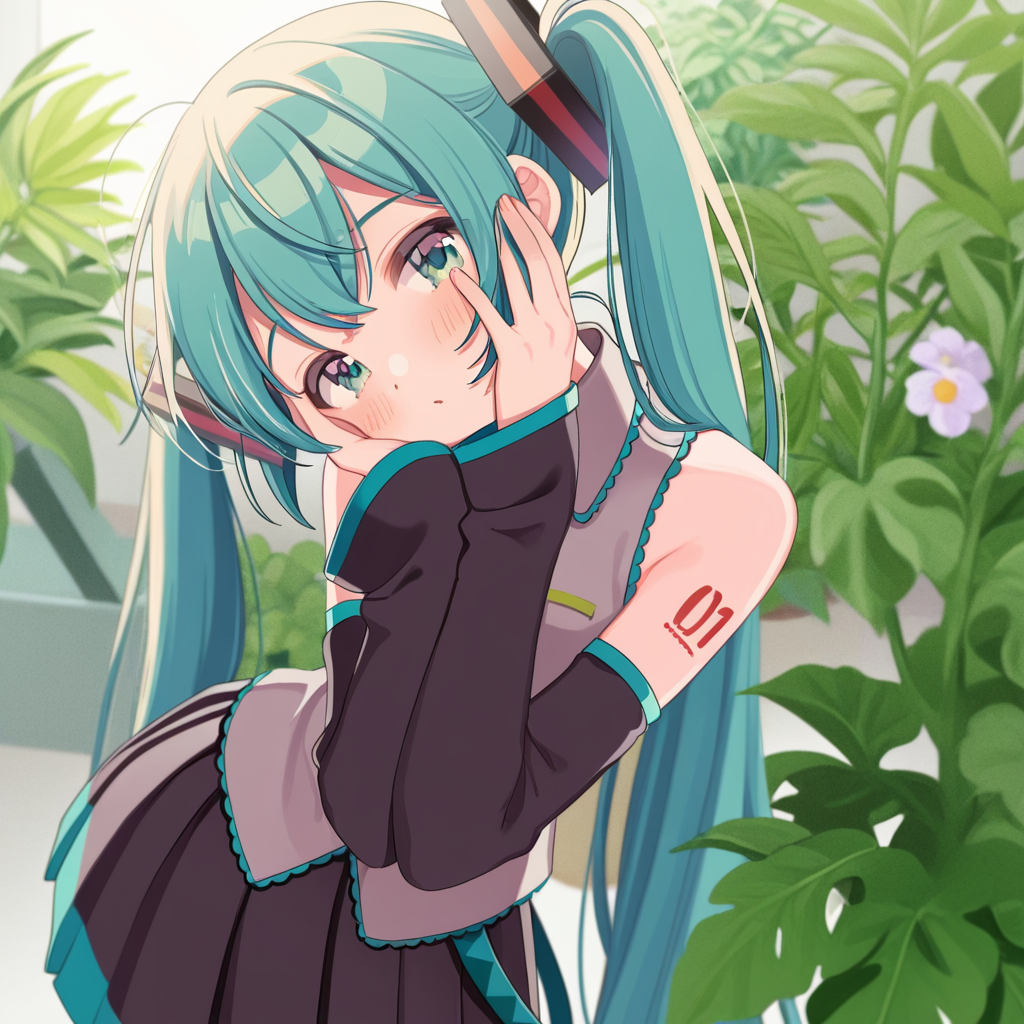 |
Let's talk about the preprocessor setting from "AIO Aux Preprocessor". Feel free to research other options, but I recommend these:
- DepthAnythingV2Preprocessor: transfers pose/composition using a depth map.
- PyraCannyPreprocessor: transfers pose/composition by detecting outlines.
- OpenposePreprocessor: transfers pose using stick figures. Only works reliably with live-action source images.
The other settings you'll want to play with are "Apply ControlNet" strength and end_percent. .5 is a good starting value for both. Lower strength allows each sampling step to deviate more from the source image. Lower end_percent removes the ControlNet at an earlier denoising step. This is especially useful when using a source image in a very different style from your desired output (e.g. live action), as applying a ControlNet the entire way through will prevent your desired style from coming out properly.
For best results you want to ensure your ControlNet source image has the same aspect ratio as your gen.
If you want to create a complex composition but you don't have any source image to use, consider making your source image with Chroma or Flux. You can also create a custom OpenPose ControlNet hint image on https://openposeai.com.
That is about all you need to use ControlNet. When using ControlNet source images with multiple characters, you might have to do a lot of rerolling to get the characters right. That is where regional prompting comes into play.
⁂
2girls and regional prompting
The common way to do regional prompting in ComfyUI is to use the custom node pack A8R8_ComfyUI_nodes.
ComfyUI has beta built-in regional prompting nodes ("Conditioning (Set Mask)" and "Conditioning (Combine)"), but they seem to not combine gracefully with ControlNet (TODO explore this further). Looking at the step-by-step preview also indicates that ComfyUI's method for regional prompting is fundamentally different from A8R8's, in a way that may be worse (unconfirmed).
That said, if you don't want to rely on custom nodes, it's good to know you have that option.
Basic workflow
Let's now look at how to use A8R8. This is how you set up the A8R8 nodes, in the most basic way possible:
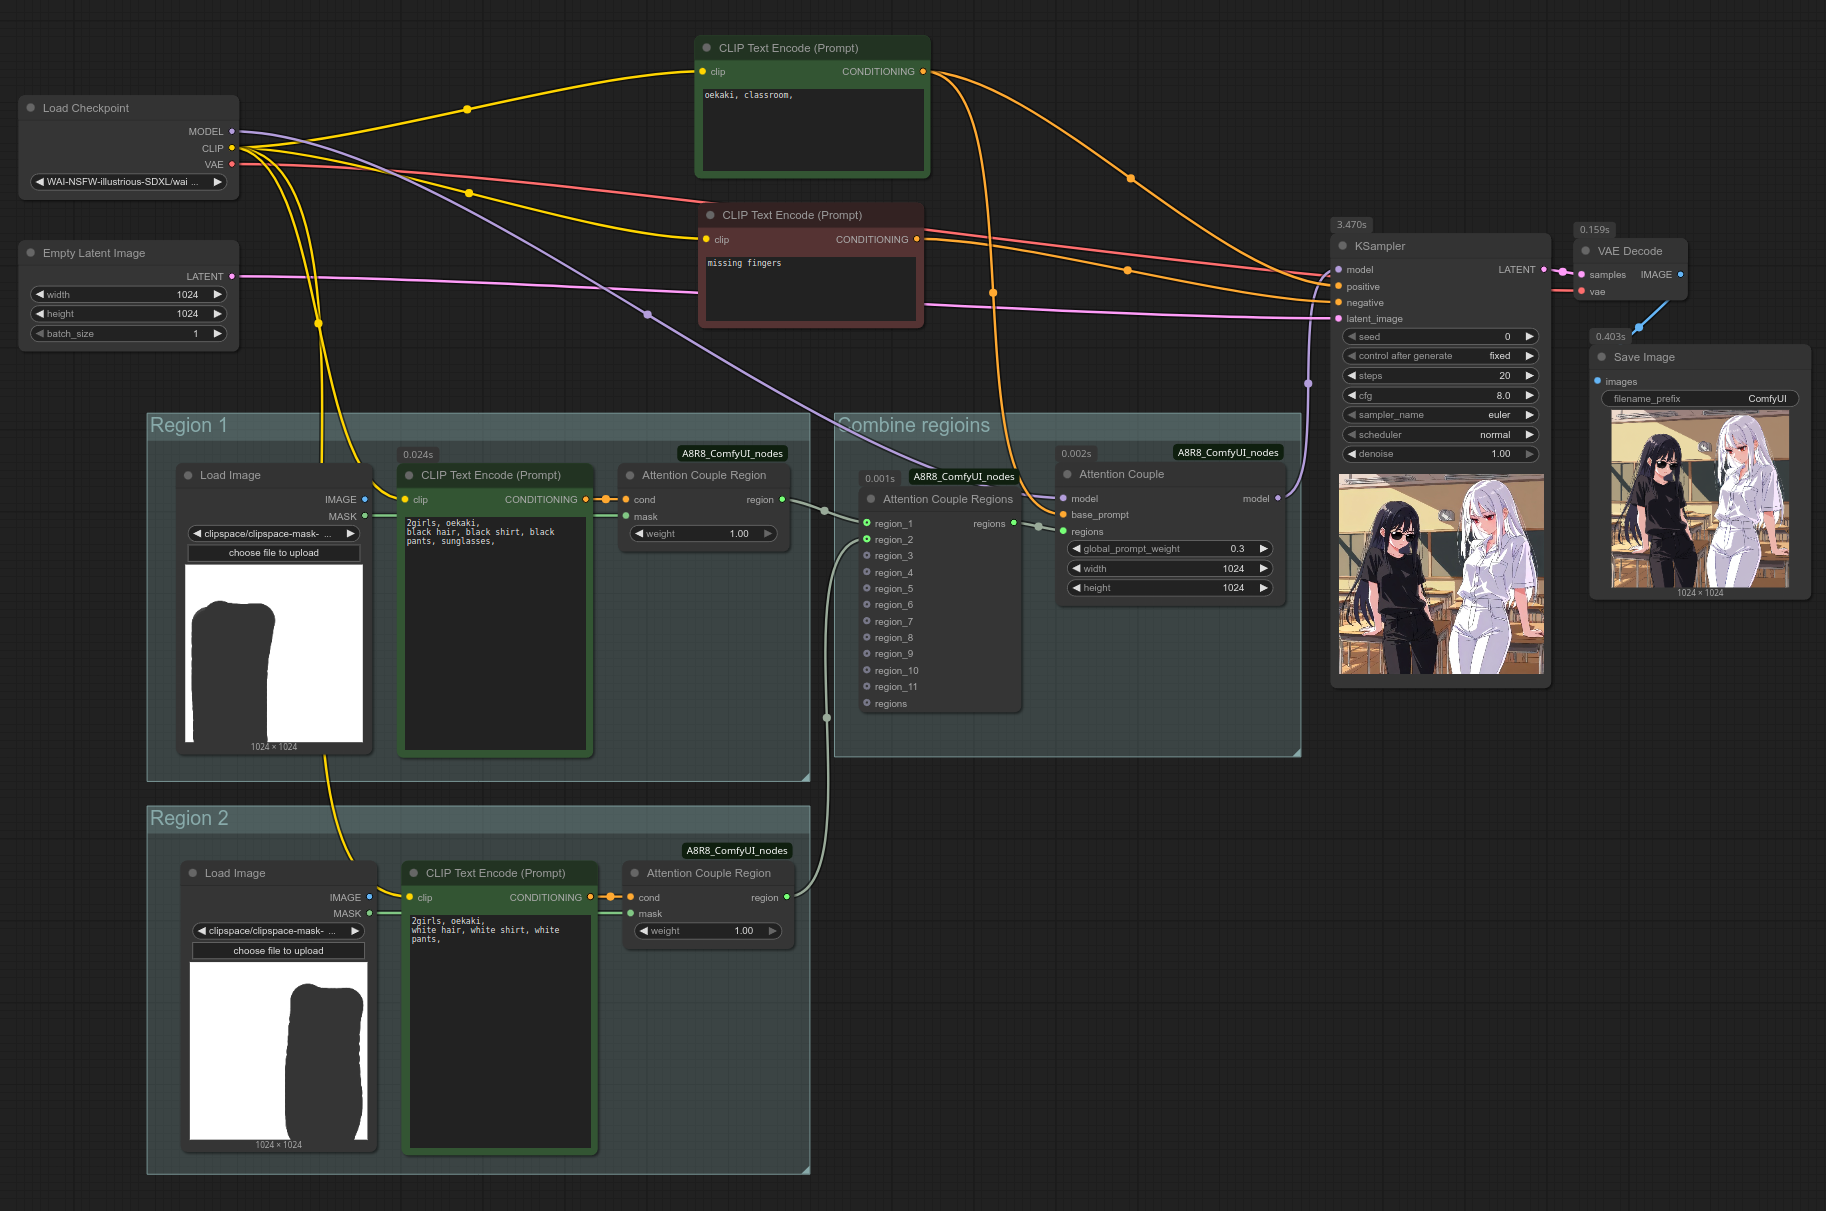
As always, you can also open the workflow by dragging the above screenshot into ComfyUI. (If it doesn't work, save it on your PC first.) However, You'll have to load the images yourself (Here is 1024x1024.png), right click them, click "Open in MaskEditor", and paint the masks yourself.
Take note of the following:
- The region images can be anything, as long as they are the same size as your latent image. You can even use reference images with characters in them, it doesn't matter. If you don't have any image on hand you can also simply make a non-regional gen and copypaste it into your region "Load Image" inputs.
- The top "CLIP Text Encode (Prompt)" node describes your background. Your regional prompts do not use it.
- You don't need to change the "Attention Couple Region's" default
weightvalue of 1, and the "Attention Couple"global_prompt_weightvalue of .3. - When prompting for multiple characters, you must use
2girlsin each region (or3girls,4girls,5girls,6+girls. Note that the tag is6+girls, not6girls, not7girls). Do not use1girl, unless a region is producing extra unwanted characters. - The "Attention Couple"
widthandheightvalues should be identical to your latent image. - If you want more regions, simply copypaste one of the existing region groups and connect it to the "Attention Couple Regions" node.
VERY COMMON MISTAKE
I'm repeating this here because it seems many people are missing it and having trouble as a result. When prompting for multiple characters, you must use 2girls in each region (or 3girls, 4girls, 5girls, 6+girls. Note that the tag is 6+girls, not 6girls, not 7girls). Do not use 1girl, unless a region is producing extra unwanted characters.
It's actually quite simple!
Combining with ControlNet
To combine regional prompting with ControlNet, you need to input your background's positive conditioning and your negative conditioning into the "Apply ControlNet" node before inputting it into "KSampler". (It seems to make no difference whether the "Attention Couple" base_prompt input gets the positive conditioning pre- or post-"Apply ControlNet".)
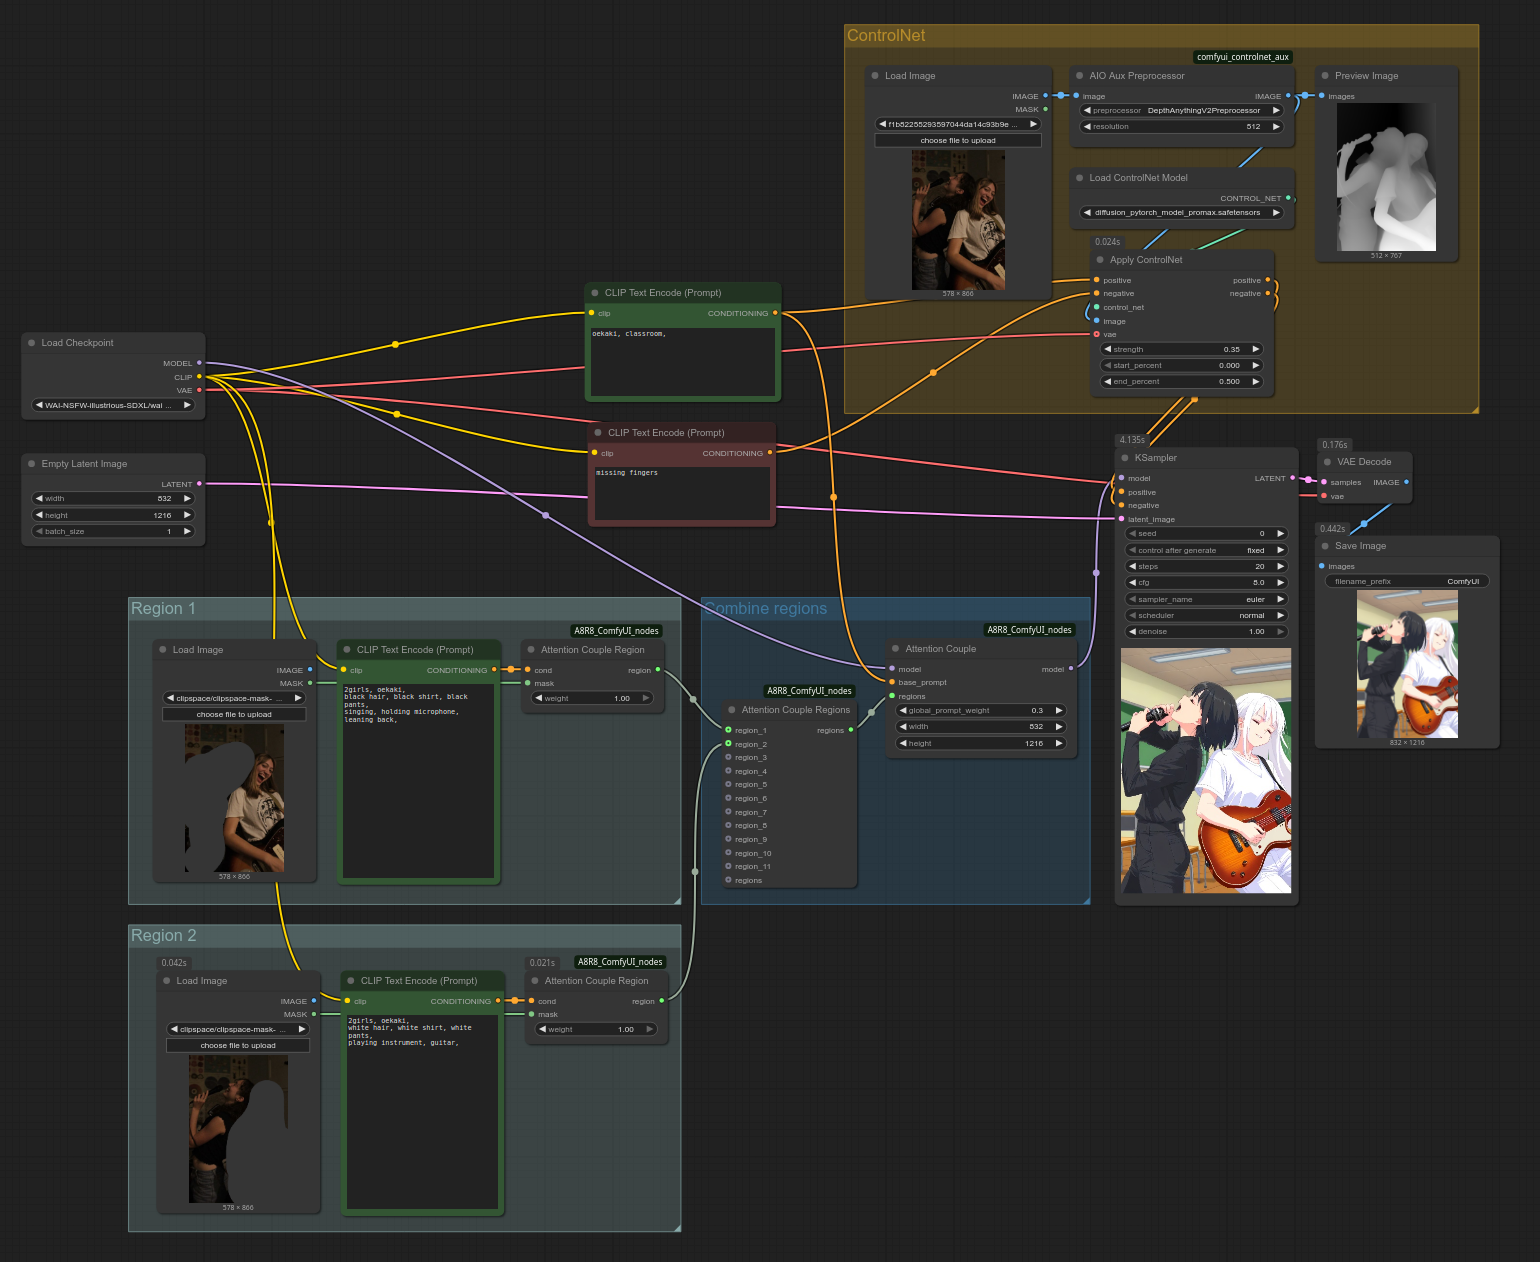
You can also open the workflow by dragging the above screenshot into ComfyUI. (If it doesn't work, save it on your PC first.)
As before, you will have to load the ControlNet/region inputs yourself, as well as draw the masks yourself. Click here for the source image. Note that in most cases, you don't want to precisely mask just the input characters, but more like a wide, general area that you want your output characters to occupy. If you don't allow for some wiggle room, it will be difficult to change the art style or character traits like hair length.
⁂
Quick tips on cleaning up spaghetti
This isn't the focus of this guide, so this part won't go into too much detail. We'll take our Regional prompting + ControlNet workflow and apply some techniques to clean it up a little.
Useful settings
Before we start, let me mention a few settings you might find useful.
- In ComfyUI settings (bottom left wheel icon) -> "Keybinding" section, you can assign a keybind to the command "Canvas Toggle Link Visibility" (e.g. CTRL + /) to entirely hide wires whenever you're not doing workflow maintenance. This is a quick compromise that lets you enjoy a relatively clean UI without going through the hoops we'll cover in this section.
- You might enjoy changing the "Link Render Mode" setting from the default "Spline" to "Straight" or "Linear", as well as the "Link midpoint markers" setting from "Circle" to "Arrow".
You can rename a node by double-clicking on its name. You can still check a rename node's original name by right-clicking it and looking at the top line of the right-click menu.
You can collapse a node by clicking on the circle to the left of its name. This is useful if you rarely look inside the node after you've set up your workflow.
You can create wireless connections using ComfyUI-KJNodes's Get/Set nodes and/or cg-use-everywhere. We'll use cg-use-everywhere here. Please refer to the official documentation for details on how to use it.
I'd recommend only using cg-use-everywhere for values which never change throughout the workflow, such as CLIP and VAE. You can also create global width and height values using the built-in "Int" node.
Wireless connections for values that do change can be useful in personal workflows, but make them harder to understand for others. Use sparingly.
Let's check in. By applying the tips mentioned thus far, we can simplify our workflow to something like this:
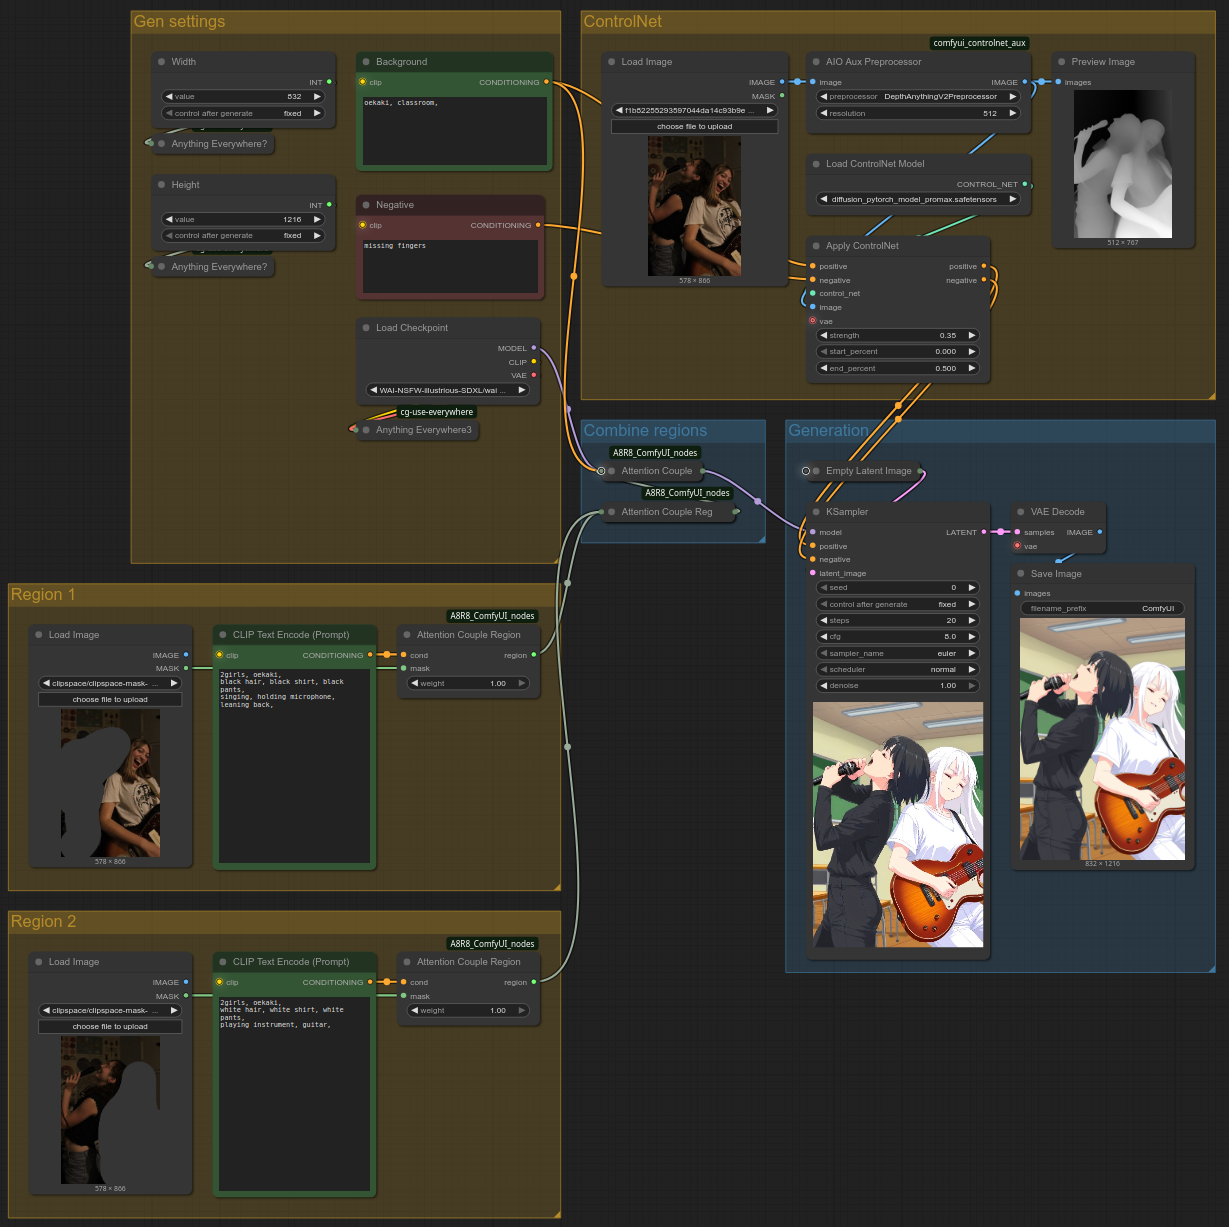
You can also open the workflow by dragging the above screenshot into ComfyUI. (If it doesn't work, save it on your PC first.)
As before, you will have to load the ControlNet/region inputs yourself, as well as draw the masks yourself. Click here for the source image. Please also note that you'll need the custom nodepack cg-use-everywhere.
NEW Subgraphs
This section was previously about Group Nodes, which are now deprecated in favor of Subgraphs. You can still read the original section about Group nodes here.
Subgraphs are now available in the latest version of ComfyUI, although they still have some rough edges, they are the better alternative to Group Nodes, which previously fulfilled the same purpose. You can use subgraphs to compact multiple nodes into one, and once you've created a subgraph, you can hide settings that you never use. This is very useful to declutter your workflow.
In order to create a Subgraph, you select the nodes you want to combine with CTRL+drag click, then you right click your ComfyUI canvas and select "Convert to Subgraph". You can then open the Subgraph and view the nodes it contain by clicking on the icon at the right of the Subgraph node's title bar.
Once you've created a Subgraph, you can control which inputs, widgets and outputs are visible on the main canvas by opening the Subgraph, then creating links between the inputs/widgets/outputs that you want to expose and the Subgraph's special Input and Output nodes.
Note the following gotchas when using Subgraphs with cg-use-everywhere:
- If you want a wireless input inside the Subgraph, make sure to expose it as a Subgraph input so that it is visible on the main canvas
- If you want a value produced by the subgraph to become wirelesslyaccessible, make sure to expose it as an output, then connect it to a cg-use-everywhere node that is on the main canvas, not inside the Subgraph
At the time of writing this, there's still a lot of jank with the Subgraphs feature. Here are the main gotchas that I'd warn about:
- "Load Image"'s image preview widget can be exposed, but does not seem to support using CTRL-V to load images from clipboard. Therefore it is better for now to keep the "Load Image" node outside of subgraphs if you rely on this functionality.
- Re-ordering Subgraph inputs/outputs requires removing inputs (/outputs) and re-creating them. This should hopefully be improved soon.
- Seed "control after generate" widget can be exposed, but any seed/int will have "fixed" behaviour. As a workaround, use the Comfy Core "Int" node and connect its output to your Subgraph's "seed" widget.
Here's what the workflow looks like using Subgraphs:
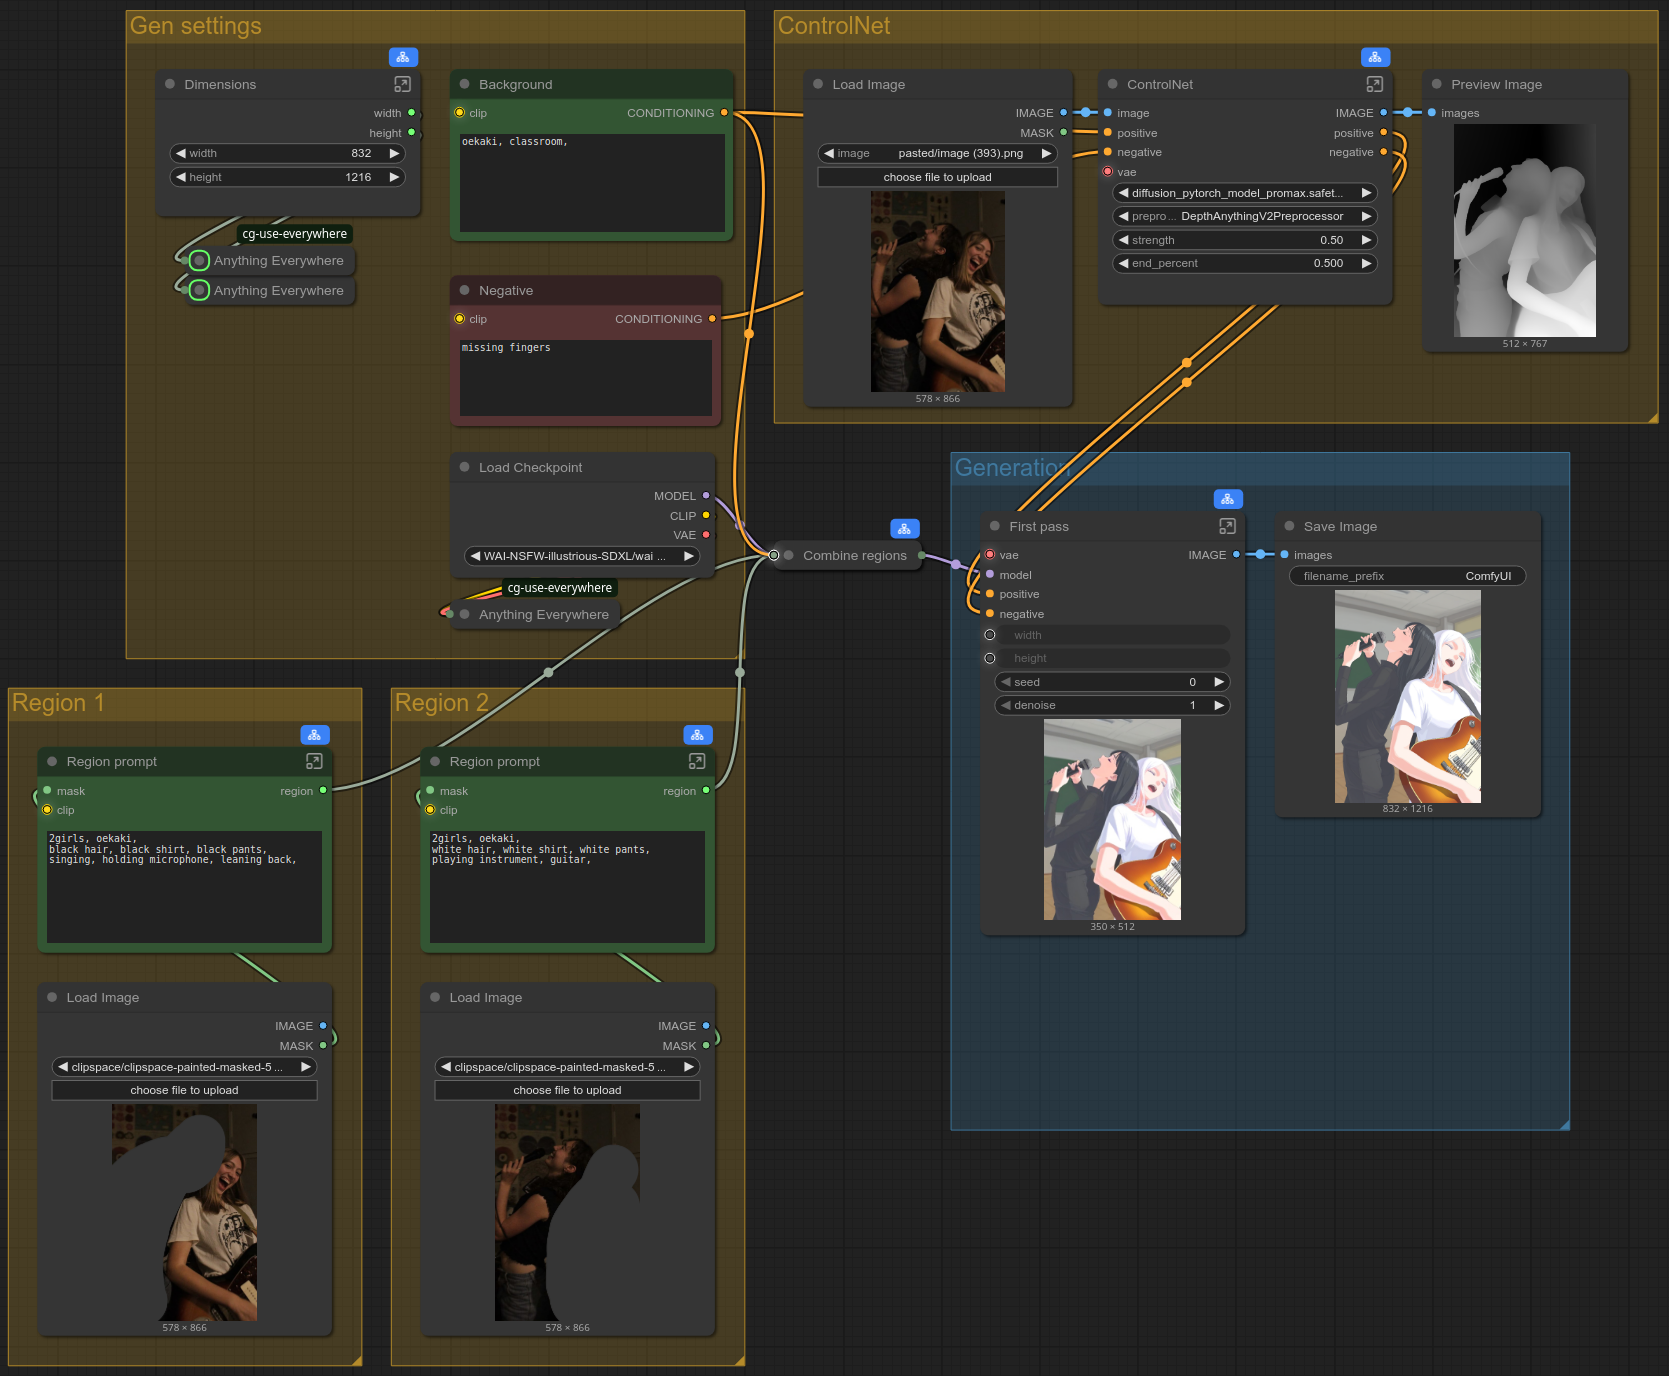
You can also open the workflow by dragging the above screenshot into ComfyUI. (If it doesn't work, save it on your PC first.)
⁂