 *
*Direction should be changed to influence.
Merge Block Weight Magic Codex 1.0Beta
- Merge Block Weight Magic Codex 1.0Beta
- 1. Introduction
- 2. Getting Started Tutorial
- 3. MBW Fusion Introduction
- 4.6. Initial conclusion
- 3. Basic theory explanation
- 4. Advanced Operations
- Appendix 1: Collection of Interesting Results for Deeper Understanding
- Appendix 2: Relevant Plug-ins
- Appendix 3: Other authors' resources
Given the lack of Chinese operation documents for Merge Block Weight (hereinafter referred to as MBW) model fusion plugin on the Chinese internet, we have decided to produce this version of the MBW operation document. If there are errors, corrections are welcome. Author: AIbedo0, a novice dog, white and cold, tddok
1. Introduction
Since the release of this document, some people have successfully merged models that they are very satisfied with, while others believe that layer fusion is uncontrollable mysticism. Of course, we also believe that there is indeed some uncontrollability, such as the upward and downward displacement of the parts responsible for layer division due to various variables (see: Advanced Operations - Understanding Layers), and the unpredictable nature of model fusion (whether traditional or layer-based). If you want a completely controllable effect, this document may not be able to meet your needs and you can close it immediately to avoid wasting your time.
If you would like to participate in editing this document or discuss layer fusion technology, please join the Q group: 437595725.
2. Getting Started Tutorial
2.1. Installation
This plugin is not included with the web-ui, so it needs to be installed first. The following explains the installation steps.
Step 1: Open this website https://github.com/bbc-mc/sdweb-merge-block-weighted-gui
 Source1
When you open it, you will see the following interface.
Step 2: Download, click this green button first.
 Source2
Then click the "Download ZIP" button.
 Source3
Wait for the download to finish.
Step 3: Installation, first unzip the downloaded installation package, then copy the extracted files.
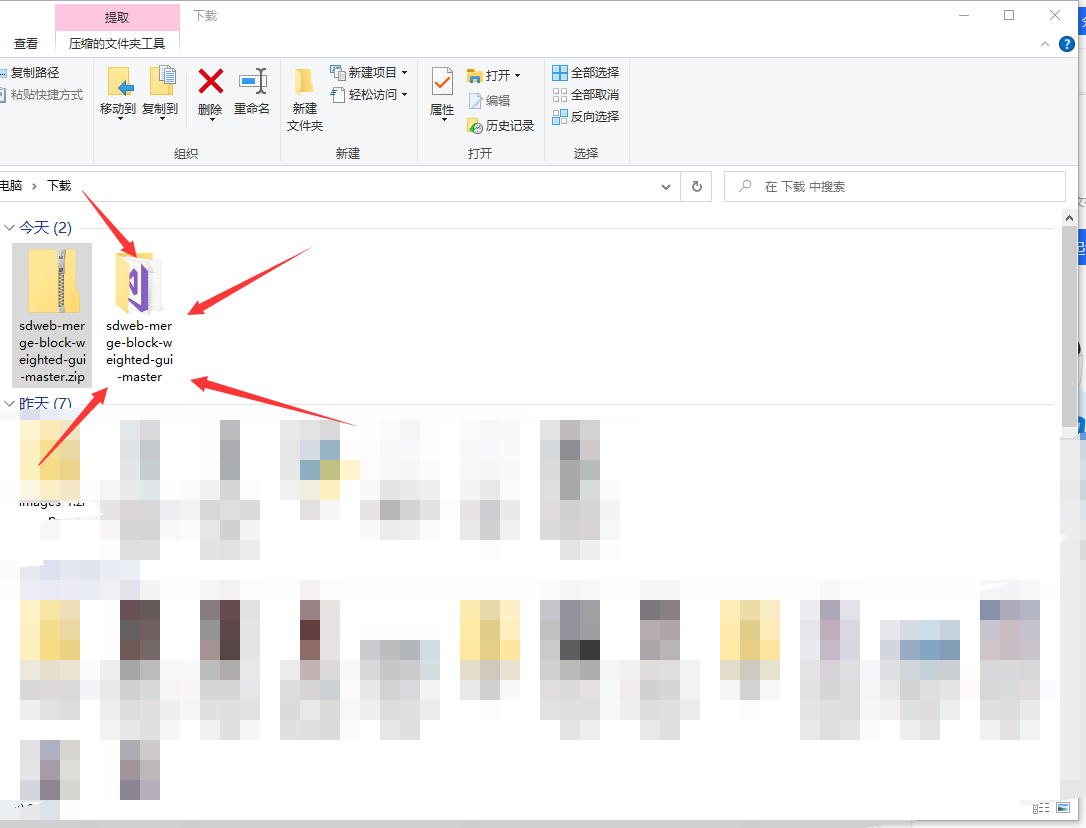 Source4
Next, open the folder where the web-ui is installed and then open the "extensions" folder.
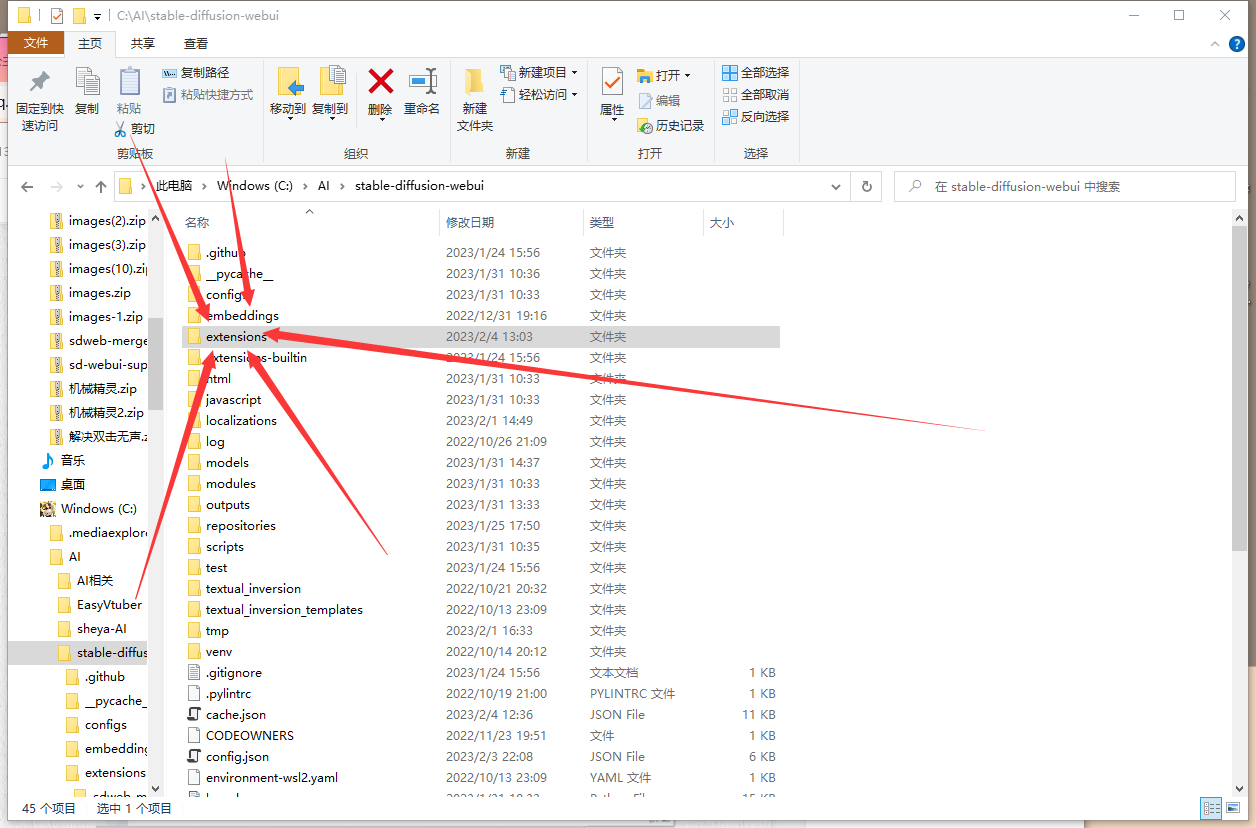 Source5
Paste the copied files into it.
 Source7
Finally, restart the web-ui.
You can see this at the top of the page if the installation was successful.
 Source8
2.2. Feature Introduction
After installation, it's time to use it.
Next, the function of each option will be introduced respectively.
When you open the merge page, you will see such an interface.
| Function: | Description: |
|---|---|
| Run Merge | Start the merge |
| Clear values | Set all the sliders below to 0.5 |
| Reload checkpoint | Refresh the model list (reread the model list) |
| Model A | Select model A to be merged |
| Model B | Select model B to be merged |
| Output Model Name | The name of the merged model |
| Preset Weights | Official merge presets (when selecting the preset, it will directly set the value for the slider below) |
| Weight values | Text of merge preset (can be filled in by yourself) |
| Apply block weight from text | Write the values in Weight values to the slider below |
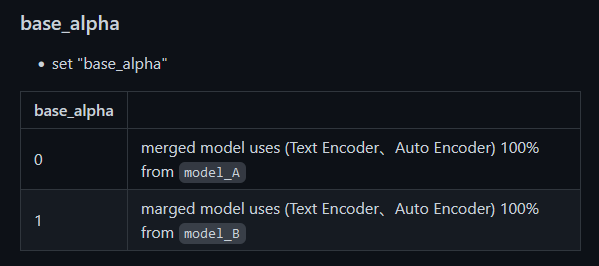
| base_alpha | The merge ratio of text encoder and auto-encoder of models A and B (will be explained in detail later in the original text and machine translation) |
| base_alpha: | |
|---|---|
| 0 | Model Usage (text encoder, autoencoder): 100% from model_A |
| 1 | Model Usage (text encoder, autoencoder): 100% from model_B |
| Function: | Description: |
|---|---|
| Verbose Console Output | Whether to output additional information from CLIP (does not affect model fusion) |
| Allow Overwrite Output-model | Whether to overwrite files with the same name |
| Save as Half | Save as a half precision (float16) model |
| Save as Safetensors | Save as .safetensors format |
| Skip/Reset CLIP position_ids | Skip or reset CLIP position_ids (Note: The Force Reset option means reset) |
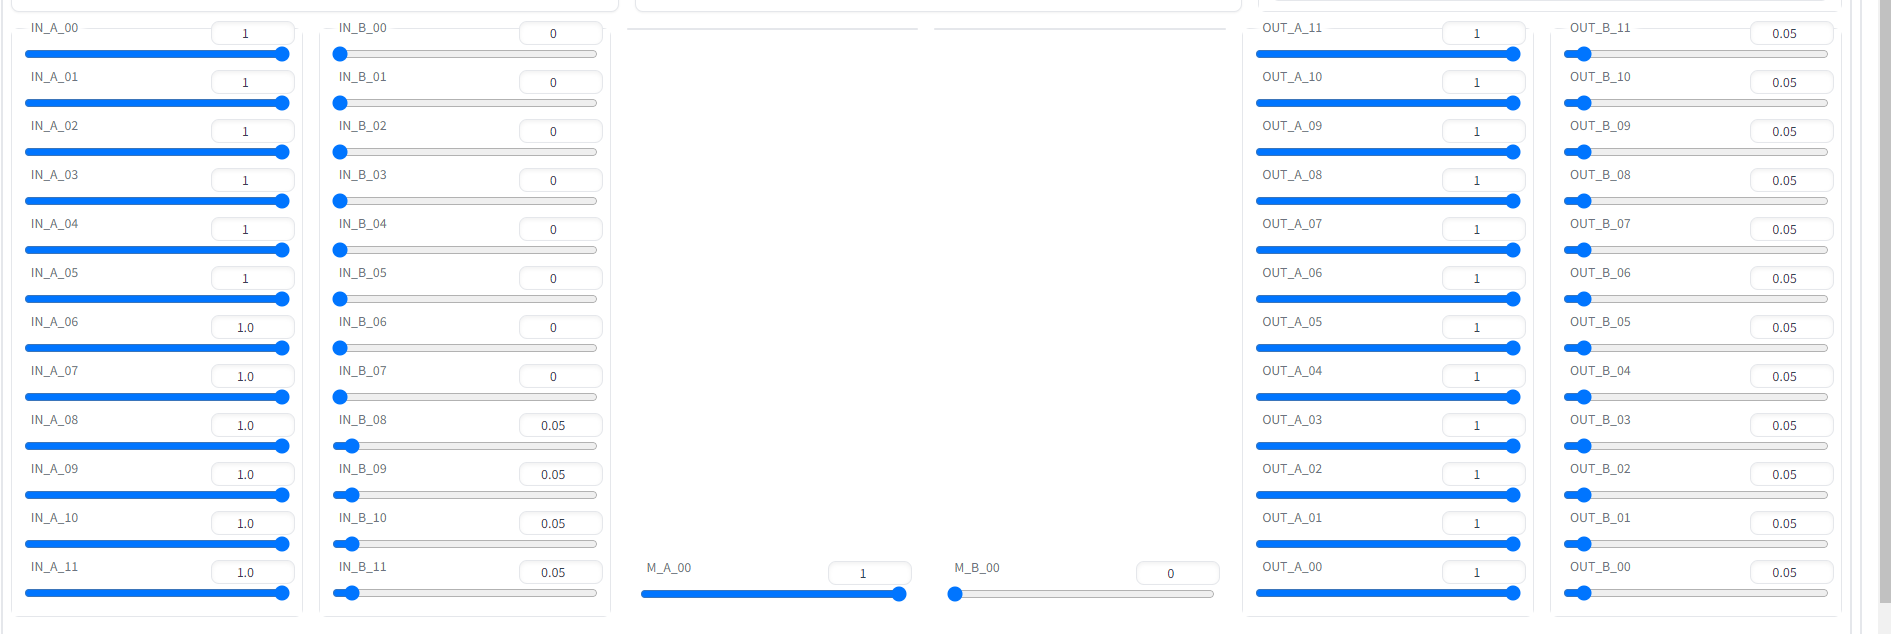
| IN0-11, M00, OUT0-11, 25 sliders in total | Adjust the fusion ratio of each layer of models A and B |
When the slider value is 1, it means that the corresponding layer of the slider is equal to B,
When the slider value is 0, it means that the corresponding layer of the slider is equal to A.
This is the basic principle of the slider.
Note: Original tutorial URL: https://github.com/bbc-mc/sdweb-merge-block-weighted-gui (raw)
3. MBW Fusion Introduction
First, list some benefits of using MBW fusion:
- Perform more fine-tuned model adjustments.
- Repair models with grayish images or transfer the overall tone of other models (the corresponding area is roughly out11-09) (PS: Check VAE first if the image is gray!)
- Transfer the light and texture of the model (roughly out08-06)
- The stroke and lines brought by other models (roughly out02-00)
- If merging a better composed B model, you can also improve the composition of model A without changing the style (corresponding area is roughly in06-11).
- Use a human model to repair the body (corresponding area is roughly in00-07)
- Alleviate model overfitting while keeping the style (corresponding area is all in layers and base_alpha)
- Repair the hands to some extent (see examples below)
- Transfer the entire style of the model to another model (corresponding area is all OUT layers, see examples below)
- You can make some adjustments to the style of the face (corresponding area is roughly out05-03, see examples below)
Of course, there are many other directions to explore, these are just some references, and more directions can be discussed together.
To help you get started faster, here are a few examples of MBW fusion and some preliminary conclusions.
3.1. Style Change
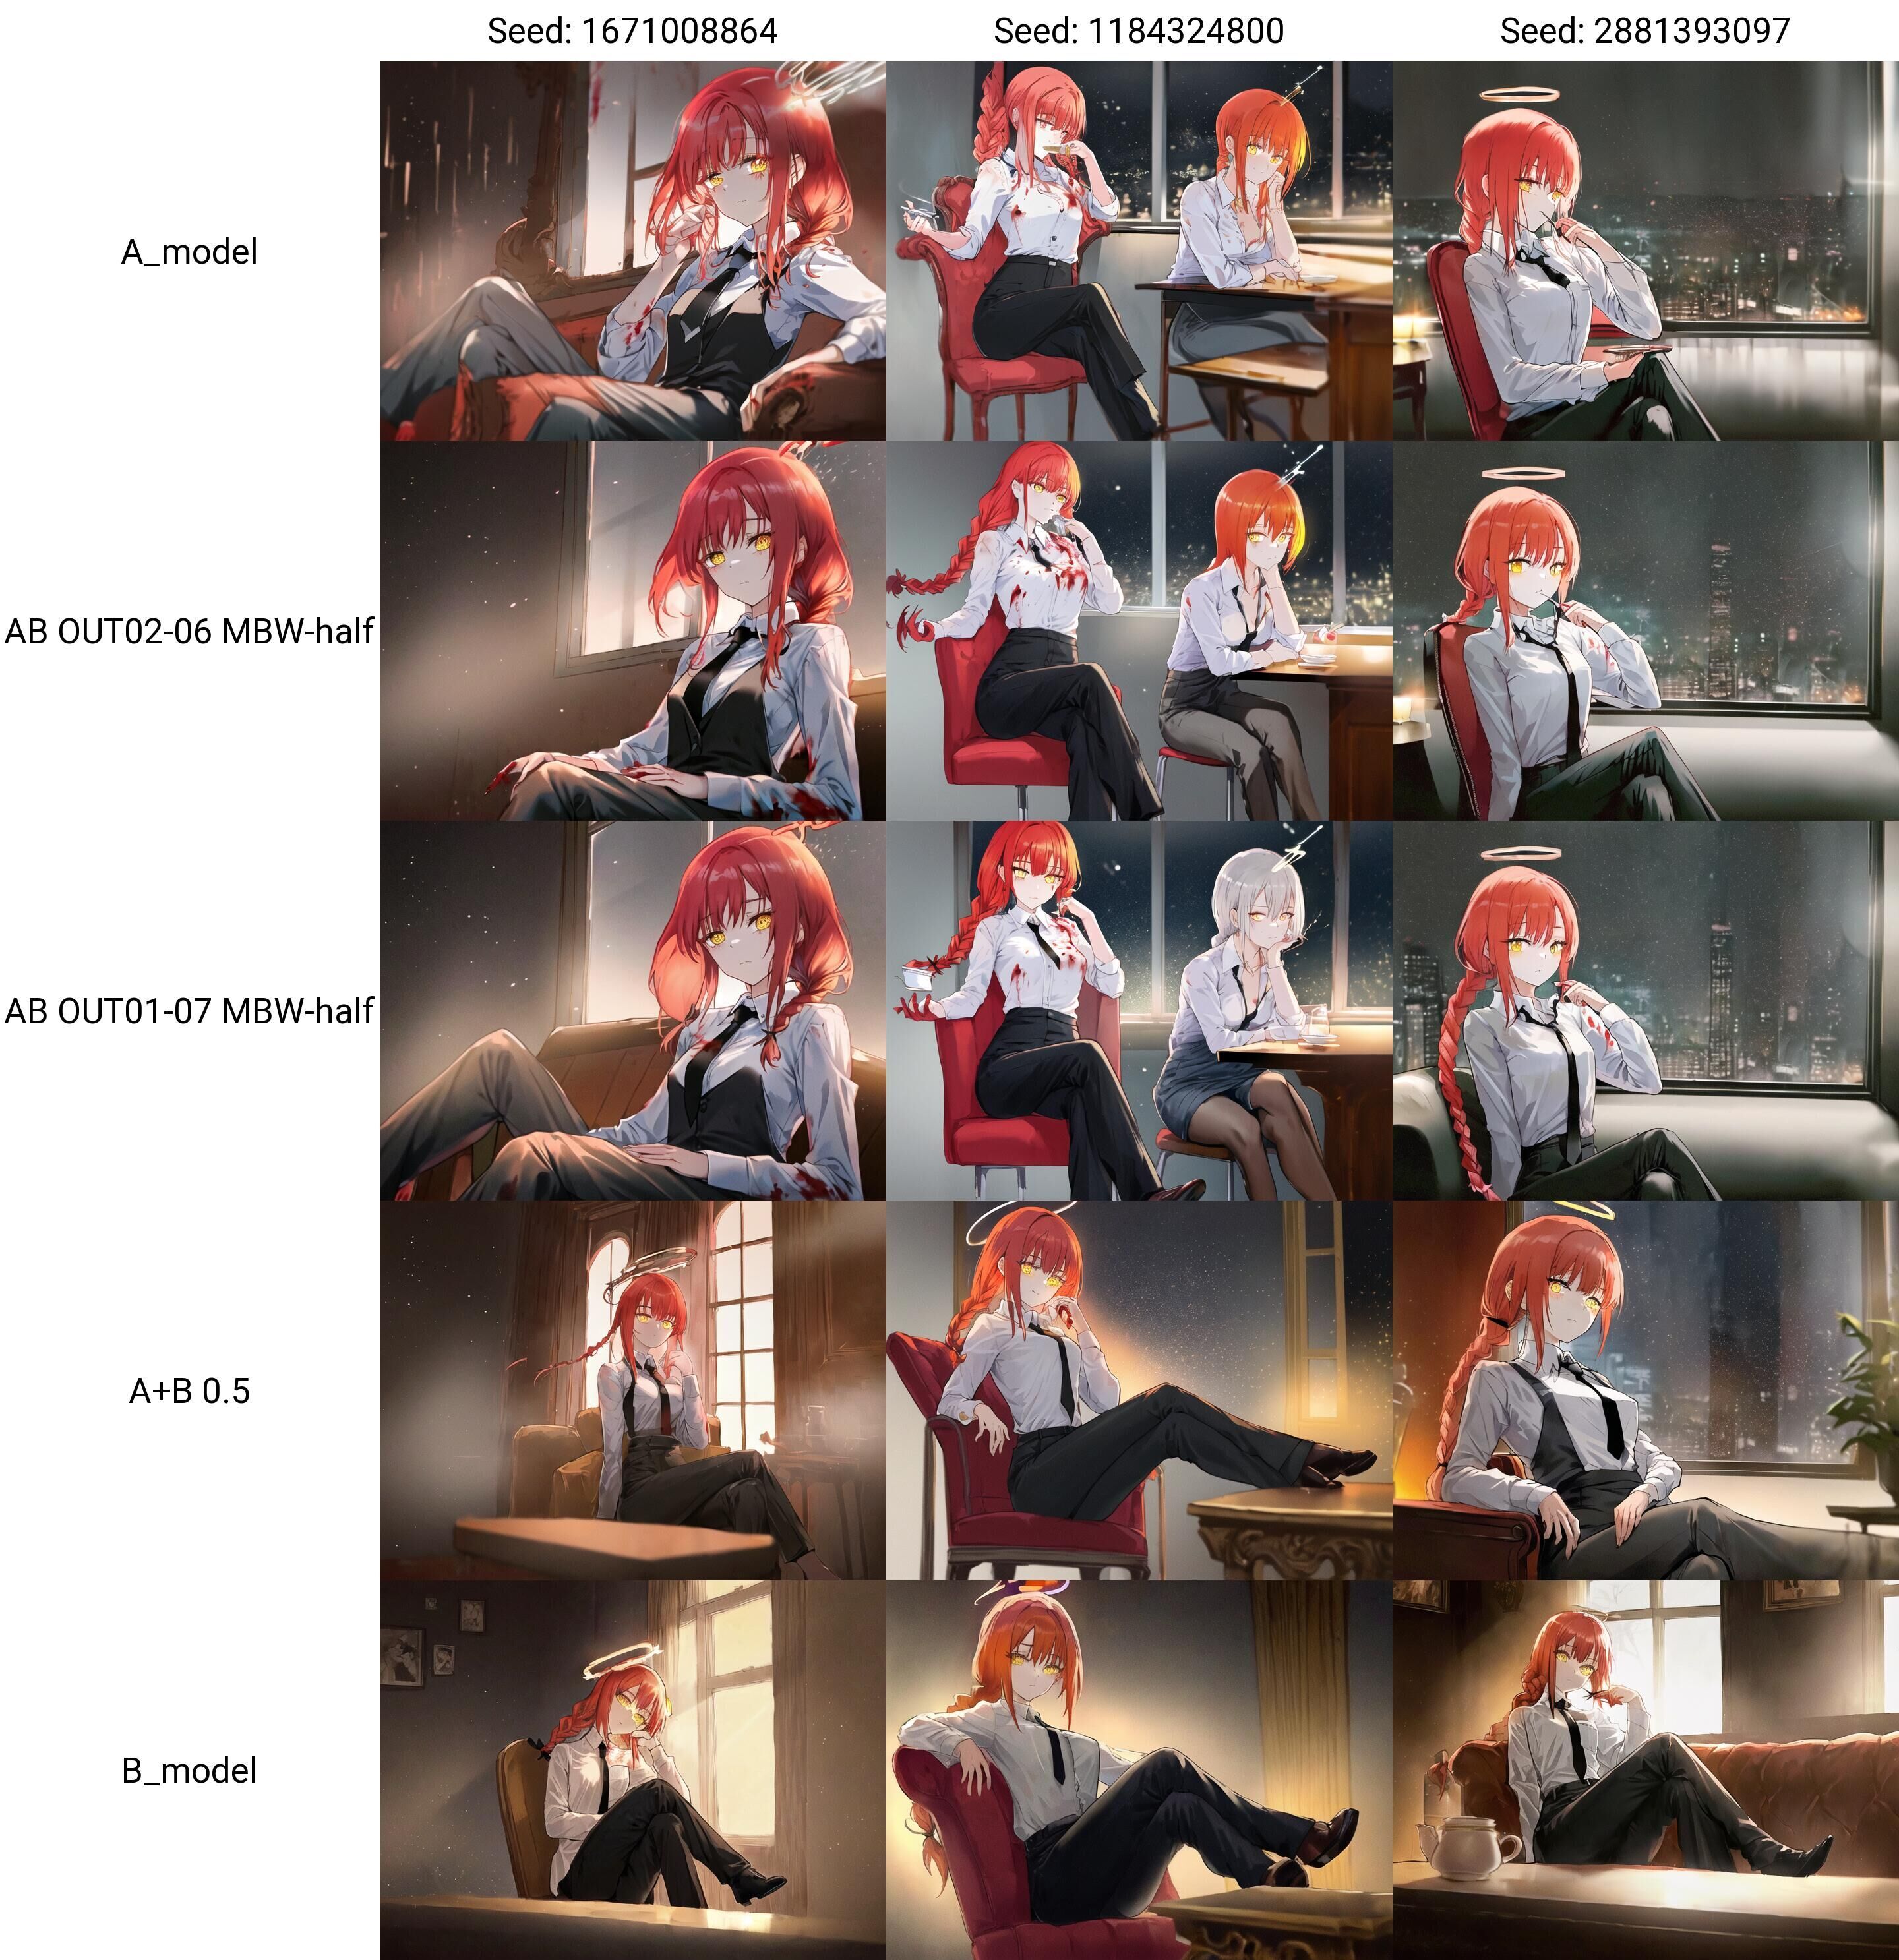
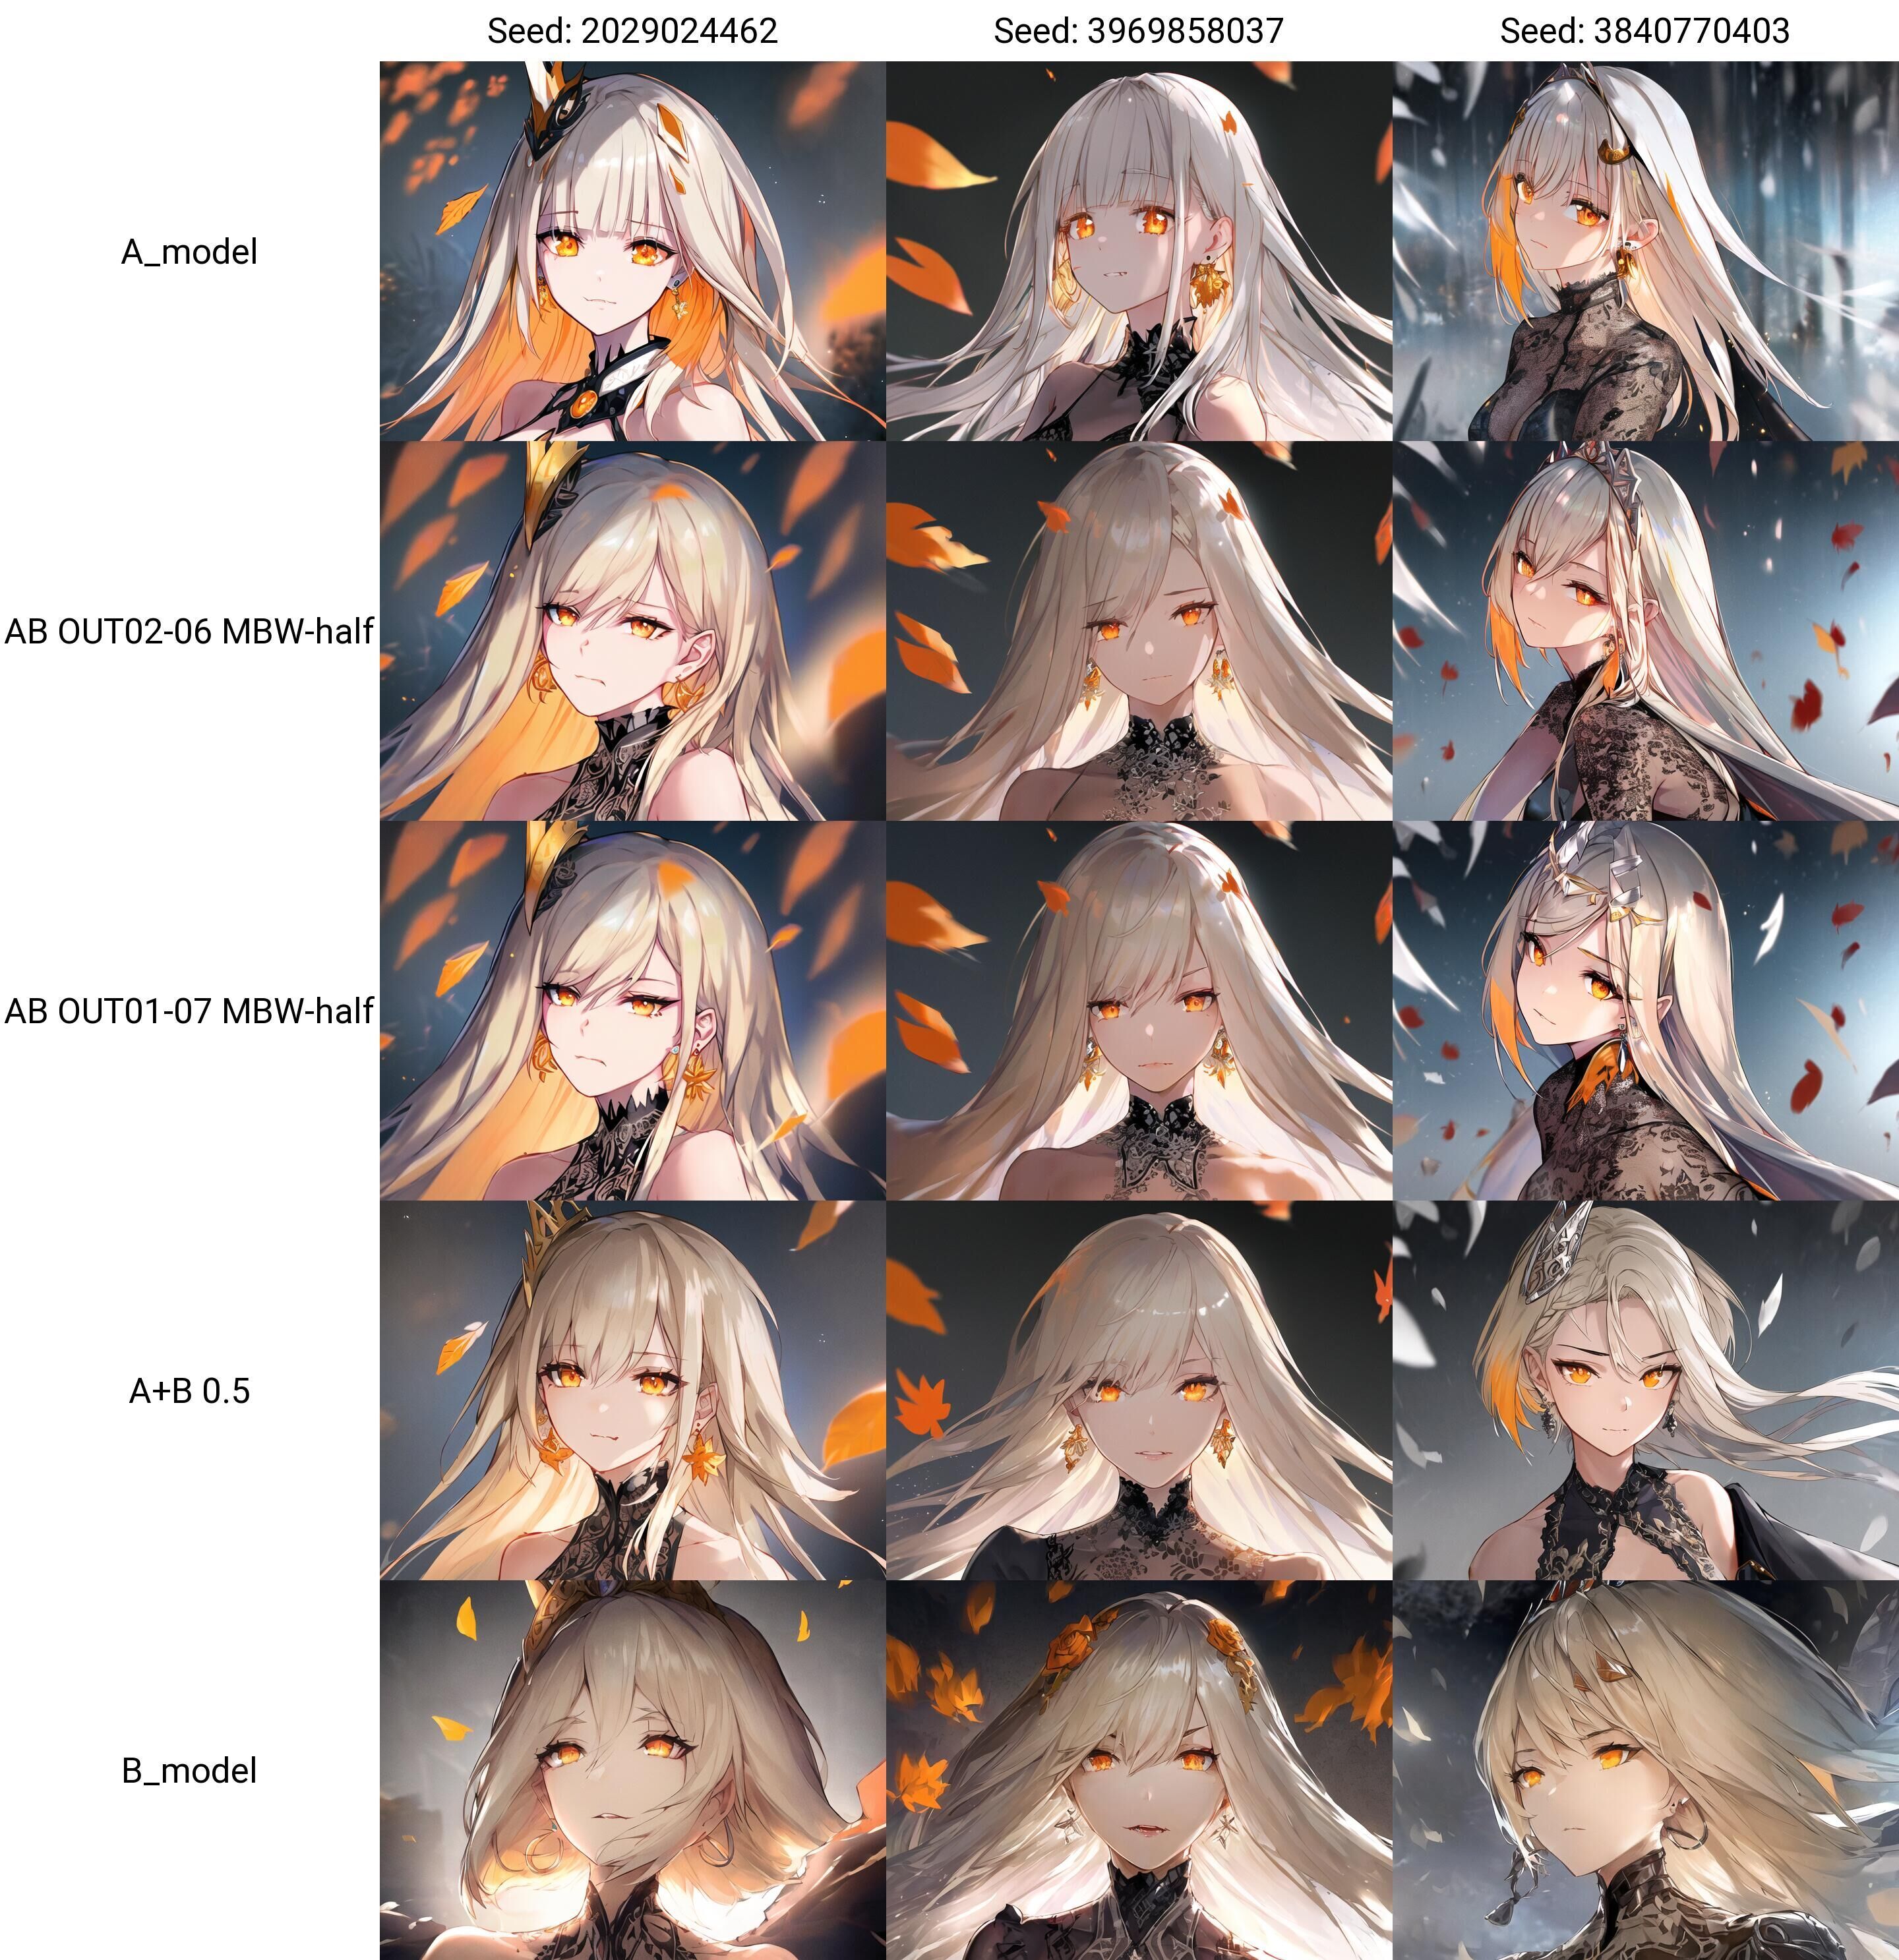
Model A is the model that needs to change style, Model B is the desired style model, Base_alpha is 0.
This demonstrates the use of Abyss Orange 2 (AOM2) and Wax Crayon Model (PM).
Layer 1 is the original AOM2_nsfw model.
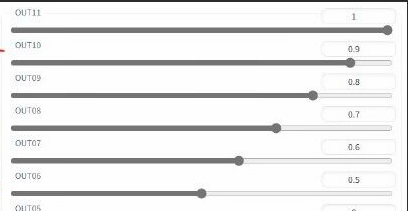
Layer 2 is the result of merging with the parameters shown in the above figure.
Layer 3 is the traditional merging with a parameter of 0.5.
Layer 4 is the original PM model.
It is evident from the comparison between layers 2 and 3 that MBW has a more obvious effect on style transfer than traditional methods. It can complete style transfer without making significant changes to the composition, and compared to traditional fusion, it can better transfer the style of model B, while retaining the style of the pencil. On the other hand, traditional fusion weakens the style of the pencil.
(Note: If it's just style transfer, the IN layer can also be 0 or appropriately weakened.)
By analogy, if the OUT layer is changed to 0.5, it can also achieve a similar effect to traditional fusion, but the difference is that it will not change the composition of the IN layer.
3.2. Improving the overall quality of the model (Composition analysis of AOM2-sfw)
On the AOM (Abyss Orange) official website, we can find the fusion parameters of AOM2-sfw.
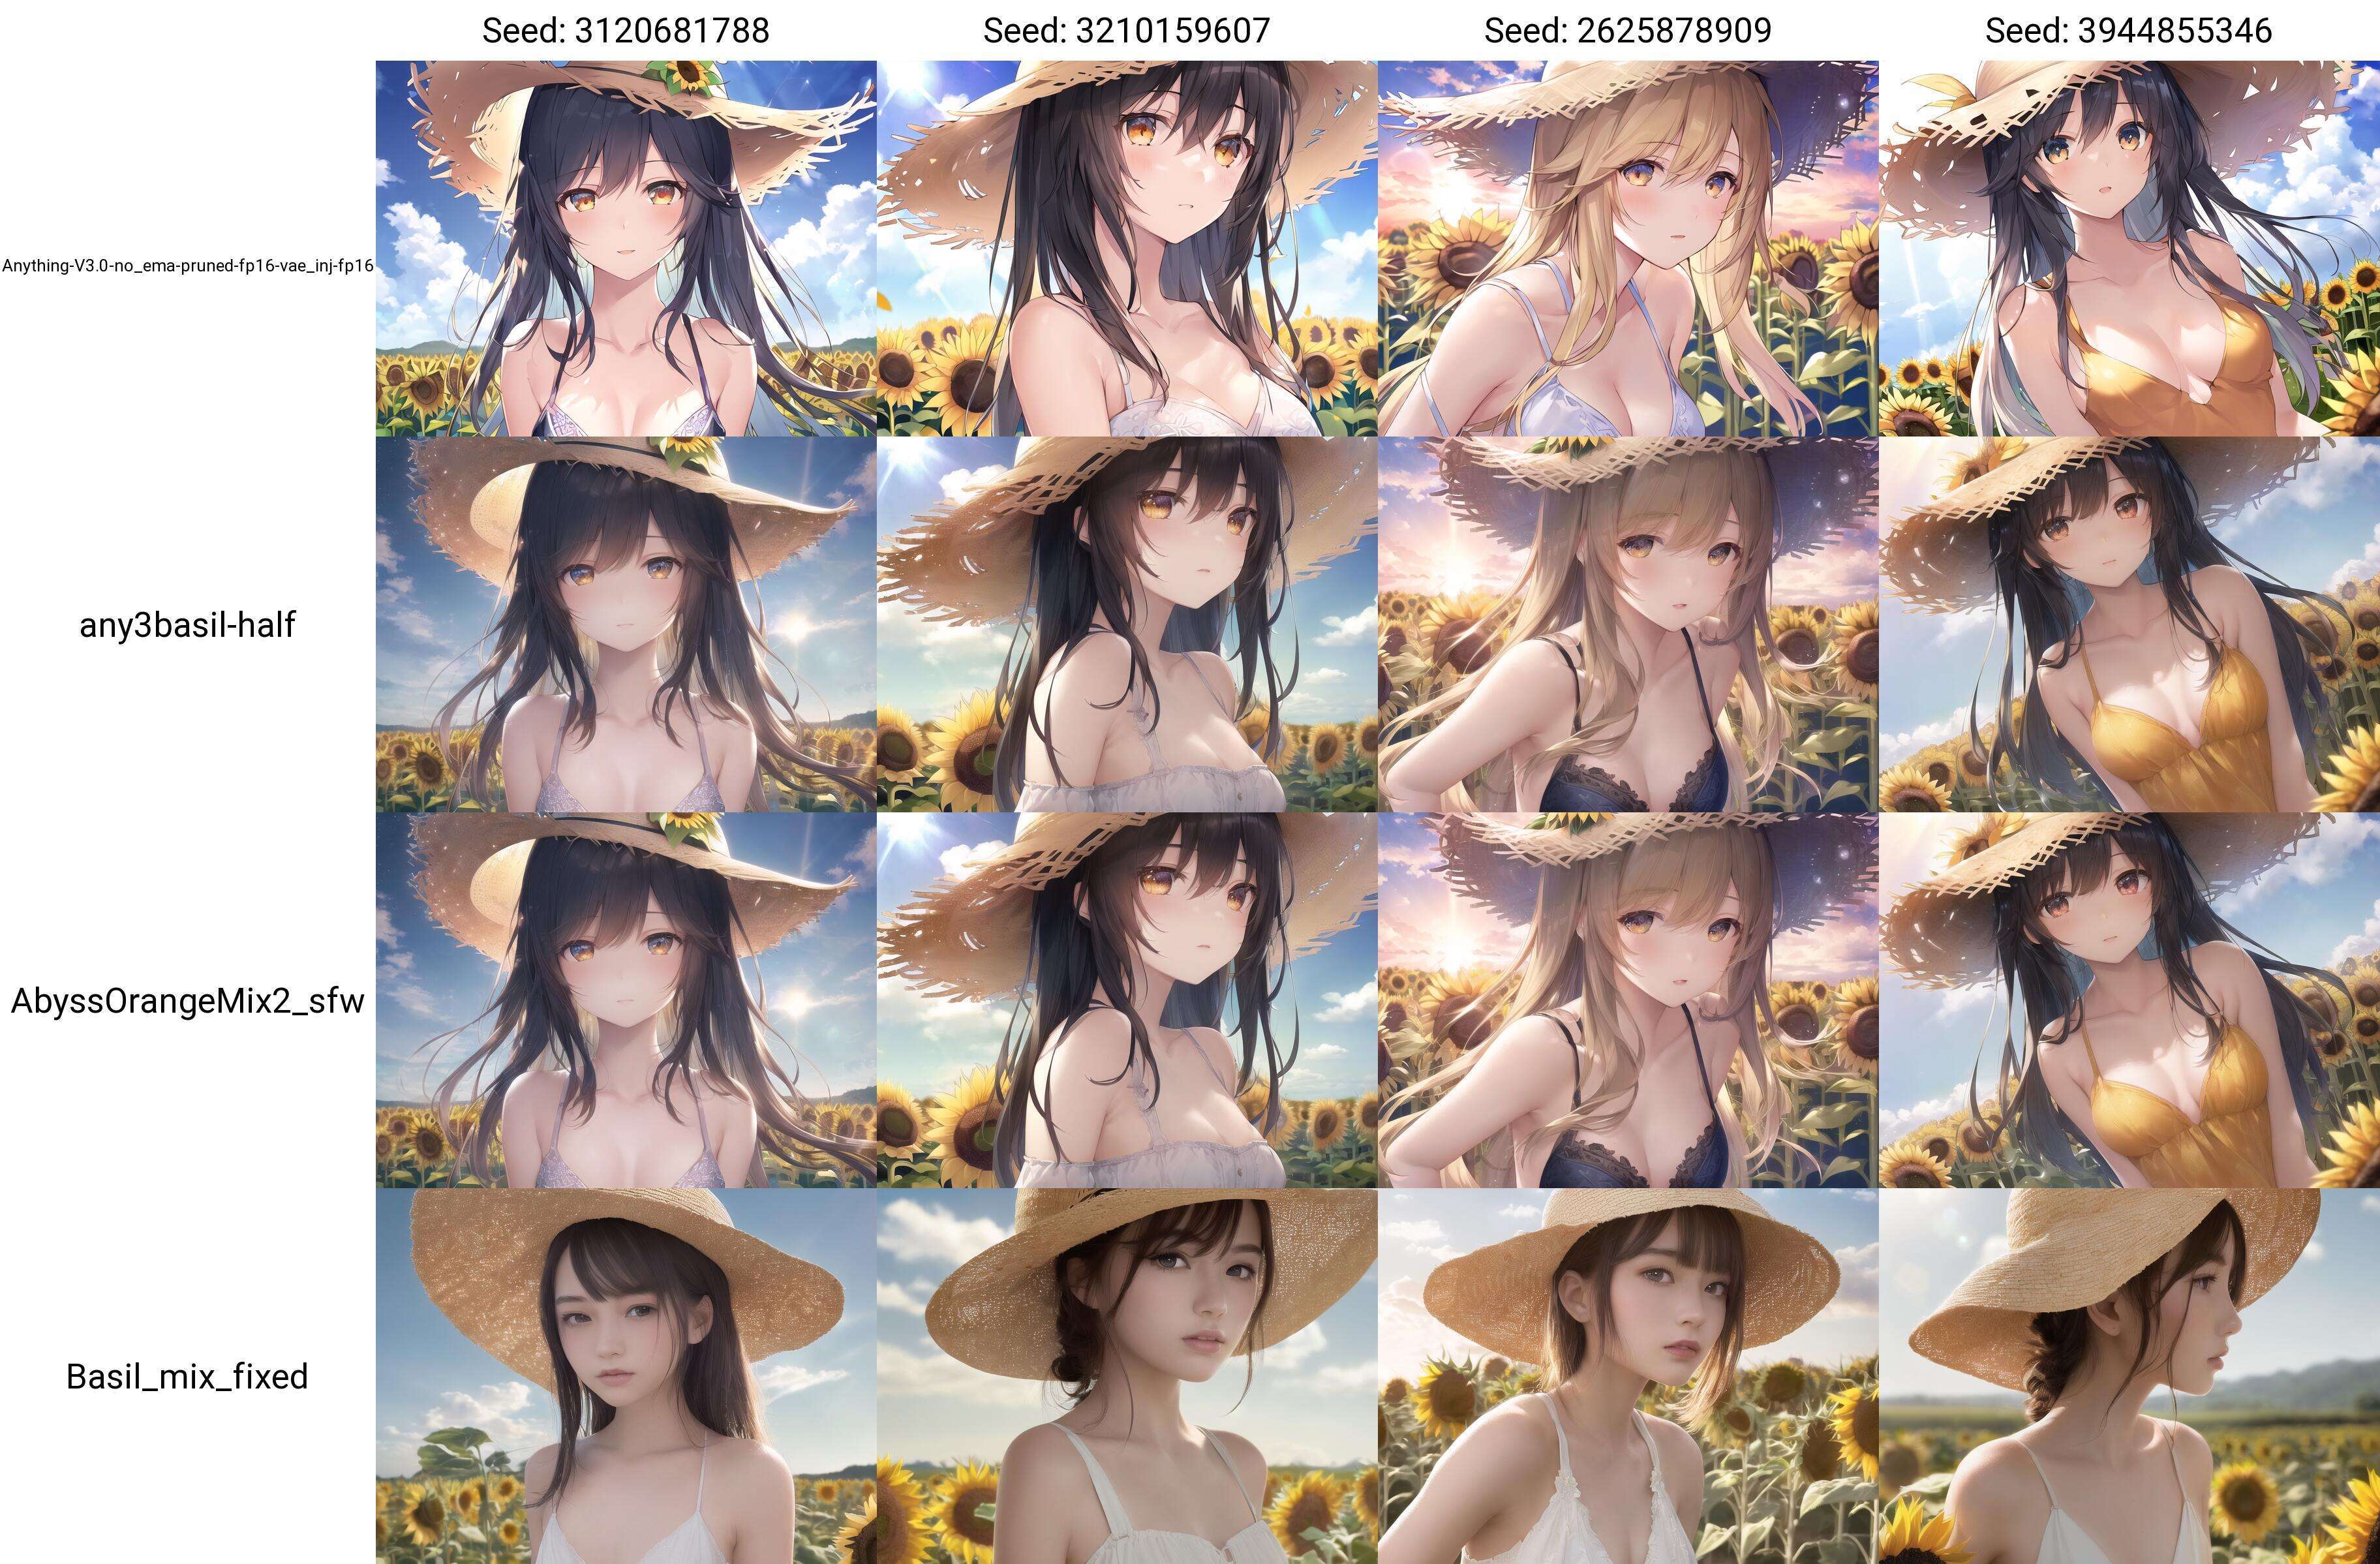
It is analyzed that the A model is AnythingV3.0 and the B model is BasilMix.
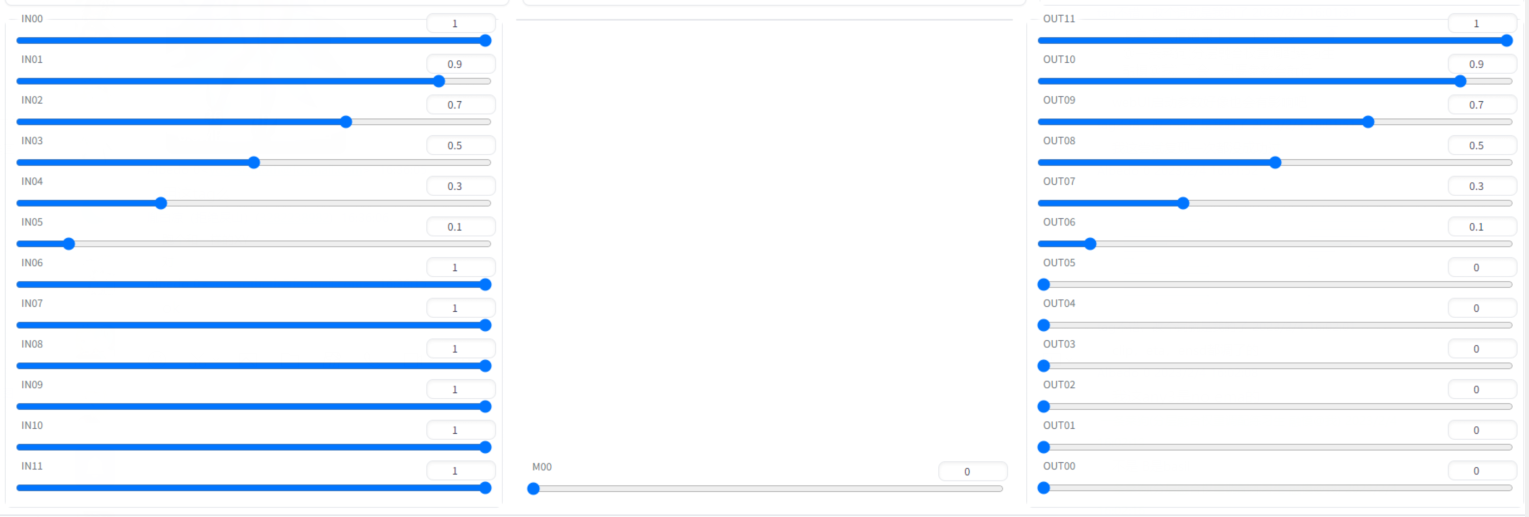
The fusion parameters are 1,0.9,0.7,0.5,0.3,0.1,1,1,1,1,1,1,0,0,0,0,0,0,0,0.1,0.3,0.5,0.7,0.9,1 with the base alpha being 0.
Based on these parameters, we conducted testing.
The first layer is the original AnythingV3.0 model,
The second layer is the result of the fusion according to the official recipe,
The third layer is the original AOM2_sfw model,
The fourth layer is the original Basil_mix model.
We used the parameters given by the orange author to reproduce the fusion result of Abyssal Orange 2, proving that the same parameters can also be reliably reproduced with layered fusion.
Then, analyzing this weight parameter, the weights of OUT11-OUT06 gradually decrease from 1, meaning that some overall tonality (or overall texture) of model B will be approached. We can see that the image of A3 has become a little gray and closer to BASIL.
In the IN layer, almost all of them are biased towards BASIL, resulting in very accurate human body and composition close to photos. However, some of A3's effects are still retained in the main part of the picture (the character), that is, the part transitioning from IN05 to IN00.
Taking this as an example, if the parameters of the IN layer are reduced, it is also possible to retain some of the original model's IN layer structure while improving the human body. (So, not all 1s are copied from the document parameters, think about how the human body was improved in traditional fusion, only 0.25 fusion can achieve good results. The traditional 0.25 fusion is equivalent to 25 layers being pulled to 0.25 at the same time.)
It can be seen that while AOM2 preserves most of the anime-style painting, it learns from Basil_mix more realistic skin, human body and light-shadow expression, and does not change the facial style of the characters. However, the traditional approach (as shown in the picture below) would cause some realism in the proportions of the character's face and body, losing some anime-style features.
3.3. Change head
1 for model A, 5 for model B, 4 for traditional 0.5 fusion, 2 for parameter of picture one, 3 for parameter of picture two.
It can be observed that the facial shape, hair depiction, and eye style are all obviously moving towards model B, but the overall color is retained and most of the composition is maintained.
Using this example as a reference, if the parameters are reduced, a similar effect of traditional fusion can also be achieved, with two facial shapes blended together. However, the difference from traditional fusion is that the composition of the IN layer will not change.
However, for models with a large difference in facial features, it is recommended to reduce the weight and make a smoother transition. In this example, you can see that the difference in facial styles is large, and the weight change is too drastic, which may lead to some results that are not as good as traditional fusion.
Especially in the case of original models with faces that are already breaking down, such as:
 Source25
(Some small thoughts: Layer fusion is like dissecting models with a surgical knife, transplanting organs between two models. Even when using traditional fusion, it is difficult to ensure that the weight allocation values are correct at once, let alone layered. Therefore, if you want to achieve a more detailed effect, you can only rely on multiple tests and repeated comparisons.)
3.4. Repair hands (Provided by white sheet ER)
(Note, poor hand drawing is a fundamental problem with AI, and this is only a solution to alleviate the issue, not completely cure it.)
This is a comparison graph of models A and B:
 Source26
The following are the parameters of the fusion: base_alpha is 0:
 Source27
This is the image generated by the fused model
 Source28
It can be seen that, without changing the style of the model, the hand drawing was successfully improved. (Update: Later feedback from me showed that other images could not be fixed stably. I personally believe that this is because the hand proportion is different in each composition, so the layer responsible for the hand will offset up and down in different compositions. So later, the parameters were adjusted to: M = 1, all IN layers = 0.66, and the output seemed stable, but this parameter has greatly destroyed the original model's IN layer, please use discretion, for the explanation of this part, see "Advanced Operation -- Understanding Layers").
3.4.1. Repair overfitted model (provided by Peach's Rabbit Head).
Line 1: Model A
Line 2: Parameters: base alpha=1, all IN layers=1, M layer=1, out00-05=0.25
Line 3: Model B
Basically, it's copying the composition of Model B. This approach is similar to the first example of changing style, but with Model A and Model B switched.
In this example, the OUT layer can be selectively blended or not blended, because the original model lacks detail in the details. Here, a small portion of the OUT layer is blended to improve the composition.
Using this example as a reference, if the parameters of the IN layer are reduced, some of the original structure of the IN layer can be preserved while improving the composition, so it is not necessary to copy all of the parameters in the documentation as 1.
4.5. Weight Allocation Techniques: How to "move flowers and trees" more naturally
Here is a tip on weight allocation. You can observe that many parameters are radiating from one layer to other layers, which makes the blend more natural.
Before fusion, it is best to run a comparison chart of AB model's XY as a reference coordinate. For different situations, weights can also be appropriately reduced. Pulling everything to 1 is not necessarily good. Like this:
 Source32
Making appropriate adjustments to parameters can make the results more in line with expectations, and it's not necessary to follow the example parameters. Flexibly applying this technique can lead to better results.
If you are not clear on how to use the XY comparison function, you can watch this video, which starts explaining it at 8 minutes:
https://www.bilibili.com/video/BV16B4y1j7mm
As for the M layer, my personal experience is that when IN11 is 1, M is 1, otherwise it's 0. As for the actual role of the M layer, it remains to be tested.
Note from the amateur: I have found that many people still don't understand the specific function of these parameters. Copying the parameters from the document often leads to a large deviation from the imagined effect. Here I still suggest understanding the parameters, running more comparison charts and experimenting, and then adjusting the parameters based on understanding.
4.6. Initial conclusion
After the above examples, I believe you have some understanding of the role of MBW. Next, I will give you some preliminary conclusions that we have studied, and in the advanced section, we will also explain Base_alpha, supermerger, and the reasons behind these phenomena using theoretical analysis.
Conclusion from the amateur:
 Source33
Explanation of what is called a secondary form of expression, in fact, it is because under the same seed, after the composition has changed, the content of the picture will change, so the color will also change, but the way of coloring (OUT layer) is still the same way of coloring. Similarly, after the color changes, in some places it will also affect the AI's judgment, making it appear to have changed the composition, but the composition method (IN layer) is still the original one.
Yin Bai Liang's conclusion:
 Source34
3. Basic theory explanation
Note: If you are not interested, just skip to the advanced operation later.
3.1. What is a neural network?
Watch the video "3 blue 1 brown" (its been put on display) to find out.
Link: https://www.bilibili.com/video/BV1bx411M7Zx/
3.2. Composition of the model
The model is composed of a semantic analysis module, a U-net drawing module, and a VAE fine-tuning module.
Since this tutorial only needs to understand the U-net module, the other modules will not be discussed (the author doesn't know either).
3.3. Composition of U-net
U-net is a type of neural network, in MBW, U-net has 25 adjustable layers, which we divide into:
IN area corresponding to the IN slider
M area corresponding to the M00 slider
OUT area corresponding to the OUT slider
The IN area has 12 layers, the M area has 1 layer, and the OUT area has 12 layers.
The rough arrangement is
IN00, IN01, IN02.......IN11, M00, OUT00, OUT01, OUT02........OUT11
Remembering the model structure will allow you to understand the reasons for differences between different layers in subsequent advanced operations.
Finally, a diagram of the U-net structure is attached.
 Source35
In simple terms, the IN area is responsible for collecting information from the previous image, the M area uses the information collected and summarized by the IN area to determine what to draw, and the OUT area is responsible for drawing the picture.
4. Advanced Operations
4.1. Understanding base_alpha
In previous chapters, there has been a parameter that has not been explained, and that is base_alpha.
In the above text, our explanation of base_alpha is: the fusion ratio of the semantic analysis module of models A and B.
It seems complicated.
In fact, it's not complicated. In fact, the "painter" U-net cannot directly understand the tags, so it needs a translator. Who is the translator? It's the semantic analysis module.
Next, we will provide several comparison pictures that only adjust base_alpha.
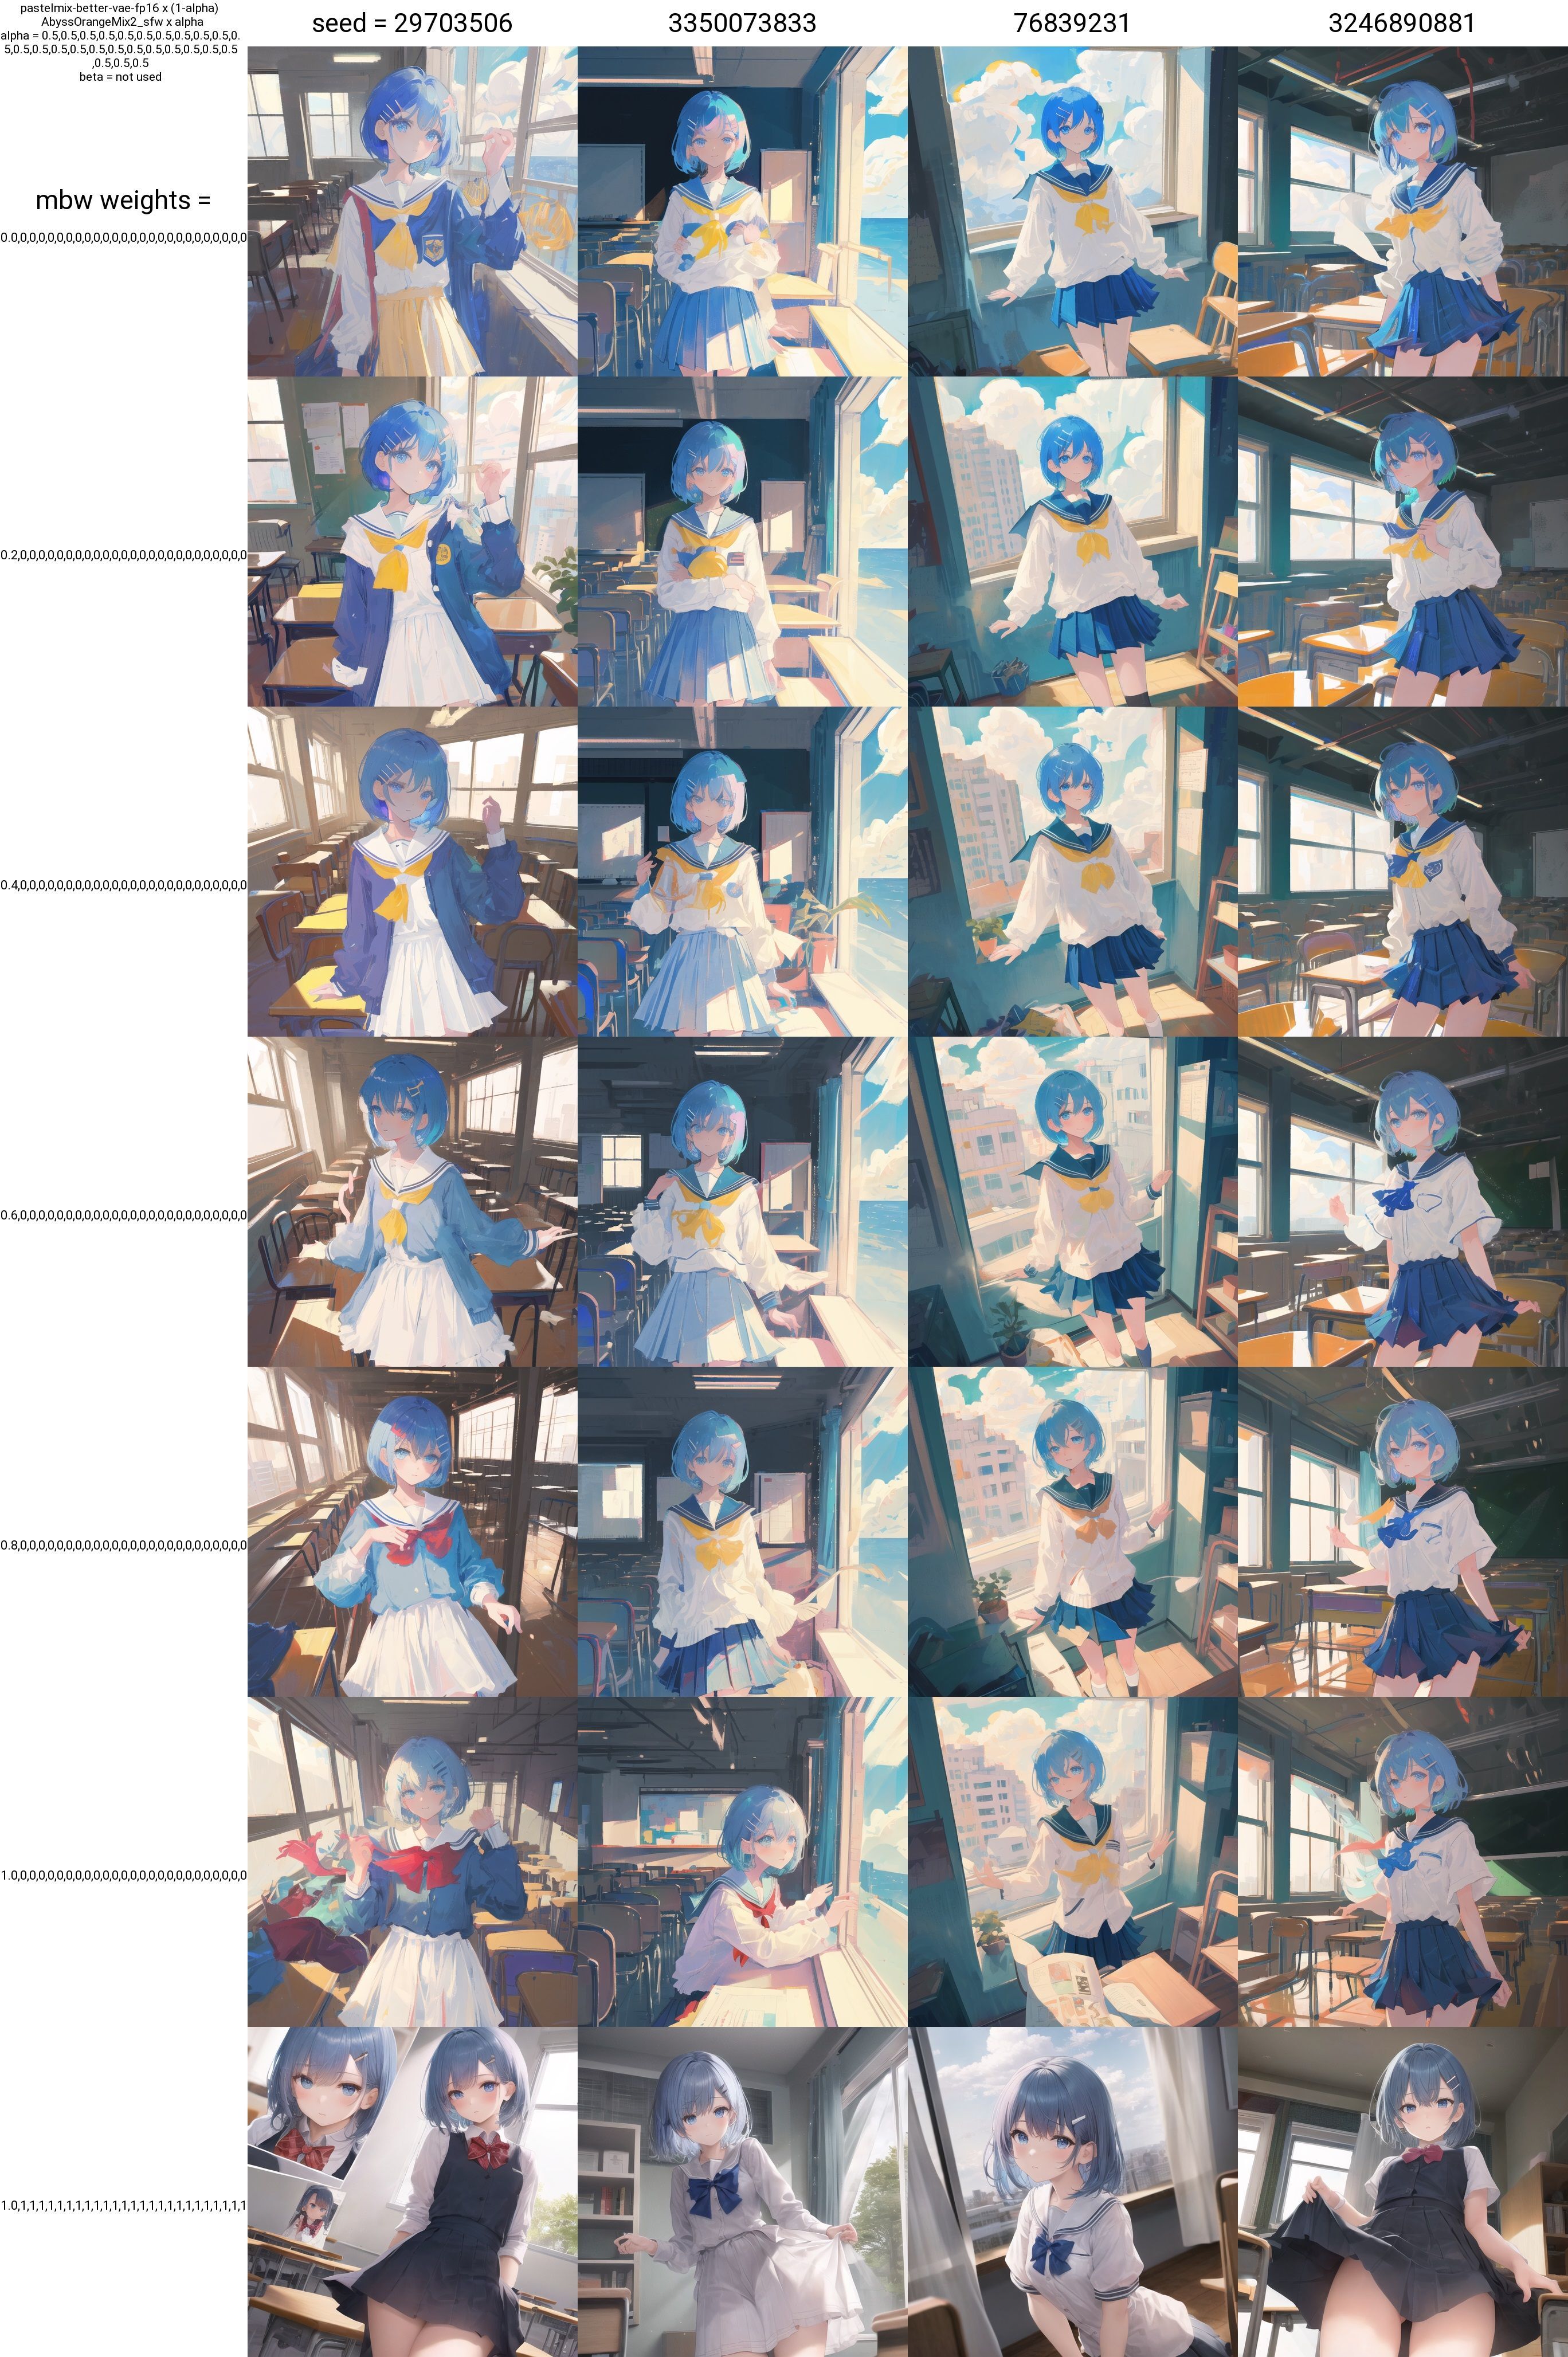
Understanding the Comparison Images of the Fusion of the Crayon Model Semantic Analysis Module and the AOM2_sfw Semantic Analysis Module
Rows 1-6 show comparison images of the fusion of the Crayon model semantic analysis module and the AOM2_sfw semantic analysis module with different ratios.
The last row is the original model of AOM2_sfw. It can be seen that as the proportion of AOM2_sfw semantic analysis module increases, the composition of the Crayon model gradually changes, but the painting style does not. From this, we can verify that the relationship between the semantic analysis module and the painting style of the model is not significant, but it can still affect the composition of the model to some extent.
4.2. Understanding the IN Area
This part is highly abstract, so be prepared for brain overload at any time.*
The experiment of the IN layer tries to screen out parameters related to composition as much as possible to avoid the influence of base alpha, only running a single tag and CFG around 3-5.
Base alpha has a great influence on long tags, which can even lead to no significant changes in the composition even if all the IN layer structures are changed. This needs to be noted.**
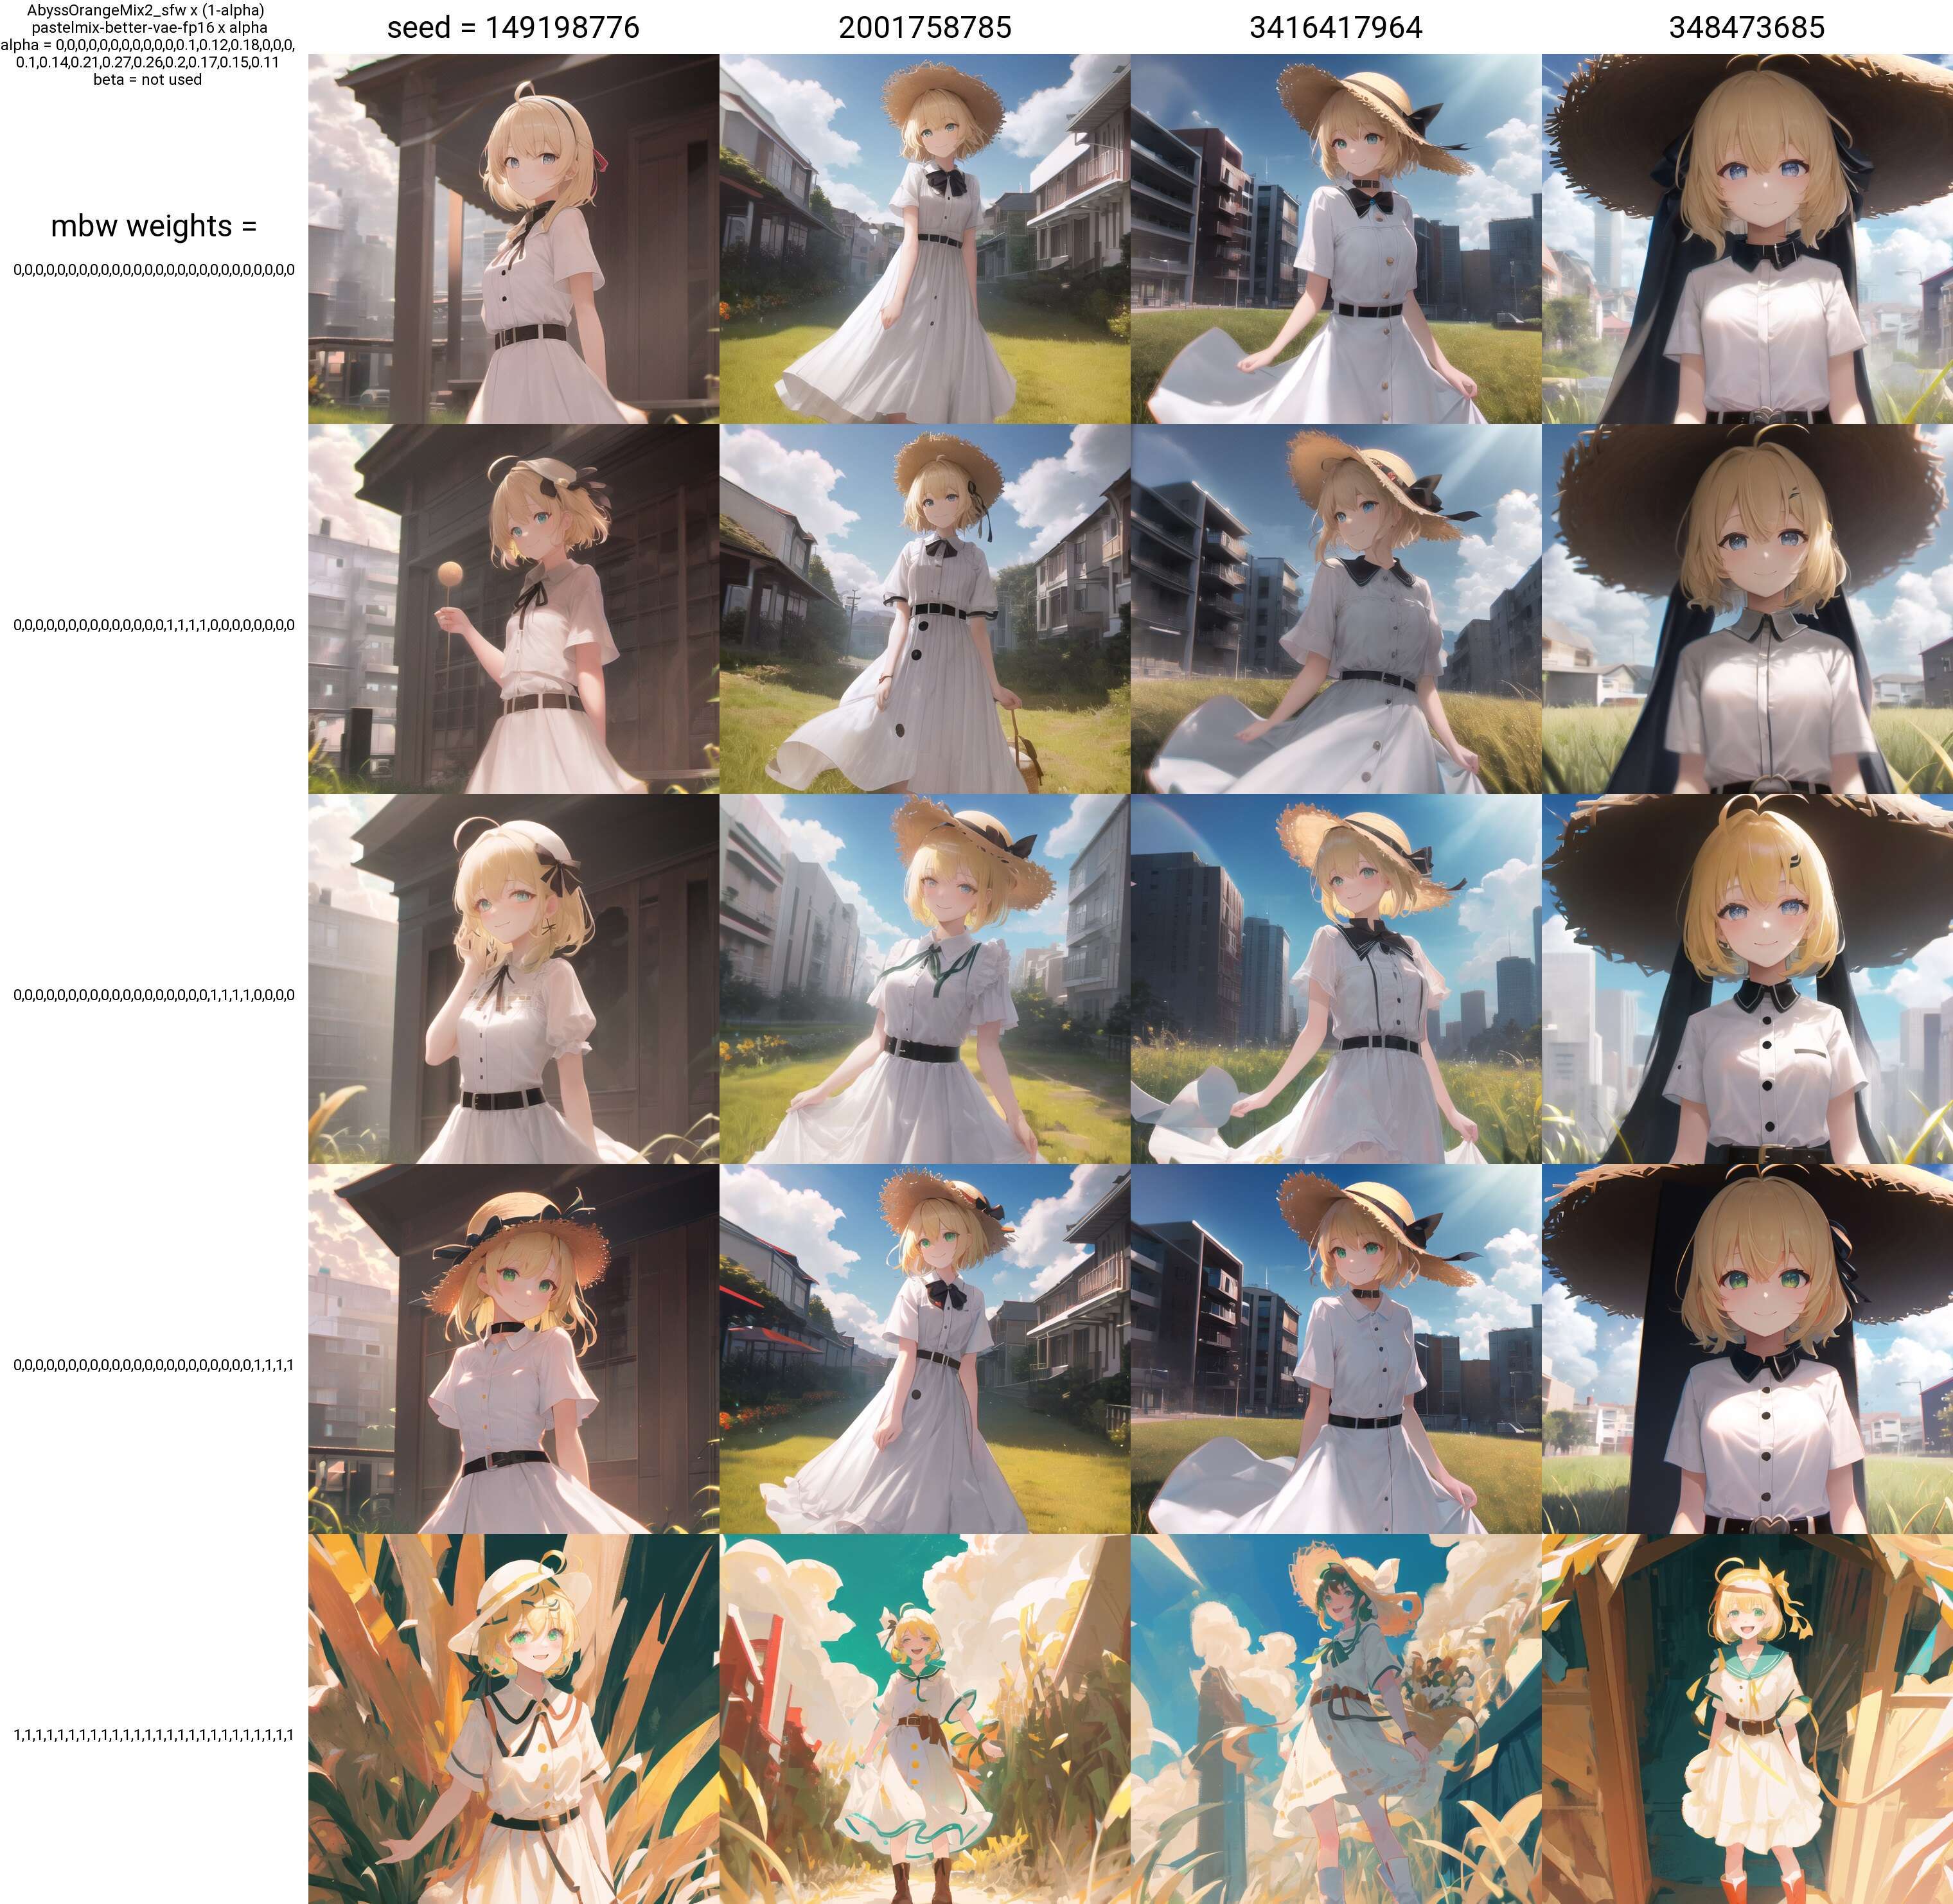
The above models are:
- Orange
- Orange merged with wax pencil in00-03 (weight 1)
- Orange merged with wax pencil in04-07 (weight 1)
- Orange merged with wax pencil in08-11 (weight 1)
- Wax pencil
First, let's explain what "composition" means in the eyes of AI.
| Example: | Meaning: |
|---|---|
 Source42 Source42 |
in00 looks like this. |
 Source43 Source43 |
in06 looks like this. |
 Source44 Source44 |
in10 looks like this. |
Because the current AI logic is weak, I think it only understands the shapes of the picture, you can refer to this video:
https://www.bilibili.com/video/BV1rh411r77q?p=4.
AI is only responsible for dividing shapes from the picture (IN layer) and then filling in different colors on different shapes (OUT layer).
And the different IN layers are differentiated by the size of the shapes (relative to the entire canvas).
So next, I will also only analyze the role of the IN layer from the "shape".
Let's first analyze in08-11, which is the most changed and relatively easy to understand for beginners.
 Source45
The shape trend of the blue line is disrupted, these lines are relatively long in length compared to the overall picture, breaking the general direction of the overall composition.
This is a moderate direction composition migration. It can be seen that the moderate direction does not cause a large-scale disruption like the large direction, but rather has more impact on the main body of the picture.
For the other directions, you can take a look at the experimental images yourself (), and if you understand the above, you will understand the small direction soon.
For the IN layer, our current conclusion is: it represents the composition style of the model. When a client (BASE ALPHA) is too specific with their requirements, the IN layer will choose to lower its composition style and lean towards the client's requirements.
Or it can also be said that the TAG is the client, and BASE ALPHA and CFG scale are the artist's understanding of the client's requirements (there may even be clip skip at work).
(Too abstract, I can't understand it at all!)
There is another aspect that is easier to understand, which is that AI has a similar function to the extent of redrawing images (denoising strength).
As everyone knows, when the redrawing extent is around 0.75, it will greatly affect the image, while when it is around 0.3, only a small range of details will change. So 0.75 is the large direction and 0.3 is the small direction.
There may also be someone asking: When I was operating, I only transferred the medium direction (or large direction), but I felt that the details of the image also changed a lot. How is this possible?
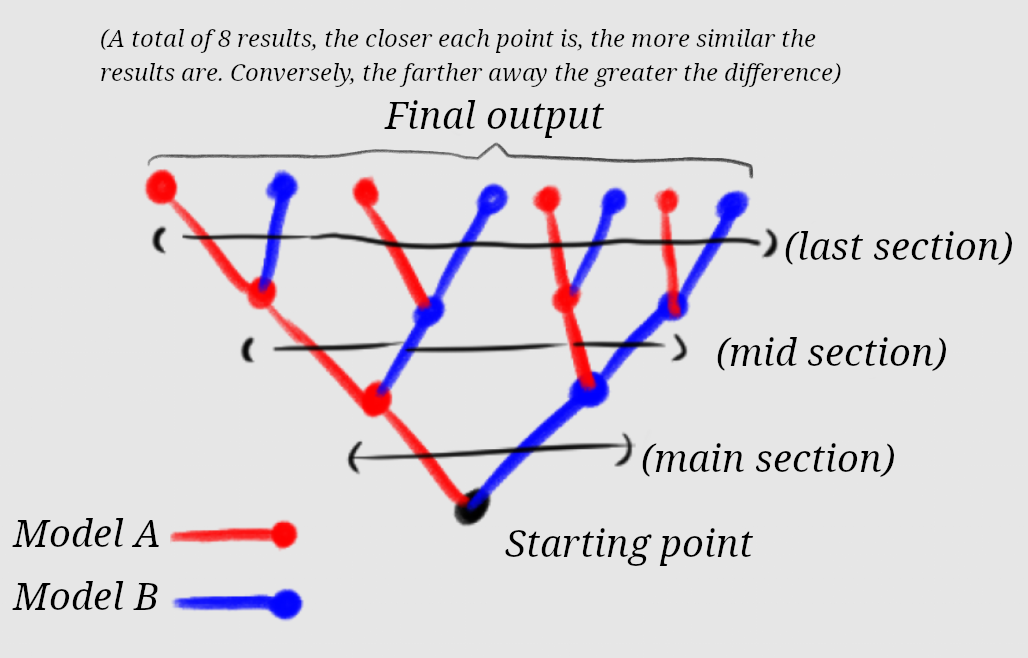 Source47
I think this should be caused by AI's tree-based decision making (the illustration in the above image is a simplified illustration for easy understanding). If the initial large-scale direction chose another direction, the deviation would also be significant. As can be seen from the experimental image, the migration in the small direction of the IN layer is controllable, while the control of the medium direction is already poor and the large direction feels completely out of control and it is no longer known what has been migrated.
As can be seen in the illustration, changing only the large-direction output result (the two blue and red points in the middle) is far from the result of pure A and pure B models (the red point on the left and the blue point on the right), leading to neither of them looking like it, which is also reflected in the above experiments to some extent.
If you still don't understand, that's okay, because the construction of the image is responsible for both the IN layer and the BASE ALPHA, and in the case of a long TAG, the influence of the IN layer will weaken a bit, and the IN layer can only learn some cases of repairing the human body first.
4.3. Understanding the OUT area.
The above models are:
- Orange
- Orange Fused Wax Pen out00-03 (weight 1)
- Orange Fused Wax Pen out04-07 (weight 1)
- Orange Fused Wax Pen out08-11 (weight 1)
- Wax Pen
The OUT layer is much easier to understand than the IN layer.
Basically, the upper layer (11 downward) is responsible for overall color adjustment,
the middle layer (5 and 6 spreading outwards) defines the style of the main subject in the picture (such as the facial features, clothes, and hair of the character),
and the lower layer (00 upward) is responsible for fine details and brushstroke depictions.
You can use this conclusion to understand the role of the OUT layer by referring to the experiment diagrams above.
Then we analyze the three experiment diagrams, first of all, except for a few special cases, most of the compositions are very stable.
The parts influenced by out00-03 can be seen in the Miku diagram.
 Source51
The dual pigtails have more hair strands and are more dynamic, with some adjustments made to the facial features. The lighting on the right has also changed. The color of the coat hasn't changed much, but the hand posture on the left has been altered and the folds in the clothing have changed.
This can be considered as a refinement of some details.
 Source52
And the middle OUT layer (04-07) directly made the main subject (character) look completely different. It can be considered that most of the style of the main subject (character) comes from these four layers.
 Source53
In the layers of out08-11, there are not many noticeable changes in detail (the lighting on the right side of the hair is a bit different, but not on the left, so it is temporarily considered to be random disturbance), and the style of painting is relatively stable (the face style seems to have changed a bit), but it can be observed that the brightness and hue of the clothing and hair have deviated, with the lower part showing a more purplish tone, and the traditional performing art of the tangerine: blur, is not observed either.
In general, the difference between different models in the intermediate layers of OUT (04-07) is quite large, and the changes after fusion are also quite drastic.
4.4. Understanding Layers
As previously mentioned,
there are 25 sliders, IN0-11, M00, OUT0-11, that adjust the blending ratio of each layer between Model A and Model B.
- When the slider value is 1, it means that the layer corresponding to the slider is completely equal to Layer B.
- When the slider value is 0, it means that the layer corresponding to the slider is completely equal to Layer A.
- This is the basic principle of the slider.
From the previous introduction, it is generally understood that each adjacent layer has a similar function.
What I want to point out is that, between Models A and B, the differences between each layer can be different and will affect the distribution of your weight values. Some models have minimal differences in a certain layer, and even if the weight is pulled to 1, there is not much change. Conversely, some models have significant differences in a certain layer, and even with a small weight, there is a very large change.
To further explain, the "layered shifting due to various variables" mentioned earlier refers to the fact that different variables can cause a shift in the part that a layer is responsible for. For example, if your face is in close-up (like in the face-swap case mentioned above), this value (of medium-small direction) can just affect the face. However, if it is a close-up or a distant shot, it will shift up and down, for example, a close-up will become medium-large direction, and a distant shot will become small direction. This is also why transitioning weights were mentioned in 4.5, which is to maintain some weights even in the case of a shift.
Also, the things that the layers are responsible for sometimes overlap, such as OUT4-5 of the face, which can also affect the hair and clothing. Like the explanation of up and down shifting mentioned earlier, these are all limitations of layer fusion.
4.5. Conclusion
From the above analysis, we feel that U-NET is like a painter, containing the style of composition and color, but these will be influenced by BASE ALPHA and TAG.
Appendix 1: Collection of Interesting Results for Deeper Understanding
Experiment 1: Replacing the Subject in the Composition
Figure 1 is an orange, Figure 2 is a wax crayon, and Figure 3 is a wax crayon merged with the orange in layers in4-7.
Analysis Result: Layers in4-7 might control the composition of the main subject in the picture.
Experiment 2: Another Parameter for the Transfer of Color Painting Styles
Figures 12 are the comparison between the AB model with the same seed and parameters. Figure 4 is the result of the fusion of the parameter in Figure 3.
Analysis result: It is not easy to analyze because there are too many affecting factors, but the intention of this parameter is to only merge most of the color of the crayon and a small part of the stroke, for reference only.
Experiment 3: Replacing Real-Person Faces with Two-Dimensional Faces.
Analysis: This test aims to explore the layer in which the real-person style and the two-dimensional style are located. The operation is to transfer all or part of the OUT layer of the orange to the BASIL real-person model. It can be observed that:
OUT full layer: The face shape and eyes are almost unchanged compared to the orange, the eye color has changed, and it is not excluded that it is influenced by the IN layer.
OUT0-3: There is not much of a noticeable change, it can only be considered to have some impact on the face. (It is guessed that the face size in the picture is closer to the orange in terms of proportion.)
OUT4-6: Obviously close to the two-dimensional face shape, but there is a huge difference from the full OUT layer.
OUT0-6: The difference from the full OUT layer is relatively small and close to the orange style. (At the same time, it was observed from Figure 3 that the skin light and shadow became more realistic, and perhaps the texture of the skin comes from OUT07-11?)
OUT7-9: In the close-up shot, the eyes seem to have become a little bigger (see Figure 4). But in the full-body shot, it seems to have changed, but also seems to have become a little bigger? (See Figure 3)
Based on the above analysis, the general conclusion is that the face style is mostly stored in 4-6, a small part in 0-3, 7-9 is almost negligible, and more detailed results require further testing.
Experiment 4: Attempt MBW EACH
Analysis: Completely didn't understand.
 Source69
It is even more confusing, currently I only found that this use is to destroy the model ( )
Experiment 5: Test from ALBEDO
Appendix 2: Relevant Plug-ins
I'll dig a hole here and give a preview. Later on, I might explain the plugin called "supermerger", which is used for batch experiment layered fusion.
And also the plugin that can block certain layers of LORA: "lora block weight".
Interested readers can also learn more about it on their own.
SUPERMERGER: https://github.com/hako-mikan/sd-webui-supermerger
lora block weight: https://github.com/hako-mikan/sd-webui-lora-block-weight
Let me briefly introduce the SUPERMERGER interface:
The use of MBW is explained below. If checked, the layer slider at the bottom is used as the parameter.
If XY chart parameters are set, the XY chart parameters will be used.
If not checked, it is a traditional fusion, and the two sliders on the right side of this option control the fusion weight.
Appendix 3: Other authors' resources
Similar English documents:
https://rentry.org/BlockMergeExplained
Similar Japanese documents:
https://economylife.net/u-net-marge-webui1111
Two experiments by the plugin author:
https://note.com/bbcmc/n/n2d4765b4bd47
https://note.com/bbcmc/n/n886576e5e770
Other authors:
https://note.com/fei_san/n/n0ac2fa12f0d2
Bilibili UP master Fei Niao Baicai: https://www.bilibili.com/video/BV1RT411D7h7
Should be the founder of MBW ():
https://note.com/kohya_ss/n/n9a485a066d5b


